
A couple of weeks ago I penned an article called Better File Uploads with Dragonfly explaining how to set up Dragonfly – a gem for handling attachments. The post set up a demo app and integrated Dragonfly into, allowing our users to share (upload) their photos.
Today, we’ll explore a bit more about file uploading, such as how to implement asynchronous file uploading with Rails as well as uploading multiple files using AJAX.
We are going to take a look at two solutions: Remotipart and File Upload.
Some other things to be covered in this article:
- Creating a progress bar to track the file uploading progress and display bitrate.
- Implementing client-side validation.
- Adding a “dropzone” with some nice CSS3 effects, allowing users to drag & drop files to be uploaded.
All this will be done in five iterations. Let’s get started!
The source code is available on GitHub.
Key Takeaways
- Asynchronous file uploads in Rails enhance user experience by allowing continued interaction with the application during file uploads, which is especially beneficial for handling large files.
- Implementing asynchronous uploads can be achieved using the `remotipart` gem, which facilitates AJAX file uploads in Rails applications.
- Multiple file uploads can be managed simultaneously and asynchronously using the jQuery File Upload plugin, enabling a more flexible and user-friendly file upload interface.
- Client-side validation and progress bars can be added to provide immediate feedback on the file type and upload progress, improving usability and informing users of upload status in real-time.
- Dropzones can be implemented for drag-and-drop file uploads, offering a convenient and modern way for users to upload files by simply dragging them into a designated area.
- Enhancements like showing upload bitrate and using CSS3 effects can significantly improve the visual feedback and overall aesthetics of the file upload process.
Preparing the Project
For this demo I am using Rails 4.1.1 but the same solution can be implemented with Rails 3.
In the first iteration, we will create a new project and integrate Dragonfly into it really quick (for a more detailed guide check out my previous article).
Create a new app without the default testing suite:
$ rails new async_uploader -T
Drop some gems into your Gemfile:
Gemfile
gem 'dragonfly'

gem 'dragonfly-s3_data_store'

group :production do

  gem 'rack-cache', :require => 'rack/cache'

end

gem 'bootstrap-sass'

gem 'remotipart', '~> 1.2'
dragonfly is the gem that will handle all the uploading magic and dragonfly-s3_data_store will allow us to store images using Amazon S3 (we will need this in production). rack-cache adds a simple caching mechanism for the production environment. bootstrap-sass will equip our app with Twitter Bootstrap. remotipart will be used in the next iteration.
Now hook up Bootstrap’s styles and scripts (don’t forget that, for real apps, pick only the required components):
stylesheets/application.css.scss
@import "bootstrap";

@import 'bootstrap/theme';
javascripts/application.js
[...]

//= require bootstrap
Now, run Dragonfly’s generator to create an initializer file:
$ rails g dragonfly
Open it up and replace the default datastore settings with these:
config/initializers/dragonfly.rb
[...]

if Rails.env.development? || Rails.env.test?

  datastore :file,

            root_path: Rails.root.join('public/system/dragonfly', Rails.env),

            server_root: Rails.root.join('public')

else

  datastore :s3,

            bucket_name: 'your_bucket_name',

            access_key_id: ENV['AWS_KEY'],

            secret_access_key: ENV['AWS_SEC'],

            url_scheme: 'https'

end
For access_key_id and secret_access_key, you need to register at Amazon and then open up “YourAccount – Security Credentials”, expand the “Access Keys” section, and create a new pair. A bucket can be created using AWS management console.
This key pair should be kept safe, so don’t put it in version control. I’m using Heroku environment variables.
Also if you are on Rails 4, enable rack-cache for the production environment:
config/environments/production.rb
[...]

config.action_dispatch.rack_cache = true

[...]
We are almost done setting up Dragonfly. The last thing to do is to create the model and add the file uploading requirements. Let’s say we want users to upload their photos. Apart from the default fields our photos table will have these columns:
image_uid(string) – this column will store image’s URIauthor(string) – this column will contain author’s name
Great, now run these commands to create and apply the required migration:
$ rails g model Photo image_uid:string title:string

$ rake db:migrate
On to the model:
models/photo.rb
class Photo < ActiveRecord::Base

  dragonfly_accessor :image
  validates :image, presence: true

  validates_size_of :image, maximum: 500.kilobytes,

                    message: "should be no more than 500 KB", if: :image_changed?
  validates_property :format, of: :image, in: [:jpeg, :jpg, :png, :bmp], case_sensitive: false,

                     message: "should be either .jpeg, .jpg, .png, .bmp", if: :image_changed?

end
At this point we are done with Dragonfly. Of course, we will also need a controller and corresponding view. The controller will be dead simple for now:
controllers/photos_controller.rb
class PhotosController < ApplicationController

  def new

    @photos = Photo.order('created_at DESC')

    @photo = Photo.new

  end
  def create

    @photo = Photo.new(photo_params)

    @photo.save

    redirect_to new_photo_path

  end
  private
  def photo_params

    params.require(:photo).permit(:image, :title)

  end

end
As you see, the “New photo” will not only allow to create a new photo, but will also list all uploaded photos.
The routes:
config/routes.rb
resources :photos, only: [:new, :create]

root to: 'photos#new'
The layout:
layouts/application.html.erb
[...]

<body>

<div class="navbar navbar-inverse" role="navigation">

  <div class="container">

    <div class="navbar-header">

      <button type="button" class="navbar-toggle" data-toggle="collapse" data-target=".navbar-collapse">

        <span class="sr-only">Toggle navigation</span>

        <span class="icon-bar"></span>

        <span class="icon-bar"></span>

        <span class="icon-bar"></span>

      </button>

      <a class="navbar-brand" href="#">Uploader</a>

    </div>

    <div class="collapse navbar-collapse">

      <ul class="nav navbar-nav">

        <li><%= link_to 'Upload one', root_path %></li>

      </ul>

    </div>

  </div>

</div>
<div class="container">

  <%= yield %>

</div>

</body>

[...]
And the view:
photos/new.html.erb
<h1>List of photos</h1>
<ul class="row" id="photos-list">

  <%= render @photos %>

</ul>
<%= form_for @photo do |f| %>

  <div class="form-group">

    <%= f.label :author %>

    <%= f.text_field :author, class: 'form-control' %>

  </div>
  <div class="form-group">

    <%= f.label :image %>

    <%= f.file_field :image, required: true %>

  </div>
  <%= f.submit 'Submit', class: 'btn btn-primary btn-lg' %>

<% end %>
I am using render @photos to render all photos using the _photos.html.erb partial, so create it as well:
photos/_photo.html.erb
<li class="col-xs-3">

  <%= link_to image_tag(photo.image.thumb('180x180#').url, alt: photo.author, class: 'img-thumbnail'),

              photo.image.remote_url, target: '_blank' %>

  <p><%= photo.author %></p>

</li>
And, lastly, a bit of styling:
stylesheets/application.css.scss
#photos-list {

  padding: 0;

  margin: 0;

  margin-top: 30px;

  clear: both;

  li {

    list-style-type: none;

    padding: 0;

    margin: 0;

    min-height: 272px;

    max-height: 272px;

    margin-bottom: 10px;

    text-align: center;

    img {

      margin-bottom: 10px;

    }

    p {

      margin: 0;

      height: 40px;

      overflow: hidden;

    }

  }

}
Phew, now we are done with the first iteration! At this point, launch the server and upload a couple of photos to make sure everything is working.
Making it Asynchronous
Our users can upload their photos, but the page is reloaded each time the form is submitted. How about making it asynchronous so the uploaded photo’s preview shows up instantly? This can be done easily.
You might think that all we need to do is add remote: true to the form helper, like this:
photos/new.html.erb
[...]

<%= form_for @photo, remote: true do |f| %>

[...]
But that won’t work because Rails doesn’t know how to send multipart forms asynchronously. Luckily, the solution is simple. Remember, we added gem 'remotipart', '~> 1.2' to our Gemfile. This gem, created by Steve Schwartz and Greg Leppert, enables AJAX file uploads with Rails 3 and 4 which exactly what we need.
The only thing to do is add a single line to the application.js file:
javascripts/application.js
[...]

//= require jquery.remotipart
And now our app knows kung fu! Pretty awesome, isn’t it?
Well, the controller needs a minor tweak so it responds to AJAX requests:
controllers/photos_controller.rb
[...]

def create

  respond_to do |format|

    @photo = Photo.new(photo_params)

    @photo.save

    format.html { redirect_to new_photo_path }

    format.js

  end

end

[...]
Don’t forget to create the corresponding view:
photos/create.js.erb
<% if @photo.new_record? %>

alert('The photo could not be uploaded: <%= j @photo.errors.full_messages.join(', ').html_safe %>');

<% else %>

$('#photos-list').prepend('<%= j render @photo %>');

<% end %>
The if @photo.new_record? condition actually checks whether the photo was successfully saved (we added some validations, remember?). If it wasn’t, then present the user with a basic alert box displaying the errors.
If the record was saved, use jQuery’s prepend method to add another element to the #photos-list unordered list. The j method is required because, otherwise, all HTML from the _photo.html.erb partial would be sanitized.
That’s all! Now, you can try some photos and check whether asynchronous uploading works.
Well, that was the easy part. Let’s move to the third iteration and implement functionality allowing users to upload multiple photos at once, asynchronously.
Uploading Multiple Photos Asynchronously
Create another view and the corresponding controller method so that we don’t mess up the previously written code.
controllers/photos_controller.rb
[...]

def new_multiple

  @photos = Photo.order('created_at DESC')

  @photo = Photo.new

end

[...]
As you can see, this method is actually the same as the new. The difference is in the view:
*photos/new_multiple.html.erb
<h1>List of photos</h1>
<ul class="row" id="photos-list">

  <%= render @photos %>

</ul>
<h3>Upload multiple photos</h3>

<%= form_for @photo do |f| %>

  <div class="form-group">

    <%= f.label :author %>

    <%= f.text_field :author, class: 'form-control' %>

  </div>
  <div class="form-group">

    <%= f.label :image %>

    <%= f.file_field :image, required: true %>

  </div>

<% end %>
Note that we do not need to provide remote: true for the form helper in this case. Lastly, set up the route:
config/routes.rb
[...]

get '/photos/new_multiple', to: 'photos#new_multiple', as: :new_photo_multiple
To allow multiple file uploading, we use the jQuery File Upload plugin, created by Sebastian Tschan. This plugin has numerous options and cool features. I encourage you to check out its documentation.
We will also use jquery-fileupload-rails by Tors Dalid to integrate this plugin into our app. Unfortunately, this gem hasn’t been updated since 2012, so let’s use a forked version instead:
Gemfile
gem 'jquery-fileupload-rails', github: 'Springest/jquery-fileupload-rails'
THe File Upload plugin comes in two versions: UI and basic. We are going to implement the basic version, as it provides more control and we can style the form the way we want.
javascripts/application.js
[...]

//= require jquery-fileupload/basic
Now, make some modifications to the view:
photos/new_multiple.html.erb
[...]
<div class="form-group">
<%= f.label :image %>
<%= f.file_field :image, required: true, multiple: true, name: 'photo![]() ' %>
' %>
</div>
[...]
<script>
$(document).ready(function() {
$('#new_photo').fileupload({dataType: 'script'});
});
</script>
The multiple: true option tells the file field that the user may choose multiple files by holding the CTRL (or Shift) key.
![]()
hard codes the field’s name because, otherwise, Rails will name this field to

and the files will be submitted as an array. We want them to be submitted one by one, and File Upload will take care that.
$('#new_photo').fileupload(); equips our form with File Upload’s magic and dataType: 'script' indicates we are expecting javascript in the response.
Also, note that our form has no “Submit” button. This is because as soon as the user selects the files, the form is submitted automatically (you may want to write a short warning message for the users regarding that).
At this point, go upload a couple of photos at once – the controller’s create method requires no changes! Everything should be working, apart from the author’s name. The photos will be uploaded, but the author field will be empty. This is because File Upload submits only the files by default. To fix this, we need to tweak the script:
photos/new_multiple.html.erb
<script>

  $(document).ready(function() {

    var multiple_photos_form = $('#new_photo');

    multiple_photos_form.fileupload({dataType: 'script'});
    multiple_photos_form.on('fileuploadsubmit', function (e, data) {

      data.formData = {'photo[author]': $('#photo_author').val()};

    });

  });

</script>
Here, we are listening for the fileuploadsubmit event (the list of callbacks is available here) and attaching the author field’s value to the form data.
Adding Client-side Validation and a Progress Bar
We are ready to move to the fourth iteration. Right now, our form is fully functional, but it has some issues:
- Validation is only on the server side. Because of that, the user will have to wait for his file to be uploaded before he is told about any errors.
- The user is not given feedback about the uploading process. If the internet connection is slow, uploading may take a long time and the user won’t see anything happening at all.
The solutions are simple: Add a client-side validation and a progress bar.
Let’s start with validation. Tweak the script:
photos/new_multiple.html.erb
[...]

multiple_photos_form.fileupload({

  dataType: 'script',

  add: function (e, data) {

    types = /(\.|\/)(gif|jpe?g|png|bmp)$/i;

    file = data.files[0];

    if (types.test(file.type) || types.test(file.name)) {

      data.submit();

    }

    else { alert(file.name + " must be GIF, JPEG, BMP or PNG file"); }

  }

});

[...]
We are checking if each file has the correct format. If it does, submit the form using data.submit();, otherwise, present the user with an error message. Now, the user will know if the files are the an acceptable format.
On to the progress bar. Bootstrap already provides a nicely styled bar, so let’s use it:
photos/new_multiple.html.erb
[...]
<div class="form-group">
<%= f.label :image %>
<%= f.file_field :image, required: true, multiple: true, name: 'photo![]() ' %>
' %>
</div>
<div class="progress-wrapper">
<div class="progress">
<div class="progress-bar" role="progressbar">
0%
</div>
</div>
</div>
[...]
We don’t want the progress bar to be displayed until the form is actually submitted, so tweak the styles a bit:
stylesheets/application.css.scss
[...]

.progress-wrapper {

  display: none;

}
To track the overall file uploading progress, the script has to listen to the fileuploadprogressall event, get the number of uploaded bites, and adjust progress bar. Also, the progress bar has to be shown once the uploading starts, complements of the fileuploadstart event. Lastly, the bar should be hidden again after uploading finishes, and fileuploaddone helps in this case.
Here is the modified script:
photos/new_multiple.html.erb
[...]

var wrapper = multiple_photos_form.find('.progress-wrapper');

var progress_bar = wrapper.find('.progress-bar');
multiple_photos_form.on('fileuploadstart', function() {

  wrapper.show();

});
multiple_photos_form.on('fileuploaddone', function() {

  wrapper.hide();

  progress_bar.width(0); // Revert progress bar's width back to 0 for future uploads

});
multiple_photos_form.on('fileuploadprogressall', function (e, data) {

  var progress = parseInt(data.loaded / data.total * 100, 10);

  progress_bar.css('width', progress + '%').text(progress + '%');

});

[...]
data.loaded gets the number of loaded bytes, whereas data.total contains the total number of bites to be uploaded.
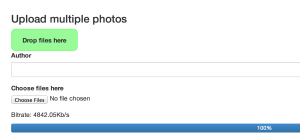
The last neat thing to do is to show the bitrate (upload speed) to the user. This is easy:
photos/new_multiple.html.erb
[...]

<div class="progress-wrapper">

  <p>Bitrate: <span class="bitrate"></span></p>

  <div class="progress">

    <div class="progress-bar" role="progressbar">

      0%

    </div>

  </div>

</div>

[...]
And the script:
[...]

var bitrate = wrapper.find('.bitrate');
multiple_photos_form.on('fileuploadprogressall', function (e, data) {

  bitrate.text((data.bitrate / 1024).toFixed(2) + 'Kb/s');
  var progress = parseInt(data.loaded / data.total * 100, 10);

  progress_bar.css('width', progress + '%').text(progress + '%');

});
Our form looks pretty awesome and provides useful information to the user. Let’s move on to the fifth and final iteration.
Adding Dropzone
The File Upload plugin provides a way to setup a so-called “Dropzone” – an area where users may drag & drop their files to begin uploading immediately (check out the browser support).
This is a nice alternative to the default file dialog. It feels more natural to just drop some files to be uploaded.
Let’s add a new element to our markup:
photos/new_multiple.html.erb
[...]
<h3>Upload multiple photos</h3>
<div id="dropzone" class="fade">Drop files here</div>
<%= form_for @photo do |f| %>
<div class="form-group">
<%= f.label :author %>
<%= f.text_field :author, class: 'form-control' %>
</div>
<div class="form-group">
<%= f.label :image, 'Choose files here' %>
<%= f.file_field :image, required: true, multiple: true, name: 'photo
![]() ' %>
' %>
</div>
<div class="progress-wrapper">
<p>Bitrate: <span class="bitrate"></span></p>
<div class="progress">
<div class="progress-bar" role="progressbar">
0%
</div>
</div>
</div>
<% end %>
[...]
The script:
photos/new_multiple.html.erb
[...]

multiple_photos_form.fileupload({

  dataType: 'script',

  dropZone: $('#dropzone'),

  add: function (e, data) {

    types = /(\.|\/)(gif|jpe?g|png|bmp)$/i;

    file = data.files[0];

    if (types.test(file.type) || types.test(file.name)) {

      data.submit();

    }

    else { alert(file.name + " must be GIF, JPEG, BMP or PNG file"); }

  }

});

[...]
We can also apply some CSS3 transitions to the drop zone (File Upload’s events will help us here). Here are some styles that you might use:
stylesheets/application.css.scss
@import "compass/css3/transition";

@import "compass/css3/opacity";

@import "compass/css3/border-radius";
[...]
#dropzone {

  background: palegreen;

  width: 150px;

  text-align: center;

  font-weight: bold;

  height: 50px;

  line-height: 50px;

  border: 1px solid darken(palegreen, 10%);

  @include border-radius(10px);

}
#dropzone.in {

  width: 600px;

  height: 200px;

  line-height: 200px;

  font-size: larger;

}
#dropzone.hover {

  background: lawngreen;

  border: 1px solid darken(lawngreen, 10%);

}
#dropzone.fade {

  @include transition-property(all);

  @include transition-duration(0.5s);

  @include transition-timing-function(ease-out);

  @include opacity(1);

}
I am using some Compass utilities (I am too lazy to specify all the vendor prefixes for the CSS3 attributes), so don’t forget to drop these lines to the Gemfile:
Gemfile
[...]

gem 'compass-rails'

gem 'compass'

[...]
and run bundle install.
Here are scripts that will take care of animating the dropzone:
photos/new_multiple.html.erb
$(document).bind('dragover', function (e) {

  var dropZone = $('#dropzone'),

          timeout = window.dropZoneTimeout;

  if (!timeout) {

    dropZone.addClass('in');

  } else {

    clearTimeout(timeout);

  }

  var found = false,

          node = e.target;

  do {

    if (node === dropZone[0]) {

      found = true;

      break;

    }

    node = node.parentNode;

  } while (node != null);

  if (found) {

    dropZone.addClass('hover');

  } else {

    dropZone.removeClass('hover');

  }

  window.dropZoneTimeout = setTimeout(function () {

    window.dropZoneTimeout = null;

    dropZone.removeClass('in hover');

  }, 100);

});
You can read more about it here.
You can now test out the form and see all this stuff is working. :)
Conclusion
We’ve taken a look at two solutions for asynchronous file uploading. I hope you’ve found this article interesting and useful.
Have you ever tried to implement asynchronous file uploading in your apps? What solutions did you employ? What problems did you face? Share your experience in the comments!
Frequently Asked Questions (FAQs) about Asynchronous File Uploads in Rails
What is the importance of asynchronous file uploads in Rails?
Asynchronous file uploads in Rails are crucial for enhancing the user experience. They allow users to upload files without having to wait for the server to process the file before they can continue using the application. This is particularly beneficial for applications that handle large files, as it prevents the application from becoming unresponsive during the upload process. Additionally, asynchronous file uploads can improve the overall performance of the application by offloading the file processing task to a background job, freeing up resources for other tasks.
How does Active Storage facilitate file uploads in Rails?
Active Storage is a built-in feature in Rails that simplifies file uploads. It provides a set of methods for uploading files to a variety of storage services, including local disk storage and cloud-based storage services like Amazon S3, Google Cloud Storage, and Microsoft Azure Storage. Active Storage also supports direct uploads, where files are uploaded directly from the client to the storage service, bypassing the application server. This can significantly reduce the load on the application server and improve the performance of the application.
How can I handle multiple file uploads in Rails?
Handling multiple file uploads in Rails is straightforward with Active Storage. You can use the has_many_attached method in your model to associate multiple files with a single record. Then, in your form, you can use the file_field form helper with the multiple: true option to allow users to select multiple files. When the form is submitted, Rails will automatically handle the upload and association of the files with the record.
How can I validate file uploads in Rails?
Rails provides several ways to validate file uploads. You can use Active Storage’s built-in validation methods, such as attached? and content_type, to check if a file has been uploaded and if it has the correct content type. You can also use custom validation methods to implement more complex validation rules. For example, you could create a custom validation method to check the size of the uploaded file and reject it if it’s too large.
How can I display uploaded files in Rails?
Displaying uploaded files in Rails is easy with Active Storage. You can use the url_for helper method to generate a URL for the uploaded file, and then use this URL in an image tag or a link tag to display the file. If the file is an image, you can also use the variant method to create different versions of the image, such as thumbnails or resized versions.
How can I delete uploaded files in Rails?
Deleting uploaded files in Rails is straightforward with Active Storage. You can use the purge method to delete an uploaded file and remove its association with a record. If you want to delete the file but keep the association, you can use the detach method instead.
How can I test file uploads in Rails?
Testing file uploads in Rails can be done using Rails’ built-in testing framework. You can use the fixture_file_upload method to simulate a file upload in your tests. This method takes the path of a file and the content type as arguments, and returns a Rack::Test::UploadedFile object that you can use in your tests.
How can I secure file uploads in Rails?
Securing file uploads in Rails involves several steps. First, you should validate the content type of the uploaded file to prevent users from uploading potentially harmful files. Second, you should use direct uploads to prevent the file data from passing through your application server. Finally, you should configure your storage service to serve files over HTTPS and restrict access to the files.
How can I handle file uploads in a Rails API?
Handling file uploads in a Rails API is similar to handling file uploads in a regular Rails application. You can use Active Storage to handle the file upload, and then return a JSON response with the URL of the uploaded file. The main difference is that you’ll need to handle the file data in a multipart form data request, rather than a regular form submission.
How can I handle file uploads with JavaScript in Rails?
Handling file uploads with JavaScript in Rails can be done using the direct upload feature of Active Storage. This feature provides a JavaScript library that you can use to handle the file upload process on the client side. The library provides events that you can listen to and react to, such as the start and end of the upload process, and the progress of the upload.