In my previous article we looked at SketchFlow, the prototyping tool that’s part of Microsoft’s Expression Studio suite. We saw how to quickly build a wireframe prototype for a (well, my) simple portfolio viewing application, and how to use the feedback features of SketchFlow to gather stakeholder and user feedback.
If you missed the first article, I highly recommend you check it out: Rapid Prototyping with SketchFlow. It’ll introduce you to the Blend interface and explain some of the tool’s core concepts.
For this article, we’ll dive deeper into Expression Blend, and look at how to take our portfolio prototype into production using Microsoft Silverlight. We’ll cover navigation, layout, and sample data—all without writing a line of code!
Pay attention because there’s a quiz at the end to test what you’ve learned!
By now, you’ve probably encountered Microsoft’s Silverlight technology somewhere on the Web. In a nutshell, Silverlight is Microsoft’s offering to deliver rich interactive experiences online.
Silverlight provides a rich set of features for visual design, animation, media integration, layout, and data visualisation. It features a large range of skinnable controls and powerful mechanisms for defining sophisticated user experiences. Silverlight is also built to interoperate with the web platform. Silverlight applications can easily interoperate with the underlying browser and HTML page, including manipulating the DOM and calling (and being called by) JavaScript.
The Silverlight plugin runs to around 4MB, with support for Internet Explorer, Safari, Firefox, Opera, and Google Chrome. Silverlight runs on Windows and Mac OSX, Linux (through the Mono project), and will soon run on Windows Phone, too.
For developers, one of the key attractions of Silverlight is that it’s a subset of .NET. This means that .NET developers can take advantage of their existing skills when developing rich applications for the Web, and that all developers can take advantage of the rich environment of tools and platforms for .NET provided by Microsoft and others. Being based on .NET, Silverlight applications are most often coded in C# or Visual Basic .NET, but they can be developed in a range of .NET-supported languages, including IronRuby, IronPython, and JavaScript.
For designers, the key benefits of working with Silverlight are the clean separation of design from development that the platform provides, and the availability of sophisticated design tools. Silverlight allows designers to work naturally, and be very productive, while requiring little or no coding.
This brings us to Expression Blend.
Expression Blend is part of Microsoft’s Expression Studio suite of design tools. It is the production tool for designing and building user interfaces for Silverlight on the Web and Windows Phone, as well as for WPF (Windows Presentation Foundation) on Windows and Microsoft Surface. Expression Blend also underpins SketchFlow, the rapid prototyping tool we covered in the last article.
The power of Blend is that it allows designers to actually build rich user interface themselves, rather than describing the interface in wireframes, site maps, and comps for someone else to build (and potentially misinterpret). Blend allows designers to create the production interface themselves if they choose to, while still working with familiar tools and concepts. This allows designers not only to be more productive, but to actively work on their design for longer, since there is less need for a formal hand-over to the development team.
When I worked at Microsoft, one of our key messages was the improved designer-developer workflow enjoyed by designers using Blend and developers using Visual Studio. Designers and developers are able to work on the same project simultaneously in Blend and Visual Studio respectively. Designers love this because it makes them fully fledged members of the project team, enabling them to contribute equally to the project, rather than being seen as outsiders who must rely on the kindness of developers to see their work realised.
Underpinning Silverlight and WPF, is the XAML user interface definition language. XAML is an XML-based language for defining the contents, layout, and behaviour of user interfaces. Figure 1, “Underlying your Silverlight experience is the XML-based XAML language” shows a button interface element and the corresponding XAML code that creates the button. While the language’s syntax and mechanics are quite different from HTML, its intention is similar. It’s XAML that makes user interface design tools like Blend possible. As a designer, it’s worth understanding the basics of how XAML works. While it isn’t usually necessary to be able to code in XAML (I haven’t found it necessary yet), it can be helpful to be able to read XAML to help debug any unexplained behaviour in your project.

In the first article, we learned that SketchFlow allows us to create prototypes “on top of” Blend. One of the advantages of this approach is that you can take your initially sketchy prototype and evolve it to a point where it’s very close to the final experience in SketchFlow. You can even connect your prototype to real back-end code. The prototype we constructed in the previous article is shown in Figure 2, “Our SketchFlow prototype”.

The natural question to ask at this point is whether you can convert your SketchFlow prototype into a production project when you’re ready. The answer is yes, sort of…
A SketchFlow prototype is a Blend project like any other. In addition to the elements you define yourself, SketchFlow provides behind-the-scenes mechanisms for wiring everything up, implementing the SketchFlow map, providing the SketchFlow styles, and of course creating the code required for the SketchFlow player. To convert a SketchFlow prototype into a production project, you basically have two options:
Strip out all the SketchFlow parts of the project. There are instructions to do this in the Blend Help files.
Harvest the assets you want to keep and effectively copy and paste them into a new project.
For all but the simplest projects, I would recommend option 2. Firstly, it ensures there aren’t any bits of SketchFlow left lying around in your project. Secondly, being part of a prototype, your screens are probably pretty sloppy by production standards. The whole point of rapid prototyping means you probably weren’t really thinking about issues like layout, containment, resizing, naming, or good architectural practices. For this reason, you’re probably better off just going through your prototype and copying out the elements (screens, components, animations, and so on) that you want to use as a starting point for your production project.
In our case, the prototype is so simple that we can get by just by starting again.
As we learned last time, when we start Expression Blend we’re given the opportunity to start a new project. This time, rather than selecting Silverlight 3 SketchFlow Application, we’ll make a real Silverlight 3 Application + Website, as shown in Figure 3, “Selecting the appropriate project type”.

A quick look at the Projects panel in Blend shows us that our new Silverlight project has one page at the moment: MainPage.xaml. That’s where we’ll build our user interface.
In our SketchFlow prototype, we built three separate pages that SketchFlow linked together with navigation. For our production application, we approach things slightly differently. We’ll make three separate pages, which will be displayed inside MainPage.xaml using a Frame, as illustrated by Figure 4, “A Frame in MainPage.xaml will hold each of our three application pages”. Silverlight’s Frame element allows us to navigate between pages (much like navigating between pages in a browser) but also gives us an extra bonus. Using a Frame element will integrate our Silverlight application with the browser navigation. That means that the browser and buttons will actually navigate back and forward in our Silverlight application. It also means that each page in our application will have its own URL, which is really useful for bookmarking.

So, before we insert the Frame in MainPage.xaml, let’s make our three pages.
To make the new pages, we go to the Projects panel, right-click on the Silverlight project (not the Web project), and choose , as shown in Figure 5, “Add New Item…”. Add a new Page and call it Introduction.xaml. While you’re at it, make another one called Portfolio.xaml.

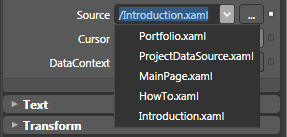
Create the Frame element (you’ll find it on the Assets tab under Controls) in MainPage.xaml and set its Source property to point to the XAML page we want it to load first—Introduction.xaml—as depicted in Figure 6, “The Source property determines which XAML file the Frame will initially display at run time”.
Figure 6. The Source property determines which XAML file the Frame will initially display at run time
Frequently Asked Questions (FAQs) about Microsoft Expression Blend
What is the main purpose of Microsoft Expression Blend?
Microsoft Expression Blend is a user interface design tool developed by Microsoft for creating graphical interfaces for web and desktop applications that blend the features of these two types of applications. It is primarily used for XAML-based applications, allowing designers and developers to create user interfaces for Windows Presentation Foundation (WPF), Silverlight, and Windows Store applications. It provides a workspace where you can draw, transform, and style objects, as well as create animations and interactivity.
How does Microsoft Expression Blend differ from Visual Studio?
While both Microsoft Expression Blend and Visual Studio are development environments, they serve different purposes. Visual Studio is a comprehensive suite for writing, editing, and debugging code. On the other hand, Expression Blend is more focused on the design aspect, providing a more visual, designer-friendly environment. It allows for the creation of rich, interactive user interfaces and graphics, which can then be integrated into the coding environment of Visual Studio.
Can I use Microsoft Expression Blend for creating mobile applications?
Yes, you can use Microsoft Expression Blend to create user interfaces for mobile applications. It supports the design of Windows Store apps, which are designed to run on Windows 8 and later, including mobile versions. However, it’s important to note that it doesn’t support the creation of interfaces for iOS or Android apps.
Is Microsoft Expression Blend suitable for beginners?
Microsoft Expression Blend is a professional-grade tool, and as such, it may have a steep learning curve for beginners. However, with its visual interface and the availability of numerous tutorials and resources, beginners can gradually learn to use it effectively. It’s also beneficial for beginners to have a basic understanding of XAML and .NET programming.
How does Microsoft Expression Blend integrate with other Microsoft tools?
Microsoft Expression Blend is designed to work seamlessly with other Microsoft development tools. For instance, it integrates directly with Visual Studio, allowing developers to switch back and forth between the design interface of Expression Blend and the coding environment of Visual Studio. It also works with Microsoft’s .NET framework, enabling the creation of powerful, data-driven applications.
What are the system requirements for Microsoft Expression Blend?
Microsoft Expression Blend requires a Windows operating system (Windows 7 or later). It also requires .NET Framework 4.5, and a 1 GHz or faster processor. For the best performance, it’s recommended to have at least 2 GB of RAM and a graphics card that supports DirectX 9.0 or later.
Is Microsoft Expression Blend still supported?
Microsoft Expression Blend has been integrated into Visual Studio and is now known as Blend for Visual Studio. While the standalone version of Expression Blend is no longer updated or supported, Blend for Visual Studio continues to receive updates and support as part of the Visual Studio suite.
Can I create animations with Microsoft Expression Blend?
Yes, one of the key features of Microsoft Expression Blend is its ability to create rich, interactive animations. It provides a visual interface for creating and editing animations, with a timeline that allows you to control the timing and sequence of animation effects.
What is XAML and how is it related to Microsoft Expression Blend?
XAML, or Extensible Application Markup Language, is a markup language used for creating user interfaces in .NET applications. Microsoft Expression Blend is a tool for creating XAML-based applications, providing a visual interface for designing and styling user interfaces, which are then defined in XAML.
Can I use Microsoft Expression Blend for web development?
Yes, Microsoft Expression Blend can be used for web development, specifically for creating Silverlight applications. Silverlight is a web-based framework for creating rich internet applications, and Expression Blend provides a design environment for creating the user interfaces for these applications. However, it’s important to note that Silverlight is no longer being developed or updated by Microsoft.
 Shane Morris
Shane Morris is one of Australia’s most respected user experience professionals. Through consulting, mentoring and training he has helped organisations create compelling digital experiences since 1991. In that time he has worked on desktop applications, internet applications, mobile user interfaces, physical devices and web sites. Shane has taught user experience topics around the world and is a key contributor to “101 Things I Learned in Interaction Design School†at ixd101.com.