At the end of May this year, the Facebook team announced major changes to the package’s developer tools, known as the Facebook Platform. Although the platform itself had been available for several months prior to this release, a host of new features were announced at f8, the Facebook developer event in San Francisco. This launch generated a lot of press coverage — from the Wall Street Journal to TechCrunch. But the important question is: why should you care?

According to Alexa, Facebook is one of the top 20 sites on the Web, and it has some impressive statistics:
- The site’s growth is around 3% per week, which equates to 100,000 new users per day.
- 50% of registered users visit the site every day.
- The site attracts more traffic than eBay: 40 billion page views per month, which equates to an average of 50 pages per user, per day.
Just looking at these statistics should start you thinking about the ways in which you can leverage this level of traffic to benefit your own web site. If you could tap into the Facebook userbase, you could very easily and quickly increase the audience’s awareness of your brand, product, service, or web site.
Let’s consider a real-world example. I’m currently working on welovelocal.com, a UK directory that allows its users to find and review businesses. While this isn’t necessarily a new idea, the site adds a social element whereby users can view reviews from their friends to find out about businesses that other users with similar interests are reviewing. And by leveraging Facebook, a site like this can significantly increase its exposure to a given user’s network of friends.
For example, if Stacy, a welovelocal user, writes a review about a restaurant, that review will be published to Stacy’s Facebook news feed. All of Stacy’s friends on Facebook will be able to see that she’s written a new review, and can click through to welovelocal to read it.
Can you see the potential?
You can work with the Facebook Platform in many ways, including creating apps that exist just within Facebook itself. However, I feel that the greatest potential lies with integrating Facebook into an existing site, and that’s what I’ll cover in this article.
The news feed is perhaps the most important element of the platform, as it adds a real viral element to any kind of notification you send out — being able to reach the entire network of friends for any of your users is certainly a great feature. But there are many other avenues by which content can be communicated to users. For example, you can:
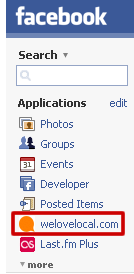
- Add a link to your own site from the left-hand menu bar of a user’s Facebook profile page, as shown below.
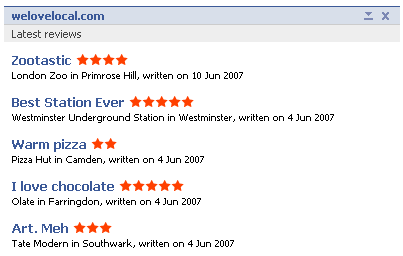
- Add to a user’s profile a content box that contains whatever content you like. With welovelocal, we use this to display the user’s latest five reviews, complete with ratings and links back to the actual reviews on our site, as shown here.
- Send requests to users to perform certain actions. For example, you could retrieve a list of your users’ friends, and send a request to all of them to add your app to their Facebook profiles.
- Upload photos, create albums, get photos, and manage photos within Facebook. One use for this might be to access the photos a user has added to their Facebook account and pull them into your site, or to push photos that have been uploaded to your site back to Facebook.
How Do I Use It?
In this article, we’ll walk through the basics of using the Facebook platform using PHP 5. If you’re interested in integrating your site with Facebook using another language, there is plenty of information on the Facebook developers’ wiki:
I was fortunate (or unfortunate) to develop the welovelocal application prior to the official platform release in May. This meant that I had to write my own code to call the functions. There is an official PHP 5 library as well as an unofficial PHP 4 version (see the PHP link above) that you can probably use to get up and running more quickly and easily than I did. However, in order to gain a proper understanding of how the platform works, it’s worth looking at the raw interactions that take place.
First Steps
You must register for an API key before you can access the Facebook Platform. To do this, you’ll need to sign up for a Facebook account, then add the “Developer” application to your Facebook account. You can do so by following the very simple instructions at www.facebook.com/developers. Once it’s added, you’ll find that the Developer application is very much like a normal Facebook group, but it has an additional link near the top of the page called “My Applications” which, when clicked, will display a list of all the Facebook applications that you have registered.
Once you’ve registered, you need to generate a key. Click the Apply for another key link and you’ll be walked through the process of creating a Facebook application. There are a number of fields that you can provide optional information to, all of which are explained in the quick start guide on the Facebook Developers site.
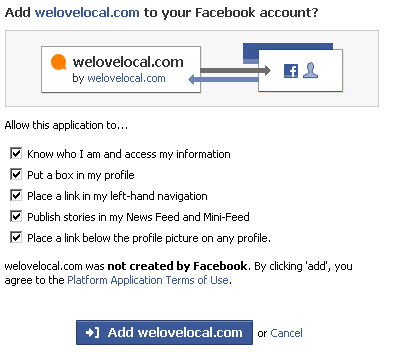
Your application is actually now ready to be used, although it won’t do anything! Depending on what you want your application to do, your users may need to perform a number of steps to install your app into their Facebook accounts. The process usually consists of them clicking an Install link, then confirming the request, as shown here.
Once the application is added, it will appear in the user’s news feed and on their mini-feed, both of which are viewable by all their friends — your first bit of free publicity!
Authentication
Your application is ready to be used, but of course you’ll want to provide some content for your user. The two most important features for web site owners are:
- the ability to publish items to the news feed
- the ability to add a profile box
Before you can use either of these pieces of functionality, you need to authenticate the current user with the Facebook platform.
Each call to the Facebook Platform API requires a session key that identifies the user who’s logged in and is using the system. To obtain this key, you must make a call to the Facebook API that redirects the user to log in to the Facebook web site and authorize the request.
One hurdle here is that this authorization provides a session key that only lasts for a certain period of time — around 24 hours. A key that didn’t expire would be much more useful. Fortunately, we can obtain such a key by following these two steps, which I’ll explain in more detail in a moment:
- First, ask the user to authorize your application so that it can access the user’s account on Facebook. This returns auth token 1, which generates a session key that expires after 24 hours.
- Then, ask the user to generate auth token 2, which they should then paste into a form on your web site. With this token in place, you’ll be able to generate a session key that never expires.
Once you have the final token, you can request a permanent session key by calling the facebook.auth.getSession function.
But first, allow me to elaborate on those two steps.
Step 1 – Obtaining Auth Token 1
From your web site, direct your user to Facebook using a URL appended with your API key, like this: www.facebook.com/login.php?api_key=APIKEY (where APIKEY should be replaced with your own API key). If the user is not currently logged in, they’ll be asked to do so.
The user will then be asked to accept any terms of service you set, and will be redirected to the callback URL that you specified when creating the application. This can be changed by editing your application through the Developer link in Facebook’s sidebar.
With the redirect in place, Facebook will append ?auth_token=TOKEN to the URL, using an actual authentication token. You can use this token with the facebook.auth.getSession function; it’s available as a GET variable in PHP.
However, because we want to get an infinite session, that auth token is actually irrelevant — we need to get another token that we can use to get a permanent session key. If we were not interested in an infinite session, this is where we would stop. We could use the auth token with the facebook.auth.getSession function below.
Step 2 – Obtaining Auth Token 2
Once your user has returned to your site after logging into Facebook, you’ll need to send them to www.facebook.com/code_gen.php?api_key=APIKEY. Back on the Facebook site, the user will be asked to generate a token that will be displayed to them. They must then copy and paste it into a form on your web site — it’s not passed through via GET/POST. It’s up to you to create a form that accepts this token from your user.
Once the user has submitted this second token to your site, you’ll need to call the facebook.auth.getSession function, passing the token as a parameter. This will finally return a session key that you can use continuously to authenticate that user; this key could, for example, be stored in the database alongside the user’s account for easy retrieval in the future.
It’s important to note that, should the user delete your application from their Facebook account, they’ll need to repeat this authentication process in order to use your Facebook application. You should therefore provide the option for the user to reset their Facebook integration and set it up again. If you’re storing the user’s session key in the database, this task would simply involve deleting that session key and taking the user through the two-step authentication process above.
Calling facebook.auth.getSession
Now that you have an authentication token, you’ll need to get yourself a session key for the current user. This key is passed to every other Facebook API call, to identify the user upon which your application is conducting an action.
Because we’re not using a library provided by Facebook, we’ll need to manually construct the HTTP query that we’ll send to Facebook, and write some code to process the response. With every call, you must provide three required values, as described on the Facebook web site:
method– The first parameter is the method name. The method must be one of those exposed by the API documentation, or the API will return error code 3 (with message Unknown method).api_key– The vendor-specific API key corresponding to the site making the API call. This is the same key that we used in the login request, as provided to you when you registered your application.sig– The signature for the method call.
The signature is generated as described by this pseudocode:
args = array of args to the request, formatted in arg=val pairs

sorted_array = alphabetically_sort_array_by_keys(args);

request_str = concatenate_in_order(sorted_array);

signature = md5(concatenate(request_str, secret))
Rather than having to do this manually every time you need to perform an HTTP query, I’ve written a short do_facebook_request() function that is available for download. This takes the optional parameters that are to be sent for a specific API function, as well as the name of that function. It constructs and sends the request, then returns the result:
do_facebook_request.php

<?php

/**

* Sends an API request to Facebook

*

* @param array $parameters Array of parameters to send

* @param string $method The API function to call

* @return array Returns array of data returned

*/

function do_facebook_request($parameters, $method)

{

  if (empty($parameters) || empty($method))

  {

    return false;

  }


  // Build Facebook args

  // http://developers.f8.facebook.com/documentation.php?v=1.0&doc=auth

  $data['api_key'] = 'API KEY';

  $data['method'] = $method;

  $data['v'] = '1.0';


  // Loop through and set as array

  foreach ($parameters as $key => $value)

  {

    $data[$key] = $value;

  }


  // Sort

  ksort($data);


  $args = '';


  foreach ($data as $key => $value)

  {

    $args .= $key.'='.$value;

  }


  $data['sig'] = md5($args.'secret');


  // Get a Facebook session

  $response = do_post_request('http://api.facebook.com/restserver.php', $data);


  // Handle XML

  $xml = simplexml_load_string($response);


  return $xml;

}


/**

* Sends a POST request with necessary parameters

* Code based on (broken link)

* We use HTTP here. See http://uk2.php.net/manual/en/wrappers.http.php

*

* @param string $url The URL to perform the POST on. Include http://

* @param array $data The data to POST in array format

* @param array $optional_headers Any HTTP headers. See http://www.php.net/manual/sv/function.header.php or http://www.faqs.org/rfcs/rfc2616

* @param string $method The method for the request. Defaults to POST

* @return string The response

*/

function do_post_request($url, $data, $optional_headers = NULL, $method = 'POST')

{

  // Just defining some parameters for the request here

  // See http://uk2.php.net/manual/en/wrappers.http.php#AEN268663 for additional context options

  $params = array('http' => array('method' => $method, 'content' => http_build_query($data)));


  if ($optional_headers !== NULL) // Add in any additional headers

  {

    $params['http']['header'] = $optional_headers;

  }


  // Makes it easier to add additional parameters such

  // as any optional HTTP headers as set above

  $context = stream_context_create($params);


  $fp = @fopen($url, 'rb', false, $context);


  if (!$fp)

  {

    return false;

  }


  $response = @stream_get_contents($fp);


  if ($response === false)

  {

    fclose($fp);

    return false;

  }


  fclose($fp);


  return $response;

}

?>
The code is part of a class I wrote for the welovelocal application, and is based on the code provided in Wez Furlong’s blog. You’ll need to replace the API_KEY on line 20 with your own key, as well as the secret on line 40 to generate the signature. The secret is a string generated by Facebook, and is displayed underneath your API key on the My Applications section of the Developer application within Facebook.
Here’s an example in which we’re calling the do_facebook_request function:
$xml = do_facebook_request(array('auth_token' => $token), 'facebook.auth.getSession');After the request has been processed, the $xml variable will contain something that looks like this:
<?xml version="1.0" encoding="UTF-8"?>

<auth_getSession_response xmlns="http://api.facebook.com/1.0/" xmlns:xsi="https://www.w3.org/2001/XMLSchema-instance" xsi:schemaLocation="http://api.facebook.com/1.0/ http://api.facebook.com/1.0/facebook.xsd">

  <session_key>5f34e11bfb97c762e439e6a5-8055</session_key>

  <uid>8055</uid>

  <expires></expires>

</auth_getSession_response>
This is the session_key that you can store and use for all subsequent requests. See the auth.getSession documentation for detailed information.
The User Profile Box
Displaying contributed content as part of users’ profiles is a great way for users to show off the work they’ve done on your web site. With welovelocal, we let people list their latest reviews on their profile, so that their friends can read what they’ve been writing. This concept could be extended for photos, news articles, game high scores — almost anything, really.
Facebook uses its own subset of the HTML language to allow you to put rich content in a user’s profile without opening security issues or destroying the layout of a site. This markup language is called FBML — Facebook Markup Language — and is well documented on the Facebook developer web site.
Pushing the content to a profile is very simple — you generate the FBML within your code, then send it to the API, which makes the content live. The function is called facebook.profile.setFBML and requires you to provide both the session key we obtained earlier and the actual FBML you want to display.
Creating FBML is very straightforward and is well explained in the official documentation, so I won’t go into any detail here. You can use the FBML test console to see a preview of what the output will look like.
Once you’ve written the FBML, you can use the do_facebook_request() function to send it to Facebook’s API:
$xml = do_facebook_request(array('session_id' => 'idhere', 'call_id' => microtime(), 'markup' => $markup), 'facebook.profile.setFBML');You’ll notice a call_id as the final parameter that we passed to the do_facebook_request function. This is a unique ID for the request. Facebook recommends that you use the current time in milliseconds, which is available via the microtime() function.
And that’s it — the profile content will appear immediately!
News Feeds
The news feed in Facebook is a summary of everything that’s going on with your friends — it’s something of a history of their interactions with the site. Through a friend’s news feed, you can:
- find out what they’re doing with status updates (like Twitter)
- learn who they’ve become friends with
- see when they’ve updated their profiles
… as well as almost anything else that happens to them on Facebook. I’m sure you’ll agree that being able to post items to all of a user’s friends is a great way to publicize activity that’s occurring on your own web site.
You can publish a news item to the feed of a single user, or to the feeds of all the friends of a specific user. Next up, we’re going to look at the latter task — using the feed.publishActionOfUser function — as this is the most useful for notifying people about things that are happening on your own site.
While the feed.publishActionOfUser function allows you to send up to four images (which is ideal for sites that use graphical content), to keep things simple, I’ll keep this example to the simple task of sending text.
When sending a news item you must specify a title (max. 40 characters), but you can also optionally provide body text. The title will be displayed in bold, and the body text in regular paragraph styling. The body text is usually used to elaborate on the details contained in the title.
Facebook allows the use of certain tags in the title and body. These tags allow you to display context-sensitive information, such as the name of the user and a link to the profile. So, if I were to send the following request to post information to my friends:
<fb:userlink uid="profileowner"/> wrote a new review.It would show up as:
David Mytton (Network Name) wrote a new review.
My name would be linked to my Facebook profile, and the Network Name would be replaced with the network through which the person viewing the news feed knows me (for example, university name, club name, or the like).
To prevent spamming, Facebook imposes limits on the number of times you can send out news items. This is explained in detail in the developer documentation.
As we saw earlier, you can also use the do_facebook_request function to send out a news feed, like so:
$params['call_id'] = microtime();

$params['session_id'] = 'idhere';

$params['title'] = '<fb:userlink uid="profileowner"/> wrote a new review';

$params['body'] = '<a href="http://www.welovelocal.com/business/'.$business['url_company'].'/#r'.$review_id.'">Read the full review...</a>';

do_facebook_request($params, 'facebook.feed.publishActionOfUser');
Spreading your Wings
We’ve touched on just a few of the key Facebook Platform functions in this article, but there are plenty of other features that you could utilize to push more content out to Facebook.
User Data – Documentation
Once you’ve authenticated the user, you can grab almost all of their profile data (though the data available may be limited depending on their privacy settings). Of course, one should use this data responsibly — one approach that comes to mind is to use it to pre-populate a lot of the fields on your own site, to save the user having to enter the same data twice.
Events – Documentation
As any given user tends to connect with many friends on Facebook, the site is often used to organize social events. The Facebook API allows you to tap into this and return a list of all the events that a user can see, based on certain criteria. The criteria by which you can filter this data include start and end dates, and whether the user has indicated that they will attend the event.
You could use this feature to present a calendar to your users, so that they can plan other events around other commitments they have in place with their friends.
Groups – Documentation
Similar to the ways in which you can use events data, you can use the Facebook API to find out which groups a user belongs to, and retrieve a list of members of those groups. This could be useful to combine with the notifications API, for example, to send requests to all users in a group to join your web site. Of course, this approach could be seen as spamming, so you would definitely need to ensure that the content you broadcast is relevant.
Photo Uploads – Documentation
Facebook has over 60 million photos uploaded every week, and 160TB of photo storage is currently available, which makes it an extremely popular way to share photos. Using the API, you can:
- create a new album to store photos
- retrieve a list of the existing albums, to choose which one to upload photos to
- upload photos to the site
- retrieve photos from a specific album, or from all photos across the entire site to which the current user has access
This means that you could present a user with a list of their Facebook photos, and provide them with the ability to display them on your own site. They could also do the reverse: copy photos from your site to Facebook, thereby allowing all their friends to see them.
Summary
This article looked at some of the ways in which you can integrate your web site with Facebook. Whether you choose to utilize only one small aspect of the Web’s fastest growing community, or embrace it with open arms, the Facebook API is a powerful tool both to enhance the experience for existing users, and to attract new users by driving traffic to your site.
Resources
 David Mytton