
I think we all agree that mobile technology has become a big part of the technology era and is now one of the main focuses of developers. One of the reasons for the success of mobile is the ability to interact with users through gestures and accessibility features. Mobile technology has set new limits to the term User Interaction
.
Users interact with smartphones in a variety of different way,s from simple touch mechanics to dragging views and multi-finger gestures. Here is an example of the complete set of primary Mobile Gestures.
In this article I will introduce some of the most important Android user interactions and gestures and implement custom Android gestures and touch events.
To make a fully interactive app a developer needs more than just onClick so the Android SDK supports a variety of gestures to detect. These allow developers to design the way users interact with an applications. Android provides the GestureDetector class to detect basic motion events and MotionEvent for handling more complicated gestures.
Key Takeaways
- Android’s GestureDetector class simplifies detecting common gestures such as taps, swipes, and long presses, allowing developers to easily implement basic user interactions.
- For more complex gestures like scaling, Android provides the ScaleGestureDetector class, which supports pinch and zoom interactions on UI elements.
- MotionEvent plays a critical role in custom touch interactions, capturing detailed information about touch events, which can be used to implement advanced gesture-based interactions.
- Implementing touch mechanics involves overriding the onTouchEvent() method in an activity or view to manage how touch events are handled and routed within the application.
- The article demonstrates practical implementations of gesture and touch mechanics, showing how to enhance user experience by enabling dynamic interactions such as moving, resizing, and rotating views based on user gestures.
1. GestureDetector
The GestureDetector class receives motion events that correspond to a specific set of user gestures. Such as tapping down and up, swiping vertically and horizontally (fling), long and short press, double taps and scrolls. GestureDetector is powerful for these standard user interactions and is easy to set SimpleOnGestureListeners on Android UI elements.
The simplicity of this class lays in overriding the methods you need from the GestureListener and implementing the gesture functionality required without having to manually determine what gesture the user performed.
Detecting Common Gestures
The following example is an example of the common gestures of the GestureDetector class. First, declare a GestureDetector instance inside your Activity class.
private GestureDetector mGestureDetector;Create a java class inside the Activity class that implements the GestureDetector.OnGestureListener and GestureDetector.OnDoubleTapListener interfaces to detect the basic Android gestures.
  class Android_Gesture_Detector implements GestureDetector.OnGestureListener,
            GestureDetector.OnDoubleTapListener {

       @Override
        public boolean onDown(MotionEvent e) {
            Log.d("Gesture ", " onDown");
            return true;
        }

    @Override
        public boolean onSingleTapConfirmed(MotionEvent e) {
            Log.d("Gesture ", " onSingleTapConfirmed");
            return true;
        }

    @Override
        public boolean onSingleTapUp(MotionEvent e) {
            Log.d("Gesture ", " onSingleTapUp");
            return true;
        }

        @Override
        public void onShowPress(MotionEvent e) {
            Log.d("Gesture ", " onShowPress");
        }

    @Override
        public boolean onDoubleTap(MotionEvent e) {
            Log.d("Gesture ", " onDoubleTap");
         return true;
        }

        @Override
        public boolean onDoubleTapEvent(MotionEvent e) {
            Log.d("Gesture ", " onDoubleTapEvent");
            return true;
        }

        @Override
        public void onLongPress(MotionEvent e) {
            Log.d("Gesture ", " onLongPress");
        }

    @Override
    public boolean onScroll(MotionEvent e1, MotionEvent e2, float distanceX, float distanceY) {

            Log.d("Gesture ", " onScroll");
            if (e1.getY() < e2.getY()){
                Log.d("Gesture ", " Scroll Down");
            }
          if(e1.getY() > e2.getY()){
                Log.d("Gesture ", " Scroll Up");
            }
            return true;
    }

        @Override
        public boolean onFling(MotionEvent e1, MotionEvent e2, float velocityX, float velocityY) {
    if (e1.getX() < e2.getX()) {
              Log.d("Gesture ", "Left to Right swipe: "+ e1.getX() + " - " + e2.getX());
               Log.d("Speed ", String.valueOf(velocityX) + " pixels/second");
     }
            if (e1.getX() > e2.getX()) {
              Log.d("Gesture ", "Right to Left swipe: "+ e1.getX() + " - " + e2.getX());
   Log.d("Speed ", String.valueOf(velocityX) + " pixels/second");
            }
            if (e1.getY() < e2.getY()) {
            Log.d("Gesture ", "Up to Down swipe: " + e1.getX() + " - " + e2.getX());
              Log.d("Speed ", String.valueOf(velocityY) + " pixels/second");
            }
            if (e1.getY() > e2.getY()) {
              Log.d("Gesture ", "Down to Up swipe: " + e1.getX() + " - " + e2.getX());
   Log.d("Speed ", String.valueOf(velocityY) + " pixels/second");
            }
            return true;

       }
}
The Android_Gesture_Detector class will intercept all the basic gestures implemented in it, but to use these gestures I override the Activity’s onTouchEvent() method to intercept these touch events and re-route them to the Android_Gesture_Detector class.
  @Override
public boolean onTouchEvent(MotionEvent event) {
    mGestureDetector.onTouchEvent(event);

    return super.onTouchEvent(event);
    // Return true if you have consumed the event, false if you haven't.
    // The default implementation always returns false.
}
Let’s fire up the gesture detector. In the onCreate() method add the following and the Android gesture detector is ready to detect user interactions.
  // Create an object of the Android_Gesture_Detector  Class
Android_Gesture_Detector  android_gesture_detector  =  new Android_Gesture_Detector();
// Create a GestureDetector
mGestureDetector = new GestureDetector(this, android_gesture_detector);
Testing the gesture class
Run the app and start interacting with the app. The result of the gestures will display in the Android Studio LogCat window.

Once detected you can build the app functionality inside the overridden methods.
Pinch Gesture
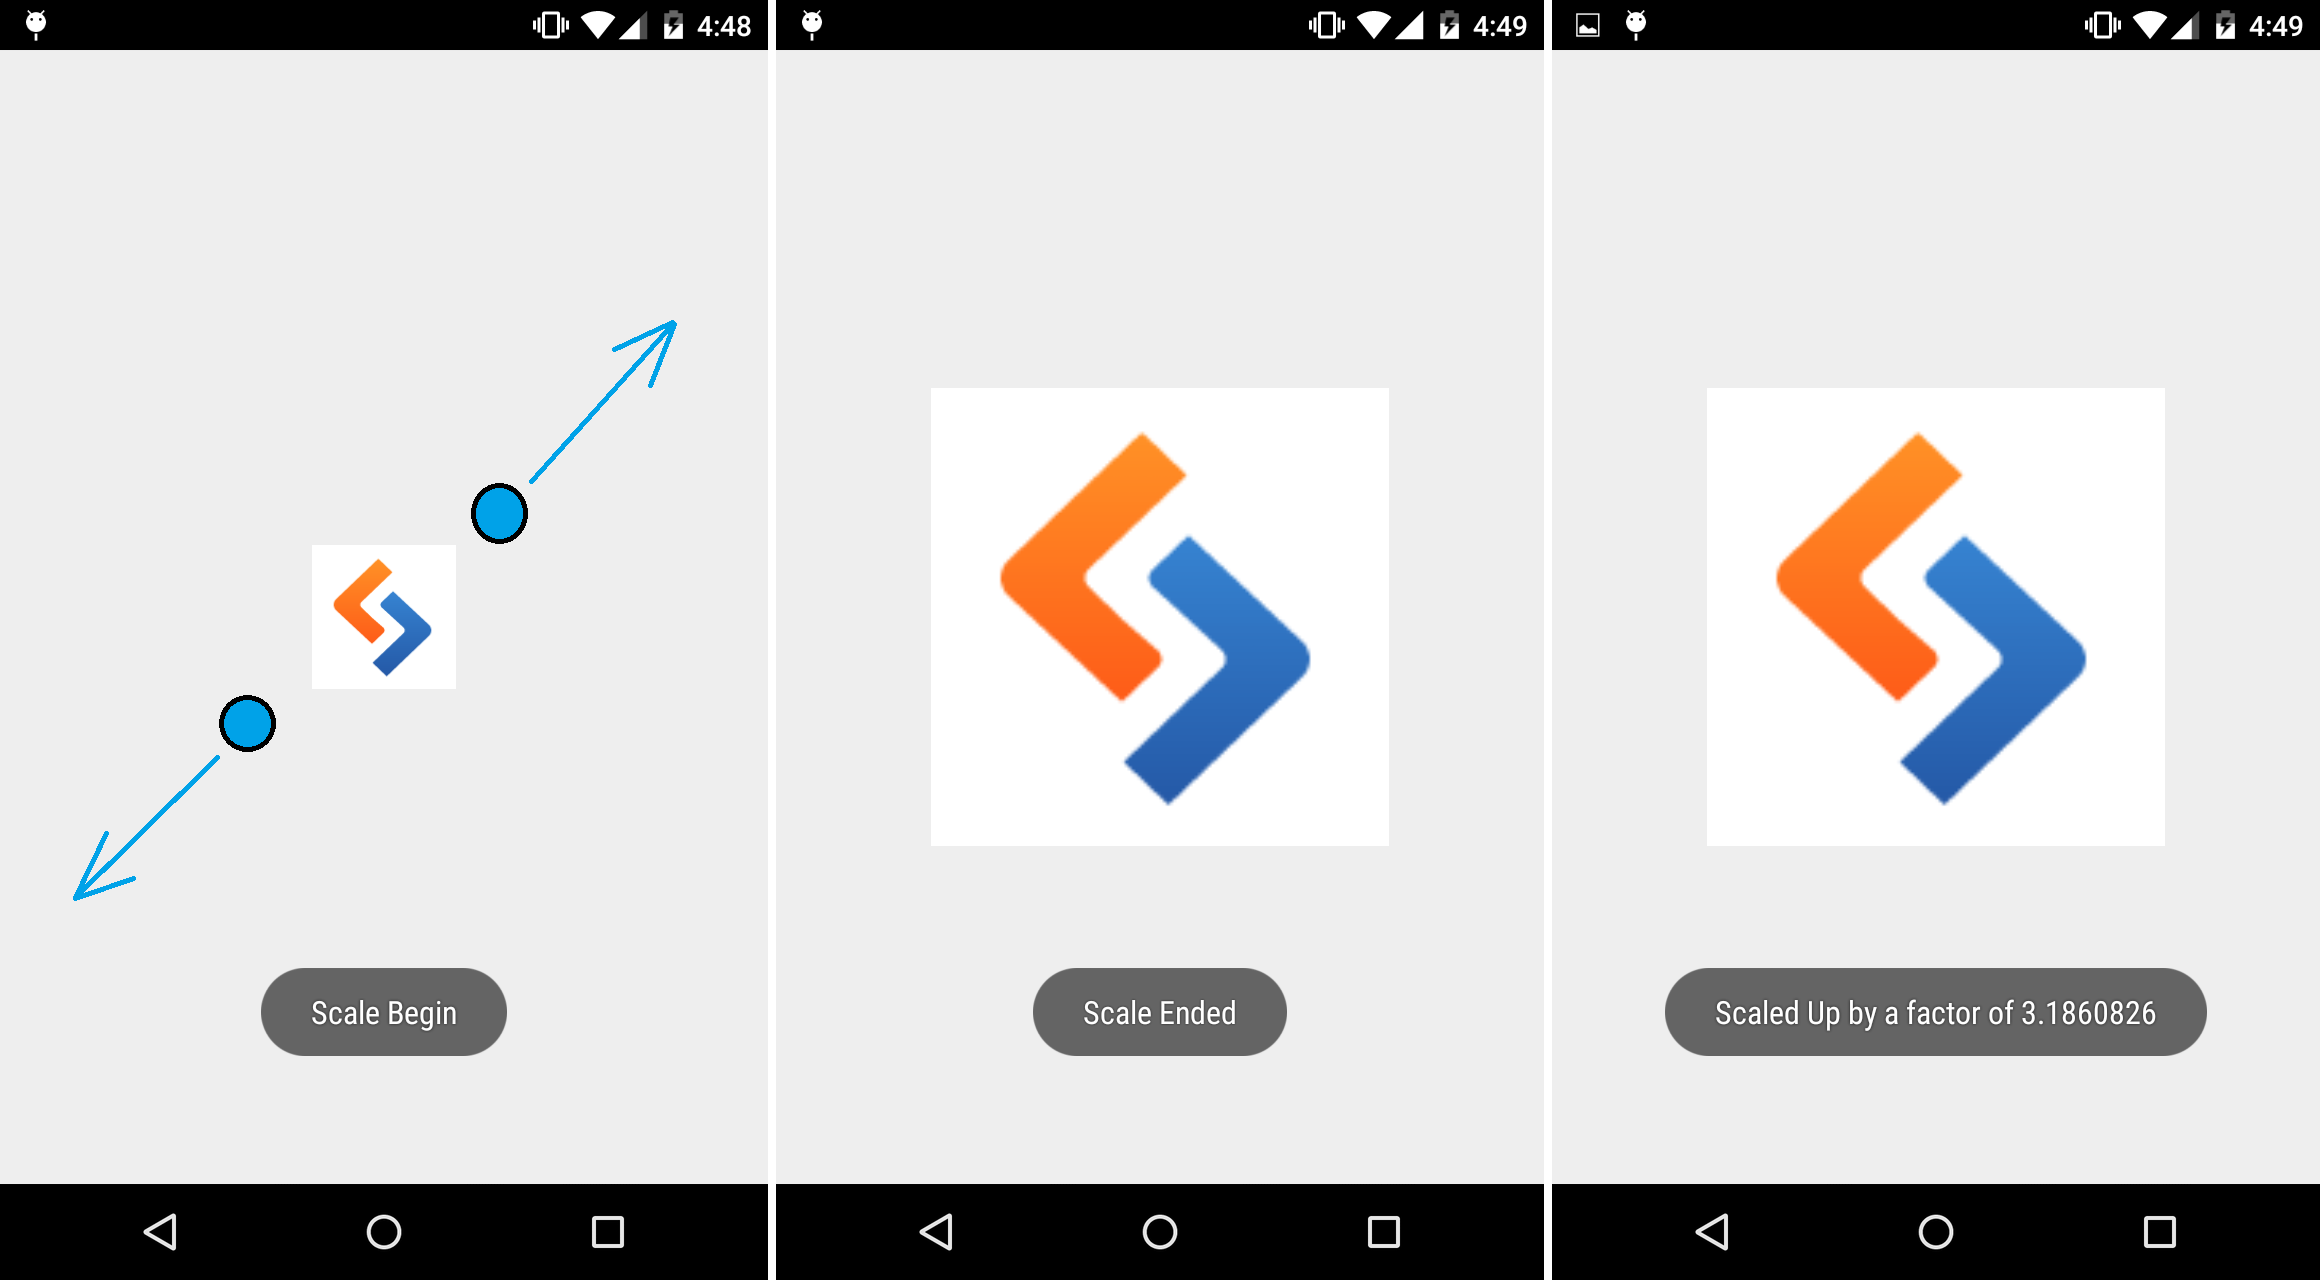
Another useful gesture in any app is the ability to scale UI elements. Android provides the ScaleGestureDetector class to handle pinch gestures for scaling views. The following code is an implementation of a simple Android app that uses the ScaleListener class to perform the pinch gesture on an imageView and scale it based on finger movements.
import android.app.Activity;
import android.os.Bundle;
import android.view.MotionEvent;
import android.view.ScaleGestureDetector;
import android.widget.ImageView;
import android.widget.Toast;

public class MainActivity extends Activity {

    private ImageView imageView;
    private float scale = 1f;
    private ScaleGestureDetector detector;

    @Override
    protected void onCreate(Bundle savedInstanceState) {
        super.onCreate(savedInstanceState);
        setContentView(R.layout.activity_main);

        imageView=(ImageView)findViewById(R.id.imageView);
        detector = new ScaleGestureDetector(this,new ScaleListener());
    }

public boolean onTouchEvent(MotionEvent event) {
//  re-route the Touch Events to the ScaleListener class
        detector.onTouchEvent(event);
        return super.onTouchEvent(event);
    }

    private class ScaleListener extends ScaleGestureDetector.SimpleOnScaleGestureListener {


        float onScaleBegin = 0;
        float onScaleEnd = 0;

        @Override
        public boolean onScale(ScaleGestureDetector detector) {
            scale *= detector.getScaleFactor();
            imageView.setScaleX(scale);
            imageView.setScaleY(scale);
            return true;
        }

        @Override
        public boolean onScaleBegin(ScaleGestureDetector detector) {

            Toast.makeText(getApplicationContext(),"Scale Begin" ,Toast.LENGTH_SHORT).show();
            onScaleBegin = scale;

            return true;
        }

        @Override
        public void onScaleEnd(ScaleGestureDetector detector) {

            Toast.makeText(getApplicationContext(),"Scale Ended",Toast.LENGTH_SHORT).show();
            onScaleEnd = scale;

            if (onScaleEnd > onScaleBegin){
                Toast.makeText(getApplicationContext(),"Scaled Up by a factor of  " + String.valueOf( onScaleEnd / onScaleBegin ), Toast.LENGTH_SHORT  ).show();
            }

            if (onScaleEnd < onScaleBegin){
                Toast.makeText(getApplicationContext(),"Scaled Down by a factor of  " + String.valueOf( onScaleBegin / onScaleEnd ), Toast.LENGTH_SHORT  ).show();
            }

            super.onScaleEnd(detector);
        }
      }
}
The ScaleListener class overrides three methods onScale, onScaleBegin and onScaleEnd. During the execution of the onScale method, the resizing of the imageView is performed based on the scale factor of the finger movement on the device screen.
2. Motion Event
The Android Simple GestureDetector is useful for basic gestures. But for any gesture looking for two (or more) touches, you need to look elsewhere. To implement custom and more complex touch mechanics we use Motion Event. In most applications you don’t need to get your hands dirty implementing your own touch event but if you ever want to make a fully interactive app with cool touch events this class is the solution. The core of the MotionEvent class is capturing touch events on an Activity, by overriding the onTouchEvent() callback or on Views by using the setOnTouchListener() method to listen for touch events on the view. View touch events can be caught by implementing View.OnTouchListener on the Activity class as I will in the following example.
Android generates the following touch events whenever the screen is touched by one or multiple fingers.
ACTION_DOWN
For the first pointer that touches the screen. New touch started.
ACTION_MOVE
A change has happened in the touch gesture. Finger is moving.
ACTION_UP
The last pointer leaves the screen.
ACTION_POINTER_DOWN
For extra pointers that enter the screen beyond the first. (multi-touch)
ACTION_POINTER_UP
Sent when a non-primary pointer goes up. Pointer up (multi-touch)
ACTION_CANCEL
The touch event has been canceled, something else took control of the event.
To show the use of the MotionEvent class let’s think of an example to use it in a real life application. The reason gestures exist are to interact with the application’s UI so I will introduce a simple example of app that moves views around the main layout on a one finger gesture, stretches the view on a two finger gesture and spins it around on a three finger gesture. If you think about it, these gestures probably will never be used together on a real app, but as this is for demonstrative purposes I will implement them together inside a touch event.
Let’s gets started with these touch events. Create an Android Activity that implements View.OnTouchListener. In the activity’s layout file set the main Relative layout an id of rootLayout. As implemented in the example, the views on this activity will be able to respond to the touch events triggered by the users actions on this layout.
The idea is to add imageView elements on the root Layout, each with the ability to act based on a touch event. To add new imageViews on the layout we add a button that calls the Add_Image() function every time it’s clicked.
This function creates an imageView, sets it a image resource, creates a set of layout parameters, pins them to the imageView, adds this imageView to the root Layout and sets the Touch Listener to this view.
    private void Add_Image() {
        final ImageView iv = new ImageView(this);
        iv.setImageResource(R.drawable.image);

        RelativeLayout.LayoutParams layoutParams = new RelativeLayout.LayoutParams(150, 150);

        iv.setLayoutParams(layoutParams);
        RootLayout.addView(iv, layoutParams);
        iv.setOnTouchListener(this);
    }
The most important part is the view TouchListener. The listener performs actions based on the touch events described above.
During the ACTION_DOWN event I get the touch’s X and Y position and remove the view’s respective margins to get the precise point inside the view in which the touch was performed.
During ACTION_UP event I implemented a custom double click event to delete the view on which this event is performed.
During ACTION_MOVE I implemented actions for the cool features described above. One cool thing about the MotionEvent class is the ability to detect the number of fingers that have touched the screen with the getPointerCount() method.
One finger – move the view.
Get the LayoutParams of the view and reset them based on the finger movement on the screen. The left margin is made equal to the position of the touch event minus the X value of the touch inside the view set during ACTION_DOWN so the view will move based on the X value of the finger on the Layout and relatively align itself based on the position of the touch inside the view.
The same logic applies to the top margin, but based on the Y axis. The right and bottom margins are set to 500 so the view doesn’t shrink when it touches the right and bottom borders of the layout, but hides itself behind it.
RelativeLayout.LayoutParams Params = (RelativeLayout.LayoutParams) view.getLayoutParams();
                        Params.leftMargin = X - Position_X;
                        Params.topMargin = Y - Position_Y;
                        Params.rightMargin = -500;
                        Params.bottomMargin = -500;
                        view.setLayoutParams(Params);
Two fingers – stretch the view
Get the LayoutParams of the view and resize the width and height of the view. During this resize action the view margins don’t change and the resizing will change based on the movement of the first finger so the sizes will be set to be the values of the first finger’s position on the layout. The constants Possition_X and Possition_Y do not influence the resizing, they are for visual purposes.
 RelativeLayout.LayoutParams layoutParams1 =  (RelativeLayout.LayoutParams) view.getLayoutParams();
                            layoutParams1.width = Position_X +(int)event.getX();
                            layoutParams1.height = Position_Y + (int)event.getY();
                            view.setLayoutParams(layoutParams1);
Three fingers – spin the view around
The spinning of the view is quite simple. Get the view’s current rotation, add a float constant to it and set it again to the view with setRotation() method during a three finger ACTION_MOVE.
view.setRotation(view.getRotation() + 10.0f);Keep in mind that the resizing of the view will not work properly after the rotation event because the view’s axis are rotated to its current rotation state.
The full code on the MotionEvent Activity is now:
import android.app.Activity;
import android.app.AlertDialog;
import android.content.DialogInterface;
import android.os.Bundle;
import android.view.MotionEvent;
import android.view.View;
import android.view.ViewGroup;
import android.widget.Button;
import android.widget.ImageView;
import android.widget.RelativeLayout;


public class MainActivity extends Activity implements View.OnTouchListener  {
    int clickCount;
    private ViewGroup RootLayout;
    private int Position_X;
    private int Position_Y;

    long startTime = 0 ;

    @Override
    public void onCreate(Bundle savedInstanceState) {
        super.onCreate(savedInstanceState);
        setContentView(R.layout.activity_main);
        RootLayout = (ViewGroup) findViewById(R.id.rootLayout);


        //new image
        Button NewImage = (Button)findViewById(R.id.new_image_button);
        NewImage.setOnClickListener(new View.OnClickListener() {
            @Override
            public void onClick(View v) {
                Add_Image();
            }
        });

        clickCount = 0;

    }


    private void Add_Image() {
        final ImageView iv = new ImageView(this);
        iv.setImageResource(R.drawable.image);

        RelativeLayout.LayoutParams layoutParams = new RelativeLayout.LayoutParams(150, 150);
        iv.setLayoutParams(layoutParams);
        RootLayout.addView(iv, layoutParams);
        iv.setOnTouchListener(this);
    }


    public boolean onTouch(final View view, MotionEvent event) {
        final int X = (int) event.getRawX();
        final int Y = (int) event.getRawY();

        int pointerCount = event.getPointerCount();


            switch (event.getAction() & MotionEvent.ACTION_MASK) {

                case MotionEvent.ACTION_DOWN:
                    RelativeLayout.LayoutParams layoutParams = (RelativeLayout.LayoutParams) view.getLayoutParams();
                    Position_X = X - layoutParams.leftMargin;
                    Position_Y = Y - layoutParams.topMargin;
                    break;

                case MotionEvent.ACTION_UP:
                    if (startTime == 0){

                        startTime = System.currentTimeMillis();

                    }else {
                        if (System.currentTimeMillis() - startTime < 200) {

                            AlertDialog.Builder builder = new AlertDialog.Builder(MainActivity.this);
                            builder.setMessage("Are you sure you want to delete this?");
                            builder.setPositiveButton("Yes", new DialogInterface.OnClickListener() {
                                @Override
                                public void onClick(DialogInterface dialog, int which) {

                                    view.setVisibility(View.GONE);

                                }
                            });

                            builder.setNegativeButton("No", new DialogInterface.OnClickListener() {
                                @Override
                                public void onClick(DialogInterface dialog, int which) {
                                    dialog.dismiss();
                                }
                            });

                            AlertDialog alertDialog = builder.create();
                            alertDialog.show();

                        }

                        startTime = System.currentTimeMillis();

                    }
                    break;
                case MotionEvent.ACTION_POINTER_DOWN:
                    break;

    case MotionEvent.ACTION_POINTER_UP:
                    break;

                case MotionEvent.ACTION_MOVE:

                    if (pointerCount == 1){
                        RelativeLayout.LayoutParams Params = (RelativeLayout.LayoutParams) view.getLayoutParams();
                        Params.leftMargin = X - Position_X;
                        Params.topMargin = Y - Position_Y;
                        Params.rightMargin = -500;
                        Params.bottomMargin = -500;
                        view.setLayoutParams(Params);
                    }

                    if (pointerCount == 2){

                            RelativeLayout.LayoutParams layoutParams1 =  (RelativeLayout.LayoutParams) view.getLayoutParams();
                            layoutParams1.width = Position_X +(int)event.getX();
                            layoutParams1.height = Position_Y + (int)event.getY();
                            view.setLayoutParams(layoutParams1);
                    }

                    //Rotation
                    if (pointerCount == 3){
                        //Rotate the ImageView
                        view.setRotation(view.getRotation() + 10.0f);
                    }

                    break;
            }

// Schedules a repaint for the root Layout.
        RootLayout.invalidate();
        return true;
    }
}
Testing the MotionEvent app
Move views
Resize view

Spin view
Conclusion
In this article I presented the two main types of Android gesture classes with the basic knowledge to get you started using them. Use what you have learned here to improve your app’s user experience and let me know if you have any questions or comments.
Frequently Asked Questions (FAQs) about Android Gestures and Touch Mechanics
What are the different types of Android gestures?
Android gestures are various touch mechanisms that allow users to interact with their devices. They include single-touch gestures like tap, double-tap, press, and drag, and multi-touch gestures like pinch, spread, and rotate. Each gesture has a specific function. For example, a tap is used to select an item, while a pinch is used to zoom out on a screen.
How can I customize Android gestures?
Android allows users to customize gestures to a certain extent. This can be done through the settings of your device. Go to ‘System’ then ‘Gestures’ and you will see a list of available gestures that you can toggle on or off. Some devices also allow you to create custom gestures.
What is the role of MotionEvent in Android gestures?
MotionEvent in Android is a key component in interpreting touch gestures. It provides information about the touch event, including the location of the touch, the action performed (like DOWN, UP, MOVE), the pressure applied, and the time of the event. This information is crucial in determining the type of gesture performed.
How does Android handle simultaneous touch events?
Android can handle simultaneous touch events using multi-touch gestures. The system tracks each finger in contact with the screen independently and provides a unique identifier for each touch event. This allows it to recognize and respond to multiple touch points at the same time.
How can I implement swipe gestures in Android?
Swipe gestures in Android can be implemented using the GestureDetector class. This class provides methods to detect common gestures. To implement a swipe gesture, you need to create an instance of GestureDetector and override the onFling() method.
What is the difference between touch feedback and haptic feedback in Android?
Touch feedback and haptic feedback are both forms of tactile feedback in Android. Touch feedback refers to visual responses to touch, like a button changing color when pressed. Haptic feedback, on the other hand, refers to physical responses, like a device vibrating when a touch event occurs.
How can I disable touch events in Android?
Touch events in Android can be disabled programmatically. This can be done by overriding the onTouchEvent() method in your activity or view and returning false. This tells the system that the touch event has not been handled and should not be propagated further.
What are the best practices for designing touch interfaces in Android?
When designing touch interfaces in Android, it’s important to consider the size and spacing of touch targets to ensure they can be easily tapped. Also, consider the natural movements of fingers and design gestures that feel intuitive. Provide immediate feedback for touch events to make the interface feel responsive.
How can I detect a long press in Android?
A long press in Android can be detected using the GestureDetector class. You need to create an instance of GestureDetector and override the onLongPress() method. When a long press occurs, this method will be called.
Can I use gestures to navigate in Android?
Yes, Android supports gesture navigation. This allows you to navigate your device using swipes and other gestures instead of traditional buttons. You can enable gesture navigation in the system settings under ‘System’ then ‘Gestures’ then ‘System navigation’.