

 FXRuby is a powerful library for developing cross-platform graphical user interfaces (GUIs). It is based on the FOX toolkit (an open source, highly optimized library written in C++) and offers Ruby developers the possibility of coding applications in the language they love, whilst at the same time taking advantage of FOX’s underlying performance and functionality.
In this article, I’m going to show you how to get up and running with FXRuby, introduce you to some of the more commonly used widgets, and demonstrate how to build a simple application with some real world value.
The code from this tutorial is available from our GitHub repo.
Key Takeaways
- FXRuby is a powerful library for creating cross-platform graphical user interfaces, leveraging the FOX toolkit and allowing Ruby developers to code in their preferred language.
- Installation of FXRuby is straightforward and varies slightly across different operating systems, with detailed instructions available online for troubleshooting.
- The tutorial introduces a basic “Hello, World!” application to demonstrate the setup and functionality of an FXRuby application, emphasizing the importance of the FXApp and FXMainWindow classes.
- FXRuby supports refactoring and Ruby idioms, encouraging developers to structure their applications with readability and maintainability in mind.
- The article provides a practical example of a password generator application, showcasing how to handle user input, generate random passwords, and connect GUI elements with Ruby code.
- FXRuby offers extensive customization and functionality for GUI applications, including clipboard interactions and layout management, demonstrating its suitability for both simple and complex application needs.
Installation
Presuming you have Ruby 1.9 installed on your machine.
Windows 7:
gem install fxruby
Ubuntu 12.04:
sudo apt-get install ruby1.9.1-dev g++ libxrandr-dev libfox-1.6-devsudo gem install fxruby
Mac OS X:
sudo gem install fxruby
If you run into any trouble, more detailed instructions can be found here: https://github.com/lylejohnson/fxruby/wiki
Hello, World!
So, let’s start off with the customary “Hello, World!” application.
To do this create a new file on your computer, name it hello_world.rb and enter the following code:
require 'fox16'

include Fox

app = FXApp.new

main = FXMainWindow.new(app, "Hello, World!" , :width => 200, :height => 50)

app.create

main.show(PLACEMENT_SCREEN)

app.run
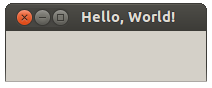
Run this file with the command ruby hello_world.rb and you should see something like this:
Let’s examine what the above code is doing:
- We start by requiring the fox16 library.
- All of FXRuby’s classes are defined within the Fox module, so including Fox in our program’s global namespace removes the need to precede these classes with a
Fox::prefix. - We then create an instance of the
FXAppclass (where App stands for Application Object). TheFXAppinstance is central to an FXRuby program and has many important tasks, such as managing the event queue and handling signals. - Next we create an instance of
FXMainWindow, passing it the previously constructedFXAppobject as the first argument. This associates the window we’re creating, with our application. We also pass it three further arguments: window title, window width and window height. - A call to
FXApp#createensures that the application’s window gets created. - Windows are however invisible by default in FXRuby, so we need to call
FXMainWindow#showfor it to be displayed. The argumentPLACEMENT_SCREENensures that it is centred on the screen. - Finally, we start the program’s main loop by calling the
FXApp#run. This method will not return until the program exits.
Time for a Little Refactoring
Although the above code works just fine, it isn’t very Ruby-like and as you start to add widgets to your application, things quickly become cluttered. Therefore, a common idiom in FXRuby is to create your application’s window as a subclass of FXMainWindow, like so:
require 'fox16'

include Fox
class HelloWorld < FXMainWindow

  def initialize(app)

    super(app, "Hello, World!" , :width => 200, :height => 50)

  end

  def create

    super

    show(PLACEMENT_SCREEN)

  end

end
app = FXApp.new

HelloWorld.new(app)

app.create

app.run
You notice, that we have defined a create method within our HelloWorld class. We need this as when we call app.create, our FXApp instance will in turn call the create method of all of the windows with which it is associated. We can also use this method to have our new HelloWorld object call show on itself after it has been created.
Another popular FXRuby idiom is to move the FXApp and HelloWorld construction into a start-up block, like so:
if __FILE__ == $0

  FXApp.new do |app|

    HelloWorld.new(app)

    app.create

    app.run

  end

end
Here, __FILE__ is the name of the current file and $0 is the name of file where execution started. By comparing the two, we can ensure that our file is the main file being run, rather than it having been required or loaded by another file. This is definitely overkill for such a small app, but serves to demonstrate the typical style of an FXRuby program.
Something a bit more exciting
“Hello, World!” apps are great, but let’s move on to something with a little more practical value. In this next section I’m going to show you how to make a simple password generator, which, at the push of a button, will output a random password of an arbitrary length.
The layout
Before we start coding, let’s take a moment to consider which elements should be present in our GUI. We’ll need a text field into which the user can type the length of the desired password. We’ll also need a check box, so that the user can opt to include special characters in the password. The password itself should be displayed on some sort of text area and finally we’re going to need two buttons: one to generate the password and one to copy it to the clipboard.
Here is a simple mock-up of what our GUI should look like:
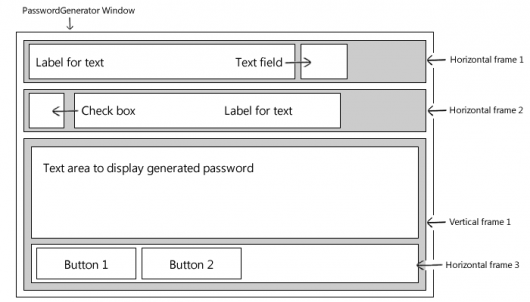
In FXRuby we use layout managers to control the position and size of the widgets. In this case I am going to use objects of the class FXHorizontalFrame (which arranges its children horizontally) and FXVerticalFrame (which arranges its children vertically). The first argument for each of these layout managers is its parent window. I also pass a layout hint to the vertical frame (LAYOUT_FILL), which tells it to take up as much space as is available to it, both horizontally and vertically.
To create the widgets themselves I will use instances of the following FXRuby classes:
FXLabel– to create a label on which we can display some textFXTextField– to create a text field into which the user can type a single line of inputFXCheckButton– to create a check button to allow the user to select or deselect an optionFXText– to create a text area to display the outputFXButton– to create a pushable button to execute a command
require 'fox16'

include Fox
class PasswordGenerator < FXMainWindow

  def initialize(app)

    super(app, "Password generator", :width => 400, :height => 200)

    hFrame1 = FXHorizontalFrame.new(self)

    chrLabel = FXLabel.new(hFrame1, "Number of characters in password:")

    chrTextField = FXTextField.new(hFrame1, 4)

    hFrame2 = FXHorizontalFrame.new(self)

    specialChrsCheck = FXCheckButton.new(hFrame2, "Include special characters in password")

    vFrame1 = FXVerticalFrame.new(self, :opts => LAYOUT_FILL)

    textArea = FXText.new(vFrame1, :opts => LAYOUT_FILL | TEXT_READONLY | TEXT_WORDWRAP)

    hFrame3 = FXHorizontalFrame.new(vFrame1)

    generateButton = FXButton.new(hFrame3, "Generate")

    copyButton = FXButton.new(hFrame3, "Copy to clipboard")

  end

  def create

    super

    show(PLACEMENT_SCREEN)

  end

end
if __FILE__ == $0

  FXApp.new do |app|

    PasswordGenerator.new(app)

    app.create

    app.run

  end

end
If you run this code on your computer you should see the skeleton of our application, looking something like this:

Generate a Random String Based on User Input
To create our password we can use Ruby’s Integer#chr method, which returns a string containing the character represented by the receiver’s value. If the user wants to include special characters in their password, then we can use any of the 93 characters from 33-126 on the ASCII chart. Otherwise we stick to values 48-57, 65-90 and 97-122 which represent numbers 1-9, uppercase A-Z and lowercase a-z respectively.
def generatePassword(pwLength, charArray)

  len = charArray.length

  (1..pwLength).map do

    charArray[rand(len)]

  end.join

end
numbers = (1..9).to_a

alphabetLowerCase = ("a".."z").to_a

alphabetUpperCase = ("A".."Z").to_a

allPossibleChars = (33..126).map{|a| a.chr}
p generatePassword(25, numbers + alphabetLowerCase + alphabetUpperCase)

=> "fO0470a7tfdAM80u8jZ2aA0SG"

p generatePassword(25, allPossibleChars)

=> "o>0]bl{6._l;s%MFCYz1Gl;hV"
Of course, to remember such a long and random password you will need to be using a password manager such as KeePass, but everyone does that anyway, right? :-)
Connecting the Two
So, we’ve got the skeleton of our GUI up and running and our generatePassword method is doing what it should. It’s time to connect the two.
In FXRuby we use the connect method to associate a user actions, such as mouse clicks, with blocks of code. In the case of FXButton it sends a SEL_COMMAND message to its target when it is clicked. The syntax is as follows:
FXButton.connect(SEL_COMMAND)do

  # This code fires when the button is clicked

  p "Yay! I was clicked!"

end
Let’s apply this to our code.
You will notice that in the generateButton.connect block I have done the following:
- I have added a line to clear the
FXTextwidget in which we want to display our output. If we didn’t do this, then every time we generated a new password, it would be appended to the old one. - I then append the result of calling
generatePasswordto the now blankFXTextwidget. - I call
generatePasswordwith the argumentchrTextField.text.to_i. This is the integer value of whatever the user has entered into the text field.
require 'fox16'

include Fox
NUMBERS = (1..9).to_a

ALPHABET_LOWER = ("a".."z").to_a

ALPHABET_UPPER = ("A".."Z").to_a

ALL_POSSIBLE_CHARS = (33..126).map{|a| a.chr}
class PasswordGenerator < FXMainWindow

  def initialize(app)

    super(app, "Password generator", :width => 400, :height => 200)
    hFrame1 = FXHorizontalFrame.new(self)

    chrLabel = FXLabel.new(hFrame1, "Number of characters in password:")

    chrTextField = FXTextField.new(hFrame1, 4)
    hFrame2 = FXHorizontalFrame.new(self)

    specialChrsCheck = FXCheckButton.new(hFrame2, "Include special characters in password")
    vFrame1 = FXVerticalFrame.new(self, :opts => LAYOUT_FILL)

    textArea = FXText.new(vFrame1, :opts => LAYOUT_FILL | TEXT_READONLY | TEXT_WORDWRAP)
    hFrame3 = FXHorizontalFrame.new(vFrame1)

    generateButton = FXButton.new(hFrame3, "Generate")

    copyButton = FXButton.new(hFrame3, "Copy to clipboard")
    generateButton.connect(SEL_COMMAND) do

      textArea.removeText(0, textArea.length)

      textArea.appendText(generatePassword(chrTextField.text.to_i, ALL_POSSIBLE_CHARS))

    end

  end
  def generatePassword(pwLength, charArray)

    len = charArray.length

    (1..pwLength).map do

      charArray[rand(len)]

    end.join

  end
  def create

    super

    show(PLACEMENT_SCREEN)

  end

end
if __FILE__ == $0

  FXApp.new do |app|

    PasswordGenerator.new(app)

    app.create

    app.run

  end

end
Special Characters
Now let’s give the user the ability to select if they want special characters to be included in the password, or not. The most straightforward way to do this is to declare an instance variable @includeSpecialCharacters, which we can initialize to false. Then we can connect our check box to a block of code that will update the value of this instance variable (by xoring its value with true) whenever the box is selected or deselected.
@includeSpecialCharacters = false

specialChrsCheck = FXCheckButton.new(hFrame2, "Include special characters in password")

specialChrsCheck.connect(SEL_COMMAND) { @includeSpecialCharacters ^= true }
I have also included a second method called chooseCharset, which recieves @includeSpecialCharacters as an argument and returns an array containing the set of characters from which the password is to be constructed.
def chooseCharset(includeSpecialCharacters)

  if includeSpecialCharacters

    @charSets.first

  else

    @charSets.last

  end

end
The character sets themselves are passed to the PasswordGenerator object upon initialization and are available in the instance variable @charSets.
charSets = [ALL_POSSIBLE_CHARS, NUMBERS + ALPHABET_LOWER + ALPHABET_UPPER]

PasswordGenerator.new(app, charSets)
Our generatePassword method will, in turn, take the array returned by chooseCharset as an argument and generate the password accordingly.
The Finishing Touches
It would be nice if the user could copy the generated password to the clipboard at the push of a button. Luckily the FXText widget provides clipboard support out of the box (i.e. you can copy its text to the clipboard using Ctrl + C) and it doesn’t take much additional code for us to interact with the clipboard programmatically.
The first thing to do is to call FXWindow#acquireClipboard when the ‘Copy to clipboard’ button is pressed:
copyButton.connect(SEL_COMMAND) do

  acquireClipboard([FXWindow.stringType])

end
We pass the method an array containing FXWindow.stringType (one of FOX’s pre-registered drag types), to indicate that we have some string data to place on the clipboard. If successful the acquireClipboard method will return true.
Now, whenever another window requests the clipboard’s contents FOX will send a SEL_CLIPBOARD_REQUEST message to the current clipboard owner. As we called acquireClipboard on the main window, the main window is now the owner of the clipboard and needs to respond this message type:
self.connect(SEL_CLIPBOARD_REQUEST) do

  setDNDData(FROM_CLIPBOARD, FXWindow.stringType, Fox.fxencodeStringData(textArea.text))

end
The setDNDData method takes three arguments. The first tells FOX which kind of data transfer we’re trying to accomplish, the second is the data type and the last is the data itself.
Aesthetics
With this done, I’m going to make two small changes to the layout of the GUI. Firstly, I’m going to place the FXTextField and the FXCheckButton in a group box and secondly I’m going to give the two buttons a uniform width.
The groupbox will be an object of the class FXGroupBox. It is a layout manager and, as is the case with the other layout managers, its first argument specifies its parent window. It also accepts various layout hints as additional arguments. Here I have used FRAME_RIDGE and LAYOUT_FILL_X which give it a ridged frame and tell it to occupy as much space as is available to it horizontally. To add some outer padding to the groupbox, I have introduced an object of the class FXPacker which will encapsulate all of the other layout managers.
packer = FXPacker.new(self, :opts => LAYOUT_FILL)

groupBox = FXGroupBox.new(packer, nil, :opts => FRAME_RIDGE | LAYOUT_FILL_X)
Giving our two buttons a uniform width is slightly easier. We just include the layout hint PACK_UNIFORM_WIDTH when creating the FXHorizontalFrame which is their direct parent.
hFrame3 = FXHorizontalFrame.new(vFrame1, :opts => PACK_UNIFORM_WIDTH)
A Final Bug Fix
In Ruby 1.87 entering a negative number into chrTextField caused the interpreter to enter an endless loop. To avoid this problem we can pass [0, chrTextField.text.to_i].max as a first argument to generatePassword which will then take the value of 0 or whatever the user entered, depending on which is higher.
Here’s the final code
require 'fox16'

include Fox
NUMBERS = (1..9).to_a

ALPHABET_LOWER = ("a".."z").to_a

ALPHABET_UPPER = ("A".."Z").to_a

ALL_POSSIBLE_CHARS = (33..126).map{|a| a.chr}
class PasswordGenerator < FXMainWindow

  def initialize(app, charSets)

    super(app, "Password generator", :width => 400, :height => 200)

    @charSets = charSets
    packer = FXPacker.new(self, :opts => LAYOUT_FILL)

    groupBox = FXGroupBox.new(packer, nil, :opts => FRAME_RIDGE | LAYOUT_FILL_X)
    hFrame1 = FXHorizontalFrame.new(groupBox)

    chrLabel = FXLabel.new(hFrame1, "Number of characters in password:")

    chrTextField = FXTextField.new(hFrame1, 4)
    hFrame2 = FXHorizontalFrame.new(groupBox)
    @includeSpecialCharacters = false

    specialChrsCheck = FXCheckButton.new(hFrame2, "Include special characters in password")

    specialChrsCheck.connect(SEL_COMMAND){ @includeSpecialCharacters ^= true }
    vFrame1 = FXVerticalFrame.new(packer, :opts => LAYOUT_FILL)

    textArea = FXText.new(vFrame1, :opts => LAYOUT_FILL | TEXT_READONLY | TEXT_WORDWRAP)
    hFrame3 = FXHorizontalFrame.new(vFrame1, :opts => PACK_UNIFORM_WIDTH)

    generateButton = FXButton.new(hFrame3, "Generate")

    copyButton = FXButton.new(hFrame3, "Copy to clipboard")
    generateButton.connect(SEL_COMMAND) do

      textArea.removeText(0, textArea.length)

      pwLength = [0, chrTextField.text.to_i].max

      charSet = chooseCharset(@includeSpecialCharacters)

      textArea.appendText(generatePassword(pwLength, charSet))

    end
    copyButton.connect(SEL_COMMAND) do

      acquireClipboard([FXWindow.stringType])

    end
    self.connect(SEL_CLIPBOARD_REQUEST) do

      setDNDData(FROM_CLIPBOARD, FXWindow.stringType, Fox.fxencodeStringData(textArea.text))

    end

  end
  def generatePassword(pwLength, charArray)

    len = charArray.length

    (1..pwLength).map do

      charArray[rand(len)]

    end.join

  end
  def chooseCharset(includeSpecialCharacters)

    if includeSpecialCharacters

      @charSets.first

    else

      @charSets.last

    end

  end
  def create

    super

    show(PLACEMENT_SCREEN)

  end

end
if __FILE__ == $0

  FXApp.new do |app|

    charSets = [ALL_POSSIBLE_CHARS, NUMBERS + ALPHABET_LOWER + ALPHABET_UPPER]

    PasswordGenerator.new(app, charSets)

    app.create

    app.run

  end

end
You can also obtain this code from from our GitHub repo.
Conclusion
I hope that in this article I’ve been able to give you a comprehensive overview of how FXRuby works and demonstrate the ease with which you can create a cross-platform graphical user interface in the language you love. I’d like to finish by presenting several resources which have helped me enormously when using this library:
- FXRuby – Create Lean and Mean GUIs with Ruby, by Lyle Johnson (creator of FXRuby) – http://pragprog.com/book/fxruby/fxruby
- FXRuby on github – https://github.com/larskanis/fxruby (Lars Kanis is the current maintainer)
- FXRuby’s documentation – http://rubydoc.info/github/larskanis/fxruby/1.6/frames
- The FXRuby mailing list (low traffic, but a good place to ask questions) – http://rubyforge.org/mail/?group_id=300
Frequently Asked Questions about FXRuby
What is FXRuby and how does it work?
FXRuby is a highly object-oriented toolkit for Ruby that provides an interface for creating rich client applications for the desktop. It is built on top of the FOX toolkit, a C++ library for graphical user interface development. FXRuby translates the FOX library’s functionalities into a Ruby-friendly format, allowing developers to create GUI applications using Ruby syntax. It offers a wide range of widgets for developing applications, including buttons, text fields, sliders, and more.
How can I install FXRuby on my system?
FXRuby can be installed using RubyGems, a package manager for the Ruby programming language. You can install FXRuby by running the command ‘gem install fxruby’ in your terminal. Ensure that you have RubyGems installed on your system before attempting to install FXRuby.
Can I use FXRuby to develop cross-platform applications?
Yes, FXRuby is a cross-platform toolkit. It allows you to develop applications that can run on various operating systems including Windows, macOS, and Linux. This makes it a versatile choice for developers looking to reach a wide audience.
What are some of the key features of FXRuby?
FXRuby offers a wide range of features for GUI development. These include a rich set of widgets, support for 2D graphics and image manipulation, drag-and-drop functionality, and support for timers and idle processing. It also provides a layout manager for automatic widget placement and resizing.
How does FXRuby compare to other Ruby GUI toolkits?
FXRuby stands out for its ease of use, extensive feature set, and cross-platform compatibility. While other toolkits like Tk and Gtk2 are also popular, FXRuby’s object-oriented approach and Ruby-friendly syntax make it a preferred choice for many developers.
Are there any resources for learning FXRuby?
There are several resources available online for learning FXRuby. The official FXRuby website provides a comprehensive guide and API documentation. Additionally, there are numerous tutorials and example projects available on platforms like GitHub and YouTube.
Can I use FXRuby with other Ruby libraries and gems?
Yes, FXRuby can be used in conjunction with other Ruby libraries and gems. This allows you to leverage the capabilities of other libraries while developing your GUI applications.
How can I contribute to the FXRuby project?
FXRuby is an open-source project, and contributions are welcome. You can contribute by reporting bugs, suggesting new features, or submitting pull requests on the project’s GitHub page.
What kind of applications can I build with FXRuby?
With FXRuby, you can build a wide range of desktop applications. This includes everything from simple utility apps to complex software with multiple windows and advanced functionalities.
Is FXRuby actively maintained?
Yes, FXRuby is actively maintained. Updates and bug fixes are regularly released to ensure the toolkit remains reliable and up-to-date. You can follow the project’s GitHub page for the latest updates.

