

With the release of version 4.3, WordPress introduced Site Icons, which allows users to define an icon that represents their website. As often occurs, this new concept has an associated API.
This article will delve into Site Icons, beginning by defining what they are. Then, we will play with this brand new API, which is essentially composed of four functions and two filters. This doesn’t sound like much, but you’ll see that it is definitely enough!
Key Takeaways
- WordPress 4.3 introduced Site Icons, allowing users to define an icon that represents their website, essentially serving as the website’s favicon.
- Site Icons can be defined using the Theme Customizer, under the ‘Site Identity’ menu option. The recommended size for the image is at least 512 pixels wide and tall.
- WordPress provides four functions in the Site Icon public API: has_site_icon(), get_site_icon_url(), site_icon_url(), and wp_site_icon(). These functions allow users to check if a Site Icon is set, retrieve the Site Icon URLs, and echo the meta tags.
- Users can define their own Site Icon sizes using two new filters available with WordPress 4.3: site_icon_image_sizes and site_icon_meta_tags. These filters allow users to indicate the sizes they need for the Site Icon and to display the new tags.
What Is a Site Icon?
Good news: if you’ve worked with the web for a while, then you probably already know what a Site Icon is. In fact, it is just the name WordPress has given to an icon we all know well: the favicon.
A favicon is the image displayed on the browser’s tab when your website is opened. In addition, when you save a shortcut to a webpage on the home screen of your smartphone, your mobile OS uses your favicon so that the same generic icon is not displayed for every website.
Once set up, the Site Icon will also be displayed on your administration panel, which was, until now didn’t have a favicon.
By defining a Site Icon, you therefore define your website’s favicon. The good news is that, as a user or a theme developer, you don’t have to do anything to activate the feature. In fact, the display of the Site Icon is activated by default in WordPress 4.3: the call for the right function is done when the wp_head action occurs and every theme must call this action.
This means one thing: if you want to try what we do in this article, you can do it without changing your current theme. The only thing you must do before following this tutorial is update your WordPress installation to version 4.3 (see our article about updating your WordPress installation if you haven’t already done so.
How To Define a Site Icon
Defining a new Site Icon can be achieved by using the Theme Customizer. You have two ways to access this customizer:
- By using the administration menu, the customizer is located in the ‘Appearance’ menu, with the second entry named ‘Customize’
- By hitting the ‘Customize’ button in the administration bar, which appears at the top of every page of your website once you are logged in (this button is new to WordPress 4.3)

The Theme Customizer consists of a preview of your website, with a sidebar on the left allowing you to customize some details. For the purposes of this tutorial, we’re interested in the ‘Site Identity’ menu option.
If you have already used the Theme Customizer, you might have noticed a change: the ‘Site Title & Tagline’ menu option has been replaced by ‘Site Identity’. This new name reflects the changes made to this menu option: you can now set not only your site’s title and tagline, but also its Site Icon.
If it’s the first time you have played with Site Icons, WordPress will show you the text ‘No file selected’ and you will be able to select an image to use as your Site Icon by hitting the ‘Select File’ button right below.
![]()
A media window will then be opened. You already know this window, as it is the same as you see everywhere you can select a media file. You can select an already uploaded image, or you can upload a new one. To ensure you have a good image quality in every context, you should upload an image which is, according to WordPress, “at least 512 pixels wide and tall”.
Once you’ve selected your image, you can choose to crop it and only select the square to really use as your Site Icon. Note that cropping this image won’t alter the original file, so you can crop it without worrying about the display of your original file, if you chose an existing image file.
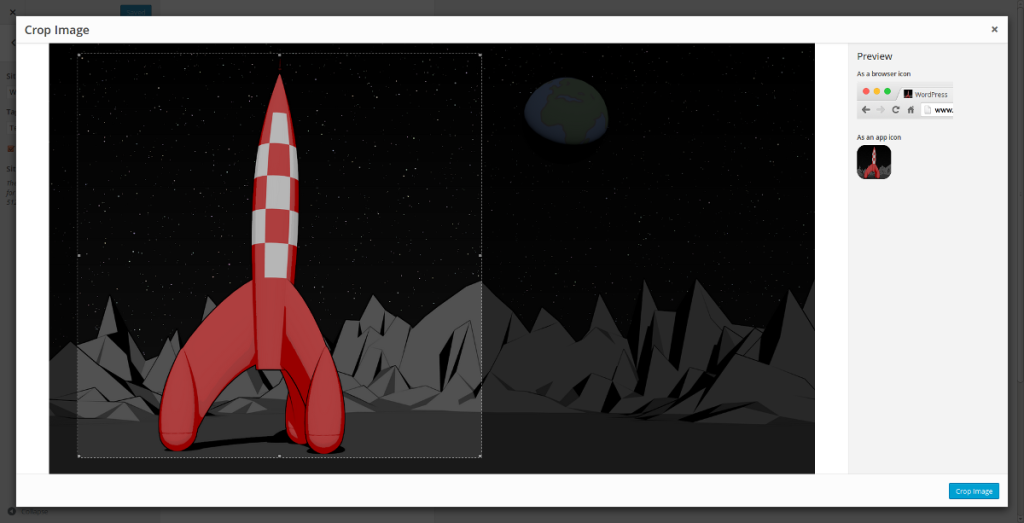
Next, once you’ve selected the square that you want to use, hit the ‘Crop Image’ button in the bottom right corner of the window and wait for the magic to happen!
WordPress will automatically resize your image to the dimensions that needs (for example, WordPress will create a 512 pixels wide square, even if your image is smaller than 512 pixels).
To save the change you just made, hit the ‘Save & Publish’ button at the top of the Theme Customizer. Now you should see your brand new favicon on every page of your website.
You can remove and change the Site Icon at any stage, by using the Theme Customizer.
![]()
Retrieving the Current Site Icon
Retrieving your current site icon is all automatic. As a theme or plugin developer, you don’t have to worry about the Site Icon for its basic usage: once the image is selected, WordPress will automatically display it as a favicon.
However, if you need to retrieve the current Site Icon for any reason in your theme or your plugin, it’s possible. For example, if you’re developing a theme, you can show your own favicon manager in an administration panel if the user hasn’t defined a Site Icon (you can also redirect them to the Theme Customizer).
WordPress Site Icon Functions API
At the moment, WordPress provides four functions in the Site Icon public API. We will review each of them.
Knowing If a Site Icon Is Set
The first function we’ll see is has_site_icon(). As its name suggests, this function allows you to see whether a Site Icon is set. That way you can indicate to your users to set a Site Icon.
This function returns a boolean: true if a Site Icon is set, false otherwise.
if (has_site_icon()) {
    // User set a Site Icon, do something awesome!
}
else {
    // User didn't set a Site Icon, do something else. But still awesome.
}
Retrieving the Site Icon URLs
WordPress provides two functions that enable us to retrieve the current Site Icon URLs: get_site_icon_url() and site_icon_url(). As we said above, WordPress generates several files in different sizes for a Site Icon. That’s why there is no error in the title of this part: there are several URLs we can retrieve.
We will begin with get_site_icon_url(). It can be used without a parameter: it will then return the current Site Icon, in its 512 pixels size.
if (has_site_icon())
    echo '<img src="' . get_site_icon_url() . '" alt="Site Icon" />';
But, we can also pass to this function three parameters. All of them are optional.
The first parameter is the ID of the blog on which you want the Site Icon; this is useful when Multisite is enabled. By default, this parameter is set to null and the current site is retrieved. In most cases, that’s the behavior we want, so you can continue to pass null as the first parameter.
The second parameter is more interesting, as it defines the wanted size for the Site Icon. You can indicate any size you want, but remember that WordPress won’t generate a new image for you: it will instead return the lower size, which is greater than the value you indicated if you indicated a value lower than 512. If you indicated a value greater or equal than 512, it will always return the 512 pixel version of the image.
For example, the following won’t display a 200 pixels wide image, but will instead display a 270 pixel wide version (with the default generated sizes).
if (has_site_icon())
echo '<img src="' . get_site_icon_url(null, 200) . '" alt="Site Icon" />';
Finally, the third parameter is the URL of the image you want to see if no Site Icon is found. It’s a good way to define a fallback URL without having to test by ourselves if the returned URL is empty or not.
The second function we can cite when we talk about retrieving a Site Icon is site_icon_url(). It echoes the URL of the current Site Icon, retrieved with get_site_icon_url(). It can be used in the same way.
Echoing the Meta Tags
The last function we’ll look at is the one used by WordPress during the wp_head action: it directly echoes all the meta tags needed to indicate to the browser (or the OS on a smartphone) the available sizes for the favicon. This function is wp_site_icon() and it does not accept any parameter.
// We should be in the head tag
wp_site_icon();
Defining Your Own Site Icon Sizes
By default, WordPress generates several sizes when you crop your Site Icon. It uses four different sizes for generating the meta tags:
- A 32 pixels wide image for the classic favicon (in a browser)
- A 180 pixels wide image for using as app icon in iOS
- A 192 pixels wide image for using as Android or Chrome app icon
- A 270 pixels wide image for using as a tile in Windows.
The four corresponding meta tags are all generated in the wp_site_icon() function, but what if you want to add your own sizes?
It is possible to add your own sizes, thanks to two new filters, available with WordPress 4.3 and dedicated to the Site Icon API.
The first filter is named site_icon_image_sizes and can be used to indicate the sizes you need for the Site Icon in your theme or plugin. The callback function must except for one parameter: an array containing the current sizes, which will be generated. It must return an array containing the sizes to generate (you can override the existing array, but you should just add your own).
function add_my_site_icon_sizes($sizes) {
    $sizes[] = 64;

    return $sizes;
}
add_filter('site_icon_image_sizes', 'add_my_site_icon_sizes');
Without using them, adding new sizes is useless. That’s why we find a second filter: site_icon_meta_tags, called when WordPress generates the meta tags corresponding to the Site Icon (in wp_site_icon()).
For this filter, your callback function must except for an array containing all the current meta tags and must return the new tags to display. Once again, if you can override the existing array, you shouldn’t do this (unless you really think that the tags generated by default are useless).
function add_my_site_icon_meta_tags($tags) {
    $tags[] = sprintf('<link rel="icon" href="%s" sizes="64x64" />', esc_url(get_site_icon_url(null, 64)));

    return $tags;
}
add_filter('site_icon_meta_tags', 'add_my_site_icon_meta_tags');
In Conclusion
With four functions and two filters, the WordPress Site Icon API is not as extensive as some other APIs, but you can see that a range of options is covered, from generating your own icon sizes, through to displaying them.
That being said, you shouldn’t use this API to display any images other than the favicon; this is not the purpose for which it has been built, and as wp_site_icon() is called by default, some side effects could be observed.
You can retrieve the filters used in this article in a little plugin available right here(broken link). Note that this example is freely inspired from the one provided by the WordPress team to introduce us to this new API.
Frequently Asked Questions (FAQs) about WordPress Site Icon API
What is the WordPress Site Icon API and why is it important?
The WordPress Site Icon API is a feature that allows you to set a site icon or favicon for your WordPress website. This icon is used as a browser and app icon for your site. It’s important because it helps to brand your website and make it easily recognizable in browser tabs, bookmarks, and mobile apps. It enhances your site’s professional look and feel, and contributes to a better user experience.
How do I use the WordPress Site Icon API?
To use the WordPress Site Icon API, navigate to the Customizer in your WordPress dashboard. Under the ‘Site Identity’ section, you can upload your site icon. The recommended size for the site icon is 512 x 512 pixels. Once uploaded, WordPress will use this icon as your site’s favicon and app icon.
Can I use custom icons with the WordPress Site Icon API?
Yes, you can use custom icons with the WordPress Site Icon API. You can upload your own image in the ‘Site Identity’ section of the Customizer. The image should ideally be square and at least 512 x 512 pixels for the best results.
What file formats are supported by the WordPress Site Icon API?
The WordPress Site Icon API supports most common image file formats, including .jpg, .png, and .gif. However, for the best results, it’s recommended to use a .png file as it supports transparency and tends to look sharper and more professional.
How do I change the site icon using the WordPress Site Icon API?
To change the site icon, go to the Customizer in your WordPress dashboard and navigate to the ‘Site Identity’ section. Here, you can remove the current site icon and upload a new one. Remember to click ‘Save & Publish’ to apply the changes.
Why isn’t my site icon showing up after setting it through the WordPress Site Icon API?
If your site icon isn’t showing up, it could be due to a caching issue. Try clearing your browser’s cache and reloading the page. If the problem persists, check the size and format of your image. The recommended size is 512 x 512 pixels and the image should be in .png, .jpg, or .gif format.
Can I use the WordPress Site Icon API on a multisite network?
Yes, the WordPress Site Icon API can be used on a multisite network. Each site in the network can have its own site icon, which can be set in the ‘Site Identity’ section of the Customizer.
Is it possible to add a site icon without using the WordPress Site Icon API?
Yes, it’s possible to add a site icon without using the WordPress Site Icon API. You can manually add a favicon to your site by uploading an .ico file to your site’s root directory and adding a link to it in your site’s header. However, using the WordPress Site Icon API is much simpler and more convenient.
How does the WordPress Site Icon API affect SEO?
While the site icon itself doesn’t directly affect SEO, it contributes to a better user experience, which is a factor in SEO. A unique and recognizable site icon can help users easily identify your site in browser tabs and bookmarks, potentially increasing click-through rates and reducing bounce rates.
Can I use the WordPress Site Icon API with any WordPress theme?
Yes, the WordPress Site Icon API is a core feature of WordPress and can be used with any WordPress theme. However, some themes may have their own methods for setting a site icon, so it’s recommended to check your theme’s documentation.

