Writing WordPress themes and plugins to be publicly distributed requires meeting minimum system requirements, specifically PHP 5.2.4. Since WordPress supports PHP 5.2.4 so must your public plugins and themes. PHP has changed immensely between PHP 5.2 and now PHP 7 RC.
To ensure your software is compatible with all of the WordPress community it’s important to test your software in a few major PHP versions, i.e. 5.2.4, 5.6, and 7.0 RC. We could of course test more versions, but picking three major ones is a safe bet.
How do we test our plugin or theme in three major versions of PHP? Generally, our system can only run one version of PHP at a time. We could spin up different virtual machines with different PHP versions, however this is pretty difficult. The answer is containers with Docker.
Dockunit is a utility for running containerized software tests. Let’s setup Dockunit to be used with a plugin or theme (this guide assumes you are working on some sort of Unix system such as OS X or Ubuntu):
Dockunit Setup
1. Download and install Dockunit and it’s dependencies.
First, install Docker via their simple installation instructions. Next, we need Node.js and npm (which should be included in your Node.js install).
Finally, install Dockunit:
npm install -g dockunit2. Setup your project for Dockunit.
Dockunit reads Dockunit.json files within your project. Dockunit.json describes the containers you want to use and how you want to run test commands. Our Dockunit.json file will define containers for PHP 5.2, 5.6, and 7.0 RC 1 since we are most concerned about those PHP version. Dockunit has no limitations; we could define containers for different MySQL versions, different WordPress versions, Apache vs. nginx, our completely different programming languages unrelated to WordPress. One of the big advantages of Dockunit over something like Travis CI is that we can create the containers we use ourselves, and we can run tests in the containers locally.
Create a file named Dockunit.json in the root of our plugin or theme.
If you are testing a plugin, paste this into Dockunit.json (make sure to change PLUGIN-NAME.php to the main plugin file in your plugin):
{
"containers": [
{
"prettyName": "PHP-FPM 5.2",
"image": "dockunit/prebuilt-images:php-mysql-phpunit-wordpress-5.2-fpm",
"beforeScripts": [
"service mysql start",
"wp-install latest"
],
"testCommand": "wp-activate-plugin PLUGIN-NAME.php"
},
{
"prettyName": "PHP-FPM 5.6",
"image": "dockunit/prebuilt-images:php-mysql-phpunit-wordpress-5.6-fpm",
"beforeScripts": [
"service mysql start",
"wp core download --path=/temp/wp --allow-root",
"wp core config --path=/temp/wp --dbname=test --dbuser=root --allow-root",
"wp core install --url=http://localhost --title=Test --admin_user=admin --admin_password=12345 --admin_email=test@test.com --path=/temp/wp --allow-root",
"mkdir /temp/wp/wp-content/plugins/test",
"cp -r . /temp/wp/wp-content/plugins/test"
],
"testCommand": "wp plugin activate test --allow-root --path=/temp/wp"
},
{
"prettyName": "PHP-FPM 7.0",
"image": "dockunit/prebuilt-images:php-mysql-phpunit-wordpress-7.0-rc-1-fpm",
"beforeScripts": [
"service mysql start",
"wp core download --path=/temp/wp --allow-root",
"wp core config --path=/temp/wp --dbname=test --dbuser=root --allow-root",
"wp core install --url=http://localhost --title=Test --admin_user=admin --admin_password=12345 --admin_email=test@test.com --path=/temp/wp --allow-root",
"mkdir /temp/wp/wp-content/plugins/test",
"cp -r . /temp/wp/wp-content/plugins/test"
],
"testCommand": "wp plugin activate test --allow-root --path=/temp/wp"
}
]
}
If you are testing a theme, paste this into Dockunit.json:
{
"containers": [
{
"prettyName": "PHP-FPM 5.2 WordPress Latest",
"image": "dockunit/prebuilt-images:php-mysql-phpunit-wordpress-5.2-fpm",
"beforeScripts": [
"service mysql start",
"wp-install latest"
],
"testCommand": "wp-activate-theme test"
},
{
"prettyName": "PHP-FPM 5.6 WordPress Latest",
"image": "dockunit/prebuilt-images:php-mysql-phpunit-wordpress-5.6-fpm",
"beforeScripts": [
"service mysql start",
"wp core download --path=/temp/wp --allow-root",
"wp core config --path=/temp/wp --dbname=test --dbuser=root --allow-root",
"wp core install --url=http://localhost --title=Test --admin_user=admin --admin_password=12345 --admin_email=test@test.com --path=/temp/wp --allow-root",
"mkdir /temp/wp/wp-content/themes/test",
"cp -r . /temp/wp/wp-content/themes/test"
],
"testCommand": "wp theme activate test --allow-root --path=/temp/wp"
},
{
"prettyName": "PHP-FPM 7.0 WordPress Latest",
"image": "dockunit/prebuilt-images:php-mysql-phpunit-wordpress-7.0-rc-1-fpm",
"beforeScripts": [
"service mysql start",
"wp core download --path=/temp/wp --allow-root",
"wp core config --path=/temp/wp --dbname=test --dbuser=root --allow-root",
"wp core install --url=http://localhost --title=Test --admin_user=admin --admin_password=12345 --admin_email=test@test.com --path=/temp/wp --allow-root",
"mkdir /temp/wp/wp-content/themes/test",
"cp -r . /temp/wp/wp-content/themes/test"
],
"testCommand": "wp theme activate test --allow-root --path=/temp/wp"
}
]
}
(OPTIONAL: If you have written actual unit/integration tests for your WordPress plugin or theme, you should run those. Here are some example Dockunit.json files for running unit/integration tests)
Let’s run through what some of the things mean in Dockunit.json. The files are written in JSON which is JavaScript object notation. All Dockunit.json files contain a root level object with a property ‘containers’ which holds an array of objects that each describe a test to be run in a Docker container. The idea is for containers to be different real life simulations of your software so you can see how it performs in different scenarios. Here is an example container object:
{
"prettyName": "My container pretty name",
"image": "docker-image-ref",
"beforeScripts": [
"before-command-1",
"before-command-2"
],
"testCommand": "my-command"
}
prettyName is just an easy way for you to describe your container which will be useful in build output. image refers to a Docker Hub image. Dockunit comes with a bunch of predefined images that you can use, however you can always create your own. beforeScripts allows you to run commands in the Docker container before the test command is run. testCommand is the command whose exit code will be evaluated to determine whether your software “passes” or not.
Now that we’ve setup our Dockunit.json file, let’s run our tests. From within the root of your project, run the command in your terminal:
dockunitFor each container you’ve defined, it will run the test command and evaluate the exit codes. If all your containers exited without error, then your build passed! If not, there is a problem with your code or how you setup Dockunit. The output should tell you which container failed. You can provide the --du-verbose option to dockunit to get even more information.
Now that we’ve setup our Dockunit.json file and done a test run, push our repository with Dockunit.json to our remote (GitHub for the purposes of this tutorial).
Continuous Integration with Dockunit.io
Once we’ve setup Dockunit in a GitHub repository, we can set up continuous integration so Dockunit tests are run on each pull request and push to the repo. If Pull Request or Push fails, a failed status will be shown on GitHub so we can fix our software.
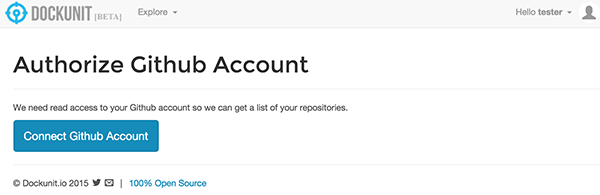
1. Create an account on Dockunit.io.
2. Go to projects and integrate your account with GitHub:
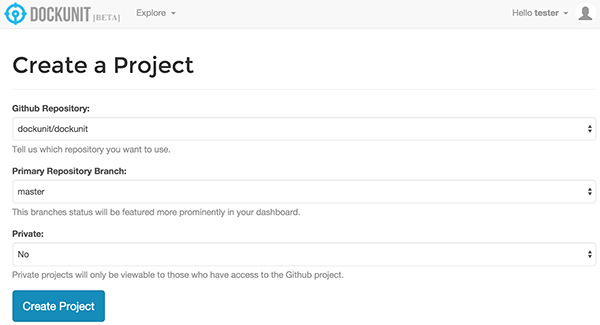
3. Within Dockunit.io, create a project for your GitHub repository:
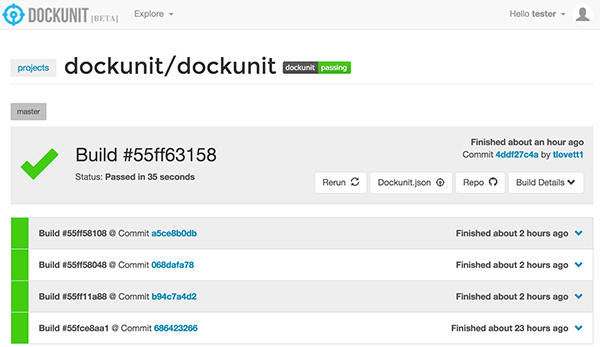
4. That’s it! You can now see the build status of your project. It will update automatically when you push to GitHub:
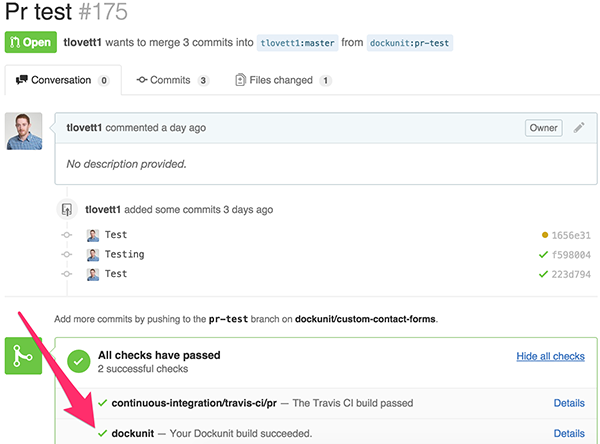
5. Within GitHub, you can see the Dockunit build status within each Pull Request:
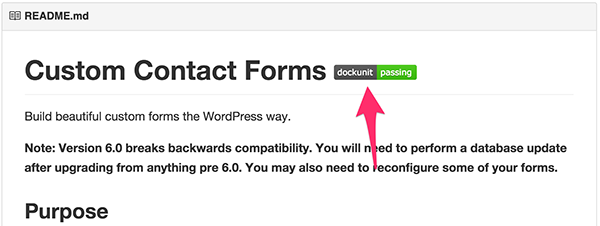
6. Don’t forget to add the Dockunit.io badge to your README.md to show people you are thoroughly testing your software:
![]()
Conclusion
Dockunit testing in combination with Dockunit.io continuous integration is a very powerful tool for ensuring your software works well cross-platform.
The versatility of Dockunit is endless since it relies on Docker – literally you can test any programming language against any platform; not just WordPress. Using Dockunit also makes testing easy for distributed teams since rather than relying on each developer to set up their local environment properly, you are relying on fixed Docker containers.
 Taylor Lovett
Open source web technologies engineer and enthusiast. Lover of all things Node.js and WordPress. Creator of Dockunit and Dockunit.io. Director of Web Engineering at 10up. Currently residing in Washington DC building cool things on the web.