 The Warp tool lets you distort into a wide variety of shapes, such as a wave, a fisheye or a bulge. The cool thing about it is the text is still editable after you apply the warp. The warp style you select is an attribute of the type layer – you can change a layer’s warp style at any time to change the overall shape of the warp. Let’s take a very simple example of how to use the tool.
1. Open up an image that you want to add some text to, or just create a new document if you’re making a text only image. I’m using a stock image of a runner’s leg.

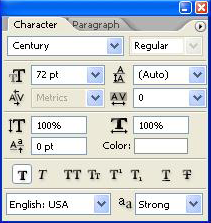
2. Select the Horizontal Type tool (![]() ), and in the Character palette set your type options. I chose Century as the typeface, 72 pt as the size and white as the color.
), and in the Character palette set your type options. I chose Century as the typeface, 72 pt as the size and white as the color.

3. Click anywhere on the upper left side of the image to add some text. I typed “Running”. Then click the Commit Any Current Edits button (![]() ) on the tool options bar to finish the text.
) on the tool options bar to finish the text.
The words appear on the image and a new layer, Running appears in the Layers palette.
Select the Horizontal Type tool again and type “Away” in the lower right corner of the image. Then commit the type.
4. Click on the Running layer in the Layers palette to make sure it is selected and then click on the Create Warp Text button on the options bar at the top of the screen.

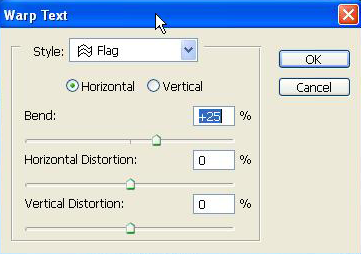
The Warp Text dialog box opens.
5. In the Warp Text dialog box, choose Style > Flag and click the Horizontal radio button. For Bend, specify +25%. Then click OK.

The words “Running” will appear to ruffle like a flag in the wind.
Repeat steps 4 and 5 for the “Away” layer.

And there you have it, very simple and fast. Like many effects in Photoshop, moderation is the key, but this is a handy little tool if you want to distort text while still keeping it editable.
Frequently Asked Questions (FAQs) about Warping Type in Photoshop
How can I warp text in Photoshop without distorting the quality?
Warping text in Photoshop without distorting the quality requires a careful approach. First, ensure that your text layer is selected. Then, go to the top menu and select “Edit” then “Transform” and finally “Warp”. A grid will appear over your text. You can now click and drag the handles to warp your text as desired. Remember to hold the shift key while dragging to maintain the proportions and avoid distortion. Once you’re satisfied with the warp, press Enter to apply the changes.
Can I warp text in Photoshop Elements?
Yes, you can warp text in Photoshop Elements. The process is similar to the standard Photoshop version. Select your text layer, go to “Image” then “Transform” and finally “Warp”. You can then manipulate the text as desired. However, Photoshop Elements may not have as many warp options as the full Photoshop version.
What are some creative ways to use the warp text feature in Photoshop?
The warp text feature in Photoshop can be used in numerous creative ways. For instance, you can use it to create a wave effect, make text follow a circular path, or even create a 3D illusion. The possibilities are endless and only limited by your imagination.
How can I undo a warp in Photoshop?
If you’re not satisfied with the warp effect, you can easily undo it. Simply go to “Edit” and then “Undo Warp”. Alternatively, you can press Ctrl+Z (or Command+Z on a Mac) to undo the last action.
Can I warp multiple layers of text at once in Photoshop?
Yes, you can warp multiple layers of text at once in Photoshop. To do this, you need to first select all the text layers you want to warp. You can do this by holding down the Shift key and clicking on each layer. Once all the layers are selected, you can then go to “Edit” then “Transform” and finally “Warp” to warp all the selected layers at once.
Why can’t I warp my text in Photoshop?
If you’re unable to warp your text in Photoshop, it could be because the text layer is locked or because the text has been rasterized. Ensure that the text layer is unlocked and that the text has not been rasterized before trying to warp it.
Can I save my warp settings in Photoshop for future use?
Unfortunately, Photoshop does not currently allow you to save warp settings for future use. However, you can save the warped text as a custom shape for future use.
How can I warp text along a path in Photoshop?
To warp text along a path in Photoshop, you first need to create a path using the Pen tool. Once the path is created, select the Text tool and click on the path. You can then type your text and it will follow the path. You can adjust the path as needed to achieve the desired warp effect.
Can I warp text in Photoshop without rasterizing it?
Yes, you can warp text in Photoshop without rasterizing it. In fact, it’s recommended to warp text without rasterizing it to maintain the text’s editability and quality.
How can I warp text into a shape in Photoshop?
To warp text into a shape in Photoshop, you first need to create the shape using the Shape tool. Once the shape is created, select the Text tool and click inside the shape. You can then type your text and it will take on the shape. You can adjust the shape as needed to achieve the desired effect.
Jennifer Farley is a designer, illustrator and design instructor based in Ireland. She writes about design and illustration on her blog at Laughing Lion Design.


