
In part 1, we discussed the basics of setting up a security system in our app (database and security.yml settings). We also covered the pre-registration stage where a user verifies their invitation status with the app.
![]()
In this article, we will talk about registration, logins and post-login actions.
Key Takeaways
- Symfony2 Registration and Login process involves creating a form for user input, mapping the form inputs to a user object, and persisting the user object in the user table. This is achieved by declaring a special form type class associated with an entity, such as RegistrationType.
- The RegistrationType class manages which fields to display and map, and any table field not added will not be displayed and thus not be populated by the user. It also allows for certain user properties to be set by the app, such as the creation date/time.
- After a successful registration, the user’s information is processed, a user object is created, and properties not populated by the user are assigned. The plain text password input by the user is hashed by the app for security.
- The login process is simple, with the action of the login form pointing to /login_check. The login form must include two inputs named “_username” and “_password” as required by Symfony’s security system.
- After a successful login, the user’s last login date and time are updated. This requires access to the user object, the entity manager, and the HTTP request. Symfony’s security control interface does not provide an intuitive way to allow the app to do some post-login actions, so tweaks must be made to the app.
Form, database, and more
Registration is done through a form. The user will enter information like email, user name, password, confirmed password, and accept a disclaimer in some cases.
We also know that a user object will ultimately be persisted in the user table.
During this persistence process, we must be aware that:
- Some form input will be used in populating a user object (like
username,password); - Some user properties will be set by the app (like
created, a date/time field to store when the user registers); - Some form inputs are merely for verification and discarded (like retyped password, a check on the disclaimer).
We must have a way to create a “link” between a form and the underlying table, and specify the above requirements.
In Symfony, we achieve this by declaring a special form type class associated with an entity. In this case, a RegistrationType manages which fields to display, which fields are mapped (to a field), etc.
This class (RegistrationType) is defined in src/AppBundle/Form/Type/RegistrationType.php:
class RegistrationType extends AbstractType

{
    public function buildForm(FormBuilderInterface $builder, array $options)

    {

        $builder->add('username', 'text', ['label'=>'User Name'])

                ->add('password', 'password',['label'=>'Password'])

                ->add('confirm', 'password', ['mapped' => false,'label'=>'Re-type password'])

                ->add('homepage', 'text',['label'=>'Homepage'])

                ->add('email', 'hidden', ['label'=>'email'])

                ->add('save', 'submit', ['label'=>'Register'])

        ;

    }
    public function getName()

    {

        return 'registration';

    }
    public function setDefaultOptions(OptionsResolverInterface $resolver)

    {

        $resolver->setDefaults([

            'data_class' => 'AppBundle\Entity\User',

        ]);

    }
}
We have several ->add() calls that add a form field to be displayed and mapped to the underlying table field; or a form field to be displayed but not mapped to the underlying table field. Any table field not added will not be displayed and thus not be populated by the user.
Let’s take a look at some examples:
add('username', 'text', ['label'=>'User Name'])
This adds a form field of text type, mapping to table field username, that has a label ‘User Name’.
add('confirm', 'password', ['mapped' => false,'label'=>'Re-type password'])
This adds a form field of password type, but is not mapped to a table field, and has a label ‘Retype password’.
add('email', 'hidden', ['label'=>'email'])
This adds a hidden form field, mapping to table field email. The label setting here is useless but there is no harm in having it there.
Once the RegistrationType is defined, we can move on to the real registration (after pre-registration passes):
$registration = new User();
$form         = $this->createForm(new RegistrationType(), $registration, ['action' => $this->generateUrl('create'), 'method' => 'POST']);
return $this->render('AppBundle:Default:register2.html.twig', ['form' => $form->createView(), 'email' => $email]);
We created a new user instance, and then used createForm to create a form (with added action and method attributes) with the constraints and manifestations declared in RegistrationType which is associated with the user object ($registration).
Finally, we display the registration form.
Rendering a form in a view template
The rendered registration form looks like this:
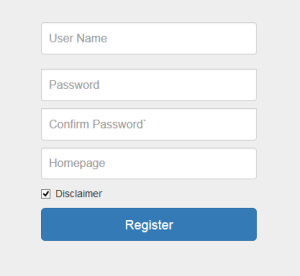
The code to render the form is like this:
<form class="form-signin" name='register_form' id='register_form' method='post' action='{{path('create')}}'>

	{{ form_widget(form.username, {'attr': {'class': 'form-control', 'placeholder':'User Name'}}) }}<br>
    {{ form_widget(form.password, {'attr': {'class': 'form-control', 'placeholder':'Password'}}) }}
    {{ form_widget(form.confirm, {'attr': {'class': 'form-control', 'placeholder':'Confirm Password'}}) }}
    {{ form_widget(form.homepage, {'attr': {'class': 'form-control', 'placeholder':'个人主页'}}) }}
    {{ form_widget(form.email, {'attr': {'value': email}}) }}
    <div class="checkbox">

        <label>

            <input type="checkbox" value="remember-me" required checked>Disclaimer

        </label>

    </div>

    <button class="btn btn-lg btn-primary btn-block" type="submit">Register</button>

</form>
I have to confess that to display a form created by the above process is not an easy job. Luckily, Twig provides a few helper functions for us to customize this rendered form.
{{ form_widget(form.password, {'attr': {'class': 'form-control', 'placeholder':'Password'}}) }}
Using the form_widget helper, the first parameter passed in is the form field (password). The more important part is the second parameter, which further defines the rendered HTML5 element. In the above code, we specified that the <input> element for password should have a CSS class form-control (which is a Bootstrap form class) and has a placeholder.
Note that we did not specify which type this form field should be – it should be a password field as we are to input a password. The form_widget is smart enough (or more precisely, $form = $this->createForm(...) is smart enough) to create form elements based on their respective definition in the RegistrationType declaration.
Creating the user
When the user clicks the “Register” button, the information will be processed further and if all goes well, a user will be created.
    public function createAction(Request $req)

    {

        $em   = $this->getDoctrine()->getManager();

        $form = $this->createForm(new RegistrationType(), new User());

        $form->handleRequest($req);
        $user= new User();

        $user= $form->getData();
        $user->setCreated(new \DateTime());

        $user->setRoles('ROLE_USER');

        $user->setGravatar('http://www.gravatar.com/avatar/'.md5(trim($req->get('email'))));

        $user->setActive(true);
        $pwd=$user->getPassword();

        $encoder=$this->container->get('security.password_encoder');

        $pwd=$encoder->encodePassword($user, $pwd);

        $user->setPassword($pwd);
        $em->persist($user);

        $em->flush();
        $url = $this->generateUrl('login');

        return $this->redirect($url);

    }
}
In this segment of code, we will do a lot of things related to actually creating a user from a form input.
$this->createFormwill be called again to generate a form based onRegistrationType.- The form object will process the user input.
- We create an empty
Userobject and by using$form->getData(), we magically assign the form input to object properties. - We start to assign those properties not populated by the user: creation date, role, gravatar, etc.
- The user can only input their password in plain text and the app takes the responsibility of hashing it. That is exactly what these two lines of code are doing.
$encoder = $this->container->get('security.password_encoder');

$pwd = $encoder->encodePassword($user, $pwd);
Note that in these two lines, we don’t even tell the code which encoding method we are actually using. Symfony just looks for the encoder from the app configuration and hashes the plain text.
NOTE: Your outdated PHP installation might not include bcrypt. If that is the case, please use composer to install the ircmaxell/password-compat library.
NOTE: Symfony 2 form input processing and database manipulation is safe in terms that it handles all the necessary escaping to prevent from malicious inputs and SQL injections. Thus we can assign the inputs to respective fields.
Login and post login
When we do our user management as stipulated above, the login process is simple. We have already defined two routes related to login:
login:

    path: /login

    defaults: { _controller: AppBundle:Security:login}
login_check:

    path: /login_check
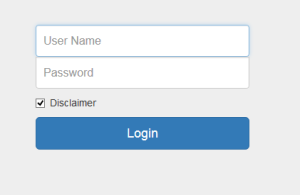
Next, we will create a template to display a basic login form:
<form class="form-signin" method='post' action='{{path('login_check')}}'>

	{% if error %}

    <div class='red'>{{ error.message }}</div><br>

    {% endif %}

    <label for="inputName" class="sr-only">User Name</label>

    <input type="text" id="inputName" name='_username' class="form-control" placeholder="User Name" required autofocus>

    <label for="inputPassword" class="sr-only">Password</label>

    <input type="password" id="inputPassword" name="_password" class="form-control" placeholder="Password" required>

    <div class="checkbox">

    	<label>

        	<input type="checkbox" value="remember-me" required checked>Disclaimer

        </label>

    </div>

    <button class="btn btn-lg btn-primary btn-block" type="submit">Login</button>

</form>
There are only 2 things to notice:
- The action of this login form must point to
{{path('login_check'}}, or/login_check. We don’t need to implement this controller. Symfony’s security system will do this for us and the default is good enough. - In our example, we are using username + password as the credentials. Thus, the two inputs in the form MUST be named “
_username” and “_password“. This is required by Symfony’s security system.
We may also notice that as we are not using a “Form type” to link the login information to the underlying user object (like we do for registration), and instead we leave this to the security interface, we constructed the form widgets all by ourselves.
That’s it. The user can now input the username and password and log in.
After a successful login, we need to be aware of a few things:
- In a controller, we can use
$this->getUser()to get the current user’s information (auserrecord in the form of aUserobject). - In Twig, we can use certain helper functions to access the user object.
As we can see in Part 1, is_granted('ROLE_ADMIN') is used to determine if the current user is in the ADMIN group.
It is quite interesting to notice that Symfony’s security control interface does not provide an intuitive way to allow the app to do some post-login actions. There is NO such thing as:
after_login:

	path: /login_after
In our app, we really need to do something after a user logs in. We need to update the user’s last login date and time (logged field). To make this simple task happen, we need to tweak our app a bit.
First, we register a service (for “after successful login event”) in service.yml:
services:

    security.authentication.success_handler:

        class: AppBundle\Handler\AuthenticationSuccessHandler

        arguments: [@security.http_utils, @service_container, {}]

        tags:

            - { name: 'monolog.logger', channel: 'security'}
Next we create a src/AppBundle/Handler/AuthenticationHandler.php file:
class AuthenticationSuccessHandler extends DefaultAuthenticationSuccessHandler

{

    protected $container;
    public function __construct(HttpUtils $httpUtils, \Symfony\Component\DependencyInjection\ContainerInterface $cont, array $options)

    {

        parent::__construct($httpUtils, $options);

        $this->container=$cont;

    }
    public function onAuthenticationSuccess(\Symfony\Component\HttpFoundation\Request $request, \Symfony\Component\Security\Core\Authentication\Token\TokenInterface $token)

    {

        $user=$token->getUser();

        $user->setLogged(new \DateTime());
        $em=$this->container->get('doctrine.orm.entity_manager');
        $em->persist($user);

        $em->flush();
        return $this->httpUtils->createRedirectResponse($request, $this->determineTargetUrl($request));

    }

}
To make a good “post-login” handler in our case, there are three things of utmost importance.
- We must get access to the user object so that we can update the user’s last login time.
- We must get access to the entity manager so that the login time can be persisted into the table.
- We must get access to the HTTP request so that after the last login time is updated, the app will still be able to redirect us to the “target” URI.
All these are accomplished via the arguments passed to the onAuthenticationSuccess handler’s constructor:
arguments: [@security.http_utils, @service_container, {}]
- The user object itself is accessible in the
onAuthenticationSuccessmethod via$token->getUser(). - The database entity manager is accessible by the service container passed in (
@service_container) and retrieved as$em = $this->container->get('doctrine.orm.entity_manager');. - The redirect is done by
$this->httpUtils->createRedirectResponse, which will refer to the parameter of@security.http_utils.
Please note that the determineTargetUrl method is called to create a redirect URI based on the $request. Normally, we may visit various URIs: the index page, or a specific link to a post. We can take a look at the implementation of this method in Symfony 2 source (project_root/vendor/symfony/symfony/src/Symfony/Component/Security/Http/Authentication/AuthenticationSuccessHandler.php):
	protected function determineTargetUrl(Request $request)

    {

        if ($this->options['always_use_default_target_path']) {

            return $this->options['default_target_path'];

        }
        if ($targetUrl = $request->get($this->options['target_path_parameter'], null, true)) {

            return $targetUrl;

        }
        if (null !== $this->providerKey && $targetUrl = $request->getSession()->get('_security.'.$this->providerKey.'.target_path')) {

            $request->getSession()->remove('_security.'.$this->providerKey.'.target_path');
            return $targetUrl;

        }
        if ($this->options['use_referer'] && ($targetUrl = $request->headers->get('Referer')) && $targetUrl !== $this->httpUtils->generateUri($request, $this->options['login_path'])) {

            return $targetUrl;

        }
        return $this->options['default_target_path'];

    }

}
It explains the logic on how eventually a target URI (normally the URI that triggers the login) is determined.
Conclusion
We just successfully covered two important aspects of application development with Symfony2:
- Registration (and Invitation)
- Login (and post login)
A recent trend in web sites is using social network credentials (G+, Facebook, etc) to ease the registration/login process. However, a pure in-house registration/login is still of critical importance for some applications. Moreover, understanding the whole flow of this registration/login process helps us understand the security system of Symfony2.
If you’d like to see more content on related points, like validation for example, or just have comments or feedback on this tutorial, please let us know!
Frequently Asked Questions (FAQs) about Symfony2 Registration and Login
How can I customize the Symfony2 registration form?
Customizing the Symfony2 registration form involves modifying the form type. You can create a new form type that extends the base registration form type and add your custom fields. Then, you need to update the registration controller to use your new form type. Remember to update your views to display the new fields.
How can I add a remember me functionality in Symfony2?
The Symfony2 security component provides a remember me functionality out of the box. You need to enable it in your security configuration file and add a remember me checkbox in your login form. The user’s login will then be remembered across sessions until they explicitly log out.
How can I handle user roles in Symfony2?
Symfony2 provides a powerful role-based access control system. You can define roles in your security configuration file and assign them to users during registration. You can then use these roles to control access to different parts of your application.
How can I customize the Symfony2 login form?
Similar to the registration form, you can customize the login form by creating a new form type that extends the base login form type. You can then add your custom fields and update your login controller and views to use the new form type.
How can I handle password encryption in Symfony2?
Symfony2 provides a built-in mechanism for password encryption. You can configure the encryption algorithm and salt in your security configuration file. The password will then be automatically encrypted when a user registers or changes their password.
How can I handle user authentication in Symfony2?
Symfony2 provides a powerful security component that handles user authentication. You can configure different authentication providers and firewalls in your security configuration file. The security component will then handle the authentication process for you.
How can I handle form validation in Symfony2?
Symfony2 provides a form validation component that you can use to validate user input. You can define validation rules in your form type and the form component will automatically validate the input when the form is submitted.
How can I handle user sessions in Symfony2?
Symfony2 provides a session management component that you can use to handle user sessions. You can start a session, store and retrieve session data, and end a session. The session component also provides a mechanism for flash messages.
How can I handle error messages in Symfony2?
Symfony2 provides a mechanism for handling error messages. You can define custom error messages in your form type and they will be displayed when the form validation fails. You can also customize the error pages that are displayed when an exception is thrown.
How can I handle user activation in Symfony2?
Symfony2 provides a mechanism for user activation. You can send an activation email to the user after registration with a unique activation link. The user can then activate their account by clicking on the link.