
Retouching images is a major part of photography and a common component of any design project. Whether you are shooting models for a print project or polishing the imagery of a landing page, there will almost always be some easy ways to transform your photos from good to great.
But, “great” can be a subjective term, especially within the realm of photography. There are a few things that you can do to ensure that the subject of a photograph looks their best. The number one rule of retouching a model is subtlety; you do not want your photos to appear Photoshopped. If the subject has a few distinct qualities that stand out in a negative way, the key is to lessen their impact, not to remove them altogether.
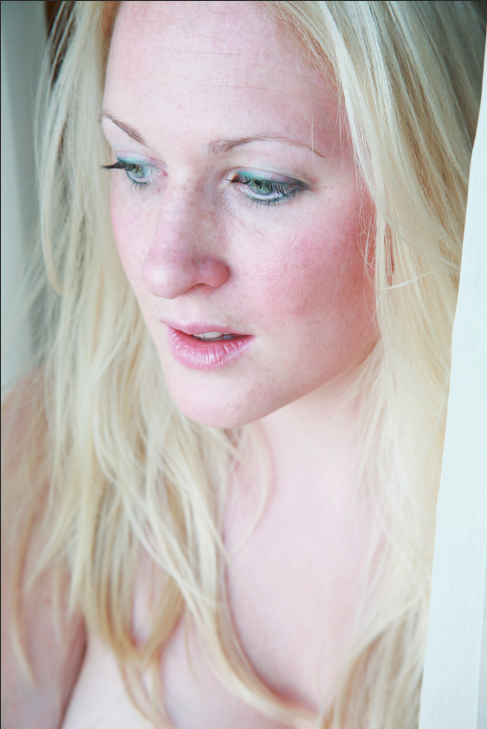
The image below can be found here. The subject’s skin has numerous blemishes, but there aren’t too many flaws that would make this image difficult to work with.

Our first step is to remove the major, unsightly blemishes. This would include pimples, scratches, and anything else that isn’t a permanent feature. To do this, select the Spot Healing Brush Tool and set the options to Create Texture. Your first instincts may be to select the ever-amazing content aware option, but this can sometimes cause problems, because it will bring in colors and samples from undesired areas. Below, I have highlighted some of the problem areas:

Simply click on the blemishes that you want to remove. Remember not to remove them all, especially permanent features, such as moles or birth marks. I left as many freckles as possible, because they are natural features. The results are shown below:
Next, we will brighten the eyes. You can do this in two ways. The first way is to select the Dodge Tool and click on the color portion of each eye. One or two single-clicks should be enough to brighten the eyes without any negative side effects. You may choose to lower the opacity of the dodge tool to 50% so that you can increase the brightness of the eyes in steady increments.

The other method is to select the Brush Tool — with white as your foreground — and select a soft edge round brush. Paint directly over the pupils of each eye, set the opacity to 20%, and the blend mode to overlay.


This should lighten the eyes without blowing out the highlight areas of the image.

Next, we are going to duplicate the original background layer by hitting Command/Ctrl + “J”. With the duplicated layer selected, right-click on the layer and select “Convert to Smart Object.” Now, when we apply filters to this layer, it will apply smart filters to the layer, allowing us to go back and edit the adjustments repeatedly.
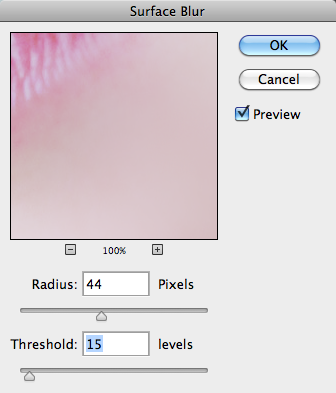
Next, apply a blur to the duplicate layer so that the skin become smoother. Go to “Filter” > “Blur” > “Surface Blur.” Set the Radius to roughly 45 pixels and the Threshold to roughly 15 levels. This should give us just the right amount of blur to soften and smooth the skin. Set the opacity of this layer to around 60-70%. The reason that we are lowering the opacity is to allow for some of the blemishes to show through, as well as some of the skin texture.

As you can see from the result above, the Surface Blur filter has done a good job of smoothing the skin, but it has also smoothed the hair and everything else in the image, almost giving things a painted look. To bring everything back into focus, use your Quick Selection tool and click and drag over the subject’s face. When you use smart filters, Photoshop creates a mask for that filter. With the selection of the woman’s face, hit Command/Ctrl + Shift + “I” to invert the selection. Then, with the Smart Filter Mask selected, fill the selection with black. This removes the smart blur filter from the hair and other areas that we don’t want to affect.

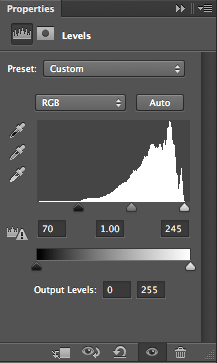
The image as a whole is washed out and could use a Levels adjustment. Go to the Layers Panel, click the new adjustment layer icon, and select Levels. In the Adjustments Panel, move the sliders on the histogram until they reach the color information. This adjustment can be a little too harsh, so we will lower the opacity of the adjustment layer to 80%.
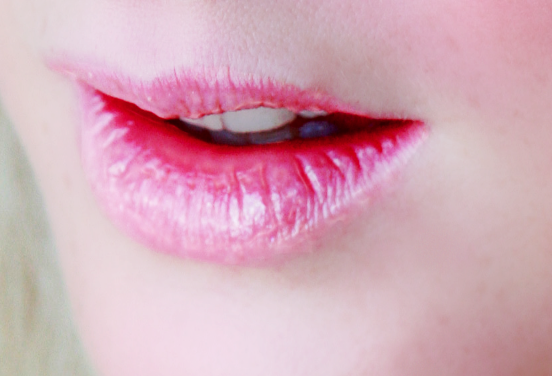
The lips are a little dull, so we will brighten those up a little. The key to remember here is subtlety. Go to your background layer and make a selection around the lips. Be sure to omit the teeth, since the effect that we are going to use will work on every selected pixel.

Hit Command/Ctrl + “J” to duplicate the selection on its own layer, and move the new layer above the blurred skin layer to make it visible.

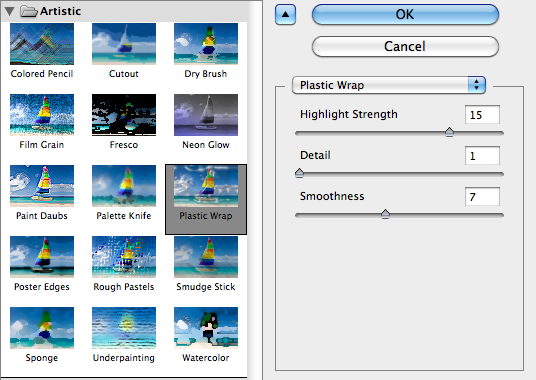
Next, we are going to run a plastic wrap filter to give the lips a naturally glossy look. Go to “Filter” > “Filter Gallery.” A large dialog box will come up with a preview of our active layer. Click “Artistic” and choose “Plastic Wrap.” Set the highlight strength to 15, the detail to 1 (which is the lowest), and smoothness to 7. Setting smoothness to the midway point will achieve a smooth, glossy appearance, while leaving ripples, like the ones you will find on wet lips.
The lips should have a glossy appearance, but the look will be too harsh and not subtle. So, set the blend mode to “Overlay” and the opacity of the layer to roughly 50%. This may be different, depending on your image.
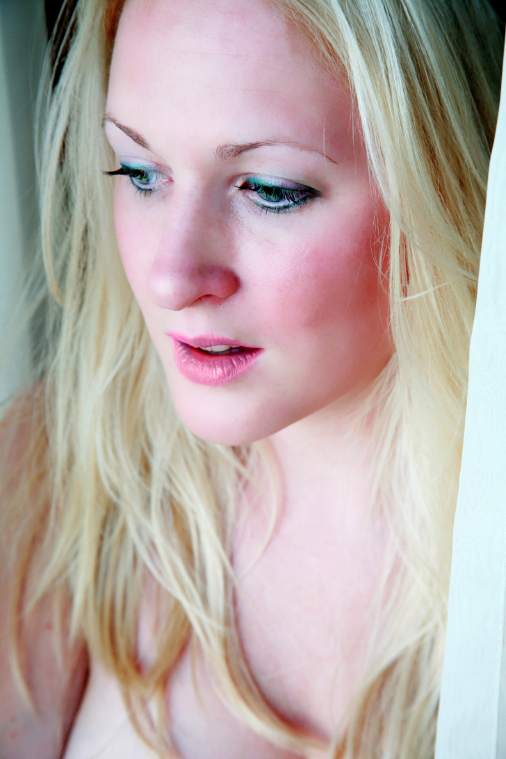
After retouching the image with subtlety, our portrait looks much more dramatic while remaining natural. The woman has relatively smooth skin, all while retaining texture within her skin. Here is the final result:

Conclusion
When working with a portrait image, it is important to follow a few guidelines. Remember to lessen certain flaws instead of eliminating them. And, lower the opacity of the blended skin layer, so that you keep some detail within the skin and avoid an ultra-smooth, clearly-Photoshopped look. If you do add color to certain areas, use the color blend mode and only add a subtle amount of color. If you follow these simple guidelines, your portraits will look clean, natural and professional.
Do you have any tips on subtle image adjustments? Do your clients prefer a natural appearance for their imagery, or do they prefer a glossy, ultra-stylized, “Photoshopped” look?
Frequently Asked Questions on Retouching a Portrait with Subtlety Using Photoshop
How can I retouch a portrait without making it look unnatural?
The key to retouching a portrait without making it look unnatural is subtlety. Start by duplicating your original layer and working on the duplicate to preserve the original image. Use the Spot Healing Brush tool to remove any blemishes or imperfections. Adjust the size of the brush to match the size of the blemish for a more natural look. For larger areas, use the Patch tool. Remember to always keep the changes subtle and not overdo it.
What are the best tools in Photoshop for retouching portraits?
Photoshop offers a variety of tools for retouching portraits. The Spot Healing Brush tool is great for removing small blemishes. The Patch tool is useful for larger areas. The Clone Stamp tool can duplicate parts of an image, and the Liquify tool can subtly reshape features. The Dodge and Burn tools can be used to lighten or darken areas of the image, adding depth and dimension.
How can I enhance the eyes in a portrait?
Enhancing the eyes can make a portrait more engaging. Use the Dodge tool to lighten the whites of the eyes. Be careful not to overdo it, as it can make the subject look unnatural. You can also use the Sponge tool to saturate the color of the eyes, making them more vibrant.
How can I smooth skin in Photoshop without losing texture?
To smooth skin without losing texture, use the Frequency Separation technique. This technique separates the color and texture of the skin, allowing you to smooth the skin tone without affecting the texture. It’s a more advanced technique, but it can provide very natural-looking results.
How can I use the Liquify tool to subtly reshape features?
The Liquify tool can be used to subtly reshape features in a portrait. Use the Forward Warp tool within Liquify to push pixels forward as you drag, allowing you to subtly change the shape of features. Remember to use this tool sparingly to maintain a natural look.
How can I adjust the lighting in a portrait?
You can adjust the lighting in a portrait using the Dodge and Burn tools. The Dodge tool lightens areas of the image, while the Burn tool darkens them. This can be used to add depth and dimension to the image, enhancing the lighting and shadows.
How can I remove stray hairs in a portrait?
Stray hairs can be removed using the Clone Stamp tool. This tool duplicates parts of an image, allowing you to paint over stray hairs with an area of clean skin. Be sure to adjust the size and hardness of the brush for the most natural results.
How can I enhance the lips in a portrait?
To enhance the lips, you can use the Sponge tool to saturate the color, making them more vibrant. You can also use the Burn tool to darken the edges of the lips, adding depth and dimension.
How can I retouch a black and white portrait?
Retouching a black and white portrait is similar to retouching a color portrait. You can still use the Spot Healing Brush, Patch, and Clone Stamp tools to remove blemishes and imperfections. The Dodge and Burn tools can be used to adjust the lighting and add depth.
How can I maintain the quality of the image while retouching?
To maintain the quality of the image while retouching, always start by duplicating your original layer and working on the duplicate. This preserves the original image. Also, avoid over-editing, as this can degrade the quality of the image. Always zoom in and out to check your work at different scales.