One of the most important aspects of React Native app development is the navigation. It’s what allows users to get to the pages they’re looking for. That’s why it’s important to choose the best navigation library to suit your needs.
If your app has a lot of screens with relatively complex UI, it might be worth exploring React Native Navigation instead of React Navigation. This is because there will always be performance bottlenecks with React Navigation, since it works off the same JavaScript thread as the rest of the app. The more complex your UI, the more data has to be passed to that bridge, which can potentially slow it down.
In this tutorial, we’ll be looking at the React Native Navigation library by Wix, an alternative navigation library for those who are looking for a smoother navigation performance for their React Native apps.
Prerequisites
Knowledge of React and React Native is required to follow this tutorial. Prior experience with a navigation library such as React Navigation is optional.
Readers are also expected to have Node and Yarn installed locally, as well as a React Native development environment. You can find help getting set up here. Be sure to choose React Native CLI Quickstart.
App Overview
In order to demonstrate how to use the library, we’ll be creating a simple app that uses it. The app will have five screens in total:
- Initialization: this serves as the initial screen for the app. If the user is logged in, it will automatically navigate to the home screen. If not, the user is navigated to the login screen.
- Login: this allows the user to log in so they can view the home, gallery, and feed. To simplify things, the login will just be mocked; no actual authentication code will be involved. From this screen, the user can also go to the forgot-password screen.
- ForgotPassword: a filler screen, which asks for the user’s email address. This will simply be used to demonstrate stack navigation.
- Home: the initial screen that the user will see when they log in. From here, they can also navigate to either the gallery or feed screens via a bottom tab navigation.
- Gallery: a filler screen which shows a photo gallery UI.
- Feed: a filler screen which shows a news feed UI.
Here’s what the app will look like:
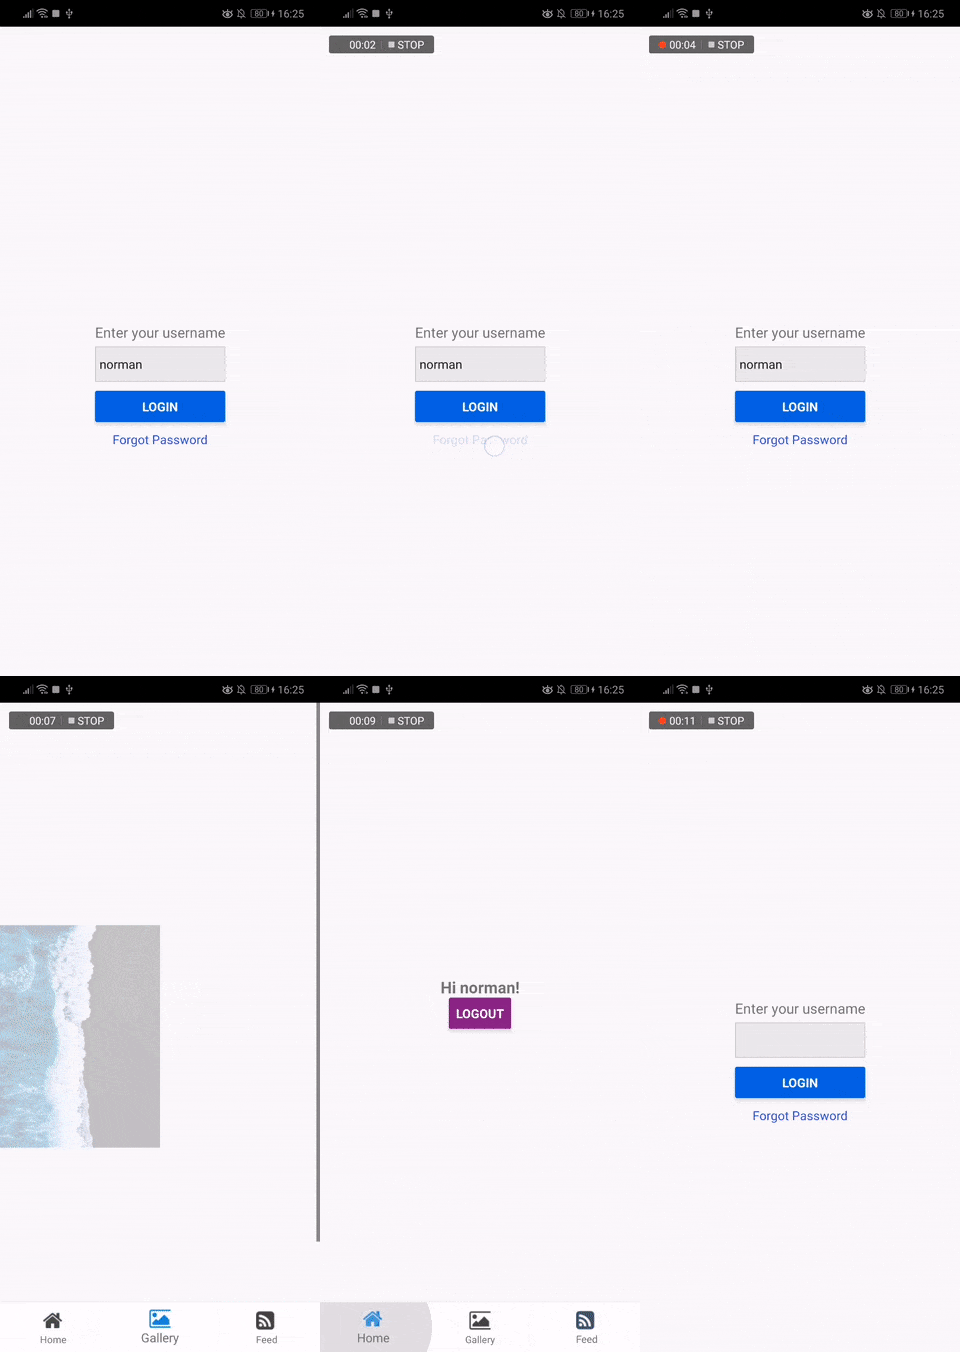
You can find the source code of the sample app on this GitHub repo.
Bootstrapping the App
Let’s start by generating a new React Native project:
npx react-native init RNNavigation
Next, install the dependencies of the app:
react-native-navigation: the navigation library that we’re going to use. Since its name is very long, I’ll be referring to it as RNN from now on.@react-native-async-storage/async-storage: for saving data to the app’s local storage.react-native-vector-icons: for showing icons for the bottom tab navigation.
yarn add react-native-navigation @react-native-async-storage/async-storage react-native-vector-icons
Once those are installed, we need to link the corresponding native module to the app. Note that I’m only going to cover module linking for React Native 0.60 and above. If you’re using an older version of React Native, you’ll have to do that via the old way which is to use the react-native link command. This should link the native modules for all the packages we’ve just installed. But sometimes errors can occur, so you’ll have to check the documentation for the package and check their manual install instructions.
If you’re using React Native 0.60 and above, we’ll have to link RNN, AsyncStorage, and Vector Icons in different ways.
For RNN, you can do that by executing the following command at the root of the project directory:
npx rnn-link
For AsyncStorage, you can do that by executing the following command (still at the root directory of the project):
npx pod-install
Lastly, for Vector Icons you’ll have to navigate to the android directory for Android apps and ios directory for iOS apps. For Android, edit the android/app/build.gradle file and add the following after the last apply from call:
apply from: "../../node_modules/react-native-vector-icons/fonts.gradle"
For iOS, execute the following command while inside the ios directory:
pod install
Finally, update index.js like so:
import { Navigation } from "react-native-navigation";
import App from "./App";

Navigation.registerComponent('com.myApp.WelcomeScreen', () => App);
Navigation.events().registerAppLaunchedListener(() => {
   Navigation.setRoot({
     root: {
       stack: {
         children: [
           {
             component: {
               name: 'com.myApp.WelcomeScreen'
             }
           }
         ]
       }
     }
  });
});
Trying Out the Project
Before we proceed to actually building the app, let’s first try out the project to see if the modules were successfully installed. First, run Metro Bundler:
npx react-native start
Then run the app on either platforms:
npx react-native run-android
npx react-native run-ios
If there were no issues with the packages, you should be able to see the default React Native project welcome screen. If you see this screen, you can now proceed with building the app. Otherwise, check out the Common Issues section below to troubleshoot the problem.
Common Issues
- The first issue that commonly occurs is when the linking of the native modules fails. This usually occurs with RNN as they have a custom script for linking the native modules. That might fail based on the React Native version you’re using. If that’s the case, then follow the manual install instructions in the documentation:
- The second common issue is this: “React Native multidex error: The number of method references in a .dex file cannot exceed 64K”. This occurs when the app (and the libraries you’re using) exceeds a certain number of methods. In this case, it’s around 64,000 (it’s 65,536 to be exact). This is the limit of the Android build architecture. To solve this issue, you can enable multidex support. To do that, open your
android/app/build.gradlefile and add the following underdefaultConfiganddependencies:
defaultConfig {
  // ...
  multiDexEnabled true
}
// ...
dependencies {
  // ...
  implementation 'com.android.support:multidex:1.0.3'
}
Those are the two most common issues you may encounter while trying to follow this tutorial. If you encounter any other issues, let me know or search for the issue. Usually, someone has already encountered it before and you’ll find the issue on the project’s issues on GitHub.
Building the App
Now we’re ready to finally start building the app.
index.js
First, open the existing index.js on the root of the project directory and replace its contents with the code below. This serves as the entry point of the app. If you noticed, we no longer have to register the main app component using React Native’s AppRegistry. Instead, we’re now using RNN’s registerComponent() method. This has to do with the updates we did earlier to the MainActivity.java and AppDelegate.m file.
The registerComponent() method accepts the screen’s unique name and the component to use to render the screen. Once it’s registered, we call the registerAppLaunchedListener() method to set the root screen for the app to LoadingScreen. This is similar to what the AppRegistry.registerComponent() does:
// index.js
import { Navigation } from "react-native-navigation";
import Icon from "react-native-vector-icons/FontAwesome";
Icon.loadFont();

import Loading from "./src/screens/Loading"; // the loading screen

import "./loadIcons"; // file for loading the icons to be used in the bottom tab navigation

Navigation.registerComponent("LoadingScreen", () => Loading);

Navigation.events().registerAppLaunchedListener(() => {
  // set the root component
  Navigation.setRoot({
    root: {
      component: {
        name: "LoadingScreen",
      },
    },
  });
});
Loading Screen
The loading screen serves as the entry point of the app. But you may be asking why a loading screen? Why not a login screen instead? This is because our sample app has a mock login system, meaning that we first have to determine if a user is already logged in or not. Using a loading screen works better than having to initially load a login screen only to find out that a user is already logged in, so we then have to navigate them to the home screen.
Start by creating a src/screens/Loading.js file and add the following:
// src/screens/Loading.js
import React, { Component } from "react";
import { View, Text, ActivityIndicator, StyleSheet } from "react-native";

import { goToLogin, goToTabs } from "../../navigation"; // import the functions for loading either the login screen or the tabs screen (shows home screen by default)

import AsyncStorage from "@react-native-async-storage/async-storage";
Next, create the component itself. When the component is mounted, we try to get the username of the logged-in user from local storage. If it exists, we navigate the user to the tabs, otherwise to the login screen:
export default class Loading extends Component {
  async componentDidMount() {
    const username = await AsyncStorage.getItem("username");
    if (username) {
      goToTabs(global.icons, username);
    } else {
      goToLogin();
    }
  }

  render() {
    // show loading indicator
    return (
      <View style={styles.container}>
        <ActivityIndicator size="large" color="#0000ff" />
      </View>
    );
  }
}

const styles = StyleSheet.create({
  container: {
    flex: 1,
    justifyContent: "center",
    alignItems: "center",
  },
});
In the above code, notice we’re passing global.icons as an argument to the goToTabs() function. That value is being set in the loadIcons.js that we imported from the index.js file earlier. Its job is to load the icons to be used for the bottom tabs, as you’ll see later.
navigation.js
This is where we register all the screens of the app and declare our navigation functions for navigating between the login screen and the tabbed screens:
// navigation.js
import { Navigation } from "react-native-navigation";

import Login from "./src/screens/Login";
import ForgotPassword from "./src/screens/ForgotPassword";
import Home from "./src/screens/Home";
import Feed from "./src/screens/Feed";
import Gallery from "./src/screens/Gallery";

Navigation.registerComponent("LoginScreen", () => Login);
Navigation.registerComponent("ForgotPasswordScreen", () => ForgotPassword);
Navigation.registerComponent("HomeScreen", () => Home);
Navigation.registerComponent("FeedScreen", () => Feed);
Navigation.registerComponent("GalleryScreen", () => Gallery);
The goToLogin() function creates a stack navigation. In RNN, these navigation types are called “Layouts”. Currently, there are only three: stacks, tabs, and drawers. We’ll only use stack and tabs in this tutorial, but here’s a brief overview of each one:
- Stack: each new screen you navigate to is laid out on top of the current one. So when you go back to the previous screen, the idea is to simply “pop” the current screen out of the stack. We’ll be using the stack navigation to navigate between the Login screen and ForgotPassword screen.
- Tab: each screen can be accessed via a bottom tab navigation. Each tab has both icon and text on it to describe the screen it navigates the user to. This type of navigation is commonly used if there are two or more main screens within the app. Having a bottom tab navigation allows for easy access between those screens. We’ll be using the tab navigation to navigate between the Home, Gallery, and Feed screens.
- Drawer: also called the side menu. This is called drawer because it’s commonly hidden within a hamburger icon and it only shows the menu under it when clicked on.
Going back to the code, we’ve only added the Login screen as a child of stack navigation, even though the ForgotPassword screen is part of it as well. As mentioned earlier, we’ll be using stack navigation to navigate between the Login screen and the ForgotPassword screen. Yet we’ve only added the Login screen here as a child. Adding it will simply make it as the default screen for the stack. In a stack navigation, you should only add the initial screen for that specific stack as the child, as you’ll see later.
The minimum requirement for a child is to add the name property for each screen. This is the name of the screen to be used for rendering. This should be the same name you used when you registered the component:
export const goToLogin = () =>
  Navigation.setRoot({
    root: {
      stack: {
        // create a stack navigation
        id: "stackMain",
        children: [
          {
            component: {
              name: "LoginScreen",
            },
          },
        ],
      },
    },
  });
Note: supplying an ID for the navigation isn’t required, but it’s good practice — especially if you know that you’ll start using the same layout type multiple times in your app.
Next, add the goToTabs() function. Unlike the previous function, this accepts two arguments: icons and username. icons is the array of icons to be used for the individual tabs, while username is the username of the user who logged in. This time, we’re using the bottomTabs navigation. As the name suggests, this allows the user to navigate between screens using bottom tabs. You can create bottom tabs using the following format:
const iconColor = "#444";
const selectedIconColor = "#0089da";

export const goToTabs = (icons, username) => {
  Navigation.setRoot({
    root: {
      bottomTabs: {
        // create a bottom tabs navigation

        id: "bottomTabsMain",
        children: [
          {
            component: {
              name: "HomeScreen",
              options: {
                bottomTab: {
                  fontSize: 11,
                  text: "Home",
                  icon: icons[0],
                  iconColor,
                  selectedIconColor,
                },
              },

              // pass the username as a navigation prop to the Home screen
              passProps: {
                username,
              },
            },
          },

          {
            component: {
              name: "GalleryScreen",
              options: {
                bottomTab: {
                  fontSize: 11,
                  text: "Gallery",
                  icon: icons[1],
                  iconColor,
                  selectedIconColor,
                },
              },
            },
          },

          {
            component: {
              name: "FeedScreen",
              options: {
                bottomTab: {
                  fontSize: 11,
                  text: "Feed",
                  icon: icons[2],
                  iconColor,
                  selectedIconColor,
                },
              },
            },
          },
        ],
      },
    },
  });
};
As you’ve seen from the code above, this pretty much uses the same format as the stack navigation. The only difference is that, this time, we’re also specifying an options property for the individual bottomTab. These options are mostly used for configuring the styles of the individual tab. They’re self-explanatory, so I won’t go into detail, but I just want to explain the icon property. By default, this accepts a local image that’s required by a require('./path/to/image.png') call. But since we’ve already installed Vector Icons, we might as well use it as the icon source instead. The only problem is that we can’t really supply a React component as the value for the icon because it expects a resource. The icons parameter accepts an array of icon resource and that’s what we’re using instead. You’ll learn how we’re loading those in the next section.
Note: you can find more styling options for bottom tabs in the official documentation for Styling. Just look for bottomTabs or bottomTab.
loadIcons.js
Here’s the code for the loadIcons file that we imported in the index.js file earlier. This uses icons from FontAwesome. Here, we’re using the getImageSource() method from Vector Icons to get the actual image resource. This allows us to use it as an icon for the bottom tabs:
// loadIcons.js
import Icon from "react-native-vector-icons/FontAwesome";
Icon.loadFont();

(function() {
  Promise.all([
    Icon.getImageSource("home", 11), // name of icon, size
    Icon.getImageSource("image", 11),
    Icon.getImageSource("rss-square", 11),
  ]).then(async (values) => {
    global.icons = values; // make it available globally so we don't need to load it again
  });
})();
Login Screen
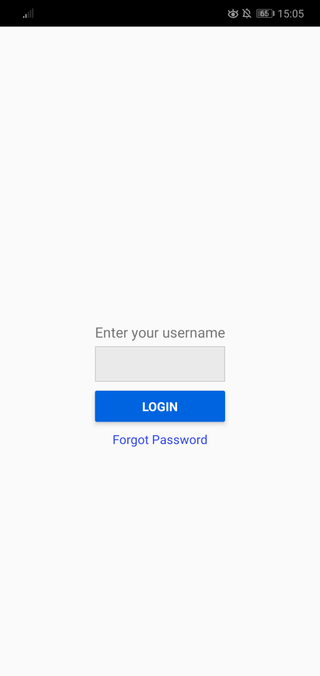
The Login screen is the default screen that the user will see if they aren’t logged in. From here, they can log in by entering their username or they can click on forgot password to view the screen for resetting their password. As mentioned earlier, all of this is just mocked and no actual authentication code is used:
// src/screens/Login.js
import React, { Component } from "react";
import { Navigation } from "react-native-navigation";
import {
  View,
  Text,
  TextInput,
  Button,
  TouchableOpacity,
  StyleSheet,
} from "react-native";
import AsyncStorage from "@react-native-async-storage/async-storage";

import { goToTabs } from "../../navigation";

export default class Login extends Component {
  static get options() {
    return {
      topBar: {
        visible: false, // need to set this because screens in a stack navigation have a header by default
      },
    };
  }

  state = {
    username: "",
  };

  render() {
    return (
      <View style={styles.wrapper}>
        <View style={styles.container}>
          <View style={styles.main}>
            <View style={styles.fieldContainer}>
              <Text style={styles.label}>Enter your username</Text>
              <TextInput
                onChangeText={(username) => this.setState({ username })}
                style={styles.textInput}
              />
            </View>

            <Button title="Login" color="#0064e1" onPress={this.login} />

            <TouchableOpacity onPress={this.goToForgotPassword}>
              <View style={styles.center}>
                <Text style={styles.link_text}>Forgot Password</Text>
              </View>
            </TouchableOpacity>
          </View>
        </View>
      </View>
    );
  }

  // next: add login code
}
//

const styles = StyleSheet.create({
  wrapper: {
    flex: 1,
  },
  container: {
    flex: 1,
    alignItems: "center",
    justifyContent: "center",
    padding: 20,
  },
  fieldContainer: {
    marginTop: 20,
  },
  label: {
    fontSize: 16,
  },
  textInput: {
    height: 40,
    marginTop: 5,
    marginBottom: 10,
    borderColor: "#ccc",
    borderWidth: 1,
    backgroundColor: "#eaeaea",
    padding: 5,
  },
});
Here’s the login code. This simply stores the username to local storage and navigates the user to the tabbed screens:
login = async () => {
  const { username } = this.state;
  if (username) {
    await AsyncStorage.setItem("username", username);
    goToTabs(global.icons, username);
  }
};
Lastly, here’s the code for navigating to another screen via stack navigation. Simply call the Navigation.push() method and pass in the ID of the current screen as the first argument, and the screen you want to navigate to as the second. The name should be the same one you used when you called Navigation.registerComponent() in the navigation.js file earlier:
goToForgotPassword = () => {
  Navigation.push(this.props.componentId, {
    component: {
      name: "ForgotPasswordScreen",
    },
  });
};
ForgotPassword Screen
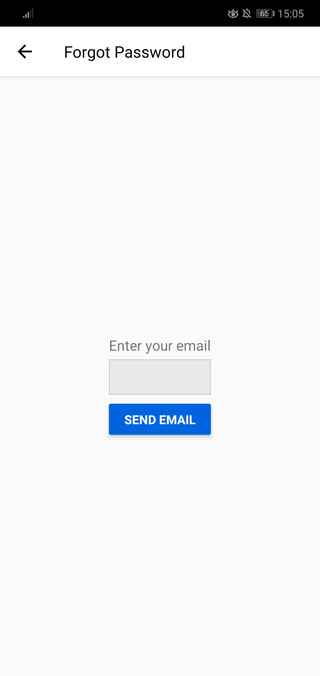
As mentioned earlier, this screen is simply used as a filler to demonstrate stack navigation. Make sure that the topBar is set to visible, because it’s where the back button for going back to the Login screen is located:
// src/screens/ForgotPassword.js
import React, { Component } from "react";
import { View, Text, TextInput, Button, StyleSheet } from "react-native";

export default class ForgotPassword extends Component {
  static get options() {
    return {
      topBar: {
        visible: true, // visible
        title: {
          text: "Forgot Password",
        },
      },
    };
  }

  state = {
    email: "",
  };

  render() {
    return (
      <View style={styles.wrapper}>
        <View style={styles.container}>
          <View style={styles.main}>
            <View style={styles.fieldContainer}>
              <Text style={styles.label}>Enter your email</Text>
              <TextInput
                onChangeText={(email) => this.setState({ email })}
                style={styles.textInput}
              />
            </View>

            <Button
              title="Send Email"
              color="#0064e1"
              onPress={this.sendEmail}
            />
          </View>
        </View>
      </View>
    );
  }

  //
  sendEmail = async () => {};
}
//

const styles = StyleSheet.create({
  wrapper: {
    flex: 1,
  },
  container: {
    flex: 1,
    alignItems: "center",
    justifyContent: "center",
    padding: 20,
  },
  fieldContainer: {
    marginTop: 20,
  },
  label: {
    fontSize: 16,
  },
  textInput: {
    height: 40,
    marginTop: 5,
    marginBottom: 10,
    borderColor: "#ccc",
    borderWidth: 1,
    backgroundColor: "#eaeaea",
    padding: 5,
  },
});
You can also have a separate button for going back to the previous screen. All you have to do is call the Navigation.pop() method:
Navigation.pop(this.props.componentId);
Home Screen
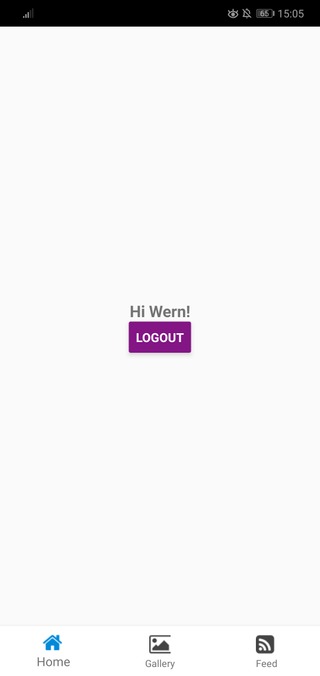
The Home screen is the default screen for the tabbed navigation, so it’s what the user will see by default when they log in. This screen shows the user’s name that was passed as a navigation prop as well as a button for logging out. Clicking the logout button will simply delete the username from local storage and navigate the user back to the login screen:
// src/screens/Home.js
import React, { Component } from "react";
import { View, Text, Button, StyleSheet } from "react-native";
import Icon from "react-native-vector-icons/FontAwesome";
Icon.loadFont();

import AsyncStorage from "@react-native-async-storage/async-storage";

import { goToLogin } from "../../navigation";

export default class Home extends Component {
  render() {
    const { username } = this.props;
    return (
      <View style={styles.container}>
        <Text style={styles.text}>Hi {username}!</Text>
        <Button onPress={this.logout} title="Logout" color="#841584" />
      </View>
    );
  }
  //

  logout = async () => {
    await AsyncStorage.removeItem("username");
    goToLogin();
  };
}

const styles = StyleSheet.create({
  container: {
    flex: 1,
    justifyContent: "center",
    alignItems: "center",
  },
  text: {
    fontSize: 18,
    fontWeight: "bold",
  },
});
In case you’re wondering how we got access to the username, we’ve passed it as a navigation prop from the navigation file earlier:
// navigation.js
{
  component: {
    name: "HomeScreen",
    options: {
      ...
    },

    // here:
    passProps: {
      username
    },

  }
},
Gallery Screen
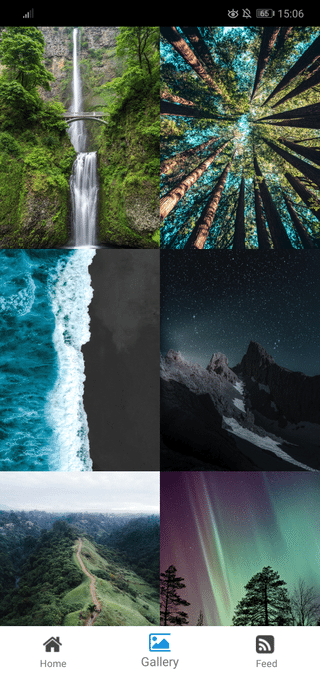
The Gallery screen is just a filler screen so we won’t be delving too much into it. Basically, it just shows a photo gallery UI:
// src/screens/Gallery.js
import React, { Component } from "react";
import {
  View,
  Text,
  FlatList,
  Image,
  Dimensions,
  StyleSheet,
} from "react-native";

const { width } = Dimensions.get("window");
const base_width = width / 2;

const images = [
  {
    id: 1,
    src: require("../images/blake-richard-verdoorn-20063-unsplash.jpg"),
  },
  {
    id: 2,
    src: require("../images/casey-horner-487085-unsplash.jpg"),
  },
  {
    id: 3,
    src: require("../images/sacha-styles-XK7thML3zEQ-unsplash.jpg"),
  },
  {
    id: 4,
    src: require("../images/eberhard-grossgasteiger-1036384-unsplash.jpg"),
  },
  {
    id: 5,
    src: require("../images/justin-kauffman-449060-unsplash.jpg"),
  },
  {
    id: 6,
    src: require("../images/vincent-guth-182001-unsplash.jpg"),
  },
];

export default class Gallery extends Component {
  render() {
    return (
      <View style={styles.container}>
        <FlatList
          data={images}
          keyExtractor={(item, index) => item.id.toString()}
          numColumns={2}
          renderItem={this.renderImage}
        />
      </View>
    );
  }
  //

  renderImage = ({ item }) => {
    return (
      <Image source={item.src} style={{ width: base_width, height: 250 }} />
    );
  };
}

const styles = StyleSheet.create({
  container: {
    flex: 1,
  },
});
Note that you’ll need to copy the images from our repo, or replace them with images of your own.
Feed Screen
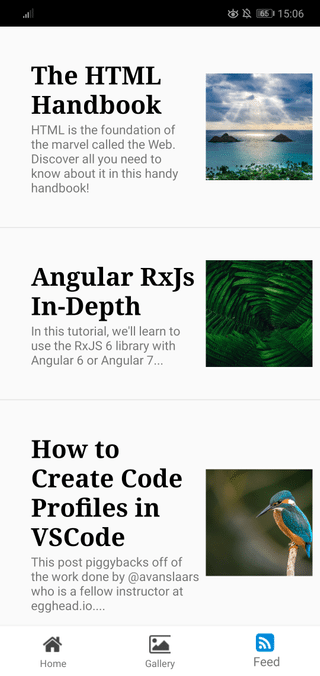
Just like the Gallery screen, the Feed screen is also a filler. It simply shows a news feed UI:
// src/screens/Feed.js
import React, { Component } from "react";
import {
  View,
  Text,
  FlatList,
  Image,
  TouchableOpacity,
  StyleSheet,
} from "react-native";

const news_items = [
  {
    id: 1,
    title: "The HTML Handbook",
    summary:
      "HTML is the foundation of the marvel called the Web. Discover all you need to know about it in this handy handbook!",
    image: require("../images/amanda-phung-1281331-unsplash.jpg"),
  },
  {
    id: 2,
    title: "Angular RxJs In-Depth",
    summary:
      "In this tutorial, we'll learn to use the RxJS 6 library with Angular 6 or Angular 7...",
    image: require("../images/daniil-silantev-318853-unsplash.jpg"),
  },
  {
    id: 3,
    title: "How to Create Code Profiles in VS Code",
    summary:
      "This post piggybacks off of the work done by @avanslaars who is a fellow instructor at egghead.io....",
    image: require("../images/vincent-van-zalinge-38358-unsplash.jpg"),
  },
];

export default class Feed extends Component {
  render() {
    return (
      <View style={styles.container}>
        <FlatList
          data={news_items}
          keyExtractor={(item, index) => item.id.toString()}
          renderItem={this.renderItem}
        />
      </View>
    );
  }
  //

  renderItem = ({ item }) => {
    return (
      <TouchableOpacity onPress={this.goToNews}>
        <View style={styles.news_item}>
          <View style={styles.news_text}>
            <View style={styles.text_container}>
              <Text style={styles.title}>{item.title}</Text>
              <Text>{item.summary}</Text>
            </View>
          </View>
          <View style={styles.news_photo}>
            <Image source={item.image} style={styles.photo} />
          </View>
        </View>
      </TouchableOpacity>
    );
  };
  //

  goToNews = () => {};
}
//

const styles = StyleSheet.create({
  container: {
    flex: 1,
  },
  news_item: {
    flex: 1,
    flexDirection: "row",
    paddingRight: 20,
    paddingLeft: 20,
    paddingTop: 20,
    paddingBottom: 20,
    borderBottomWidth: 1,
    borderBottomColor: "#E4E4E4",
  },
  news_text: {
    flex: 2,
    flexDirection: "row",
    padding: 15,
  },
  title: {
    fontSize: 28,
    fontWeight: "bold",
    color: "#000",
    fontFamily: "georgia",
  },
  news_photo: {
    flex: 1,
    justifyContent: "center",
    alignItems: "center",
  },
  photo: {
    width: 120,
    height: 120,
  },
});
Running the App
At this point, you should be able to run the app. Start by running the Metro Bundler:
npx react-native start
Then run the app on your device or simulator:
npx react-native run-android
npx react-native run-ios
Try out the app and see if it performs better than React Navigation (if you’ve used it before).
Conclusion and Next Steps
In this tutorial, you learned how to use the React Native Navigation library. Specifically, you learned how to set up React Native Navigation and use the stack and tab navigation. You also learned how to load icons from React Native Vector Icons instead of using image icons.
As a next step, you might want to check out how animations can be customized, how to implement a side menu navigation, or view the examples of different layout types.
If you’re still unsure about which navigation library to use for your next project, be sure to check out this post: “React Navigation vs. React Native Navigation: Which is right for you?”
You can find the source code of the sample app on this GitHub repo.
Frequently Asked Questions (FAQs) about React Native Navigation Library
What are the key differences between React Native Navigation and React Navigation?
React Native Navigation and React Navigation are two popular libraries used for navigation in React Native applications. React Native Navigation is a native navigation library, meaning it uses the native navigation components of both iOS and Android. This results in a smoother user experience and better performance. On the other hand, React Navigation is a JavaScript-based navigation library. It’s easier to set up and more customizable, but it may not perform as well as React Native Navigation in complex applications.
How do I set up React Native Navigation in my project?
Setting up React Native Navigation involves a few steps. First, you need to install the library using npm or yarn. Then, you need to link the library to your project using the react-native link command. After that, you need to configure your app’s main file to use React Native Navigation. This involves importing the library, registering your app’s screens, and setting up the initial screen.
Can I use both React Native Navigation and React Navigation in the same project?
While it’s technically possible to use both React Native Navigation and React Navigation in the same project, it’s generally not recommended. Using two navigation libraries can lead to confusion and unexpected behavior. It’s better to choose one library that fits your needs and stick with it.
How do I navigate between screens using React Native Navigation?
Navigating between screens in React Native Navigation involves using the push and pop methods. The push method is used to navigate to a new screen, while the pop method is used to go back to the previous screen. You can also use the reset method to clear the navigation stack and navigate to a new screen.
How do I pass data between screens in React Native Navigation?
Passing data between screens in React Native Navigation is done using props. When you navigate to a new screen, you can pass data as props in the push method. The data can then be accessed in the new screen using this.props.
How do I handle deep linking in React Native Navigation?
Deep linking in React Native Navigation is handled using the handleDeepLink method. This method allows you to register a listener that will be called whenever a deep link is opened. You can then navigate to the appropriate screen based on the deep link.
How do I customize the appearance of the navigation bar in React Native Navigation?
Customizing the appearance of the navigation bar in React Native Navigation is done using the static navigatorStyle property. This property allows you to set various styles for the navigation bar, such as the background color, title color, and button styles.
How do I handle screen transitions in React Native Navigation?
Screen transitions in React Native Navigation are handled using the static navigatorStyle property. This property allows you to set the transition animation for pushing and popping screens. You can choose from various built-in animations or create your own custom animation.
How do I handle tab navigation in React Native Navigation?
Tab navigation in React Native Navigation is handled using the startTabBasedApp method. This method allows you to set up a tab-based layout with multiple screens. You can customize the appearance of the tabs and handle tab changes using the onNavigatorEvent method.
How do I handle drawer navigation in React Native Navigation?
Drawer navigation in React Native Navigation is handled using the startSingleScreenApp method with a drawer configuration. This allows you to set up a layout with a side drawer that can be opened and closed. You can customize the appearance of the drawer and handle drawer events using the onNavigatorEvent method.
Wern is a web developer from the Philippines. He loves building things for the web and sharing the things he has learned by writing in his blog. When he's not coding or learning something new, he enjoys watching anime and playing video games.


