

Model level caching is something that’s often ignored, even by seasoned developers. Much of it’s due to the misconception that, when you cache the views, you don’t need to cache at the lower levels. While it’s true that much of a bottleneck in the Rails world lies in the View layer, that’s not always the case.
Lower level caches are very flexible and can work anywhere in the application. In this tutorial, I’ll demonstrate how to cache your models with Redis.
Key Takeaways
- Redis is an effective tool for caching in Rails applications, enabling faster data retrieval and a reduction in database load. It works by storing frequently accessed data in memory, which can be retrieved much faster than from the database.
- Setting up Redis for Rails model caching involves installing Redis and the Redis Ruby client, redis-rb, on your system. You then configure your Rails application to use Redis as the cache store.
- Rails model caching with Redis can significantly improve application performance by reducing the number of database queries. Subsequent requests for the same data are served from the cache, speeding up response times and providing a smoother user experience.
- Managing cache expiration with Redis in Rails can be achieved using the expire command, which sets a time-to-live (TTL) on a key. After the TTL has passed, the key is automatically removed from the cache, preventing stale data from being served.
How Caching Works?
Traditionally, accessing disk has been expensive. Trying to access data from the disk frequently will have an adverse impact on performance. To counter this, we can implement a caching layer in between your application and the database server.
A caching layer doesn’t hold any data at first. When it receives a request for the data, it calls the database and stores the result in memory (the cache). All subsequent requests will be served from the cache layer, so the unnecessary roundtrip to the database server is avoided, improving performance.
Why Redis?
Redis is an in-memory, key-value store. It’s blazingly fast and data retrieval is almost instantaneous. Redis supports advanced data structures like lists, hashes, sets, and can persist to disk.
While most developers prefer Memcache with Dalli for their caching needs, I find Redis very simple to setup and easy to administer. Also, if you are using resque or Sidekiq for managing your background jobs, you probably have Redis installed already. For those who are interested in knowing when to use Redis, this discussion is a good place to start.
Prerequisites
I’m assuming you have Rails up and running. The example here uses Rails 4.2.rc1, haml to render the views, and MongoDB as the database, but the snippets in this tutorial should be compatible with any version of Rails.
You also need to have Redis installed and running before we get started. Move into your app directory, and execute the following commands:
$ wget http://download.redis.io/releases/redis-2.8.18.tar.gz

$ tar xzf redis-2.8.18.tar.gz

$ cd redis-2.8.18

$ make
The command is going to take a while to complete. Once it has completed, just start the Redis server:
$ cd redis-2.8.18/src

$ ./redis-server
To measure the performance improvement, we will use the gem “rack-mini-profiler”. This gem will help us measure the performance improvement right from the views.
Getting Started
For this example, let’s build a fictional online story reading store. This store has books in various Categories and Languages. Let’s create the models first:
# app/models/category.rb
class Category

  include Mongoid::Document

  include Mongoid::Timestamps

  include Mongoid::Paranoia
  include CommonMeta

end
# app/models/language.rb
class Language

  include Mongoid: :Document

  include Mongoid::Timestamps

  include Mongoid::Paranoia
  include CommonMeta

end
# app/models/concerns/common_meta.rb
module CommonMeta

  extend ActiveSupport::Concern

  included do

    field :name, :type => String

    field :desc, :type => String

    field :page_title, :type => String

  end

end
I’ve included a seed file here. Just copy paste this into your seeds.rb and run the rake seed task to dump data into our database.
rake db:seed
Now, let us create a simple category listing page that shows all the categories available with a description and tags.
# app/controllers/category_controller.rb
class CategoryController < ApplicationController

  include CategoryHelper

  def index

    @categories = Category.all

  end

end
# app/helpers/category_helper.rb
module CategoryHelper

  def fetch_categories

    @categories = Category.all

  end

end
# app/views/category/index.html.haml
%h1

  Category Listing

%ul#categories

  - @categories.each do |cat|

      %li

        %h3

          = cat.name

        %p

          = cat.desc
# config.routes.rb
Rails.application.routes.draw do

  resources :languages

  resources :category

end
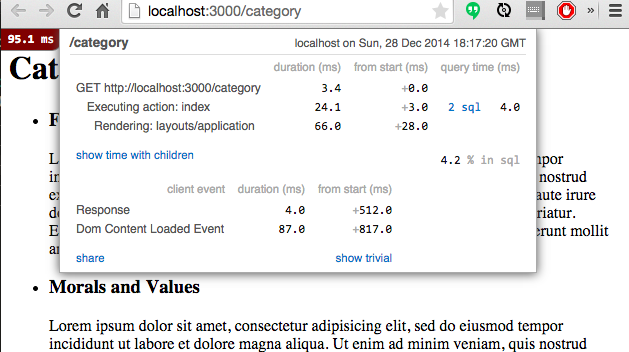
When you fire up your browser and point it to /category, you’ll find mini-profiler benchmarking the execution time of each action performed in the backend. This should give you a fair idea which parts of your application are slow and how to optimize them. This page has executed two SQL commands and the query had taken around 5ms to complete.
While 5ms may seem trivial at first, especially with the views taking more time to render, in a production-grade application there are typically several database queries, so they can slow down the application considerably.
Since the metadata models are unlikely to change that often it makes sense to avoid unnecessary database roundtrips. This is where lower level caching comes in.
Initialize Redis
There is a Ruby client for Redis that helps us to connect to the redis instance easily:
gem 'redis'

gem 'redis-namespace'

gem 'redis-rails'

gem 'redis-rack-cache'
Once these gems are installed, instruct Rails to use Redis as the cache store:
# config/application.rb
#...........

config.cache_store = :redis_store, 'redis://localhost:6379/0/cache', { expires_in: 90.minutes }

#.........
The redis-namespace gem allows us to create nice a wrapper around Redis:
# config/initializers/redis.rb
$redis = Redis::Namespace.new("site_point", :redis => Redis.new)
All the Redis functionality is now available across the entire app through the ‘$redis’ global. Here’s an example of how to access the values in the redis server (fire up a Rails console):
$redis.set("test_key", "Hello World!")
This command will create a new key called “test_key” in Redis with the value “Hello World”. To fetch this value, just do:
$redis.get("test_key")
Now that we have the basics, let’s start by rewriting our helper methods:
# app/helpers/category_helper.rb
module CategoryHelper

  def fetch_categories

    categories =  $redis.get("categories")

    if categories.nil?

      categories = Category.all.to_json

      $redis.set("categories", categories)

    end

    @categories = JSON.load categories

  end

end
The first time this code executes there won’t be anything in memory/cache. So, we ask Rails to fetch it from the database and then push it to redis. Notice the to_json call? When writing objects to Redis, we have a couple of options. One option is to iterate over each property in the object and then save them as a hash, but this is slow. The simplest way is to save them as a JSON encoded string. To decode, simply use JSON.load.
However, this comes in with an unintended side effect. When we’re retrieving the values, a simple object notation won’t work. We need to update the views to use the hash syntax to display the categories:
# app/views/category/index.html.haml
%h1

  Category Listing

%ul#categories

  - @categories.each do |cat|

    %li

      %h3

        = cat["name"]

      %p

        = cat["desc"]
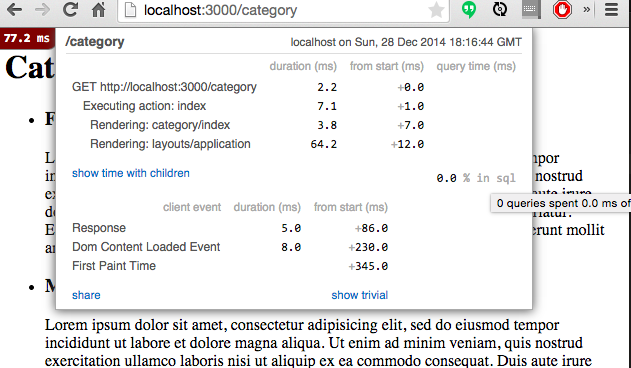
Fire up the browser again and see if there is a performance difference. The first time, we still hit the database, but on subsequent reloads, the database is not used at all. All future requests will be loaded from the cache. That’s a lot of savings for a simple change :).
Managing Cache
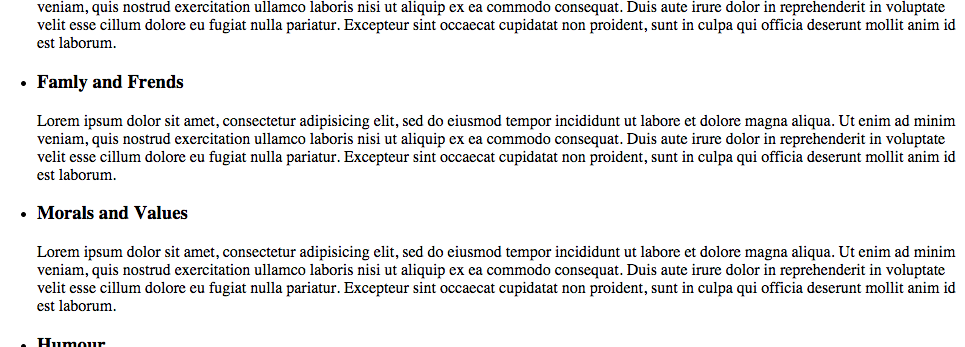
I just noticed a typo in one of the categories. Let’s fix that first:
$ rails c
c = Category.find_by :name => "Famly and Frends"

c.name = "Family and Friends"

c.save
Reload and see if this update shows up in the view:
Nope, this change is not reflected in our views. This is because we’ve bypassed accessing the database and all values are served from the cache. Alas, the cache is now stale and the updated data won’t be available until Redis is restarted. This is a deal breaker for any application. We can overcome this issue by expiring the cache periodically:
# app/helpers/category_helper.rb
module CategoryHelper

  def fetch_categories

    categories =  $redis.get("categories")

    if categories.nil?

      categories = Category.all.to_json

      $redis.set("categories", categories)

      # Expire the cache, every 3 hours

      $redis.expire("categories",3.hour.to_i)

    end

    @categories = JSON.load categories

  end

end
This will expire the cache every 3 hours. While this works for most scenarios, the data in the cache will now lag the database. This likely will not work for you. If you prefer to keep the cache fresh, we can use an after_save callback:
# app/models/category.rb
class Category

  #...........

  after_save :clear_cache
  def clear_cache

    $redis.del "categories"

  end

  #...........

end
Every time the model is updated, we’re instructing Rails to clear the cache. This will ensure that the cache is always up to date. Yay!
You should probably be using something like
cache_observersin production, but for brevity sake we will stick withafter_savehere. In case you’re not sure which approach might work best for you, this discusssion might shed some light.
Conclusion
Lower level caching is very simple and, when properly used, it is very rewarding. It can instantaneously boost your system’s performance with minimal effort. All the code snippets in this article are available on Github.
Hope enjoyed reading this. Please share your thoughts in the comments.
Frequently Asked Questions (FAQs) about Rails Model Caching with Redis
What is the role of Redis in Rails model caching?
Redis, which stands for Remote Dictionary Server, is an open-source, in-memory data structure store that is used as a database, cache, and message broker. In Rails model caching, Redis plays a crucial role in storing and retrieving data quickly. It helps to reduce the load on the database by storing frequently accessed data in memory, which can be retrieved much faster than from the database. This significantly improves the performance and speed of Rails applications.
How do I set up Redis for Rails model caching?
Setting up Redis for Rails model caching involves a few steps. First, you need to install Redis on your system. Once installed, you can use the Redis Ruby client, redis-rb, to interact with Redis from your Rails application. You can add it to your Gemfile and run bundle install. After that, you can configure your Rails application to use Redis as the cache store. This can be done in the configuration file of your environment.
How does Rails model caching with Redis improve application performance?
Rails model caching with Redis improves application performance by reducing the number of database queries. When data is cached, it is stored in Redis after the first request. Subsequent requests for the same data are served from the cache, which is much faster than querying the database. This reduces the load on the database and speeds up response times, resulting in a smoother and more responsive user experience.
Can I use Redis for caching in Rails applications other than model caching?
Yes, Redis can be used for various types of caching in Rails applications, not just model caching. This includes page caching, action caching, and fragment caching. Each type of caching has its own use cases and benefits, and Redis can be used effectively in all of them to improve application performance.
How do I manage cache expiration with Redis in Rails?
Managing cache expiration with Redis in Rails can be done using the expire command. This command allows you to set a time-to-live (TTL) on a key, after which the key will automatically be removed from the cache. You can also use the expire_at command to set a specific expiration time. This helps to ensure that your cache does not become stale and continues to serve up-to-date data.
What are the potential issues I might face when using Redis for Rails model caching?
While Redis is a powerful tool for caching, it’s not without its potential issues. One common issue is running out of memory, as Redis stores all data in memory. This can be mitigated by using Redis’ eviction policies, which determine how keys are removed when memory is full. Another potential issue is data persistence. By default, Redis does not write data to disk, so if the Redis server crashes, all data in the cache will be lost. However, Redis provides options for data persistence that you can configure based on your needs.
How can I monitor the performance of Redis in my Rails application?
Monitoring the performance of Redis in your Rails application can be done using various tools and techniques. Redis provides a command called INFO that returns information and statistics about the server. There are also several third-party tools available, such as Redis Monitor, that provide real-time monitoring and analytics of your Redis server.
Can I use Redis for caching in a Rails application that is deployed on multiple servers?
Yes, Redis can be used for caching in a Rails application that is deployed on multiple servers. Redis provides various data replication and partitioning methods that allow you to distribute your data across multiple servers. This can help to improve the scalability and reliability of your application.
How can I handle cache invalidation with Redis in Rails?
Cache invalidation with Redis in Rails can be handled in several ways. One common method is to use a cache key that changes whenever the underlying data changes. This ensures that stale data is not served from the cache. Another method is to manually delete keys from the cache when the data changes. Redis provides several commands for deleting keys, such as DEL and FLUSHALL.
What are some best practices for using Redis for Rails model caching?
Some best practices for using Redis for Rails model caching include: using appropriate data structures for your needs, managing cache expiration effectively to avoid serving stale data, monitoring your Redis server to ensure it is performing optimally, and handling cache invalidation properly to ensure data consistency. It’s also important to consider the trade-offs of using Redis, such as memory usage and data persistence, and configure Redis appropriately based on your application’s needs.