
This tutorial will explain how to create a PHP extension using a new language: Zephir, which is similar to C and Fortran. You can download the full source code from github. We’ve touched on the concept of Zephir before, so if you’re interested in getting a broad overview, see our previous articles.
Zephir can be looked at as a hybrid language that lets you write code that looks like PHP, but is then compiled to native C, meaning you can create an extension from it and come away with very efficient code.
Key Takeaways
- Zephir allows PHP developers to write efficient extensions using a syntax similar to PHP but compiled to native C for enhanced performance.
- To set up a Zephir development environment, you need specific tools like gcc, gnu make, PHP development headers, re2c, and json-c, with a recommendation for a Linux-based system.
- The process of creating a PHP extension in Zephir involves initializing a project, writing code in .zep files, compiling the code, and configuring your PHP environment to include the new extension.
- Zephir not only boosts performance but also offers a way to protect the source code, making it suitable for creating closed source PHP applications.
Installation
To build a PHP extension and use Zephir you’ll need the following:
- gcc >= 4.x/clang >= 3.x/vc++ 9
- gnu make 3.81 or later
- php development headers and tools
- re2c 0.13 or later
- json-c
The installation instructions vary for every platform, so I trust you’ll know how to obtain them if you’re reading an article with a topic as advanced as this one. For the record – I recommend using a Linux based system for developing Zephir apps.
Once you obtain all the prerequisite software, download the latest version of Zephir from Github, then run the Zephir installer, like so:
git clone https://github.com/phalcon/zephir
cd zephir && ./install -c
It should install automatically – try typing zephir help. If it is not working, add the “bin” directory to your PATH enviroment variable. In my case: /home/duythien/app/zephir/bin, like so:
vi $HOME/.bash_profile
Append the following export command:
export PATH=$PATH:/home/duythien/app/zephir/bin
To verify the new path settings and test the installation, enter:
echo $PATH
zephir help
You can find out about Zephir basics and syntax, as well as its typing system and see some demo scripts over at their website.
Programming with Zephir
Now we’ll use Zephir to re-work a mathematical equation that C and Fortran handle very well. The example is rather esoteric and won’t be explained into much detail, except to demonstrate the power of Zephir.
Time-Dependent Schrodinger Equation solved with Finite Difference
The time-dependent Schrödinger equation can be solved with both implicit (large matrix) and explicit (leapfrog) methods. I’ll use the explicit method.
Firstly, issue the following command to create the extension’s skeleton:
zephir init myapp
When this command completes, a directory called “myapp” is created on the current working directory. This looks like:
myapp/
 |-----ext/
 |-----myapp/
 |-----config.json
Inside the “myapp” folder, create a file called “quantum.zep” (which will give us the Myapp\Quantum namespace). Copy paste the following code inside:
namespace Myapp;
class Quantum{

    const PI = 3.14159265358979323846;
    const MAX = 751;

    public function Harmos(double x){
        int  i,j,n;
        var  psr, psi, p2, v,paramater,fp;
        double dt,dx,k0,item_psr,item_psi;

        let dx = 0.02,
            k0 = 3.0*Myapp\Quantum::PI,
            dt = dx*dx/4.0;
        let paramater =[dx,k0,dt,x];
        let i   = 0,
            psr = [],
            psi = [],
            p2  = [],
            v   = [],
            fp  = [];

        let fp = fopen ("harmos.txt", "w");
            if (!fp) {
            return false;
            }
        while i <= Myapp\Quantum::MAX{
            let item_psi = sin(k0*x) / exp(x*x*2.0),
                item_psr = cos(k0*x) / exp(x*x*2.0);
            let psr[i] = [item_psr],
                psi[i] = [item_psi],
                v[i] = [5.0*x*x],
                x = x + dx,
                i++;
        }
        var tmp;
        let i =1, j=1,tmp=[2.0];
        for n in range(0, 20000){

            for i in range(1,Myapp\Quantum::MAX - 1 ){
                let psr[i][3] =psr[i][0] - paramater[2]*(psi[i+1][0] + psi[i - 1][0]
                            - tmp[0]*psi[i][0]) / (paramater[0]*paramater[0]) + paramater[2]*v[i][0]*psi[i][0],

                p2[i] = psr[i][0]*psr[i][4] + psi[i][0]*psi[i][0];
            }
            for j in range(1,Myapp\Quantum::MAX - 1 ) {
                let psr[0][5] = 0,
                    psr[Myapp\Quantum::MAX][6]= 0 ;
                let psi[j][7] = psi[j][0] + paramater[2]*(psr[j+1][8] + psr[j - 1][9]
                             - tmp[0]*psr[j][10]) / (paramater[0]*paramater[0]) - paramater[2]*v[j][0]*psr[j][11];
            }
        //output split
        if (n ==0 || n % 2000 == 0) {
            let i =1;
            while i < Myapp\Quantum::MAX - 1 {
            fprintf(fp, "%16.8lf %16.8lf %16.8lf \n",i*dx,n*dt,p2[i]);
                let i = i + 10;
            }
            fprintf(fp, "\n");
        }
        // change new->old
        let j = 1;
        while j <  Myapp\Quantum::MAX - 1 {
                let psi[j][0] = psi[j][12],
                    psr[j][0] = psr[j][13];
                let j++;
        }

    }
    return true;

    }
}
We’ve used many PHP functions such as fopen(), sin(), fprintf(), etc – feel free to study the syntax. I’ll also give you one more example. In the process of working with the Phalcon PHP framework, the function Phalcon\Tag::friendlyTitle() is invalid if you’re working in Vietnamese or German. This example, far simpler than the equation above, creates the file normalizeChars.zep. Insert the following code into the file:
namespace Myapp;

class NormalizeChars{
    public function trans(var s)
    {
            var replace;
        let replace = [
            "ế" : "e",
            "ề" : "e",
            "ể" : "e",
            "ễ" : "e",
            "ệ" : "e",
            //--------------------------------E^
            "Ế" : "e",
            "Ề" : "e",
            "Ể" : "e",
            "Ễ" : "e",
            "Ệ" : "e",
            //--------------------------------e
            "é" : "e",
            "è" : "e",
            "ẻ" : "e",
            "ẽ" : "e",
            "ẹ" : "e",
            "ê" : "e",
            //--------------------------------E
            "É" : "e",
            "È" : "e",
            "Ẻ" : "e",
            "Ẽ" : "e",
            "Ẹ" : "e",
            "Ê" : "e",
            //--------------------------------i
            "í" : "i",
            "ì" : "i",
            "ỉ"  : "i",
            "ĩ" : "i",
            "ị" : "i",
            //--------------------------------I
            "Í" : "i",
            "Ì" : "i",
            "Ỉ"  : "i",
            "Ĩ" : "i",
            "Ị" : "i",
            //--------------------------------o^
            "ố" : "o",
            "ồ" : "o",
            "ổ" : "o",
            "ỗ" : "o",
            "ộ" : "o",
            //--------------------------------O^
            "Ố"  : "o",
            "Ồ" : "o",
            "Ổ"  : "o",
            "Ô" : "o",
            "Ộ"  : "o",
            //--------------------------------o*
            "ớ"  : "o",
            "ờ" : "o",
            "ở"  : "o",
            "ỡ" : "o",
            "ợ"  : "o",
            //--------------------------------O*
            "Ớ"  : "o",
            "Ờ" : "o",
            "Ở"  : "o",
            "Ỡ" : "o",
            "Ợ"  : "o",
            //--------------------------------u*
            "ứ"  : "u",
            "ừ" : "u",
            "ử"  : "u",
            "ữ" : "u",
            "ự"  : "u",
            //--------------------------------U*
            "Ứ"  : "u",
            "Ừ" : "u",
            "Ử"  : "u",
            "Ữ" : "u",
            "Ự"  : "u",
            //--------------------------------y
            "ý"  : "y",
            "ỳ" : "y",
            "ỷ"  : "y",
            "ỹ" : "y",
            "ỵ"  : "y",
            //--------------------------------Y
            "Ý"  : "y",
            "Ỳ" : "y",
            "Ỷ"  : "y",
            "Ỹ" : "y",
            "Ỵ"  : "y",
            //--------------------------------DD
            "Đ"  : "d",
            "đ" : "d",
            //--------------------------------o
            "ó"  : "o",
            "ò" : "o",
            "ỏ"  : "o",
            "õ" : "o",
            "ọ"  : "o",
            "ô" : "o",
            "ơ"  : "o",
            //--------------------------------O
            "Ó"  : "o",
            "Ò" : "o",
            "Ỏ"  : "o",
            "Õ" : "o",
            "Ọ"  : "o",
            "Ô" : "o",
            "Ơ"  : "o",
            //--------------------------------u
            "ú"  : "u",
            "ù" : "u",
            "ủ"  : "u",
            "ũ" : "u",
            "ụ"  : "u",
            "ư" : "u",
            //--------------------------------U
            "Ú"  : "u",
            "Ù" : "u",
            "Ủ"  : "u",
            "Ũ" : "u",
            "Ụ"  : "u",
            "Ư" : "u",

            //--------------------------------a^
            "ấ"  : "a",
            "ầ" : "a",
            "ẩ"  : "a",
            "ẫ" : "a",
            "ậ"  : "a",
            //--------------------------------A^
            "Ấ"  : "a",
            "Ầ" : "a",
            "Ẩ"  : "a",
            "Ẫ" : "a",
            "Ậ"  : "a",
            //--------------------------------a(
            "ắ"  : "a",
            "ằ" : "a",
            "ẳ"  : "a",
            "ẵ" : "a",
            "ặ"  : "a",
            //--------------------------------A(
            "Ắ"  : "a",
            "Ằ" : "a",
            "Ẳ"  : "a",
            "Ẵ" : "a",
            "Ặ"  : "a",
            //--------------------------------A
            "Á"  : "a",
            "À" : "a",
            "Ả"  : "a",
            "Ã" : "a",
            "Ạ"  : "a",
            "Â" : "a",
            "Ă"  : "a",
            //--------------------------------a
            "ả"  : "a",
            "ã" : "a",
            "ạ"  : "a",
            "â" : "a",
            "ă"  : "a",
            "à" : "a",
            "á"  : "a"];
        return strtr(s, replace);

    }
}
Now, we need to tell Zephir that our project must be compiled and the extension generated:
cd myapp
zephir build
On the first time it is run a number of internal commands are executed producing the necessary code and configurations to export this class to the PHP extension. If everything goes well you will see the following message at the end of the output:
Compiling…
Installing…
Extension installed!
Add extension=myapp.so to your php.ini
Don’t forget to restart your web server
Note that since Zephir is will in its infancy, it’s possible to run into bugs and problems. The first time I tried to compile this it didn’t work. I tried the following commands and eventually got it to work:
zephir compile
cd ext/
phpize
./configure
make && sudo make install
The last command will install the module in the PHP extensions folder (in my case: /usr/lib/php5/20121212/). The final step is to add this extension to your php.ini by adding the following line:
extension=/usr/lib/php5/20121212/myapp.so
//or
extension=myapp.so
Restart Apache, and we’re done.
Test the code
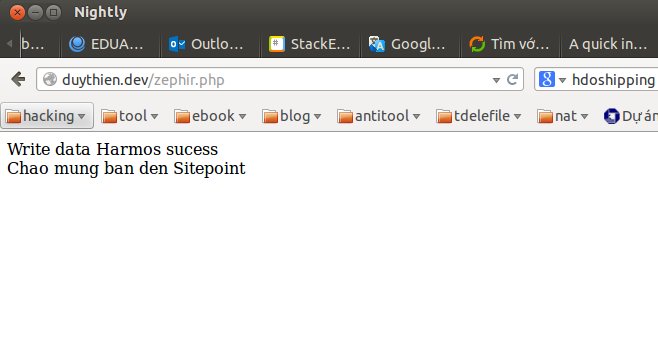
Now, create a new file called zephir.php :
$flow = new Myapp\Quantum();

$ok = $flow->Harmos(-7.5);

if ($ok == true) {
    echo "Write data Harmos sucess <br>";
}

$normalize = new Myapp\NormalizeChars();

echo $normalize->trans("Chào mừng bạn đến Sitepoint");
Finish up by visiting your zephir.php page. It should look similar to the following output:
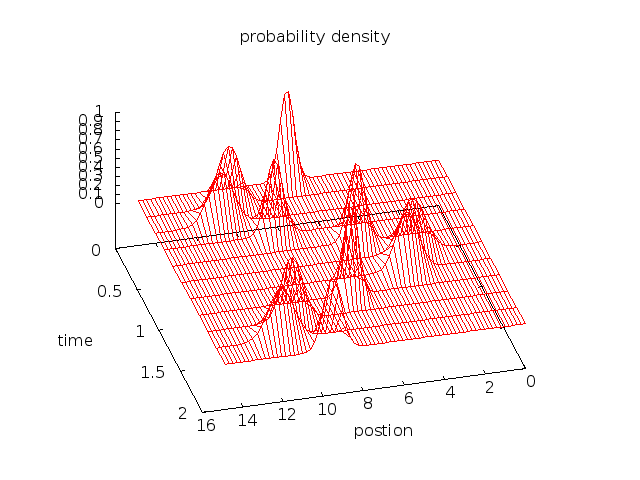
If you’re mathematically inclinced, install gnuplot and run it with the .txt output we got from our Zephir extension:
gnuplot
splot './harmos.txt' w l
This command will draw the image using the data file harmos.txt, which will look like this, proving our equation was calculated properly.
Protected code
In some cases, the compilation does not significantly improve performance, maybe because of a bottleneck located in the I/O bound of the application (quite likely) rather than due to limits in computation or memory. However, compiling code could also bring some level of intellectual protection to your application. When producing native binaries with Zephir, you can also hide the code from users or customers – Zephir allows you to write closed source PHP applications.
Conclusion
This article gave a basic guide on how to create extensions in Zephir. Remember, Zephir wasn’t created to replace PHP or C, but as a complement to them, allowing developers to venture into code compilation and static typing. Zephir is an attempt to join the best things from the C and PHP worlds and make applications run faster, and as such competes rather directly with HHVM and Hack.
For more information on Zephir check out the online documentation. Did you enjoy this article? Let me know in the comments!
Frequently Asked Questions about PHP Extension Development via Zephir
What is Zephir and why is it used in PHP extension development?
Zephir is a high-level, open-source programming language designed for creating PHP extensions easily and efficiently. It is used in PHP extension development because it provides a syntax similar to PHP, making it easier for PHP developers to write extensions without needing to learn the complexities of C, the language typically used for PHP extensions. Zephir also offers memory safety and performance optimization, making the resulting extensions more reliable and faster.
How do I install Zephir?
To install Zephir, you need to clone the Zephir repository from GitHub to your local machine. After cloning, navigate to the cloned directory and run the install command. It’s important to note that Zephir requires certain dependencies like PHP development headers and a C compiler. Make sure these are installed before you start the installation process.
How do I create a PHP extension using Zephir?
Creating a PHP extension using Zephir involves several steps. First, you need to initialize a Zephir project using the init command. This creates a directory structure for your extension. Next, you write your extension code in .zep files. Once your code is ready, you can compile it into a PHP extension using the compile command. Finally, you need to add the extension to your php.ini file to enable it.
What are the benefits of using Zephir over C for PHP extension development?
While C is a powerful language, it can be complex and difficult to use, especially for developers who are not familiar with it. Zephir, on the other hand, provides a simpler, more familiar syntax for PHP developers. It also handles memory management automatically, reducing the risk of memory leaks. Additionally, Zephir includes performance optimizations that can make the resulting extensions run faster.
Can I use Zephir to write extensions for other languages besides PHP?
Currently, Zephir is designed specifically for creating PHP extensions. However, its developers have expressed interest in adding support for other languages in the future. For now, if you want to create extensions for other languages, you will need to use a different tool or language.
How do I debug a Zephir extension?
Debugging a Zephir extension can be done using a variety of tools. One common method is to use the Zephir Parser extension, which provides detailed error messages and can help you identify problems in your code. You can also use standard PHP debugging tools like Xdebug, although these may not provide as much detail for Zephir-specific issues.
What is the performance of Zephir compared to native PHP code?
Zephir is designed to be highly efficient, and in many cases, extensions written in Zephir can be faster than equivalent PHP code. This is because Zephir compiles to C, which is a lower-level language that can be executed more quickly by the computer. However, the exact performance difference can vary depending on the specific code and how it’s used.
Can I contribute to the Zephir project?
Yes, Zephir is an open-source project, and contributions from the community are welcome. If you’re interested in contributing, you can check out the project on GitHub to see what issues are currently open and what help is needed.
Are there any resources for learning Zephir?
There are several resources available for learning Zephir. The official Zephir documentation is a good starting point, providing a comprehensive guide to the language’s features and usage. There are also several tutorials and blog posts available online that can provide additional insights and examples.
What are some common use cases for Zephir?
Zephir is often used when there’s a need to optimize a critical part of a PHP application for performance. It’s also used when there’s a need to interface with a C library, as Zephir can serve as a bridge between PHP and C. Additionally, Zephir can be used to encapsulate complex business logic in a PHP extension, providing a clean, efficient interface for application code.