The J2EE platform is built around an architecture designed for developing distributed, multi-tier systems.
As we saw in Part 1 and Part 2 of this series, such systems are typically implemented around:
- a Web tier, embodied by request handling and user interface generation
- a business tier, exposing business logic, services, and processes
- an integration tier, providing data access and enterprise integration system (EIS) access
The figure below illustrates the various components that make up a typical J2EE environment.
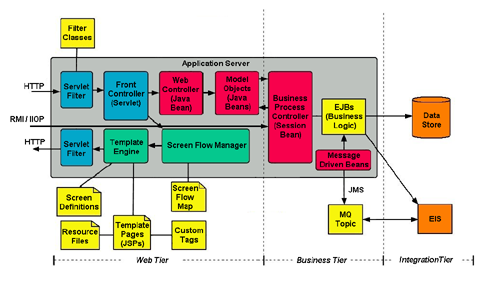
As illustrated, the business tier exposes business-logic as Enterprise JavaBeans (EJBs). The EJB architecture allows a business-logic developer to concentrate on the business logic, leaving the complexities of a distributed, component infrastructure to the EJB container.
The EJB architecture is the center of attention in the J2EE programming model. The EJB specification makes a business-logic developer’s life easier by:
- Presenting a comprehensive set of APIs that a developer can use to implement business-logic components
- Defining a distributed container environment in which EJBs are constructed, invoked, persisted, restored and retired without intervention by the business-logic developer
The Pet Store application is the quintessential sample application being used by distributed environment vendors to benchmark and demonstrate the features and performance of their products. This application demonstrates how to use the technologies of the J2EE platform, including EJBs, to develop full-featured enterprise applications.
The Pet Store application is an incarnation of the Enterprise BluePrints presented by Sun. This working example of the BluePrints enables developers to reduce the learning curve of the J2EE platform by acting as a starting point for a complete, end-to-end solution for most typical enterprise applications. Here, we’ll focus our attention on the Pet Store’s use of EJBs. First, we must install the needed environments.
Installing the Pet Store Application
The Pet Store application must run in an application server environment. The reference implementation application server can be downloaded here. The Pet Store application can be downloaded here.
Once you’ve downloaded the reference implementation and the Pet Store application, run the reference implementation’s install program, then unzip the Pet Store application and extract its contents to your desired directory. Note the install directories and any other information for both products.
The rest of this article will refer to the reference implementation installation directory as <J2EE_HOME> and the Pet Store installation directory as <PETSTORE_INSTALL_DIR>.
From the bin directory of <PETSTORE_INSTALL_DIR>, run the setup script. On a UNIX or Linux system, open a shell window and type:
cd <PETSTORE_INSTALL_DIR>

sh setup.sh
On a Windows system, open a command window and type:
cd <PETSTORE_INSTALL_DIR>

setup.bat
Starting the Database
The Pet Store requires a database to be installed and populated. The reference implementation provides a free database called Cloudscape. You must start the Cloudscape database before you deploy the Pet Store application. On a UNIX or Linux system, open a shell window and type:
cd <J2EE_HOME>/bin

cloudscape -start
On a Windows system, open a command window and type:
cd <J2EE_HOME>bin

cloudscape.bat –start
Starting the Application Server
Now, you must start the application server provided by the reference implementation. This will also start the EJB container provided by the reference implementation. On a UNIX or Linux system, open a shell window and type:
cd <J2EE_HOME>/bin

j2ee -verbose
On a Windows system, open a command window and type:
cd <J2EE_HOME>bin

j2ee.bat -verbose
Building and Deploying the Application
Once you’ve installed everything, started the database and started the application server, you must build and deploy the Pet Store application. To build the application on a UNIX or Linux system, open a shell window and type:
cd <PETSTORE_INSTALL_DIR>/src/apps/admin/src

sh build.sh

cd <PETSTORE_INSTALL_DIR>/src/apps/opc/src

sh build.sh

cd <PETSTORE_INSTALL_DIR>/src/apps/petstore/src

sh build.sh

cd <PETSTORE_INSTALL_DIR>/src/apps/supplier/src

sh build.sh
On a Windows system, open a command window and type:
cd <PETSTORE_INSTALL_DIR>srcappsadminsrc

build.bat

cd <PETSTORE_INSTALL_DIR>srcappsopcsrc

build.bat

cd <PETSTORE_INSTALL_DIR>srcappspetstoresrc

build.bat

cd <PETSTORE_INSTALL_DIR>srcappssuppliersrc

build.bat
After you build the application, you’ll find a .ear file in each of the following directories:
<PETSTORE_INSTALL_DIR>/src/apps/admin/build<PETSTORE_INSTALL_DIR>/src/apps/opc/build<PETSTORE_INSTALL_DIR>/src/apps/petstore/build<PETSTORE_INSTALL_DIR>/src/apps/supplier/build
Now you must deploy the .ear files of the Pet Store application. You can use the deploytool to deploy the .ear files. To deploy the application .ear files using deploytool., on a UNIX or Linux system, open a shell window and type:
cd <J2EE_HOME>/bin

sh deploytool.sh
On a Windows system, open a command window and type:
cd <J2EE_HOME>bin

deploytool.bat
Once the deploytool is running, you will see a window similar to this:
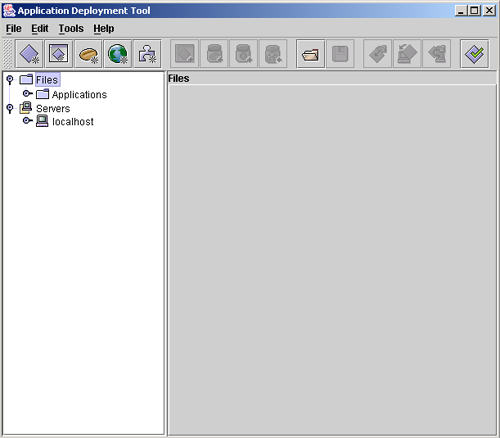
In the deploytool, select the File -> Open menu item for each .ear file of the Pet Store application. A new node will be created in the navigation (left) pane of the deploytool for each .ear file you open. Now, select the node in the navigation pane and click the “Deploy…” menu item. Accept the default options for each pane of the deploy wizard and select the “Next” button until you see the “Finish” button. When the “Finish” button appears, click it. A diagnostic window appears, showing you the progress of the deploy process. When the deploy process is finished, close the dialog and open the next .ear file.
After building and deploying the application, you can start to use it.
Running the Pet Store Application
Using a browser, go to the following URL:
http://localhost:8000/petstore
The first time you run the Pet Store, you will need to create a new user before making a purchase.
- Click the Sign-In link on the home page.
- Fill out the form titled, “I would like to sign up for an account”, and click Create New Account.
- Enter your account information, and click Submit.
Placing an Order
To purchase a bulldog, for example, follow these steps:
- On the home page, select Dogs.
- Click Bulldog.
- Click Add to Cart in the row for the Male Adult Bulldog.
- Click Check Out. A form for your billing and shipping information appears with pre-filled information.
- Click Submit.
When you complete the order, the Storefront sends the order info asynchronously to the order processing center (OPC).
Using the Admin Client
To run the administration module, go to http://localhost:8000/admin/. Launch the administrator, and look at the pending and non-pending orders tabs. The bulldog order will be non-pending, because it was less than $500, and all orders under $500 are automatically approved.
Using the Supplier Client
The supplier and its inventory are managed using a simple Web interface. Be sure to first logout of the admin client, before using the supplier.
To manage the supplier and its inventory, go to http://localhost:8000/supplier/. Look around the inventory; click Display Inventory at the home screen. A table shows the quantity of each item in the inventory.
An Analysis of the Pet Store Application
Let’s take an in-depth look at the Pet Store application’s architecture and expose its structure so we can understand how it’s put together. If we can gain enough knowledge and experience, we might be able to use the application as a platform for some self-directed learning about J2EE.
The Java Pet Store Demo consists of the following high-level module:
- The front page (storefront) presents a typical user interface for a Web application. Customers use the storefront to place orders for pets.
- The order processing center (OPC) module receives orders from the storefront.
- The supplier module fulfills orders from the OPC inventory and invoices the OPC.
- The admin module presents an administrator interface in a JFC/Swing front-end. Administrators use the admin module to examine pending orders and approve or deny them.
Now, let’s take a look at the types of EJBs employed by the Pet Store application and the roles they play.
Stateless Session Beans
ShoppingClientFacadeLocal– Provides a facade to all of the EJBs related to a shopping clientOrderFulfillmentFacade– Facade used by Supplier Order MDB – called every time the supplier gets a PO and will save a PO, try to fulfill an order, create an Invoice for a shipped order, and any other activities needed to fulfil an order when a purchase order arrivesAsyncSender– converts shopping cart contents and customer data into an XML message representing an order, and sends the message to the Order Processing CenterOrderProcessingCenterAdminFacade– the facade that OPC uses to handle admin client requestsProcessManager– provides methods to view and modify information for a particular order workflow processCatalog– provides a programmatic interface to the catalogSignOn– creates and authenticates system usersUniqueIdGenerator– creates globally unique object identifiers
Stateful Session Beans
ShoppingController– controls all the shopping activities that happen for a particular client sessionShoppingClientFacade– acts as an intercessory between a shopping client and any business-logic objectsShoppingCart– maintains the contents of an individual user’s virtual shopping cart
Entity Beans
Inventory– represents the inventory for a given itemCreditCard– tracks card number, card type, and expiration dateAddress– tracks two lines of street address, state, zip code, and countryContactInfo– tracks family and given name, telephone, email, and addressLineItem– represents line-items in an InvoicePurchaseOrder– represents purchase orders from customersCustomer– tracks customer ID (primary key), account, and profileAccount– tracks account status, credit card, and contact infoProfile– tracks preferred language, category, list preference, and banner preferenceUser– represents a user who may sign on to the system; tracks a user name and passwordCounter– represents a counter with a specific prefix; used only byUniqueIdGeneratorto manage series of unique numbersSupplierOrder– represents orders sent from suppliers
Message-Driven Beans
SupplierOrder– processesPurchaseOrdersfrom the Java Pet StorePurchaseOrder– processes PurchaseOrders from the Java Pet StoreInvoice– processes Invoices from the SupplierOrderApproval– processesOrderApprovalsfrom the AdminMailInvoice– processes Invoices received from the SupplierMailOrderApproval– processes receiving an Order ApprovalMailCompletedOrder– processes a completed orderMailer– receives mail messages from the mailer serviceOPCAdminFacade– exposes the interface for the Admin client from OPCManager– provides functionality to view and modify sign-on information for a particular manager
The source code for each EJB is located in an ejb directory under the src directory for each module, as in the following:
<PETSTORE_INSTALL_DIR>/src/apps/opc/src/com/sun/j2ee/blueprints/opc /ejb<PETSTORE_INSTALL_DIR>/src/apps/opc/src/com/sun/j2ee/blueprints/opc/admin/ejb<PETSTORE_INSTALL_DIR>/src/apps/petstore/src/com/sun/j2ee/blueprints/petstore/controller/ejb<PETSTORE_INSTALL_DIR>/src/apps/supplier/src/com/sun/j2ee/blueprints/supplier/inventory/ejb
Browse around at the source code for each of the EJBs and pay attention to the way the interfaces are used and reused.
Summary
The Pet Store application offers a full-featured demonstration of the J2EE platform and provides a quick start to building any typical Web application or distributed application. The Pet Store’s extensive use of EJBs allows business-logic developer’s the opportunity to view many types of interactions and uses for the power of the EJB architecture.
 Jeff Hanson
Jeff has more than 18 years of experience in the software development industry, including almost 7 years experience with Java and J2EE. He's authored numerous articles and books, including NET versus J2EE Web Services: A Comparison of Approaches and Connecting JMX Clients and Servers: Understanding the Java Management Extensions.