

One of the reasons why Java is so popular is because it can be used to build applications, Web pages, applets and beans that can run on several platforms including Windows, Linux and Solaris. Java runs a virtual machine called JVM, and code is compiled into an intermediate format known as Java byte code, which is platform independent. When that particular piece of code is executed within the JVM, the JVM optimizes the code for the platform on which it is running as it is compiled.
Microsoft’s latest technology, .NET, follows the same principles. Code is compiled into Microsoft Intermediate Language (MSIL) and is then executed within the .NET framework as an application domain. Microsoft is hoping to standardize C# and MSIL so that .NET code can run cross-platform.
So what has all of this got to do with PHP-GTK? Well, both Java and .NET can be used to build windowed applications and Web pages. Thanks to PHP-GTK, we can now build cross-platform windowed applications with PHP as well.
In this article we’re going to take a look at PHP-GTK: what it is, how to download and install it, and how to use it to build cross-platform interactive GUI applications. To test the PHP-GTK samples in this article, you should have PHP 4.1.1 or later installed on a Windows, Linux or Unix machine.
Key Takeaways
- Utilize PHP-GTK to create cross-platform windowed applications, leveraging PHP’s capabilities beyond web pages.
- PHP-GTK is an extension that allows the development of GUI applications using PHP, similar to how Java and .NET operate for their respective platforms.
- Installation of PHP-GTK involves downloading from the GTK site, extracting files, and configuring your system to recognize PHP-GTK scripts.
- PHP-GTK supports event-driven programming, enabling interactive GUI applications through signals and callback functions.
- The PHP-GTK library includes a wide range of widgets such as buttons, windows, and text entries, facilitating the creation of rich user interfaces.
- PHP-GTK integrates seamlessly with databases like MySQL, allowing for the development of data-driven applications within a GUI environment.
What is PHP-GTK?
Personally, I’d call PHP-GTK an excellent set of classes that can be used to build applications that contain buttons, windows, toolbars, menus, scroll bars, database access, lists and more. The team that developed PHP-GTK defines it as a PHP extension that allows us to easily write cross-platform GUI based applications.
Funnily enough, PHP-GTK was written to prove that PHP could actually be used to build stuff other that Web pages, and let me tell you that they’ve succeeded.
No doubt you’re familiar with the PHP acronym, but what does GTK mean? GTK stands for GIMP Tool Kit, and it’s basically just a set of widgets that we can use to create applications. A widget is the equivalent of a control (such as a button, list box, frame or radio button) in “Linux speak”.
GIMP is an acronym for GNU Image Manipulation Program, and is a fully featured graphics editing program that runs on Linux. It has many (if not all) of the features of popular Windows programs such as Photoshop and Paintshop. It’s the graphics editor of choice for most Linux users.
GTK is actually part of a set of libraries that was written in C, called GTK+. GTK+ was built up over time and is now a main part of Gnome, which is a Linux GUI desktop environment. GTK+ has an object-oriented nature and also includes two other libraries:
- GLib: A library of tools that can be used to help developers create applications with GTK+.
- GDK: Similar to GDI for Win32, GDK is the standard for GIMP drawing kit and wraps a set of lower level drawing functions into classes that make developing applications with GTK+ easier. If you’re thinking along the lines of MFC for C++ then you’re making a fair comparison: MFC wraps several controls and hides the calls to the underlying Windows API’s from the developer. GDK does the same thing for GTK+.
Although GTK is used in many other applications and projects, in terms of PHP-GTK, it’s an advanced set of classes which can be referenced to create widgets that we can then manipulate programmatically. PHP-GTK’s programming style is similar to event driven programming languages such as Visual Basic and C++, in that it fires off signals. These signals can be captured and specific functions (called callback functions) can be defined to handle them.
I know that we haven’t even looked at PHP-GTK yet, but consider the following PHP code:
$button = &new GtkButton("Click me");


$button->connect("clicked", "buttonClicked");
In the code above I’ve instantiated a new GtkButton class. I’ve then called its connect function passing in two parameters: the name of the signal to capture (clicked) as well as the name of a call-back function to execute when this signal is caught (buttonClicked). This tells PHP-GTK that when the button emits a “clicked” signal, the buttonClicked function should be called.
So if we added a buttonClicked function like this:
function buttonClicked()

{

 echo "You clicked the button";

}
Then “You clicked the button” would be echoed to the screen when the button was clicked on.
That brings me to another point: PHP-GTK apps are run by calling them up with the normal PHP interpreter. The console window in which you called the PHP-GTK GUI app sits in the background and the app sits on top. While the app is running you can still output to the console window using echo, print, etc.
In my opinion this is excellent, because it means you can set a debug flag and treat the console window as a debug window, outputting debugging statements while you build your PHP GTK GUI app. When you’re ready to distribute the app, simply set the debug flag to false or remove the echo commands.
Hopefully now you have a bit of an understanding of what PHP-GTK is. The next step is to actually download and install PHP-GTK, so let’s go!
Downloading and Installing PHP-GTK
As with all GPL licensed software, PHP-GTK is a completely free download. Visit the GTK site and choose the version of PHP-GTK that matches your operation system. At the time of writing, you could choose to download the source, windows binary, as well as the concurrent versions system (CVS) download.
Installing PHP-GTK for Windows
I’m running Windows 2000 with PHP-GTK, so I’ll give you my overview of installing PHP-GTK on Windows. Firstly, make sure you’re equipped with an unzip program such as WinZip. Next, locate the directory where PHP is installed. If you installed PHP using the default options it will be c:php4.
Extract all the files in the downloaded zip file to a directory such as c:temp. Copy all of the files from the php4 directory to your current PHP extensions directory, which can be found in your php.ini file (typically it’s either the directory where you installed PHP, such as c:php4, or the extensions directory of your PHP installation, such as c:php4extensions).
You’ll notice a file called php_win.exe. This executable can be used to run PHP-GTK scripts by simply double clicking on them. Before continuing, let’s set up Windows so that our PHP-GTK scripts will be run automatically when we double click on them.
Double click on any PHP script on your computer. When the “Open With…” dialog appears, choose other and browse to c:php4php_win.exe. Make sure the “Always use this program” checkbox is ticked and click OK. You’ll notice that all your PHP files now have the PHP-GTK icon.
Ok, back to the installation. The winnt directory in your PHP-GTK download contains a php.ini file. If you don’t have a php.ini file in your windows directory already (which is c:windows for Windows 95 and 98 and c:winnt for Windows NT, 2000 and XP), then copy that php.ini file there.
Next, copy all of the files from the winntsystem32 directory of your download to your Windows system directory, which is c:windowssystem for Windows 95 and 98 users and c:winntsystem32 for Windows NT, 2000 and XP users.
Run sysedit (Start -> Run -> “sysedit”) and add the following line to the end of your autoexec.bat file:
path=%path%;c:php4Lastly, copy the test directory to the same directory where PHP is installed. The test directory contains a couple of PHP-GTK scripts that demonstrate how to create and interact with the various PHP-GTK files. Change into the c:php4test directory and double click on hello.php. You should see a PHP-GTK window that contains one button. If everything worked OK, then you’ve successfully installed PHP-GTK.
It might also be a good idea to restart Windows at this point.
Installing PHP-GTK for Linux
I’m going to show you how to download PHP-GTK using PHP’s CVS server. Before you can install PHP-GTK, make sure you have PHP version 4.1.1 or later, CVS, and The Linux GTK+ libraries, as well as:
- libtool 1.3.3 or later,
- automake 1.4 or later,
- autoconf 2.12 or later, bison 1.28 or later, and
- flex 2.54 or later
installed and working correctly.
Firstly, login to the CVS tree using phpfi as your password:
cvs --d :pserver:cvsread@cvs.php.net:/repository loginNext, download PHP-GTK to your machine from PHP’s CVS server:
0

cvs -d :pserver:cvsread@cvs.php.net:/repository co php-gtk
Change into the directory where PHP-GTK was downloaded:
cd php-gtkRun the phpize tool, which should’ve been installed when you installed PHP. It should be in the directory pointed to by your phpize path.
phpizeNow you’ll need to configure, make and install PHP-GTK:
./configure && make && make installLastly, run the following command to execute the hello.php script that was installed when you downloaded PHP-GTK. You should be presented with a PHP-GTK window that contains one button:
php --q test/hello.phpBuilding Our First PHP-GTK App
Now that PHP-GTK’s installed, we’re ready to create our first GUI application. Create a new PHP script called window.php and enter the following code into it:
<?php


 // Load the PHP-GTK extension

 $extension = "php_gtk" . (strpos(PHP_OS, "WIN") >= 0 ? ".dll" : ".so");

 dl($extension);


 // Create a new window

 $window = &new GtkWindow();

 $window->set_title("Test App");

 $window->set_usize(300, 100);

 $window->set_position(GTK_WIN_POS_CENTER);

 $window->set_policy(false, false, false);


 // Set a callback function for the destroy signal

 $window->connect("destroy", "killwin");


 function killwin()

 {

 echo("Window Destroyed!n");

 gtk::main_quit();

 }


 // Show the window

 $window->show_all();


 // Start the main PHP-GTK listener loop

 gtk::main();


?>
Change into the directory where you created window.php and use the following command to execute it:
php --q window.phpHere’s the result of window.php on my Windows 2000 machine:
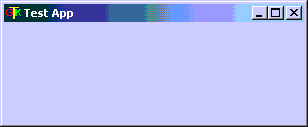
Our First PHP-GTK Window
If you play around with the window, then you’ll notice that you can’t resize or maximize it, because of the calls that window.php makes to various GTK functions. When you close the window, you’ll notice that some text has been output to the console window:
C:>php -q window.php

Window Destroyed!
Let’s run through the code we used to create window.php.
// Load the PHP-GTK extension

$extension = "php_gtk" . (strpos(PHP_OS, "WIN") >= 0 ? ".dll" : ".so");

dl($extension);
As the comment indicates, we load the PHP-GTK extension. The PHP_OS variable contains a word that represents your operating system. On my machine, PHP_OS is “WINNT”. We set the value of the $library variable to either php_gtk.dll (for Windows) or php_gtk.so (for Linux), depending on whether or not PHP_OS contains the string “WIN”. We then call the dl() function to load the extension into memory.
// Create a new window

$window = &new GtkWindow();

$window->set_title("Test App");

$window->set_usize(300, 100);

$window->set_position(GTK_WIN_POS_CENTER);

$window->set_policy(false, false, false);
The most important aspect of any application is the user interface. PHP-GTK defines a class called GtkWindow, which we can instantiate by reference to create a new window. The GtkWindow class includes several functions that we can use to specify how the window will look, where it will be located, etc. In our example I’ve set the windows title using set_title, set its width and height using set_usize, set its position to the center of the screen, and also used set_policy to tell PHP-GTK that the window can’t be resized.
// Set a callback function for the destroy signal

$window->connect("destroy", "killwin");


function killwin()

{

 echo("Window Destroyed!n");

 gtk::main_quit();

}
Most PHP-GTK widgets include a method called connect(), which allows us to specify callback functions that should be executed when a specific event is captured. The PHP-GTK library monitors our application in much the same way as any other object-orientated, event-driven programming language. PHP-GTK is based on the concept of signals and callbacks, which means that if we move the mouse over a button, for example, a signal will be emitted. We can register a callback function to tell PHP-GTK which function(s) to run when this specific signal is emitted.
In our example, I’ve used the connect function to tell PHP-GTK that when our window emits the “destroy” signal (which is emitted when we close the window) that it should execute our killwin function. Our killwin function contains a call to the static function main_quit of the gtk class, which unloads our window and terminates our application.
// Show the window

$window->show_all();


// Start the main PHP-GTK listener loop

gtk::main();
The show_all() function displays our window, and if it contained any widgets then these would be displayed as well. The main function of the gtk class is called statically, and tells the PHP-GTK library to begin its listener loop.
Registering Multiple Callback Functions
One of the great things about PHP-GTK is that you can register multiple callback functions for any signal. This can come in handy if you need to perform multiple tasks when a button is clicked, a window is closed, a tree is expanded, etc.
Let’s take a quick look at how to register multiple callback functions for the destroy signal of the window we created in window.php:
// Set a callback function for the destroy signal

$window->connect("destroy", "function1");

$window->connect("destroy", "killwin");


function function1()

{

 echo("This is some output before the killwin function is called.n");

}


function killwin()

{

 echo("Window Destroyed!n");

 gtk::main_quit();

}
As you can see, I’ve added another call to our windows connect function, specifying that it should also call the function1 function when it is destroyed. I’ve placed the call to connect("destroy", "function1") before the call to connect("destroy", "killwin"). This is an important point to remember: the order in which you register the callback functions is the order in which they will be executed.
The output to my console window from running window.php with the new callback handler and function looks like this:
C:>php -q window.php

This is some output before the killwin function is called.

Window Destroyed!
Adding GTK Widgets to Our Window
So, we’ve created a basic PHP-GTK window and set up the GTK loop, but what good is our application when we can’t even interact with it? Let’s add a text box and button to our window. When we click on the button, any text in the text box will be reversed using PHP’s strrev function.
Before we look at the code to do this, we need to know about the GtkEntry and GtkButton classes. The GtkEntry class is a single-lined text box that allows us to enter, copy, paste, and delete text from it. The GtkButton class is a button that can be clicked, double clicked, etc. Both the GtkEntry and GtkButton classes support the connect event to register callback functions.
Create a new file called reverse.php and enter the following code into it:
<?php


 // Load the PHP-GTK extension

 $extension = "php_gtk" . (strpos(PHP_OS, "WIN") >= 0 ? ".dll" : ".so");

 dl($extension);


 // Create a new window

 $window = &new GtkWindow();

 $window->set_title("Test App");

 $window->set_usize(300, 50);

 $window->set_position(GTK_WIN_POS_CENTER);

 $window->set_policy(false, false, false);


 // Set a callback function for the destroy signal

 $window->connect("destroy", "killwin");


 function killwin()

 {

 echo("Window Destroyed!n");

 gtk::main_quit();

 }


 // Add a GtkVBox class to our window

 $box = &new GtkVBox();

 $window->add($box);


 // Add a GtkEntry class to our window

 $entry = &new GtkEntry();

 $entry->set_text("Hello World");

 $box->pack_start($entry);


 // Add a GtkButton class to our window

 $button = &new GtkButton("Reverse Text");

 $button->connect("clicked", "reverseText", $entry);

 $box->pack_start($button);


 function reverseText($theButton, $theEntry)

 {

 $text = strrev($theEntry->get_text());

 $theEntry->set_text($text);

 }


 // Show the window

 $window->show_all();


 // Start the main PHP-GTK listener loop

 gtk::main();


?>
Run reverse.php. When you click on the button, the text in the text box will be reversed, like this:
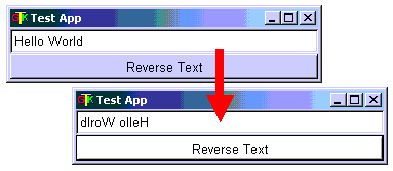
It’s time to introduce a new concept regarding PHP-GTK. Put simply, PHP-GTK doesn’t support absolute positioning of widgets, which means that we can’t add a text box 10 pixels from the left of a window and 20 pixels down. PHP-GTK only supports relative positioning, which requires us to define areas into which widgets can be placed.
The GtkHBox and GtkVBox classes create horizontal and vertical boxes that act as containers for other widgets. In our example above, we create a new GtkVBox object, adding it to our window, like this:
// Add a GtkVBox class to our window

$box = &new GtkVBox();

$window->add($box);
All GTK widgets that are containers (i.e. can hold other widgets) expose the add function, which accepts one parameter: a widget. This widget is then displayed within that container.
The GtkVBox widget inherits many of its functions from its base classes. All GTK widgets are derived from base classes, so most of the widgets share similar functionality. Here’s the hierarchy of the GtkVBox class:
GtkObject

|-- GtkWidget

|---- GtkContainer

|------ GtkBox

|-------- GtkVBox
The GtkBox class exposes a pack_start function. This function is used to add a widget to a GtkBox class or derived class. In our example, we create a new GtkEntry and GtkButton class, adding them to our GtkVBox object using its pack_start function, like this:
// Add a GtkEntry class to our window

$entry = &new GtkEntry();

$entry->set_text("Hello World");

$box->pack_start($entry);


// Add a GtkButton class to our window

$button = &new GtkButton("Reverse Text");

$button->connect("clicked", "reverseText", $entry);

$box->pack_start($button);
As you can see in the example above, we register a callback function for the “clicked” signal of our button. Remember back to our first window.php example where our call to connect contained only two arguments. In the example above, we specify a third parameter, which is our GtkEntry widget, $entry. The callback function we specify is reverseText, which looks like this:
function reverseText($theButton, $theEntry)

{

 $text = strrev($theEntry->get_text());

 $theEntry->set_text($text);

}
The reverseText function accepts two arguments: the widget that emitted the signal (which in our case is the button) as well as a custom argument (which is our GtkEntry widget). The first argument, $theButton is passed in implicitly by PHP-GTK, and we have manually passed in the second argument when we defined our callback function for the buttons “clicked” signal.
Our reverseText function gets the text from our GtkEntry object by calling its get_text function. This text is reversed using PHP’s strrev function, and is then put back into our GtkEntry object by calling its set_text function.
Other PHP-GTK Widgets
PHP-GTK has dozens of other widgets that we can instantiate and use in our application. Here’s a list:
- GtkButton: A button that can be clicked on.
- GtkCalendar: A calendar that shows dates that can be selected.
- GtkCheckButton: A check box that can be toggled on and off.
- GtkCList: A list with several columns that can be scrolled.
- GtkColorSelection: A very cool widget that can be used to select colors.
- GtkCombo: A dropdown list that can also accept typed in text.
- GtkCTree: A tree list that can contain nodes that can expand and collapse.
- GtkDialog: A popup dialog that can be modal.
- GtkEntry: A text box with text that can be changed.
- GtkFileSelection: Similar to Windows common dialog control, the GtkFileSelection control displays a dialog allowing us to choose a file on our local machine.
- GtkFontSelection: A widget that allows us to select various font properties.
- GtkFrame: A frame that can contain a caption.
- GtkHRuler: A horizontal ruler.
- GtkHScrollBar: A horizontal scrollbar.
- GtkImage: A widget for displaying an image.
- GtkMenu: A container widget that can hold menu items.
- GtkNoteBook: A tabbed control that can display multiple tabs.
- GtkProgressBar: A bar that can be used to display the progress of some event.
- GtkRadioButton: A radio button that can be grouped.
- GtkSpinButton: Used to increment/decrement a value using arrows.
- GtkToolTips: Used to add tooltips to other widgets.
- GtkVBox: Vertical box container.
- GtkVScrollBar: A vertical scrollbar.
- GtkWindow: An application window.
As you can see from the classes shown above, PHP-GTK contains all of the necessary classes to facilitate the development of a complete cross-platform GUI application.
Building a Database App with PHP-GTK
One of the cool things about PHP-GTK is that it integrates seamlessly with PHP, so we can still use all PHP’s regular functions in our PHP-GTK applications. The most popular database to use with PHP is MySQL, so let’s create a PHP-GTK app that connects to a MySQL database and retrieves some records.
Enter the following commands at the MySQL console application:
create database people;

use people;


create table programmers

(

 pId int auto_increment,

 pName varchar(50),

 pAge tinyint,

 primary key(pId),

 unique id(pId)

);
Add some people to our programmers’ table with the following insert commands:
insert into programmers values(0, 'Bill Smith', 23);

insert into programmers values(0, 'James Black', 45);

insert into programmers values(0, 'Lyonel Jones', 18);

insert into programmers values(0, 'Phil Brown', 22);

insert into programmers values(0, 'Michael Clay', 56);
Now let’s create a PHP-GTK app that connects to our database and retrieves the records from our programmers’ table. The app is a bit large to post here in its entirety, so download the support material for this article if you want to test it on your machine.
Our app starts by creating several labels and text boxes, as well as one command button, which, when clicked will connect to a MySQL server:
$button = &new GtkButton("Connect and Get Rows");

$button->connect("clicked", "getdata");

$box->pack_start($button);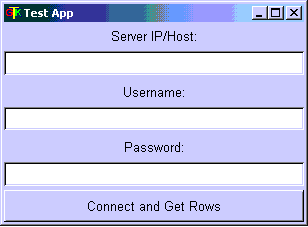
The getdata function connects to MySQL using the host, username and password values from the GtkEntry controls in our app:
function getdata($theButton)

{


global $server;

global $user;

global $pass;


...


$dServer = $server->get_text();

$dUser = $user->get_text();

$dPass = $pass->get_text();


$s = mysql_connect($dServer, $dUser, $dPass) or die("Couldn't

connect to database server");


$d = mysql_select_db("people", $s);
Next, all of the controls that occupy our GtkVBox widget are hidden:
// Hide all controls

$label1->hide();

$label2->hide();

$label3->hide();

$server->hide();

$user->hide();

$pass->hide();

$button->hide();
It then queries the programmer’s table, looping through each result and adding it to a string variable:
$result = mysql_query("select * from programmers order by pName asc");

$pList = "";


while($row = mysql_fetch_array($result))

{

 // Create a string array

 $pList .= $row["pName"] . " is " . $row["pAge"] . "n";

}
It then creates a new GtkLabel widget and assigns the value of the $pList variable to the label by passing it to the labels constructor. The label is then added to the GtkVBox widget, which is part of our main window:
// Create a GtkCList and show it

$p = &new GtkLabel("$pList");

$box->add($p);

$p->show();
Here’s how the window looks before:
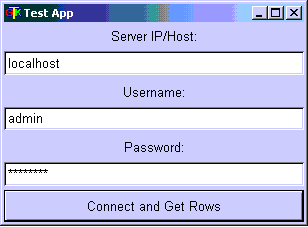
…and after I click the connect button:
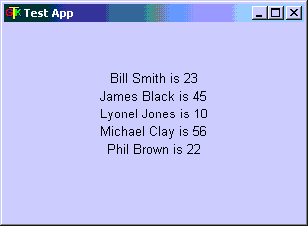
As you can see, the GtkLabel and GtkEntry objects are hidden, and the new label is displayed inside of out GtkVBox object.
Conclusion
In this article we’ve covered everything you need to know to start creating cross platform GUI applications with PHP and the PHP-GTK library. We’ve seen how to download and install PHP-GTK, as well as several ways to create simple apps with it.
Of course PHP-GTK contains heaps of other functionality and widgets, so make sure you check out the links below if you’re after more information on PHP-GTK. You can also download the support material for this article using the link shown below.
- The PHP-GTK Manual
- Sourceforge, the world’s largest open source development site.
- This article’s support materials.
Frequently Asked Questions (FAQs) about PHP for Windowed Apps
What are the benefits of using PHP for windowed apps?
PHP is a versatile scripting language that’s particularly effective for web development. It can be embedded into HTML and is compatible with various servers and operating systems. When used for windowed apps, PHP offers several benefits. It’s open-source, meaning it’s free to use and has a large community of developers constantly improving it. PHP also has a low learning curve, making it accessible for beginners. It’s capable of handling complex applications and can be integrated with various databases like MySQL, Oracle, and more.
How does PHP compare to .NET for cross-platform desktop applications?
Both PHP and .NET have their strengths when it comes to cross-platform desktop applications. PHP is open-source, easy to learn, and has a large community of developers. It’s also highly flexible and can be integrated with various databases. On the other hand, .NET, particularly .NET Core, is a powerful framework that allows for the development of efficient, scalable applications. It supports multiple languages like C#, F#, and Visual Basic, and has robust security features. The choice between the two often depends on the specific requirements of your project.
Is PHP still relevant for windowed apps in 2022?
Yes, PHP remains a popular choice for windowed apps in 2022. Despite the emergence of other languages and frameworks, PHP’s simplicity, flexibility, and robustness keep it relevant. Its open-source nature and large community of developers ensure that it continues to evolve and improve. Moreover, PHP’s compatibility with various databases and servers makes it a versatile choice for windowed apps.
How does PHP handle cross-platform mobile development?
PHP isn’t typically the first choice for cross-platform mobile development, as it’s primarily a server-side scripting language. However, with the right tools and frameworks, it’s possible to use PHP for this purpose. For instance, you can use PHP to develop the backend of your mobile app, handling tasks like database interactions, user authentication, and more. For the frontend, you can use technologies like HTML, CSS, and JavaScript.
Can I use Visual Studio for PHP development?
Yes, you can use Visual Studio for PHP development. Visual Studio is a powerful integrated development environment (IDE) that supports multiple languages, including PHP. It offers features like syntax highlighting, code completion, and debugging tools, which can enhance your PHP development experience. However, you’ll need to install a PHP extension to enable PHP support in Visual Studio.
How does PHP performance compare to other languages for windowed apps?
PHP’s performance can vary depending on the specific task or application. For web-based applications, PHP is known for its speed and efficiency. However, for more complex, resource-intensive tasks, other languages like C# or Java might offer better performance. It’s important to choose the right tool for the job, considering factors like the nature of your project, your team’s expertise, and the specific requirements of your application.
What are some challenges of using PHP for windowed apps?
While PHP offers many benefits, it also has its challenges. For instance, PHP isn’t typically used for desktop applications, so you might face limitations in terms of UI design and performance. PHP also lacks some of the advanced features of languages like C# or Java. However, with the right tools and frameworks, you can overcome many of these challenges and create effective windowed apps with PHP.
How can I optimize PHP for windowed apps?
Optimizing PHP for windowed apps involves several strategies. First, ensure your code is clean and efficient, avoiding unnecessary computations and database queries. Use caching to improve performance, and consider using a PHP accelerator to compile your PHP code into bytecode. Also, keep your PHP version up to date to benefit from the latest improvements and optimizations.
Can PHP be used for large-scale windowed apps?
Yes, PHP can be used for large-scale windowed apps. PHP is capable of handling complex applications and can be integrated with various databases, making it suitable for large-scale projects. However, for optimal performance and scalability, it’s important to follow best practices in PHP development, such as using efficient code, leveraging caching, and keeping your PHP version up to date.
What resources are available for learning PHP for windowed apps?
There are many resources available for learning PHP for windowed apps. Online tutorials, courses, and documentation can provide a solid foundation in PHP. Websites like PHP.net offer comprehensive documentation, while platforms like Udemy and Coursera offer courses on PHP development. Additionally, the PHP community is active and supportive, with numerous forums and discussion boards where you can ask questions and learn from experienced developers.

