
Key Takeaways
- The article provides a comprehensive guide on installing PHP 8.2 and Apache 2.4 on Windows 10 or 11 (64-bit), noting that while Linux and macOS often have these pre-installed, Windows requires additional steps. The guide also covers alternative installation options such as using an all-in-one package, a Linux virtual machine, Windows Subsystem for Linux 2, or Docker.
- The article explains the benefits of installing PHP locally on a development PC, as it allows for the creation and testing of websites and applications without affecting live server data or systems. It also highlights the importance of emulating the live server environment as closely as possible to prevent development errors.
- The guide provides detailed steps for installing Apache and PHP directly on Windows, including downloading and extracting files, configuring php.ini, adding PHP to the PATH environment variable, configuring PHP as an Apache module, and testing a PHP file. It also provides additional resources for further information on Apache and MySQL installation.
This article explains how to install PHP 8.2 and Apache 2.4 on Windows 10 or 11 (64-bit).
Linux and macOS users often have Apache and PHP pre-installed or available via package managers. Windows requires a little more effort. The steps below may work with other editions of Windows, PHP, and Apache, but check the documentation of each dependency for specific instructions.
Contents:
- Why PHP?
- Why Install PHP Locally?
- Alternative Installation Options
- Installing Apache (optional)
- Installing PHP
Why PHP?
PHP remains the most widespread and popular server-side programming language on the Web. It’s installed by most web hosts, and has a simple learning curve, close ties with the MySQL database, superb documentation, and a wide collection of libraries to cut your development time. PHP may not be perfect, but you should consider it for your next web application. It’s the language of choice for Facebook, Slack, Wikipedia, MailChimp, Etsy, and WordPress (the content management system which powers almost 45% of the web).
To get your PHP setup blazing fast, check out our free book on improving PHP Performance.
Why Install PHP Locally?
Installing PHP on your development PC allows you to create and test websites and applications without affecting the data or systems on your live server.
Alternative Installation Options
Before you jump in, there may be a simpler installation options…
Using an all-in-one package
All-in-one packages are available for Windows. They contain Apache, PHP, MySQL, and other useful dependencies in a single installation file. These packages include XAMPP, WampServer and Web.Developer.
These packages are easy to use, but they may not match your live server environment. Installing Apache and PHP manually will help you learn more about the system and configuration options.
Using a Linux virtual machine
Microsoft Hyper-V (provided in Windows Professional) and VirtualBox are free hypervisors which emulate a PC so you can install another operating system.
You can install any version of Linux, then follow its Apache and PHP installation instructions. Alternatively, distros such as Ubuntu Server provide them as standard (although they may not be the latest editions).
Using Windows Subsystem for Linux 2
WSL2 is also a virtual machine, but it’s tightly integrated into Windows so activities such as file sharing and localhost resolution are seamless. You can install a variety of Linux distros, so refer to the appropriate Apache and PHP instructions.
Using Docker
Docker creates a wrapper (known as a container) around pre-configured application dependencies such as Apache, PHP, MySQL, MongoDB, and most other web software. Containers look like full Linux Virtual Machines but are considerably more lightweight.
Once you’ve installed Docker Desktop on Windows, it’s easy to download, configure, and run Apache and PHP.
Docker is currently considered the best option for setting up a PHP development environment. Check out SitePoint’s article Setting Up a Modern PHP Development Environment with Docker for a complete guide to setting it up.
Installing Apache (optional)
The following sections describe how to install Apache and PHP directly on Windows.
PHP provides a built-in web server, which you can launch by navigating to a folder and running the PHP executable with an -S parameter to set the localhost port. For example:
cd myproject
php -S localhost:8000
You can then view PHP pages in a browser at http://localhost:8000.
This may be adequate for quick tests, but your live server will use Apache or similar web server software. Emulating that environment as closely as possible permits more advanced customization and should prevent development errors.
To install Apache, download the latest Win64 ZIP file from https://www.apachelounge.com/download/ and extract its Apache24 folder to the root of your C: drive. You’ll also need to install the Visual C++ Redistributable for Visual Studio 2015–2020 (vc_redist_x64); the page has a link at the top.
Open a cmd command prompt (not PowerShell) and start Apache with:
cd C:\Apache24\bin
httpd
You may need to accept a firewall exception before the server starts to run. Open http://localhost in a browser and an “It works!” message should appear. Note:
C:\Apache24\conf\httpd.confis Apache’s configuration file if you need to change server settings.C:\Apache24\htdocsis the web server’s root content folder. It contains a singleindex.htmlfile with the “It works!” message.
If Apache fails to start, another application could be hogging port 80. (Skype is the prime candidate, and the Windows app won’t let you disable it!) If this occurs, edit C:\Apache24\conf\httpd.conf and change the line Listen 80 to Listen 8080 or any other free port. Restart Apache and, from that point onward, you can load web files at http://localhost:8080.
Stop the server by pressing Ctrl + C in the cmd terminal. The ReadMe file in the ZIP also provides instructions for installing Apache as a Windows service so it auto-starts on boot.
Installing PHP
Install PHP by following the steps below. Note that there’s more than one way to configure Apache and PHP, but this is possibly the quickest method.
Step 1: Download the PHP files
Get the latest PHP x64 Thread Safe ZIP package from https://windows.php.net/download/.
Step 2: Extract the files
Create a new php folder in the root of your C:\ drive and extract the content of the ZIP into it.
You can install PHP anywhere on your system, but you’ll need to change the paths referenced below if you use anything other than C:\php.
Step 3: Configure php.ini
PHP’s configuration file is php.ini. This doesn’t exist initially, so copy C:\php\php.ini-development to C:\php\php.ini. This default configuration provides a development setup which reports all PHP errors and warnings.
You can edit php.ini in a text editor, and you may need to change lines such as those suggested below (use search to find the setting). In most cases, you’ll need to remove a leading semicolon (;) to uncomment a value.
First, enable any required extensions according to the libraries you want to use. The following extensions should be suitable for most applications including WordPress:
extension=curl
extension=gd
extension=mbstring
extension=pdo_mysql
If you want to send emails using PHP’s mail() function, enter the details of an SMTP server in the [mail function] section (your ISP’s settings should be suitable):
[mail function]
; For Win32 only.
; http://php.net/smtp
SMTP = mail.myisp.com
; http://php.net/smtp-port
smtp_port = 25

; For Win32 only.
; http://php.net/sendmail-from
sendmail_from = my@emailaddress.com
Step 4: Add C:\php to the PATH environment variable
To ensure Windows can find the PHP executable, you must add it to the PATH environment variable. Click the Windows Start button and type “environment”, then click Edit the system environment variables. Select the Advanced tab, and click the Environment Variables button.
Scroll down the System variables list and click Path, followed by the Edit button. Click New and add C:\php.
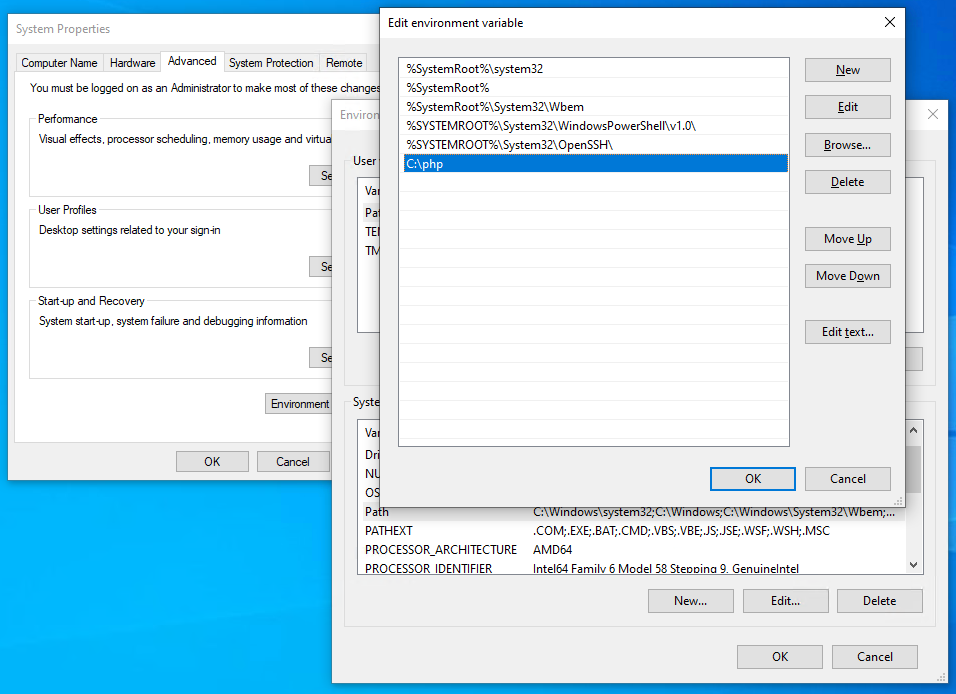
Note that older editions of Windows provide a single text box with paths separated by semi-colons (;).
Now OK your way out. You shouldn’t need to reboot, but you may need to close and restart any cmd terminals you have open.
Step 5: Configure PHP as an Apache module
Ensure Apache is not running and open its C:\Apache24\conf\httpd.conf configuration file in a text editor. Add the following lines to the bottom of the file to set PHP as an Apache module (change the file locations if necessary but use forward slashes rather than Windows backslashes):
# PHP8 module
PHPIniDir "C:/php"
LoadModule php_module "C:/php/php8apache2_4.dll"
AddType application/x-httpd-php .php
Optionally, change the DirectoryIndex setting to use index.php as the default in preference to index.html. The initial setting is:
<IfModule dir_module>
    DirectoryIndex index.html
</IfModule>
Change it to:
<IfModule dir_module>
    DirectoryIndex index.php index.html
</IfModule>
Save httpd.conf and test the updates from a cmd command line:
cd C:\Apache24\bin
httpd -t
Syntax OK will appear … unless you have errors in your configuration.
If all went well, start Apache with httpd.
Step 6: Test a PHP file
Create a new file named index.php in Apache’s web page root folder at C:\Apache24\htdocs. Add the following PHP code:
<?php
phpinfo();
?>
Open a web browser and enter your server address: http://localhost/. A PHP version page should appear, showing all PHP and Apache configuration settings.
You can now create PHP sites and applications in any subfolder of C:\Apache24\htdocs. If you need to work more than one project, consider defining Apache Virtual Hosts so you can run separate codebases on different localhost subdomains or ports.
Further information:
- How to Install Apache
- How to Install MySQL
- MySQL: the Pros and Cons of MyISAM Tables
- MySQL: the Pros and Cons of InnoDB Tables
- How to Use MySQL Foreign Keys for Quicker Database Development
- Book: PHP & MySQL: Novice to Ninja, 7th Edition
- Book: Jump Start PHP Environment, as well as many more books in our library.
Best of luck!