
It’s IoT Week at SitePoint! All week we’re publishing articles focused on the intersection of the internet and the physical world, so keep checking the IoT tag for the latest updates.
In the first part of this series, we learned a bit of Minecraft and the circuitry we can make inside it. We also made a circuit to alert us when the door to our mansion was opened.
We then hooked this virtual alarm to a listening PHP script, so we can know when the door is opened in the context of a PHP script.
In this part, we’ll build a small Arduino-based alarm circuit. We’ll learn how to trigger the alarm, using the the official IDE and programming language, and then using something called Firmata.
We’ll round the series out by connecting the alarm circuit to the Minecraft circuit, so we hear a real alarm for Minecraft mansion.
You can find the code for this tutorial at https://github.com/sitepoint-editors/tutorial-php-arduino-and-minecraft/tree/connect-arduino
Crash Course in Arduino Programming
Arduino is one of many types hobbyist circuit controllers. There are a few different designs, like the bigger Uno or the smaller Micro.
What’s common among them is that they have ports/pins for connecting to different components (e.g. buttons, sensors, and LEDs) and understand a common programming languages. The programming languages are C and C++, which is about the hardest thing to learn about Arduino.
You can think of Arduino boards as smaller, simpler computers, capable of abstracting the basics of circuitry and providing a programatic interface for them.
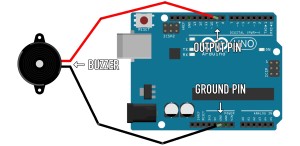
You’ll need to get an Arduino (or alternatives discussed later) and an alarm buzzer or LED.
The buzzer and/or LED have two pins: one for ground (sometimes labelled “gnd” or “-“) and the other which needs to go to an Arduino port/pin:

I modelled this in Fritzing. It’s fantastic, and you should give it a try!
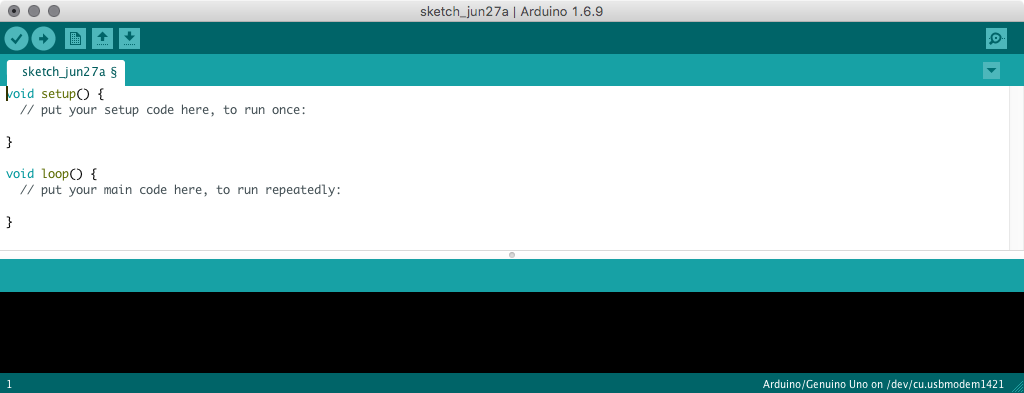
Next, we need to download the official IDE. Head over to https://www.arduino.cc/en/Main/Software and download the version appropriate for your operating system. Load it up and you should see something like this:
The primary Arduino programming languages are C and C++. Functions look similar to PHP 7 functions, where the return type takes the place of the function keyword. So we see a couple of methods that should return void (meaning they shouldn’t return anything).
The setup function is called as the Arduino starts up. As the name suggests, we can use it to do initial setup of the board. You see those numbers next to each pin/port on the Arduino? Those can be used for input or output (digital and analog). In fact, it’s generally a good idea to define the function of each pin before it’s used.
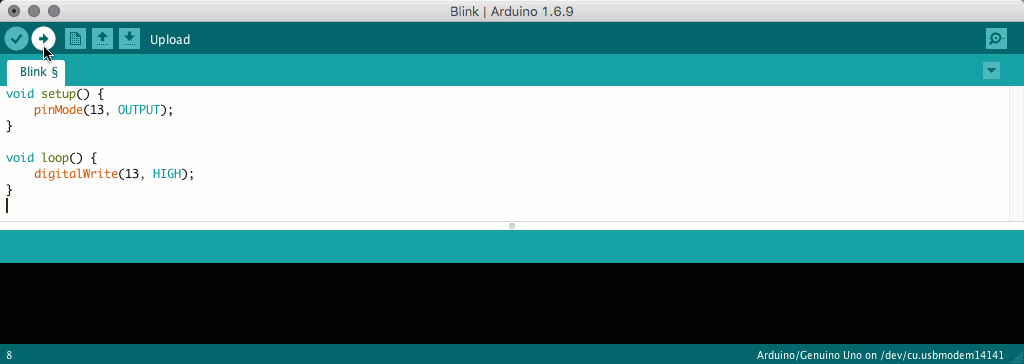
Many Arduino boards come with pin 13 already connected to an LED on the board. We can switch this on using the following code:
void setup() {
    pinMode(13, OUTPUT);
}

void loop() {
    digitalWrite(13, HIGH);
}
Before we can upload this code to the Arduino, we need to find where it is. Open up a terminal window and try the following command:
ls /dev | grep usbmodem
This command lists everything in /dev (which on OSX and most Linux systems is where we can find the device names of USB devices plugged into our system). It then takes this list and pipes it through the Grep command, to filter out all item that contain the word usbmodem.
Take note of the items returned. If you don’t see any, something may be wrong with your Arduino or it may just not be plugged in properly. Let us know, in the comments, if you can’t get past this step…
Go back to the Arduino IDE, and select the matching Arduino port, from the “Tools” → “Port” menu. It’s good to know the actual device name, even though you could have guessed it without the terminal commands, since we need the exact name later on.
Once you’ve set the correct port, and picked the applicable Arduino type (from the “Tools” → “Board” menu), you should be able to upload the example to the board.
The Arduino IDE takes the C or C++ code and compiles it to bytecode the board can understand. This process of writing, compiling, and uploading code to the Arduino can be frustratingly slow for us PHP folk. We’ll use an easier approach soon.
You can find many example Arduino programs, via the “File” → “Examples” menu. I found these invaluable when getting to grips with the C syntax and board capabilities!
In fact, the easier way to check if an Arduino is working, and connected correctly, is to upload the “Blink” example:
If you’ve connected the buzzer or LED correctly, you can even alter the script to set the applicable port to HIGH/Low. But it’s a slow and frustrating process, to have to learn C and constantly re-upload code to the Arduino.
Sometimes figuring out how different components work is tricky. Here’s a guide to get you started!
Familiar PHP
Let’s try something different. In the realm of Arduino there exists a universal language with which we can communicate. It’s a protocol called Firmata, and it enables us to use any language to make our tech whir.
Go to the “Examples” → “Firmata” → “StandardFirmata” example, and upload it to your Arduino. It’s now able to communicate through a standard serial interface.
If you’ve not yet downloaded the code from the last post, now is a good time to do so. We’re going to build on top of it…
We need to add a new library to those we already have:
composer require carica/firmata
This library acts as a client for the Standard Firmata code we just uploaded to our Arduino. In index.php we can add the following code, to connect to the Arduino:
use Carica\Io;
use Carica\Firmata;

$board = new Firmata\Board(
    Io\Stream\Serial\Factory::create(
        "/dev/cu.usbmodem14141", 57600
    )
);
You will definitely need to close the Arduino IDE before attempting to run this code. It opens connections to the Arduino which block subsequent connections from our PHP script. If you’re unable to connect to the Arduino at any point, simply disconnect and re-connect the Arduino to the same USB port. This will break any open connections which could be blocking things up.
You’ll need to replace the cu.usbmodem14141 with the device name you got from the terminal command (or found in the IDE “Tools” → “Port” menu).
Let’s add an event listener, for when the PHP script finally connects to the Arduino:
$board
    ->activate()
    ->done(
        function() use ($board, $loop, $watcher) {
            $pin = $board->pins[9];
            $pin->mode = Firmata\Pin::MODE_PWM;

            print "connected to Arduino";
        }
    );

$loop->run();
We can attach a callback to be run after the PHP script finally connects to the board. We have to set the mode of the Arduino pin/port, just like we did in the Arduino IDE C code. This time we’re setting pin 9 to PWM (Pulse-Width Modulation) mode.
Most Arduino pins can be set to HIGH or LOW. Devices set to HIGH will switch on (an LED will light up), and set to LOW will switch off. PWM is an incremental mode, where values between 0 and 255 provide granular charge to connected devices. Technically PWM is more like rapidly switching between HIGH and LOW for x/255 of the time it would otherwise be set to HIGH, but the observable effects are the same.
Notice we’ve brought the $watcher and $loop through? $loop is an instance of an event loop, which is not all that common in PHP applications. If you’ve unfamiliar with what event loops are, or how they work, check out the introduction we gave a while ago…
We can use a concept similar to JavaScript’s setInterval function, by attaching a callback to the event loop we have here:
print "connecting.";

$board
    ->activate()
    ->done(
        function() use ($board, $loop, $watcher) {
            print "connected.";

            $pin = $board->pins[9];
            $pin->mode = Firmata\Pin::MODE_PWM;

            $loop->setInterval(
                function() use ($pin, $watcher) {
                    // this is called about every second
                },
                1000
            );
        }
    );
So, instead of using an infinite loop to check for changes to log files, we can use an event loop timer. When combined with the rest of the script, we can set pin 9 to a value between 0 and 255:
$loop->setInterval(
    function() use ($pin, $watcher) {
        print "check.";

        $watcher->findChanges();
        $changes = $watcher->getUpdatedResources();

        if (count($changes) > 0) {
            $first = $changes[0];

            $lines = file($first);

            for ($i = count($lines) - 1; $i > -1; $i--) {
                if (stristr($lines[$i], "CHAT")) {
                    if (stristr($lines[$i], "closed")) {
                        print "open.";

                        $pin->analog = 0; // 0/255
                    }

                    if (stristr($lines[$i], "open")) {
                        print "closed.";

                        $pin->analog = 0.5; // 127/255
                    }

                    break;
                }
            }
        }
    },
    1000
);
We’re using roughly the same code we made last time. This time, instead of writing open or closed to the terminal, we’re setting the analog value of pin 9. analog relates to the PWM setting we did earlier. If we wanted to use the simpler HIGH or LOW values, we could set the pin mode to digital:
$pin->mode = Pin::MODE_OUTPUT;
…and set the digital value of the pin:
if (stristr($lines[$i], "closed")) {
    $pin->digital = 0;
}

if (stristr($lines[$i], "open")) {
    $pin->digital = 1;
}
Bring In The Gorilla
While working through this, I found the Arduino/Firmata/OSX link to be unstable at times. The Carica Firmata library uses a few different methods (depending on the availability of extensions), and the default is native socket streams. Unfortunately, the version of Arduino I have automatically resets after new connections are made, and Firmata requires a short delay before communicating with the Arduino.
The native socket stream implementation (in Carica Firmata) communicates too quickly with the board, which interrupts the boot cycle. Trouble ensues.
I was able to avoid this by installing the Gorilla extension, which is supported by Carica Firmata. You can find instructions on how to do this, over at Github. Build and enable the Gorilla extension, and you shouldn’t suffer the same stability issues I did…
Even though there are many different micro controllers you could use for this project, I’m focussing on Arduino because that’s what I have. If you have something else (that’s compatible with Firmata) then the code in this part should work for you. You’ll have to figure out how to connect the buzzer or LED to your micro controller though…
We’ve successfully implemented half a circuit inside Minecraft, and the other half on Arduino. In addition, we’ve discovered one way to connect them both through PHP. Think of the possibilities!
Frequently Asked Questions about PHP, Arduino, and Minecraft
How can I connect my Arduino to PHP?
Connecting your Arduino to PHP involves a few steps. First, you need to install the PHP serial class which allows PHP to communicate with serial ports. Then, you need to connect your Arduino to your computer and upload a simple sketch to it. After that, you can write a PHP script to send data to the Arduino. Remember to set the correct COM port and baud rate in your PHP script.
How can I control an Arduino with PHP?
To control an Arduino with PHP, you need to use the PHP serial class. This class allows PHP to communicate with serial ports. You can send commands from your PHP script to the Arduino by writing to the serial port. The Arduino can then execute these commands.
How can I use PHP to interact with Minecraft?
PHP can interact with Minecraft through the use of a Minecraft Query library. This library allows PHP to send queries to a Minecraft server and receive information about the server’s status, players, and more. You can use this information to create dynamic web pages that display real-time information about your Minecraft server.
How can I get data from PHP using Arduino?
To get data from PHP using Arduino, you need to use the PHP serial class. This class allows PHP to communicate with serial ports. You can send data from your PHP script to the Arduino by writing to the serial port. The Arduino can then read this data and use it in its program.
How can I run a PHP script from Arduino?
Running a PHP script from Arduino is not directly possible because Arduino is a microcontroller, not a full-fledged computer. However, you can use Arduino to send data to a PHP script running on a computer. The PHP script can then process this data and perform actions based on it.
How can I convert Minecraft item names to item IDs using PHP?
Converting Minecraft item names to item IDs using PHP can be done using a Minecraft Query library. This library allows PHP to send queries to a Minecraft server and receive information about the server’s status, players, and more. You can use this information to create a lookup table that maps item names to item IDs.
How can I use PHP to query a Minecraft server?
To query a Minecraft server using PHP, you need to use a Minecraft Query library. This library allows PHP to send queries to a Minecraft server and receive information about the server’s status, players, and more. You can use this information to create dynamic web pages that display real-time information about your Minecraft server.
How can I control a Minecraft server with PHP?
Controlling a Minecraft server with PHP is possible through the use of a Minecraft Query library. This library allows PHP to send commands to a Minecraft server. These commands can be used to control various aspects of the server, such as kicking players, changing game modes, and more.
How can I use Arduino to interact with Minecraft?
Arduino can interact with Minecraft through the use of a Minecraft Query library. This library allows Arduino to send queries to a Minecraft server and receive information about the server’s status, players, and more. You can use this information to create dynamic web pages that display real-time information about your Minecraft server.
How can I use PHP to control an Arduino remotely?
To control an Arduino remotely using PHP, you need to use the PHP serial class. This class allows PHP to communicate with serial ports. You can send commands from your PHP script to the Arduino by writing to the serial port. The Arduino can then execute these commands. To control the Arduino remotely, you would need to have the PHP script running on a server that is accessible over the internet.
 Christopher Pitt
Christopher is a writer and coder, working at Over. He usually works on application architecture, though sometimes you'll find him building compilers or robots.