Setup
Our setup will be split into two sections. The first will cover the steps that we need to follow on the Notion software and API. In the second, we’ll get our hands on the code by initializing a folder, adding the Notion dependency and creating the initialindex.js and editing the package.json to make everything work.
To follow along, you’ll need a Notion account (more on that below), as well as a recent copy of Node installed on your machine. As ever, the code for the tutorial can be found on GitHub.
The Notion Setup
If you don’t already have a Notion account, please create one by following this link. It has a very generous free tier and you don’t have to add any payment information! After creating your account and logging in, create a new page by choosing Add a page and give it a name. For this tutorial, we’ll choose theTable database. This will give us an empty table, which is exactly what we want!
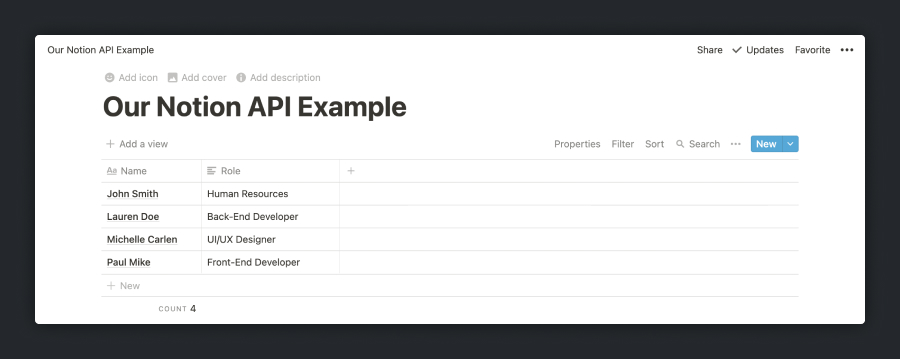
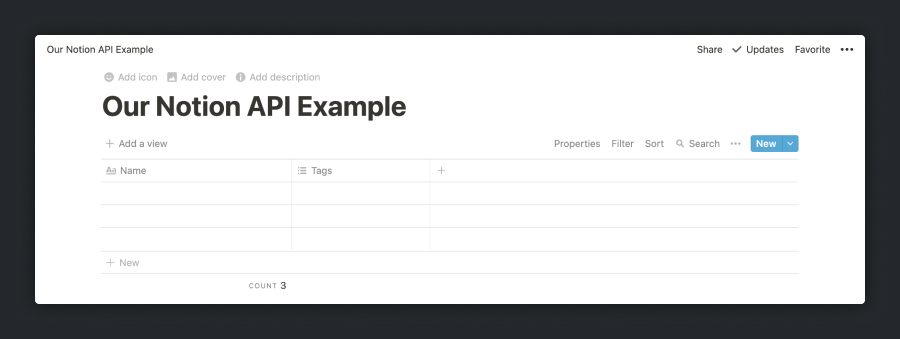 The next step is to create some columns on our
 database and fill them with some mock data. For this tutorial, we’ll work just with Name and Role fields, as if we’re working with a database of employees in a company.
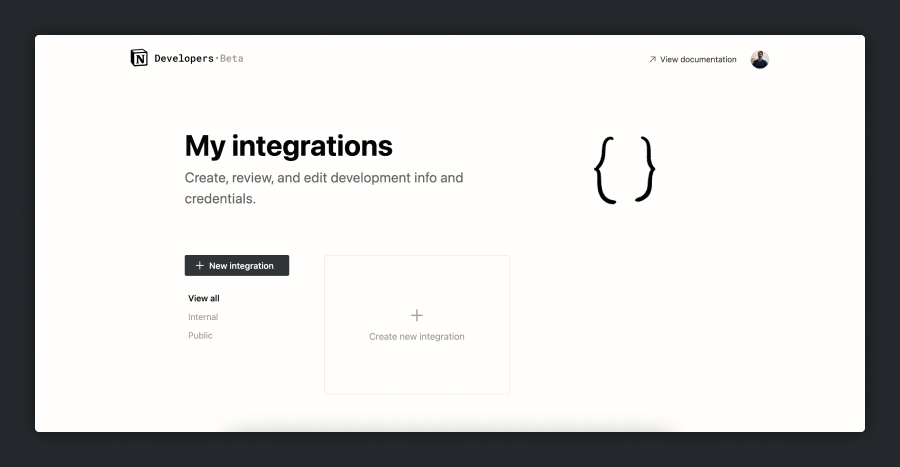
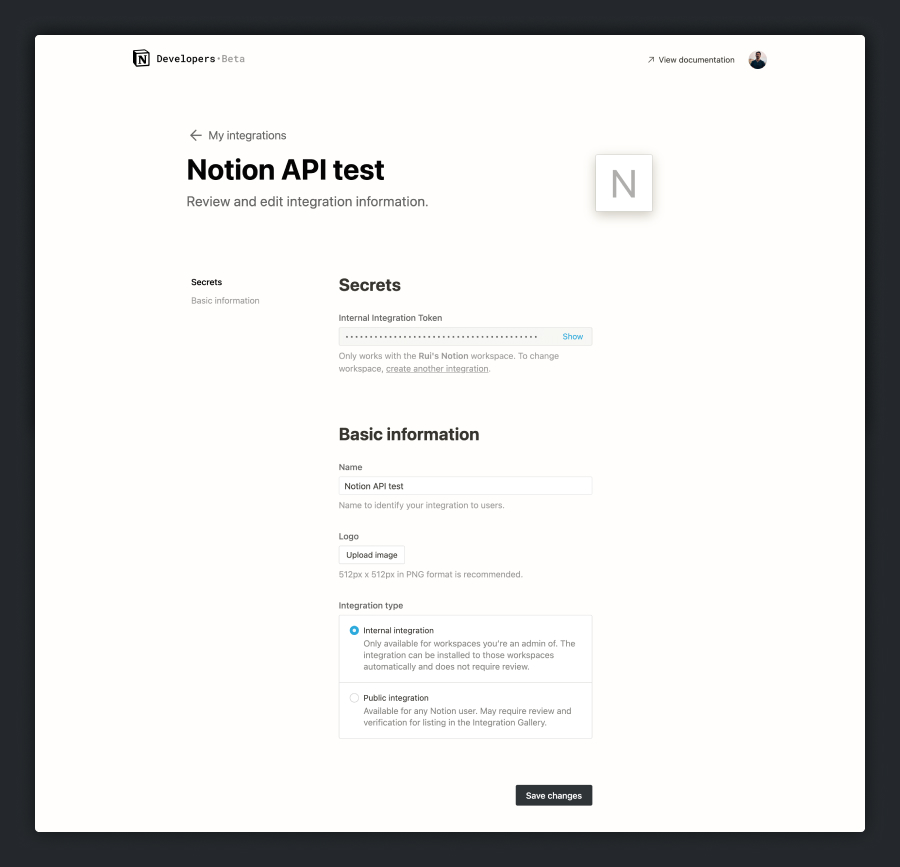
 Now we’ll go to the documentation website. You’ll see a My integrations link in the top corner. If you click it, you’ll be directed to a screen showing “My integrations”, and yours will be empty, of course.
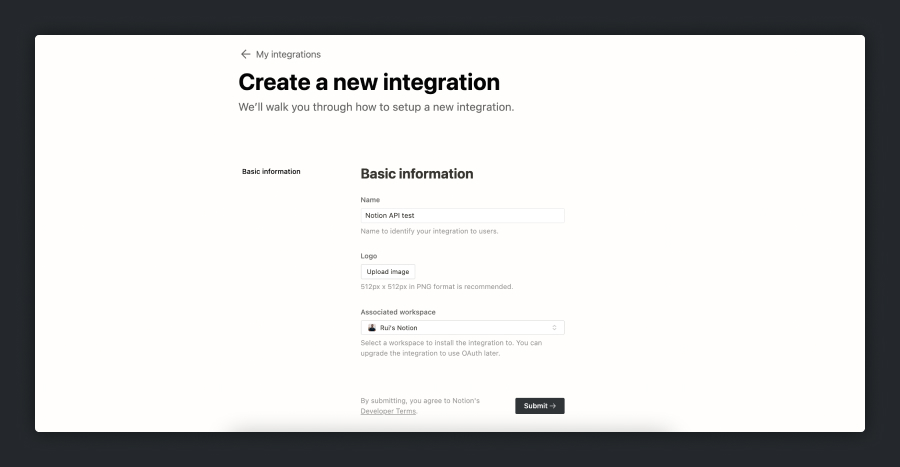
 Press Create new integration, fill in your title and be sure to choose your
 Associated workspace (it will be chosen by default but make sure of this). Press Submit and you’ll be directed to a new page with an Internal Integration Token (we’ll use this on our code) and with two option boxes for where you want to use your integration. You don’t need to do anything on this page other than copying your token and press Save changes.
Note: at the time of writing, there doesn’t seem to be a way to delete integrations, so name them wisely.
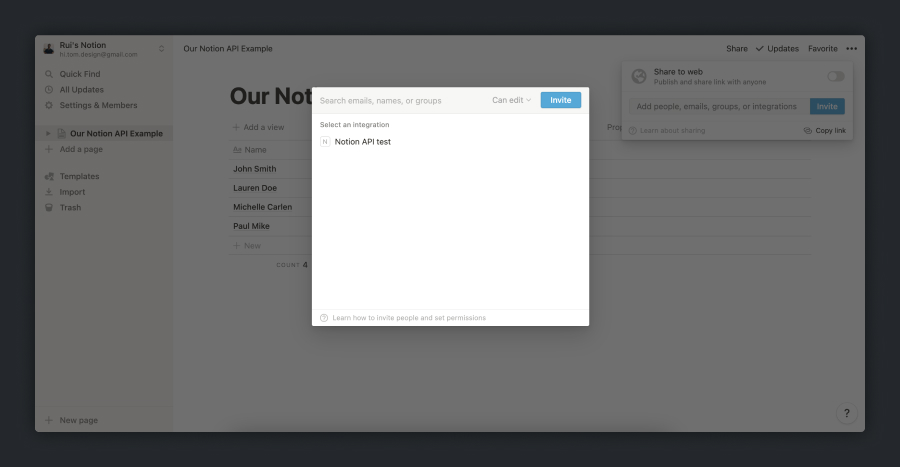
 Now go back to your Notion workspace. On our newly created database, we want to press Share, then Invite. You’ll then be able to choose your newly created integration. Choose it and press Invite, and your Notion setup is done. Well done! 🙌
The code setup
Now let’s do some code. Open your terminal and domkdir notion-api-test (this will create a folder called notion-api-test) on your chosen location, and after that, step into your folder with cd notion-api-test and do npm init -y (this command will create a package.json with some basic setup and the -y flag answers to some prompts automatically so you don’t have to bother yourself with them).
As I mentioned before, we’re going to use notion-sdk-js, and for that we need to install it as a dependency, so we’re going to do npm install @notionhq/client.
Now, open your notion-api-test on your code editor and create an initial index.js on the root and edit the package.json scripts by replacing what’s there with the following:
"scripts": {
    "start": "node index"
},
.gitignore file and another one called .env. The .gitignore allows you to put different file/folder names inside, and that means that these files/folders won’t be added to your repo when you push you code. This is very important, because our integration token
(remember that?) will be inside the.env file, like this:
NOTION_API_KEY = YOUR_TOKEN_HERE
.gitignore you should add this on the first line:
.env
.env file, we should also add a new dependency, dotenv, so you can load your NOTION_API_KEY variable. You can do that by doing npm install dotenv.
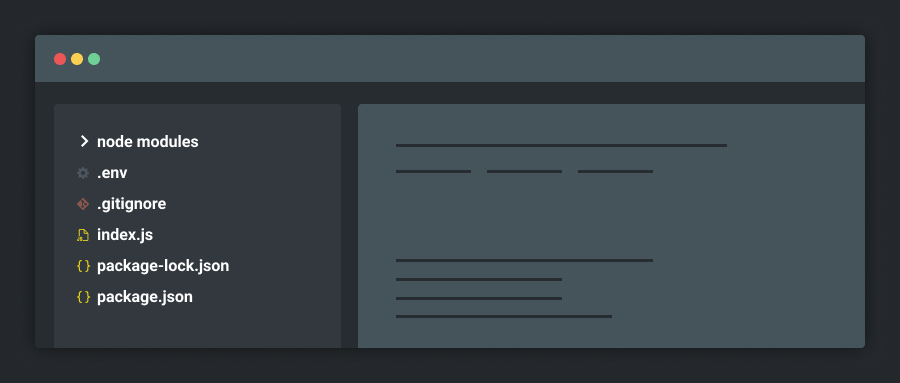
The code setup is now done, and your folder should look something like what’s shown below. 🎉
Pulling Data from the Notion API
Now that the boring part is over, let’s get to the good stuff! Ourindex.js file will be a Node.js file, and the following code block shows our starting code and what each line exactly does!
// this will allow us to import our variable
require("dotenv").config();
// the following lines are required to initialize a Notion client
const { Client } = require("@notionhq/client");
// this line initializes the Notion Client using our key
const notion = new Client({ auth: process.env.NOTION_API_KEY });
myworkspace/) and before the question mark (?). The ID is 32 characters long, containing numbers and letters.
https://www.notion.so/myworkspace/a8aec43384f447ed84390e8e42c2e089?v=...
                                  |--------- Database ID --------|
.env file, so that it looks something like this:
NOTION_API_KEY = YOUR_TOKEN_HERE
NOTION_API_DATABASE = YOUR_DATABASE_ID_HERE
index.js with this:
const databaseId = process.env.NOTION_API_DATABASE;
async function:
const getDatabase = async () => {
  const response = await notion.databases.query({ database_id: databaseId });

  console.log(response);
};

getDatabase();
npm start in your terminal, you should see a log of an object with a results property that has an array. That array contains the entries in your database. To look into them, we can do the following:
const getDatabase = async () => {
  const response = await notion.databases.query({ database_id: databaseId });

  const responseResults = response.results.map((page) => {
    return {
      id: page.id,
      name: page.properties.Name.title[0]?.plain_text,
      role: page.properties.Role.rich_text[0]?.plain_text,
    };
  });

  // this console.log is just so you can see what we're getting here
  console.log(responseResults);
  return responseResults;
};
results (matching the entries in our database) and we’re mapping the paths for different properties to names that we’re choosing (in this case, id, name and role). Notice how specific the object path is. I’ve used optional chaining to account for blank rows in the database, or rows where one or the other of these fields isn’t filled out.
Either way, feel free to play with the different properties, and be aware that this is a matter of trial and error, and that every API behaves and organizes the information differently. The important thing here is to go through each property until we get to the info we’re looking for.
If looking into each property and using console.log() is not your thing, you could always use Postman to inspect the response. Unfortunately, that’s not within the scope of this tutorial, but you could check the “How to Master Your API Workflow with Postman” post to give it a go!
Another important note here: notice the notion.databases.query that we’ve used. If you look at the Notion API documentation, you’ll see that we’re using POST | Query a database. We could use just GET | Retrieve a database, but here I would like to challenge you to read the documentation and try to sort the list differently!
Before we wrap this part, let’s change our getDatabase function so we can properly import it into another file that we’ll create. It should look like the following:
exports.getDatabase = async function () {
  const response = await notion.databases.query({ database_id: databaseId });

  const responseResults = response.results.map((page) => {
    return {
      id: page.id,
      name: page.properties.Name.title[0]?.plain_text,
      role: page.properties.Role.rich_text[0]?.plain_text,
    };
  });

  return responseResults;
};
Setting up an Express Server
With the previous step done, we now can successfully retrieve our results. But to be able to actually use them properly, we’ll need to create a server, and the easiest way of doing so — since we’re using Node.js — is to use Express. So, we’ll get started by runningnpm install express and creating a new file at the root called server.js.
If express confuses you, don’t worry. We’ll be using it to facilitate our work and create a quick back end and server to our application. Without it, we wouldn’t be able to properly retrieve our data, since we’re initializing our Notion client within our code.
On our server.js file, we’ll start by importing express, the module where we have our code (index.js), our getDatabase function, a port number, and a variable to initialize our express function:
const express = require("express");
// our module
const moduleToFetch = require("./index");
// our function
const getDatabase = moduleToFetch.getDatabase;

const port = 8000;
const app = express();

// this last command will log a message on your terminal when you do `npm start`
app.listen(port, console.log(`Server started on ${port}`));
server.js, we should change our start
command on package.json to look for server, so it should look like this:
"scripts": {
    "start": "node server"
},
npm start, you’ll see the Server started on 8000 message, which means that our setup is working as expected! Well done!
Now that our express app is working, we need to get our database to work with it, and we can do that with app.get(). This method needs a path (it won’t matter in our case) and a callback function (which will invoke our getDatabase function):
app.get("/users", async (req, res) => {
  const users = await getDatabase();
  res.json(users);
});
app.get method, as referred, and inside our callback function we’re getting the results from our function and we’re using the .json() Express middleware function that parses the request into readable and workable data. (You can learn a bit more about it in the official documentation.)
This means that we’re now successfully accessing our data, and that we’ve created a route to “fetch” it. As a final step, we should add app.use(express.static("public")); to our server.js file, so that the end result looks something like this:
const express = require("express");
// our module
const moduleToFetch = require("./index");
// our function
const getDatabase = moduleToFetch.getDatabase;

const port = 8000;
const app = express();

// the code line we just added
app.use(express.static("public"));

app.get("/users", async (req, res) => {
  const users = await getDatabase();
  res.json(users);
});

app.listen(port, console.log(`Server started on ${port}`));
use a specific folder where we’ll create our front-end code, which will be the public folder. Here we’ll work with our HTML, CSS and JavaScript to access this /users route that we created on our back end. Let’s get to it!
Displaying Data from the Notion API
We’ll start by creating, at the root of our project, a folder calledpublic. Here’s where our front-end code will live.
The HTML and CSS parts are straightforward, so I’ll mostly just leave the code here and focus on the JavaScript part, since that’s what we’re all here for!
Our HTML (/public/index.html) will look like this:
<!DOCTYPE html>
<html lang="en">
  <head>
    <meta charset="UTF-8" />
    <meta http-equiv="X-UA-Compatible" content="IE=edge" />
    <meta name="viewport" content="width=device-width, initial-scale=1.0" />
    <title>Notion API Test</title>
    <link rel="stylesheet" href="style.css" />
  </head>
  <body>
    <div id="banner">Notion API Database Test</div>
    <div id="wrapper">
      <div id="container"></div>
    </div>

    <script type="module" src="./main.js"></script>
  </body>
</html>
/public/style.css) will look like this:
body,
html {
  padding: 0;
  margin: 0;

  height: 100vh;
  width: 100vw;
  font-family: Arial, Helvetica, sans-serif;

  position: relative;
}

#banner {
  height: 50px;

  display: flex;
  justify-content: center;
  align-items: center;

  background-color: #ef4444;
  color: white;
  font-weight: bold;
}

#wrapper {
  display: flex;
  justify-content: center;
  align-items: center;
  height: calc(100vh - 50px);
}

#container {
  width: 80vw;
  margin: auto;

  display: grid;
  grid-template-columns: repeat(auto-fit, minmax(250px, 1fr));
  grid-auto-rows: 200px;
  gap: 20px;
}

.userContainer {
  display: flex;
  flex-direction: column;
  justify-content: center;
  align-items: center;

  box-shadow: rgba(149, 157, 165, 0.2) 0px 8px 24px;
  border-radius: 10px;
}
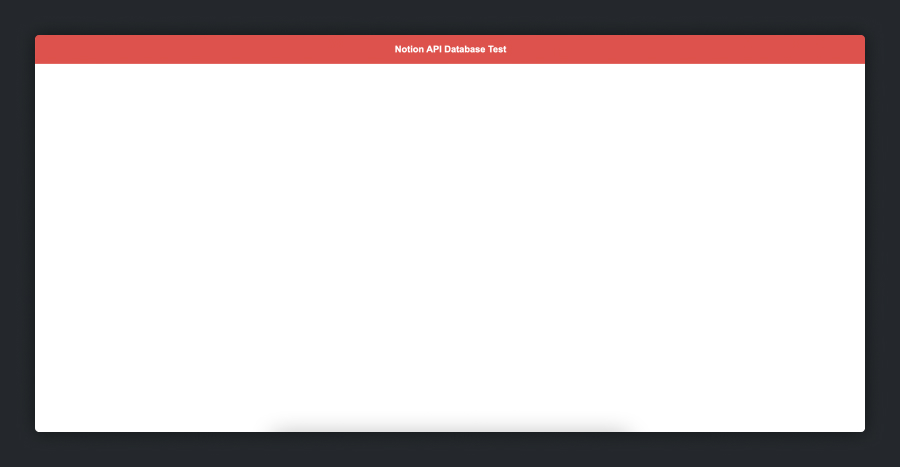
npm start on your project and visit http://localhost:8000, you should see your front-end code.
 Now for our
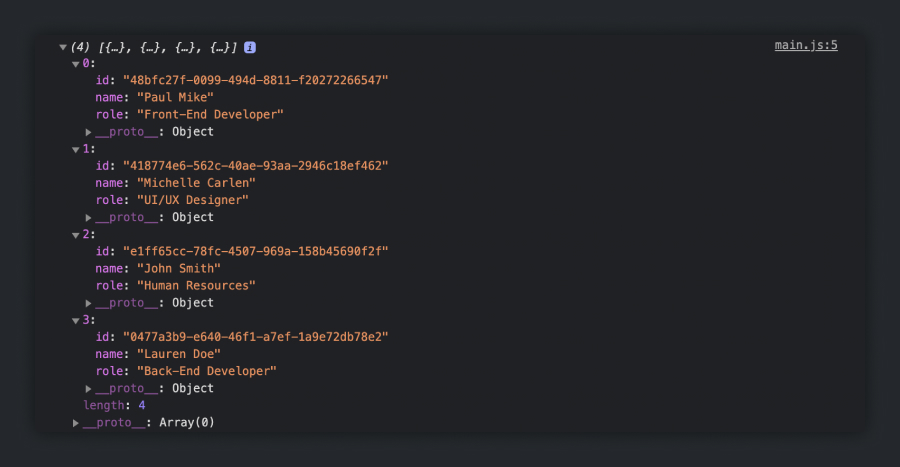
 public/main.js file! Our first step is make a request to the route that we created on the back end (/users/), which will allow us to grab our database information:
const getDataFromBackend = async () => {
  const rest = await fetch("http://localhost:8000/users");
  const data = await rest.json();

  return data;
};

// Note that top-level await is only available in modern browsers
// https://caniuse.com/mdn-javascript_operators_await_top_level
const res = await getDataFromBackend();
console.log(res);
 Let’s now show this data inside our
 <div id="container"></div>, which will be very easy. We’ll start by doing a getElementById to get the proper element, and then we’ll create a function that will run getDataFromBackend() and will iterate over each object inside our data array and push this content to our HTML. Here’s my approach to it:
// Add data to HTML
const addData = async () => {
  const data = await getDataFromBackend();

  data.forEach((value) => {
    const div = document.createElement("div");
    div.classList.add("userContainer");
    div.innerHTML = `
        <h3>${value.name}</h3>
        <p>${value.role}</p>
    `;

    container.append(div);
  });
};

addData();
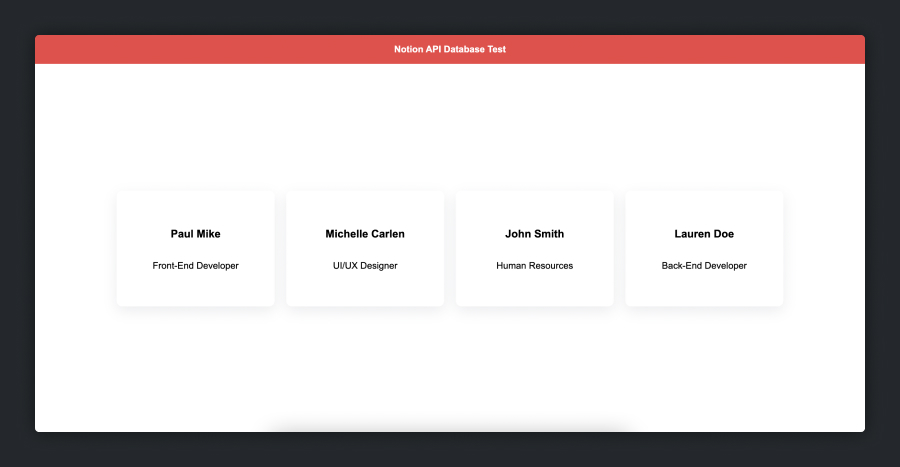
data variable (inside the addData function) is the same information that we could see logged (the array of objects) and we’re looping over it by creating a <div> with the class of userContainer, and inside it we have the name and role for each of our entries on the database.
If you now run your code, you should see something like what’s pictured below!
Writing Data to Our Notion Database
This would be a great stopping point for our experimentation with the Notion API, but we can do even more! Let’s now add new entries to our database by using theCreate Page POST request (which can be found here) so that we have a fully functioning and working application using pretty much all the abilities of the Notion API.
So, our idea here will be to add a form on our front end that, when filled in and submitted, will push new data to our database, which will then show up in our front end!
Let’s start by adding a new function on our index.js called newEntryToDatabase. Considering the documentation, we now should do const response = await notion.pages.create(), and we should pass an object that matches the current database we’re working on. It will also have two arguments, name
and role, which, for this project, would look like this:
exports.newEntryToDatabase = async function (name, role) {
  const response = await notion.pages.create({
    parent: {
      database_id: process.env.NOTION_API_DATABASE,
    },
    properties: {
      Name: {
        title: [
          {
            text: {
              content: name,
            },
          },
        ],
      },
      Role: {
        rich_text: [
          {
            text: {
              content: role,
            },
          },
        ],
      },
    },
  });

  return response;
};
getDatabase with our responseResults variable, by walking through each property until we get to the property we actually want to work with. Here, we’re using our arguments as values to the properties. If this looks confusing, it’s absolutely okay; review the linked documentation on this section to see more examples!
Now, jumping to our server.js, let’s not forget to import our new function with const newEntryToDatabase = moduleToFetch.newEntryToDatabase; at the top of the file. We’ll also do a POST request using app.post(). Here we also need a route (it will be /submit-form), and our callback function should get the name and role from the request (our filled-in form fields) and invoke newEntryToDatabase with these two arguments. We then finish our function with a redirect to our base route, / and we also end our request.
Our server.js file will also need a bit of code inside an app.use() function, which is the express.urlencoded. This is middleware for Express, so we can use the POST request, since we’re actually sending data:
const express = require("express");
const moduleToFetch = require("./index");
const getDatabase = moduleToFetch.getDatabase;
// importing our function
const newEntryToDatabase = moduleToFetch.newEntryToDatabase;
const port = 8000;

const app = express();

app.use(express.static("public"));
app.use(
  express.urlencoded({
    extended: true,
  })
);

app.get("/users", async (req, res) => {
  const users = await getDatabase();
  res.json(users);
});

// our newly added bit of code
app.post("/submit-form", async (req, res) => {
  const name = req.body.name;
  const role = req.body.role;
  await newEntryToDatabase(name, role);
  res.redirect("/");
  res.end();
});

app.listen(port, console.log(`Server started on ${port}`));
<form> in your HTML with method="POST" and action="/submit-form". This basically tells our code what type of form this should be, and also links it to a route (/submit-form), which we created to process requests.
So something like the following would be more than enough:
<form method="POST" action="/submit-form">
  <input type="text" name="name" placeholder="Insert user name" required />
  <input type="text" name="role" placeholder="Insert user role" required />
  <input type="submit" />
</form>
button that, when clicked, will open a modal with the form (also with the possibility of closing it without filling it), so here’s my HTML:
<!-- The rest of the code above -->
<div id="wrapper">
  <div id="container"></div>
</div>

<div id="addUserFormContainer">
  <button id="closeFormButton">Close</button>
  <form method="POST" action="/submit-form" id="addUserForm">
    <h1 id="formTitle">Add a new user to your database</h1>
    <input
      type="text"
      name="name"
      placeholder="Insert user name"
      class="inputField"
      required
    />
    <input
      type="text"
      name="role"
      placeholder="Insert user role"
      class="inputField"
      required
    />
    <input type="submit" id="submitFormInput" />
  </form>
</div>

<button id="newUserButton">Add a new user</button>

<script type="module" src="./main.js"></script>
<!-- The rest of the code below -->
/* The rest of the code above */
#newUserButton {
  position: absolute;
  bottom: 10px;
  right: 10px;

  padding: 10px 20px;

  background-color: #ef4444;
  color: white;
  font-weight: bold;

  border: none;
  border-radius: 4px;
}

#addUserFormContainer {
  position: absolute;
  top: 0;
  left: 0;

  height: 100vh;
  width: 100vw;

  display: none;
  flex-direction: column;
  justify-content: center;
  align-items: center;

  background: rgba(255, 255, 255, 0.4);
  backdrop-filter: blur(20px);
}

#closeFormButton {
  position: absolute;
  top: 10px;
  right: 10px;

  padding: 10px 20px;

  background-color: black;
  color: white;
  font-weight: bold;

  border: none;
  border-radius: 4px;
}

#formTitle {
  margin-bottom: 40px;
}

#addUserForm {
  padding: 50px 100px;
  width: 300px;

  display: flex;
  flex-direction: column;
  justify-content: center;
  align-items: center;

  background: white;

  box-shadow: rgba(149, 157, 165, 0.2) 0px 8px 24px;
}

#addUserForm input {
  width: 100%;
  box-sizing: border-box;
}

.inputField {
  margin-bottom: 20px;
  padding: 10px 20px;

  border: 1px solid #b3b3b3;
  border-radius: 4px;
}

#submitFormInput {
  padding: 10px 20px;
  margin-bottom: none;

  background-color: #ef4444;
  color: white;
  font-weight: bold;

  border: 1px solid #ef4444;
  border-radius: 4px;
}
/public/main.js file!
Here, we’ll start by grabbing the #newUserButton, the #closeFormButton and the #addUserFormContainer:
const container = document.getElementById("container");
// the new variables
const openFormButton = document.getElementById("newUserButton");
const closeFormButton = document.getElementById("closeFormButton");
const addUserFormContainer = document.getElementById("addUserFormContainer");
openFormButton we’ll add a click event listener that will end up styling our addUserFormContainer with display: flex:
openFormButton.addEventListener("click", () => {
  addUserFormContainer.style.display = "flex";
});
form modal, we just need remove this flex that we’re adding by pressing the closeFormButton, so it should look like this:
closeFormButton.addEventListener("click", () => {
  addUserFormContainer.style.display = "none";
});
Taking It Further
While this demo showcases some of the important uses of the Notion API, there’s still room for improvement in our app. For example, it would be advisable to implement some error handling, or a loading spinner showing when the app is communicating with Notion (and thus unresponsive). Also, instead of always querying the API to retrieve the data, you could quite easily turn this into a single-page application that queries the API once, then keeps the data we’re working with in state. If you’d like help implementing any of this, or would like to showcase your solution, why not head over to SitePoint forums and let us know.Conclusion
With this project, we ended up exploring almost the full functionality of the Notion API, and I think it’s pretty clear how amazing it can actually be! I hope this post has given you a full view of the Notion API and inspired you to create more stuff with it! If you want to quickly test this project, you can clone it from our GitHub repo.Frequently Asked Questions (FAQs) about Notion API JavaScript SDK
What is the Notion API JavaScript SDK?
The Notion API JavaScript SDK is a software development kit that allows developers to interact with Notion’s API using JavaScript. It provides a set of tools and functions that simplify the process of sending requests and receiving responses from the API. This SDK is particularly useful for developers who want to integrate Notion’s features into their own applications or websites.
How do I install the Notion API JavaScript SDK?
To install the Notion API JavaScript SDK, you need to use the Node Package Manager (npm). First, ensure that you have Node.js and npm installed on your system. Then, open your terminal and run the command npm install @notionhq/client. This will install the SDK in your project.
How do I authenticate with the Notion API?
To authenticate with the Notion API, you need to generate an internal integration token from your Notion workspace. Once you have the token, you can use it to authenticate your requests by including it in the headers of your HTTP requests. The SDK provides a convenient way to do this by allowing you to set the token when you create a new instance of the Notion client.
How do I retrieve data from a Notion database?
To retrieve data from a Notion database, you can use the databases.query method provided by the SDK. This method allows you to send a query to the API and receive a list of pages that match the query. Each page represents a row in the database and contains the data for that row.
How do I create a new page in a Notion database?
To create a new page in a Notion database, you can use the pages.create method provided by the SDK. This method requires you to specify the ID of the database where you want to create the page and the properties of the page. The properties should be an object where each key is the name of a property in the database and the value is the value for that property.
How do I update a page in a Notion database?
To update a page in a Notion database, you can use the pages.update method provided by the SDK. This method requires you to specify the ID of the page you want to update and the properties you want to update. The properties should be an object where each key is the name of a property in the database and the value is the new value for that property.
How do I delete a page from a Notion database?
To delete a page from a Notion database, you can use the pages.delete method provided by the SDK. This method requires you to specify the ID of the page you want to delete.
How do I handle errors when using the Notion API JavaScript SDK?
The Notion API JavaScript SDK uses promises for all its methods. If an error occurs during a request, the promise will be rejected with an error object. You can handle these errors by using the catch method of the promise.
Can I use the Notion API JavaScript SDK in the browser?
Currently, the Notion API JavaScript SDK is designed to be used in a Node.js environment and may not work correctly in the browser. However, you can use the Fetch API or other HTTP libraries to interact with the Notion API in the browser.
Is the Notion API JavaScript SDK open source?
Yes, the Notion API JavaScript SDK is open source. You can find the source code on the Notion GitHub repository. This means you can contribute to its development, report issues, or even fork the repository and make your own modifications if you wish.
Hi, I'm Rui and I'm from Portugal. I'm a self-taught front-end developer with a Master's Degree in Psychology. After finishing my course I realized that I wanted to leave my mark on the world and the dev world was the obvious choice since it always fascinated me!


