

In a previous article, we briefly explained the upcoming changes in the Blazor .NET8 Render Modes, which allow you to specify per Razor page or individual component if that page or component would be rendered on the server (WebSocket), on the client (WebAssembly), or in auto mode (interactive server side rendering on first vist, and subsequently on the client).
With the Render Modes having been introduced with the release version of Blazor in meantime, let’s have a more detailed look into the different Render Mode options, and how to use them in your application.
Key Takeaways
- Blazor, a free and open-source web framework developed by Microsoft, offers developers the ability to specify per Razor page or individual component where it would be rendered – on the server, on the client, or in auto mode. This functionality is enabled through the use of Blazor .NET8 Render Modes.
- The new Blazor .NET8 Render Modes include options such as Server, ServerPrerendered, and Static. These modes determine the hosting model used, where the component is rendered, and whether or not it’s interactive. The Auto option starts from the server, is cached, and then on subsequent visits is rendered on the client, offering faster load times.
- To use the Blazor .NET8 Render Modes, developers need to set up the interactive render modes in their Blazor web app. This involves using component builder extensions and endpoint convention builder extensions. The Render Mode can be specified per page or per component, offering developers greater flexibility and control over how their components are rendered.
Blazor Recap
Blazor is a free and open-source web framework that enables developers to create web apps using C# and HTML. It is being developed by Microsoft and is part of the .NET ecosystem. Blazor has two hosting models: Blazor Server and Blazor WebAssembly. Blazor Server offers a way to build web UIs using C# instead of JavaScript. Blazor Server apps are hosted on the server and use real-time communication via SignalR to handle UI updates. Blazor WebAssembly, on the other hand, takes advantage of WebAssembly to do everything in the browser.
Blazor Render Modes
In .NET 8, Blazor has introduced several enhancements, including the ability to choose the component render mode at runtime. This means that developers can now add client interactivity per component or page, and generate static HTML content with components. Additionally, Blazor in .NET 8 has improved authentication, the ability to route to a named element, and the ability to monitor circuit activity.
The render-mode attribute is used to define where a root-level component should be rendered. The RenderMode option indicates the manner in which the component should be rendered. There are several supported RenderMode options, including Server, ServerPrerendered, and Static. Server mode is rendered interactively once a connection with the browser is established. ServerPrerendered mode is first prerendered and then rendered interactively. Static mode is rendered as static content.
Every component in a Blazor web app relies on a specific render mode to determine the hosting model that it uses, where it’s rendered, and whether or not it’s interactive. To apply a render mode to a component use the @rendermode directive on the component instance or on the component definition.
Static Server and Interactive Server are known as Server Render Mode. Interactive WebAssembly is known as Client Render Mode. The Auto option starts from the server, is cached, and then on subsequent visits is redered on the client. This saved bandwidth and means faster load times.
Enable Support for Interactive Render Modes (Server and Client)
When you are developing a .Blazor web app, you as a developer need to set up the interactive render modes. When you start from the provided project template (with sample data or empty, it doesn’t matter), the template automatically has the following extensions available:
Component builder extensions:
AddInteractiveServerComponentsadds services to support rendering Interactive Server components.AddInteractiveWebAssemblyComponents adds services to support rendering Interactive WebAssembly components.MapRazorComponentsdiscovers available components and specifies the root component for the app (the first component loaded), which by default is the App component (App.razor).
Endpoint convention builder extensions:
AddInteractiveServerRenderModeconfigures interactive server-side rendering (interactive SSR) for the app.AddInteractiveWebAssemblyRenderModeconfigures the Interactive WebAssembly render mode for the app.
Individual components are still required to declare their render mode after the component services and endpoints are configured in the app’s Program file. You could say there is a project configuration part (in the Program.cs file) in which you specified the global project render mode, after which you should still specify the individual page or component render mode.
Using Render Mode in a sample application
With the theoretical part out of the way, let’s guide you through a step-by-step example on how to experiment with the different Render Modes. We’ll start from the default Blazor Server Web App template in Visual Studio, after which we add the Blazor WebAssembly project, and demonstrate the Render Mode options for an interactive button.
- Make sure you have the latest version of Visual Studio 2022 (17.8.x or higher) installed, together with the .NET 8 SDK.
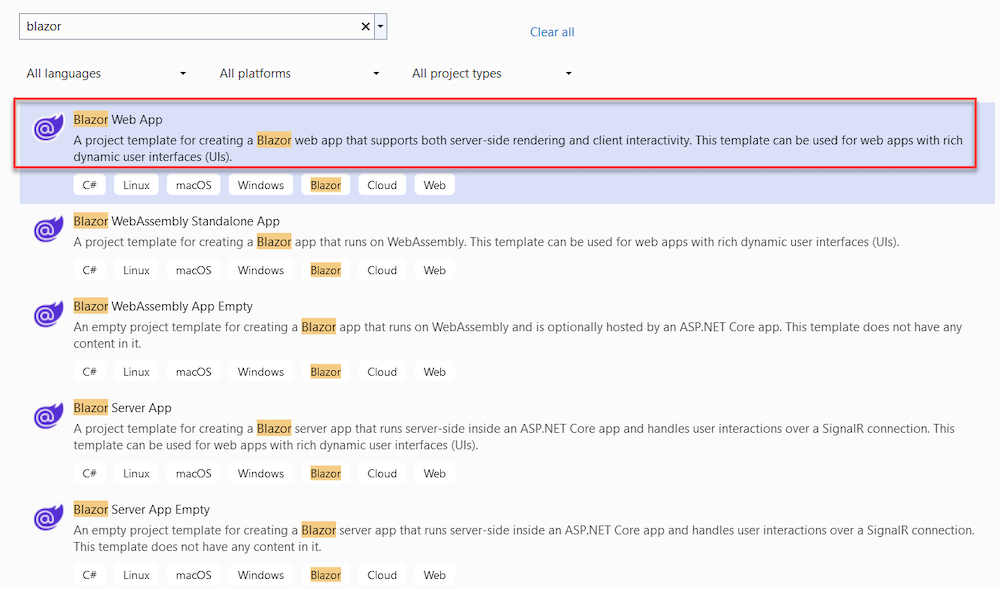
- From Visual Studio, select Create New Project and search for Blazor; this will show several different options to choose from.
- Select Blazor Server App as template; click Next
- Provide a name for your project, for example BlazorRenderModes
- In the Additional Information page, provide the following settings:
- Framework: .NET 8.0 (Long Term Support)
- Authentication Type: None
- Configure for HTTPS: selected
- Interactive Render Mode: Server
- Interactivity Location: Per page/component
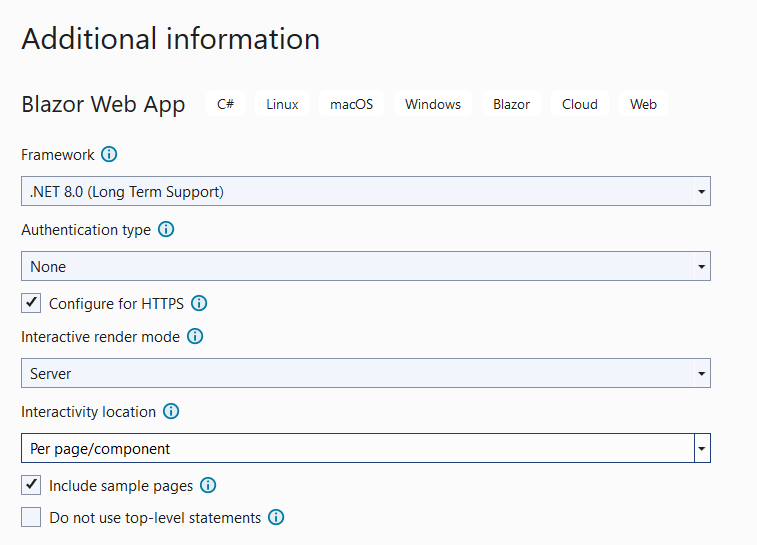
Note: as you can see, the Project wizard for Blazor has been updated with the Render Mode options already.
- From within the project, open the
Program.csfile, and check the following:
// Add Services to the container.

 builder.Services.AddRazorComponents()

     .AddInteractiveServerComponents().

This clarifies what we explained earlier in the Component Builder Extensions, where our Blazor Server App is now ready to use Interactive Server Render Mode. - A bit further down in the same
Program.csfile, you find the following:
app.MapRazorComponents()

.AddInteractiveServerRenderMode(); 
This clarifies what we explained earlier in theMapRazorComponent, where our Blazor Server App is now ready to use Interactive Server Render Mode. - To add an interactive component to our app, let’s add some sample code to the
Home.razorpage.@page "/"
<PageTitle>Home</PageTitle>
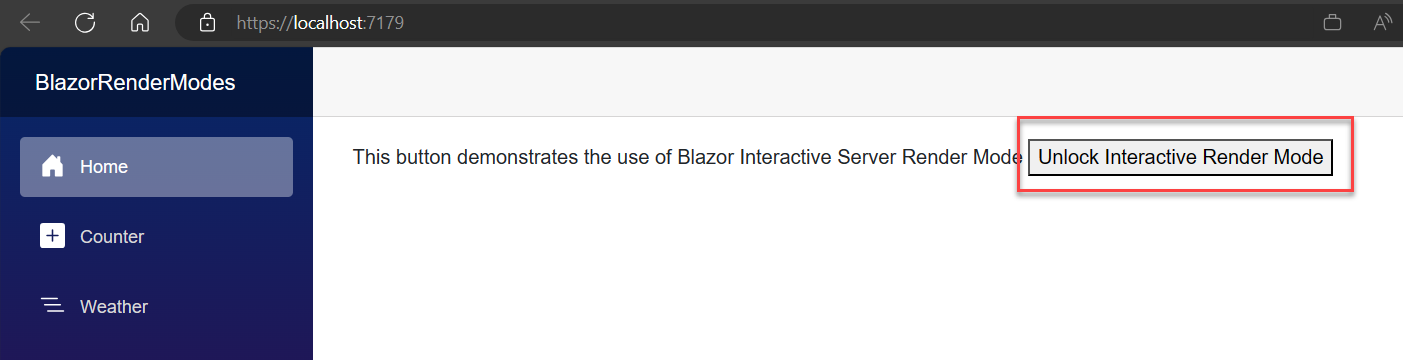
This button demonstrates the use of Blazor Interactive Server Render Mode
<button @onclick="Unlocked">Unlock Interactive Render Mode</button>
<span>@unlockmessage</span>
@code {
string unlockmessage = "";
void Unlocked()
{
unlockmessage = "Interactive Render Mode Unlocked";
}
} - The
@pagesyntax is Blazor’s route to a page, in this case the Home page. This is followed by plain HTML language, showing some text, a button, and a text element within the HTML “<span>” object. - 1The @
codesection contains C# language, just like in a traditional ASP.NET web page, which shows a text message when the user clicks the button. - Save the code and Run the application.
- If you click the button, you might be be suprised that nothing is happening. As all looks OK. However, remember we specified our Blazor project for Interactive Server Render Mode, which means we need to make some minor update to the button element, to make it interactive.
- Navigate back to the code, and update the
Home.razorfile and, on the second line, right below the@pageline, add the following:@rendermode InteractiveServer - When you run the application again, and click the button, the text message will nicely appear! Great job!

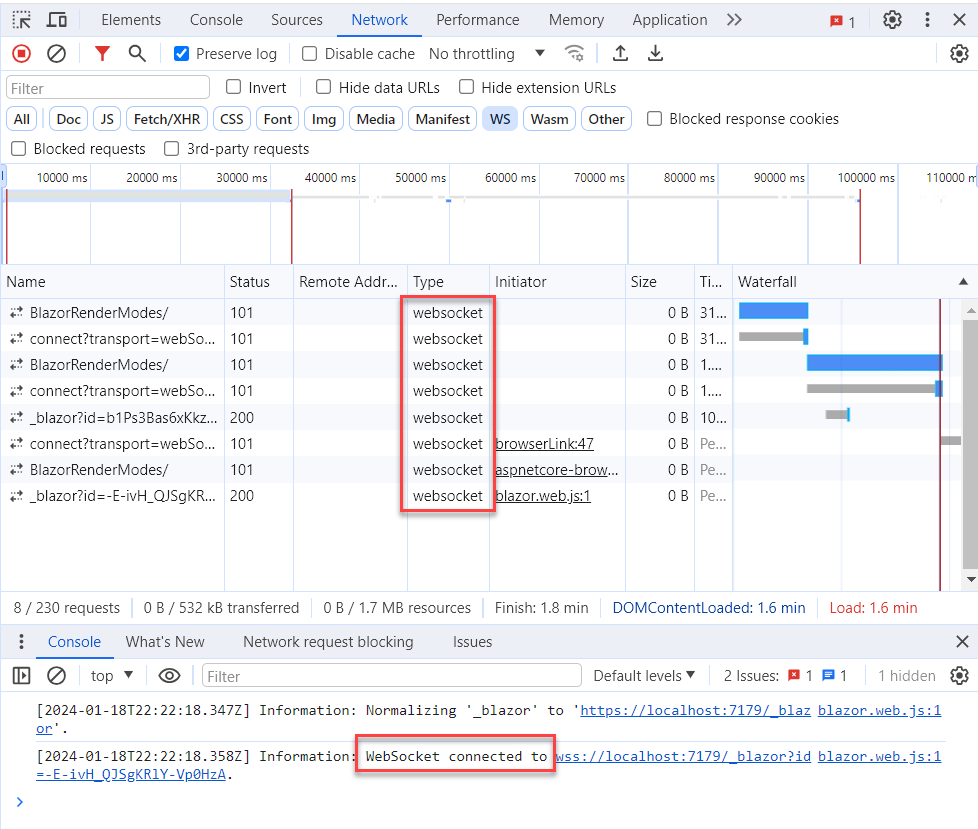
- Opening the Browser Diagnostics Tools (Inspect), and checking the Network also shows us this is an active websocket connection.
- Now, remember, the Render Mode can be specified per page or per component. (If you are wondering what a Blazor component is, think of a section of a web page, like a button, a form, a grid,… that could be loaded as a separate item). To show how this can be applied to a component, update your
Home.razorfile as follows:
@page "/"


 @*

 @rendermode InteractiveServer

 *@
where the@* *@means “comment out”.
Next, add the Weather table to the Home Page layout, which is technically a separate pageWeather.razor, as an object using the updated code syntax:<span>@unlockmessage</span>
<Weather @rendermode=InteractiveServer/>
@code {
string unlockmessage = ""; - Same as earlier, we are now loading the page, using traditional Static Server Side Rendering, but specifying to use the Interactive Server Render Mode for the
Weathercomponent. - Save and Run the application again. You will see the previous button is no longer doing anything when clicking it, but the Weather information is nicely loading.
In a forthcoming article, we will reuse this sample Blazor Web App and introduce InteractiveWebAssembly for Client-side rendering.
Summary
In summary, the new Blazor .NET8 render mode provides developers with more flexibility and control over how their components are rendered, allowing for improved performance and interactivity in their web applications.