
Key Takeaways
- Microsoft’s Visual Studio App Center is a centralized platform for building, testing, and delivering iOS apps, supporting various platforms and frameworks including iOS, Android, Windows, macOS, Xamarin, and React Native.
- App Center’s Continuous Integration and Continuous Delivery features allow for constant building and testing of apps, identifying bugs before they reach production, and automatic distribution to testers and the App Store.
- Automated UI tests can be run across hundreds of device configurations with every build or on demand through App Center, reproducing user environments and providing screenshots and device logs for each test run.
- App Center enables the creation of distribution groups for targeted sending of builds to specific sets of users, such as internal testers or external beta testers.
- App Center can be integrated with popular development tools like GitHub, Bitbucket, and Azure DevOps for seamless code sharing and collaboration, and also provides powerful analytics and diagnostics tools for real-time monitoring of app performance and usage.
This article was created in partnership with Microsoft. Thank you for supporting the partners who make SitePoint possible.
Typically, each native OS and platform has its own build tools, testing tools, and deployment tools. This often implies that you need separate Continuous Integration (CI) and Continuous Delivery (CD) pipelines for each platform you are working on, thereby duplicating or triplicating your efforts.
Microsoft’s Visual Studio App Center is one of the best ways to deal with the fragmentation of the mobile development landscape: it seamlessly centralises all your Continuous Integration and Continuous Delivery needs in a single place, supporting any platform and framework you may need, including iOS, Android, Windows, macOS, Xamarin, and React Native.
This present tutorial will show you how to use App Center to build, test, and deliver a very simple native Swift iOS app.
Note: You’ll need Xcode 8+. If you’re following this tutorial to integrate the App Center SDK into an existing app, your app must target iOS 8.0+ and cannot use any other crash reporting library. Also, this tutorial will assume you have a good working knowledge of Git.
Note again: If you’re already familiar with Continuous Integration or Unit Testing, you can skip to the Wrapping up tests section. If not, follow along.
I’ll create a very simple app and some tests to demonstrate the value of Continuous Integration by showing the many ways in which even something seemingly simple should be tested for bugs, and the ease with which this can be achieved in App Center. I’ll also go over App Center’s Continuous Delivery features and show how painless it is to send your iOS builds to internal and external testers.
Reliable Burgers
Our local burger shop has asked us to build them an app with a simple daily calorie counter, which can also tell the user how many hamburgers they can have without exceeding their daily calorie intake. Let’s assume that a teammate is taking care of the UI, we’re just going to work on the app’s back-end logic.

The client are called Reliable Burgers because they can be relied upon to provide food that’s of the highest quality. A bold claim, but it’s backed up by all the 5 Star restaurant reviews they’ve received. But because they’re not the type that simply make or accept “bold claims” they want independent validation from us that our code will also produces the expected results.
To this end, they have employed a large team of internal and external testers to receive the latest changes to the code as soon as they’re committed to the codebase.
This is where the Continuous Integration and Continuous Delivery features in App Center can help.
Setting up the project
- Open Xcode
- Create a new project, use the iOS Single View App template
- Name it Reliable Burgers
- Make sure to tick Include Unit Tests
Writing code
Open ViewController.swift, and paste the following code above class ViewController: UIViewController { :
class CalorieCounter {

    let maxDailyCalories = 2200

    let caloriesPerBurger = 550

    private var totalCaloriesConsumedToday = 0

    func add(caloriesToAdd: Int) {
        totalCaloriesConsumedToday += caloriesToAdd
    }

    var hamburgersICanStillEatToday: Int {
        return maxDailyCalories - totalCaloriesConsumedToday / caloriesPerBurger
    }
}
Whenever the user consumes food, they’ll input the corresponding amount of calories using the add method, which updates totalCaloriesConsumedToday. hamburgersICanStillEatToday computes how many Reliable Hamburgers the user can still eat that day (we just divide the calories the user can still consume that day by the number of calories in a Reliable Hamburger (550)).
That’s it, looks like we took care of all the requirements! Let’s commit, push, send to the testers, and we’re done for the day.
Continuous Integration using App Center Build & Test
Catching Bugs
Less than 10 minutes after you’ve opened Reddit, you receive these messages from testers:
The app said I could still eat more than 2000 Reliable Burgers, so I bought and ate 20 and now I’m not feeling too well!
So clearly our code needs fixing. But rather than just applying the fixes, we should also write tests to ensure that these bugs won’t appear again.
You Can’t Eat 2200 Burgers
We can reproduce the error thus:
let counter = CalorieCounter()
print(counter.hamburgersICanStillEatToday) // 2200
How could hamburgersICanStillEatToday return a number over 2000? Let’s take a closer look at the operation we’re doing:
var hamburgersICanStillEatToday: Int {
    return maxDailyCalories - totalCaloriesConsumedToday / caloriesPerBurger
}
Assume totalCaloriesConsumedToday is 0 and caloriesPerBurger is 550. The operation is: 2200 - 0 / 550. The bad result is due to our ignoring an elementary rule of maths: divisions are carried out before subtractions. Swift follows these rules to the letter, so it starts by dividing 0 by 550, obtaining 0, then subtracting 0 from 2200. hamburgersICanStillEatToday is thus 2200 when totalCaloriesConsumedToday is 0!
Before we write a fix, let’s ensure that we never again tell a user they can eat 2200 burgers! Assuming that a human should consume approximately 2200 calories a day, and that a burger is approximately 550 calories, hamburgersICanStillEatToday should never return a number above 4 (a figure we get by dividing 2200 by 550, keeping our users (and our client) happy).
Open Reliable_BurgersTests.swift (located within the Reliable BurgersTests folder in Xcode), and add the following lines beneath class Reliable_BurgersTests: XCTestCase {
func testHamburgersICanStillEatTodayReturnsWithinRange() {
    let counter = CalorieCounter()
    XCTAssert(counter.hamburgersICanStillEatToday <= 4, "we should NOT recommend eating more than four hamburgers a day!")
    XCTAssert(counter.hamburgersICanStillEatToday >= 0)
}
This test method will recreate the scenario our above user encountered by creating a new CalorieCounter from scratch and querying it for hamburgersICanStillEatToday. The XCTAssert methods will expect the expression within their parentheses to be true. If all XCTAsserts pass, the test passes. If one or more fails, the test fails.
Let’s test our app! Go ahead and press ⌘ + U (or long click on the run button in the top left of the screen, and select Test)
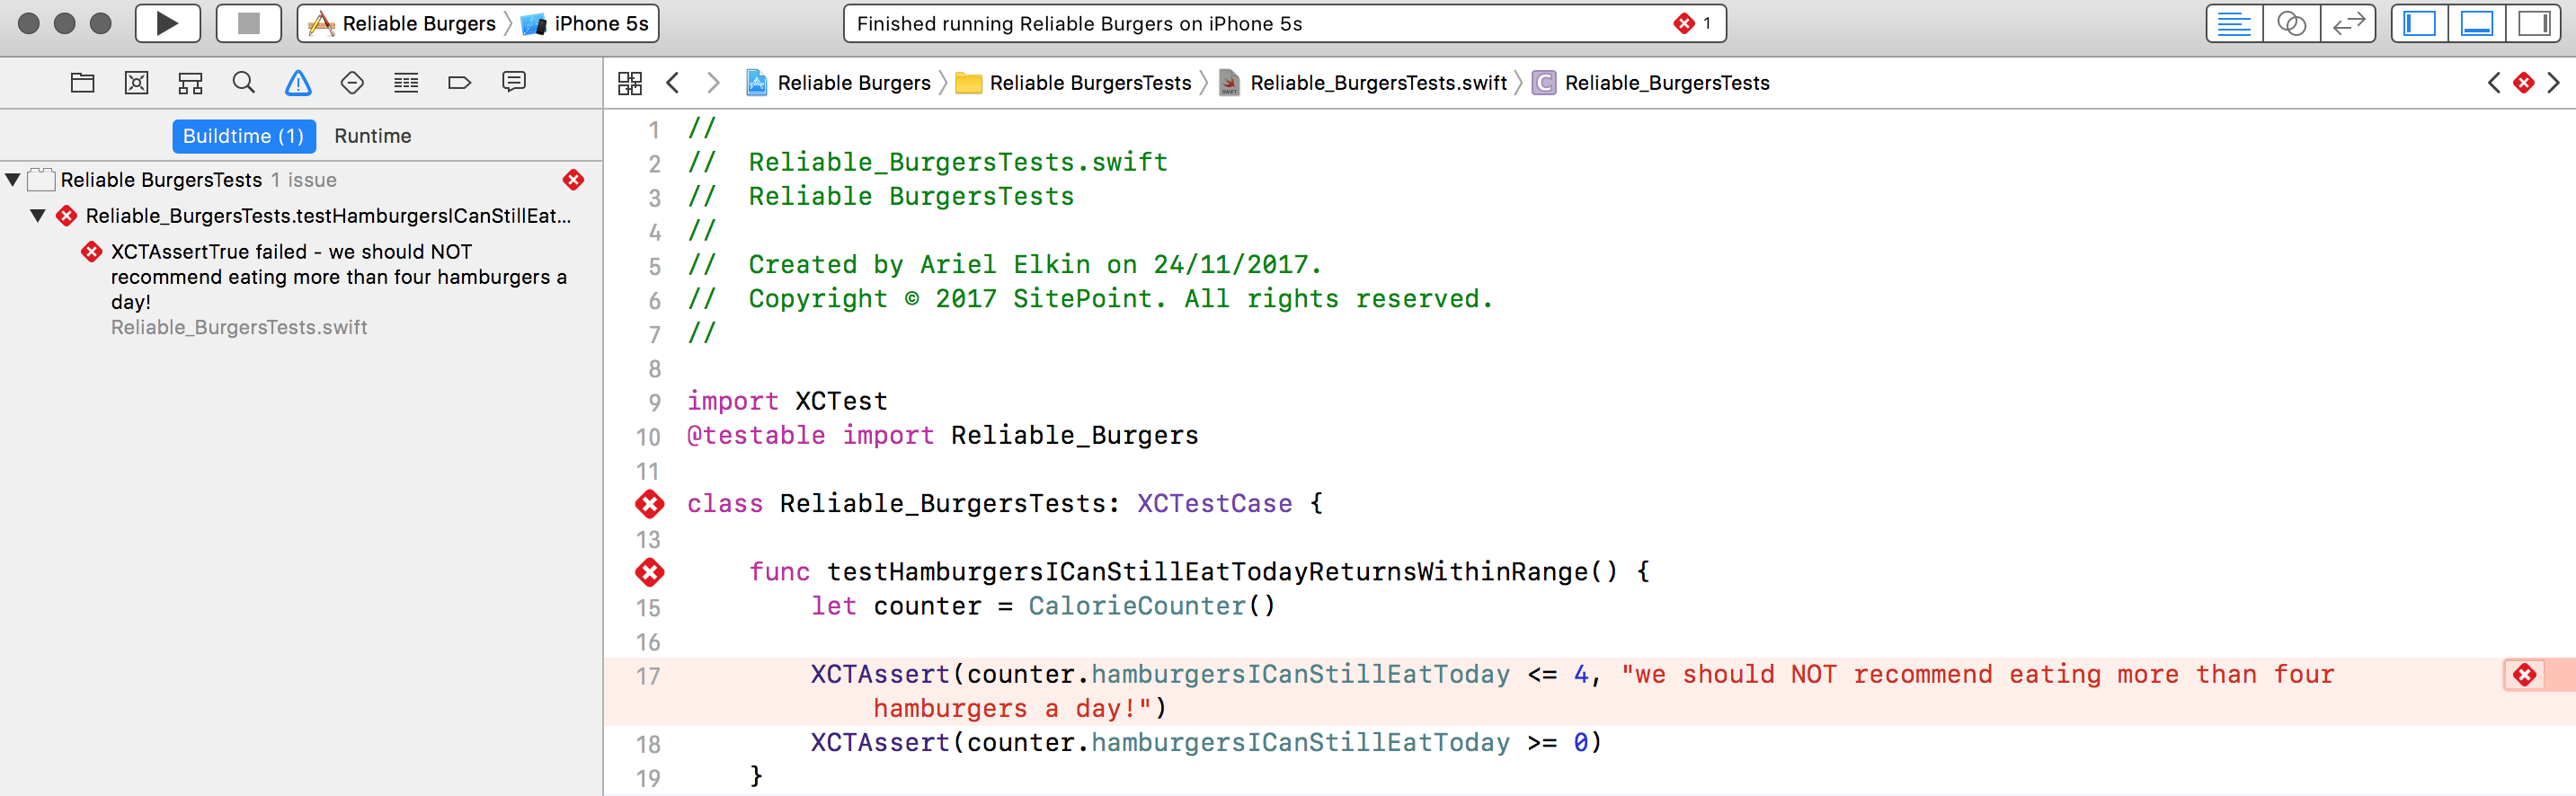
testHamburgersICanStillEatTodayReturnsWithinRange fails, as expected.
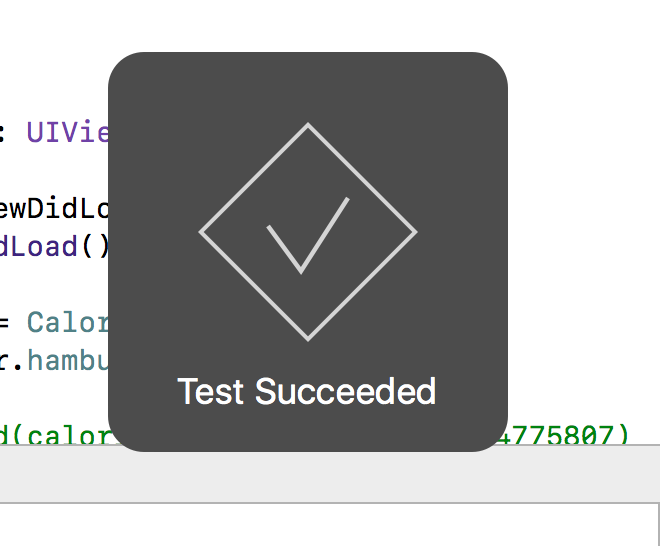
Now go to ViewController.swift and implement the fix (simply involves adding parentheses in the right place):
var hamburgersICanStillEatToday: Int {
    return (maxDailyCalories - totalCaloriesConsumedToday) / caloriesPerBurger
}
hamburgersICanStillEatToday should now pass the test, let’s press ⌘ + U to verify that. Here’s the output:
Wrapping up tests
These two tests ensure that the two bugs we identified earlier on don’t sneak into our app again. We must now make sure that these tests pass before new code is merged into the codebase, and before an app is sent to users.
App Center will make it easy for us to ensure this!
Sharing the Xcode scheme
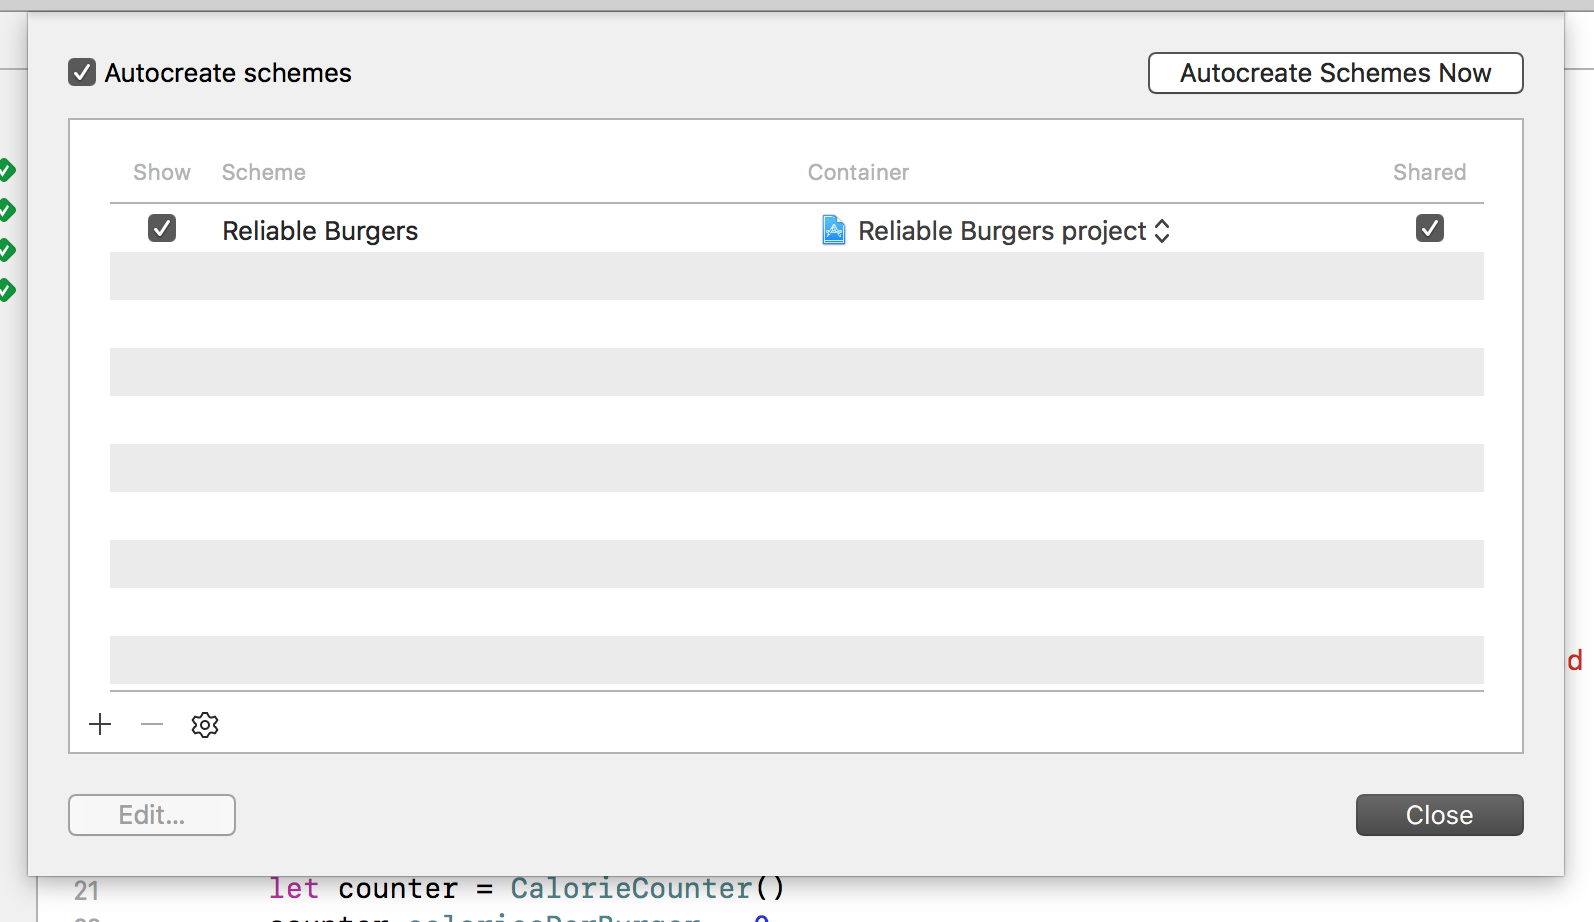
In order for App Center to build our Xcode project, we need to share the Xcode scheme.
To share a scheme, alt + click on Xcode’s run button, click on Manage Schemes, and ensure the Shared box is ticked.
Committing and pushing the code
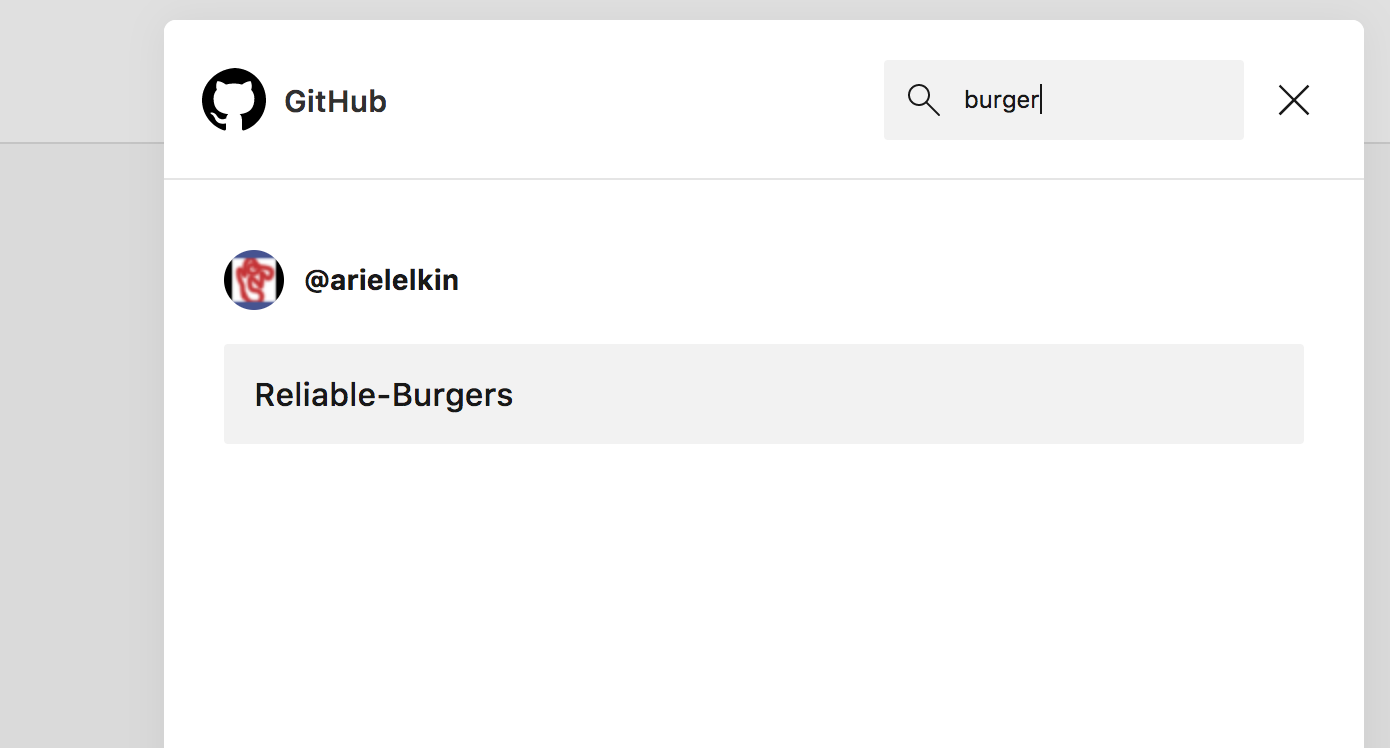
App Center can build and test our app once it’s hosted on GitHub, Bitbucket, or Visual Studio Team Services. Continuous Integration always works in tandem with version control.
To continue, create a new repository in one of the above services (I’ll use GitHub for the remainder of this tutorial) named Reliable Burgers. Then, commit the entire directory we just worked on:
/Reliable Burgers/
|-- Reliable Burgers.xcodeproj/
|-- Reliable Burgers/
|-- Reliable BurgersTests/
and push.
Building and Testing using App Center Portal
-
Visit appcenter.ms and click on the link to Get Started (you can then sign up for a new account or sign in with Github, Microsoft, Facebook, or Google)
-
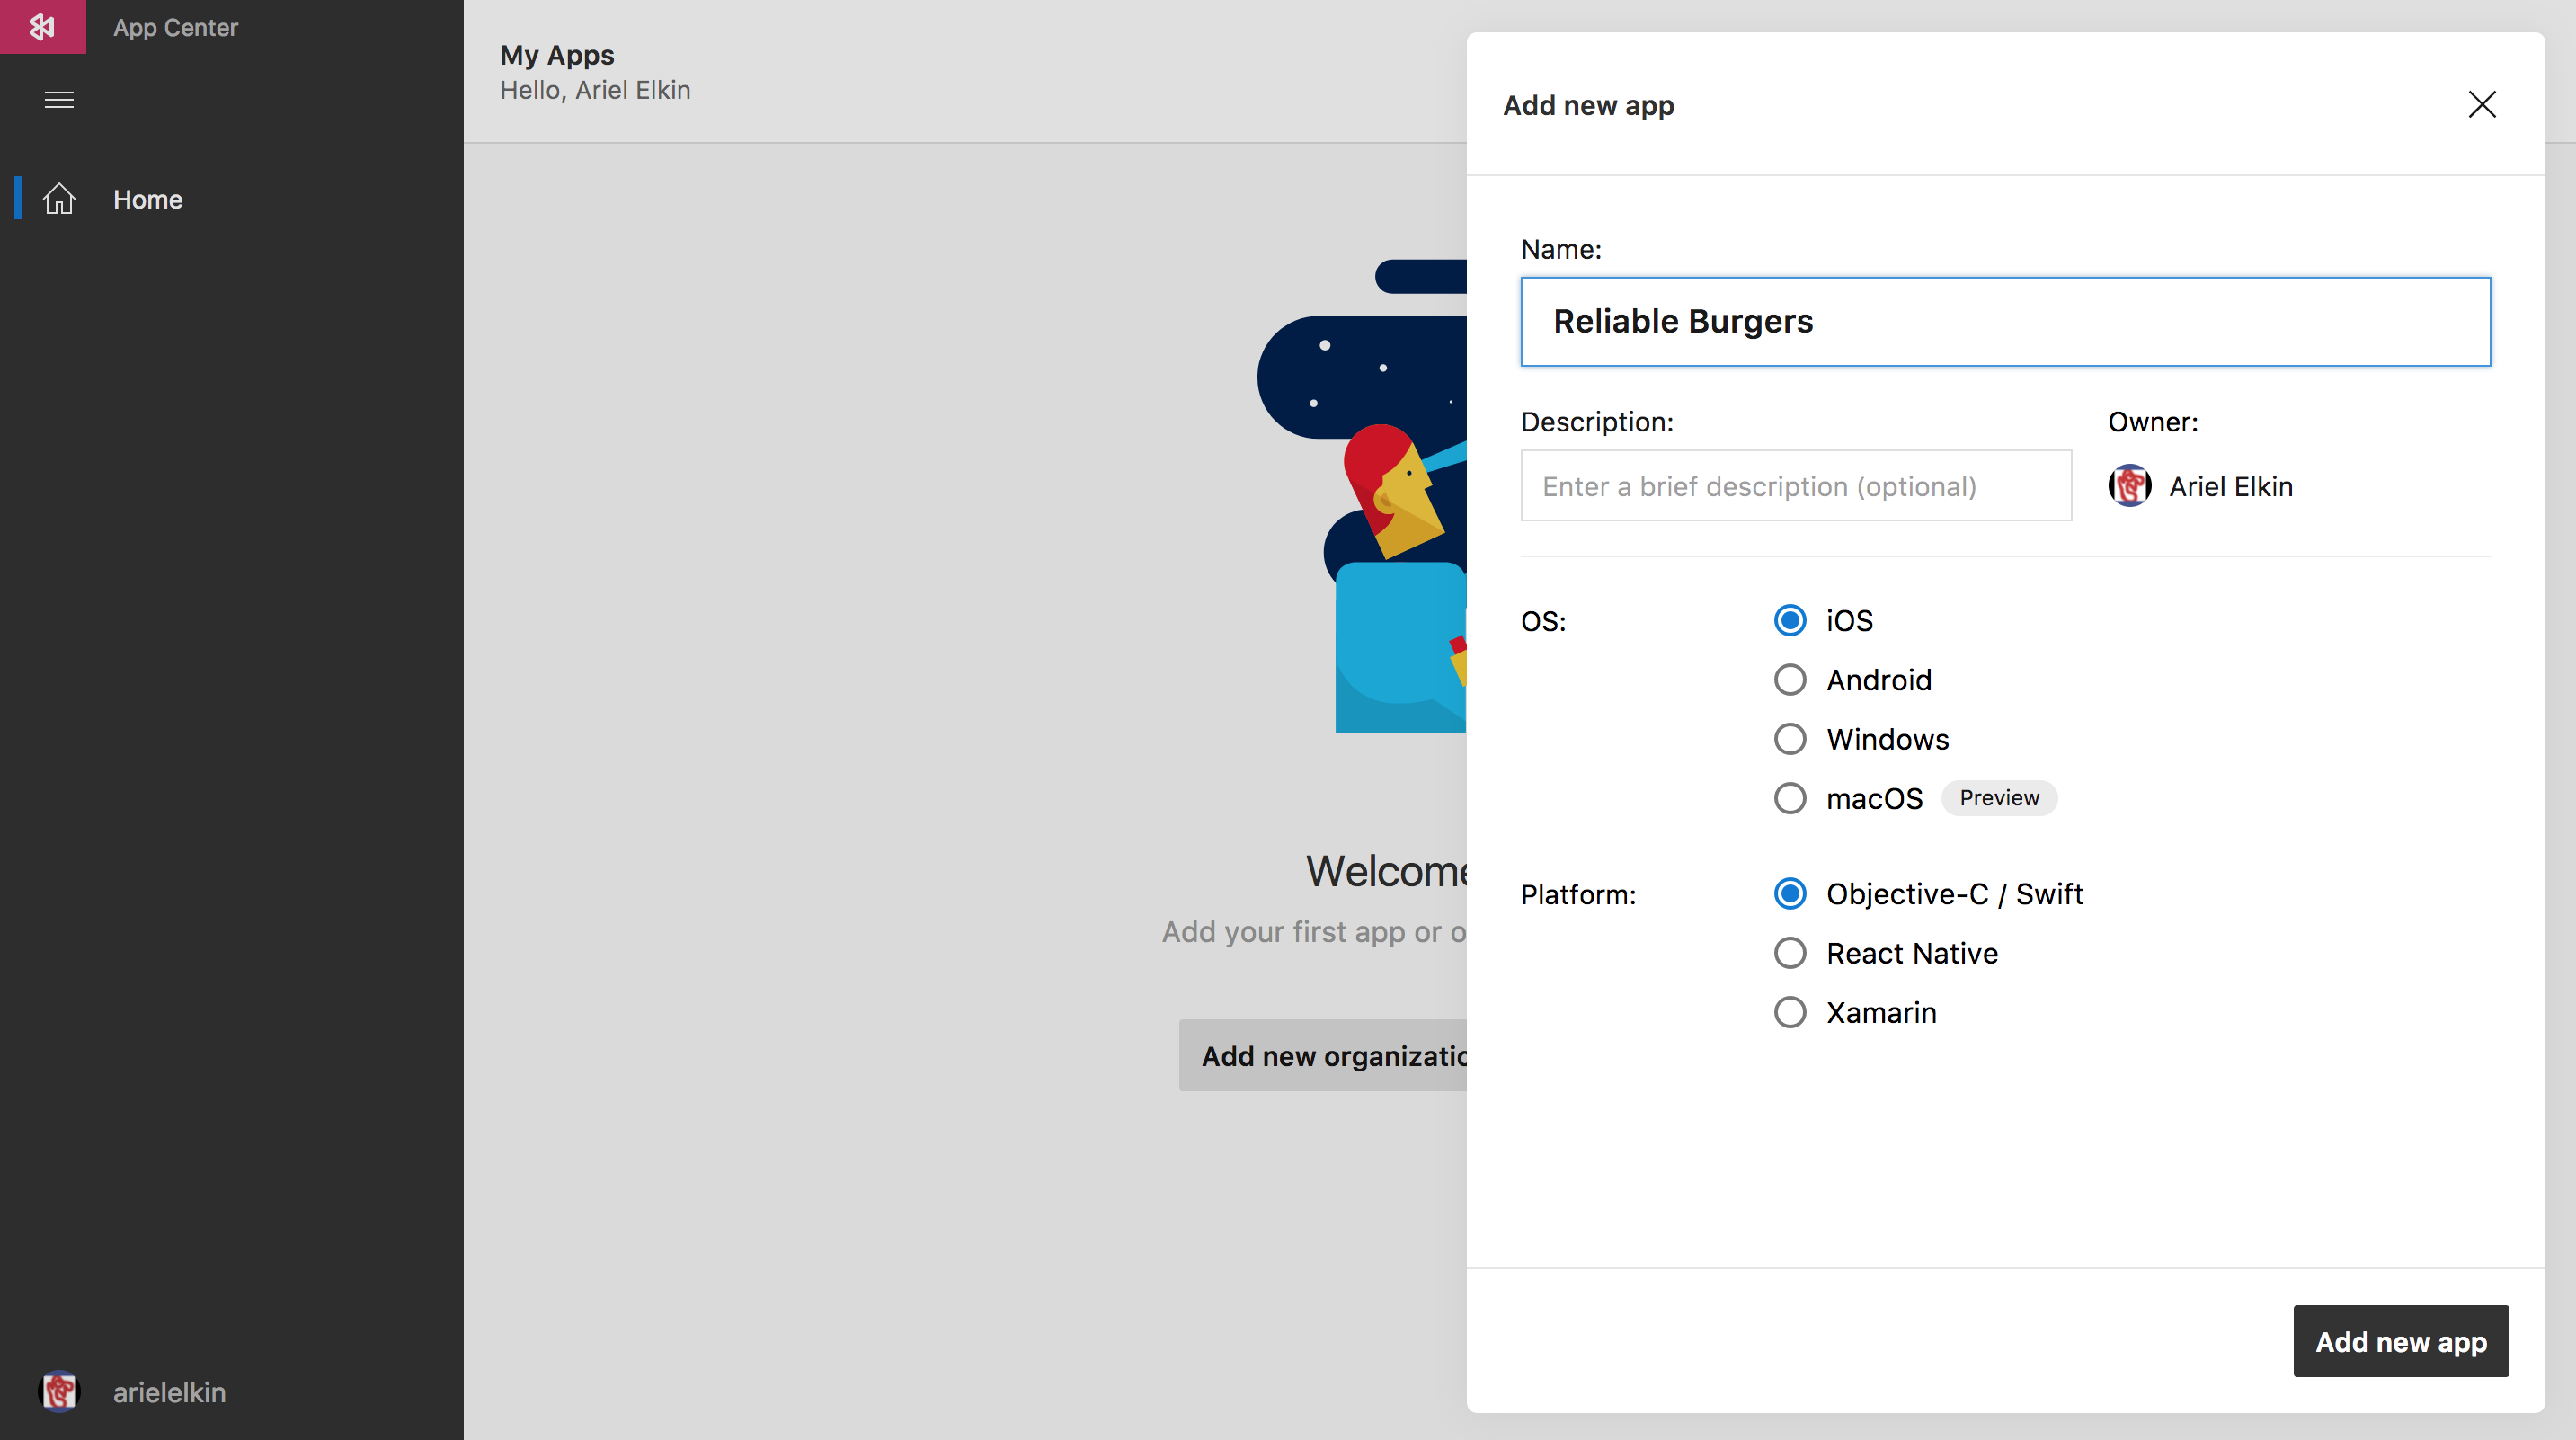
Once you’re in, click on Add New App, set Reliable Burgers as the name, select iOS as the OS, and Objective-C/Swift as the platform.
-
In App Center’s left column, click on Build, connect your hosting service if needed, and select your repository.
-
Reliable Burgers is now being handled by App Center! Now let’s click on “Configure Build” and take a look at the options:
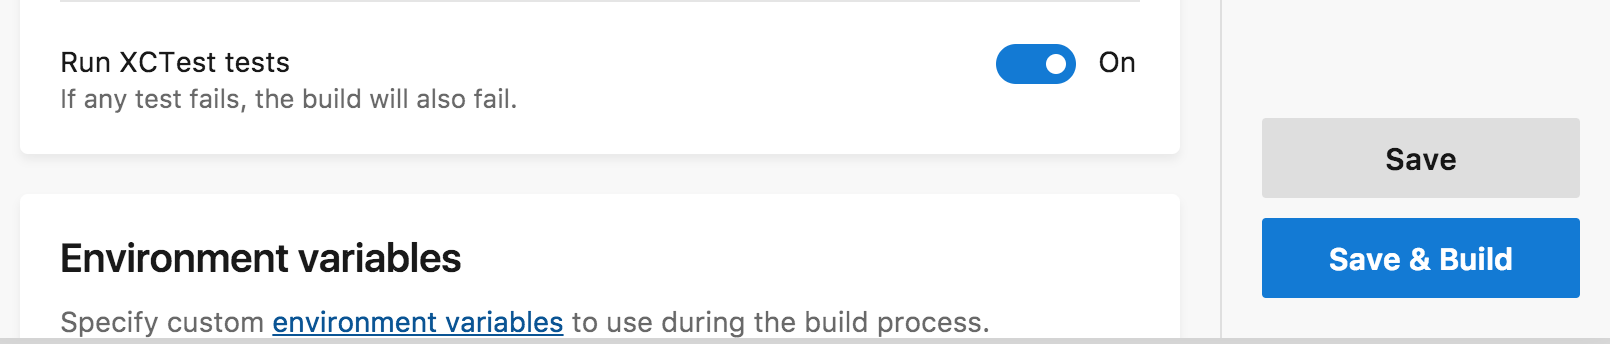
-
Turn the Run XCTest tests to On. We want the build to fail if any of the tests fail!
-
Click on Save & Build.
Builds usually take a few minutes, but you can click on it to see the real-time output of the build process.
By default, every time we push code to the master branch, a build will begin on App Center. We can configure builds to start when code is pushed to other branches too. We thus have an efficient Continuous Integration pipeline that ensures the latest commits don’t break builds or fail tests.
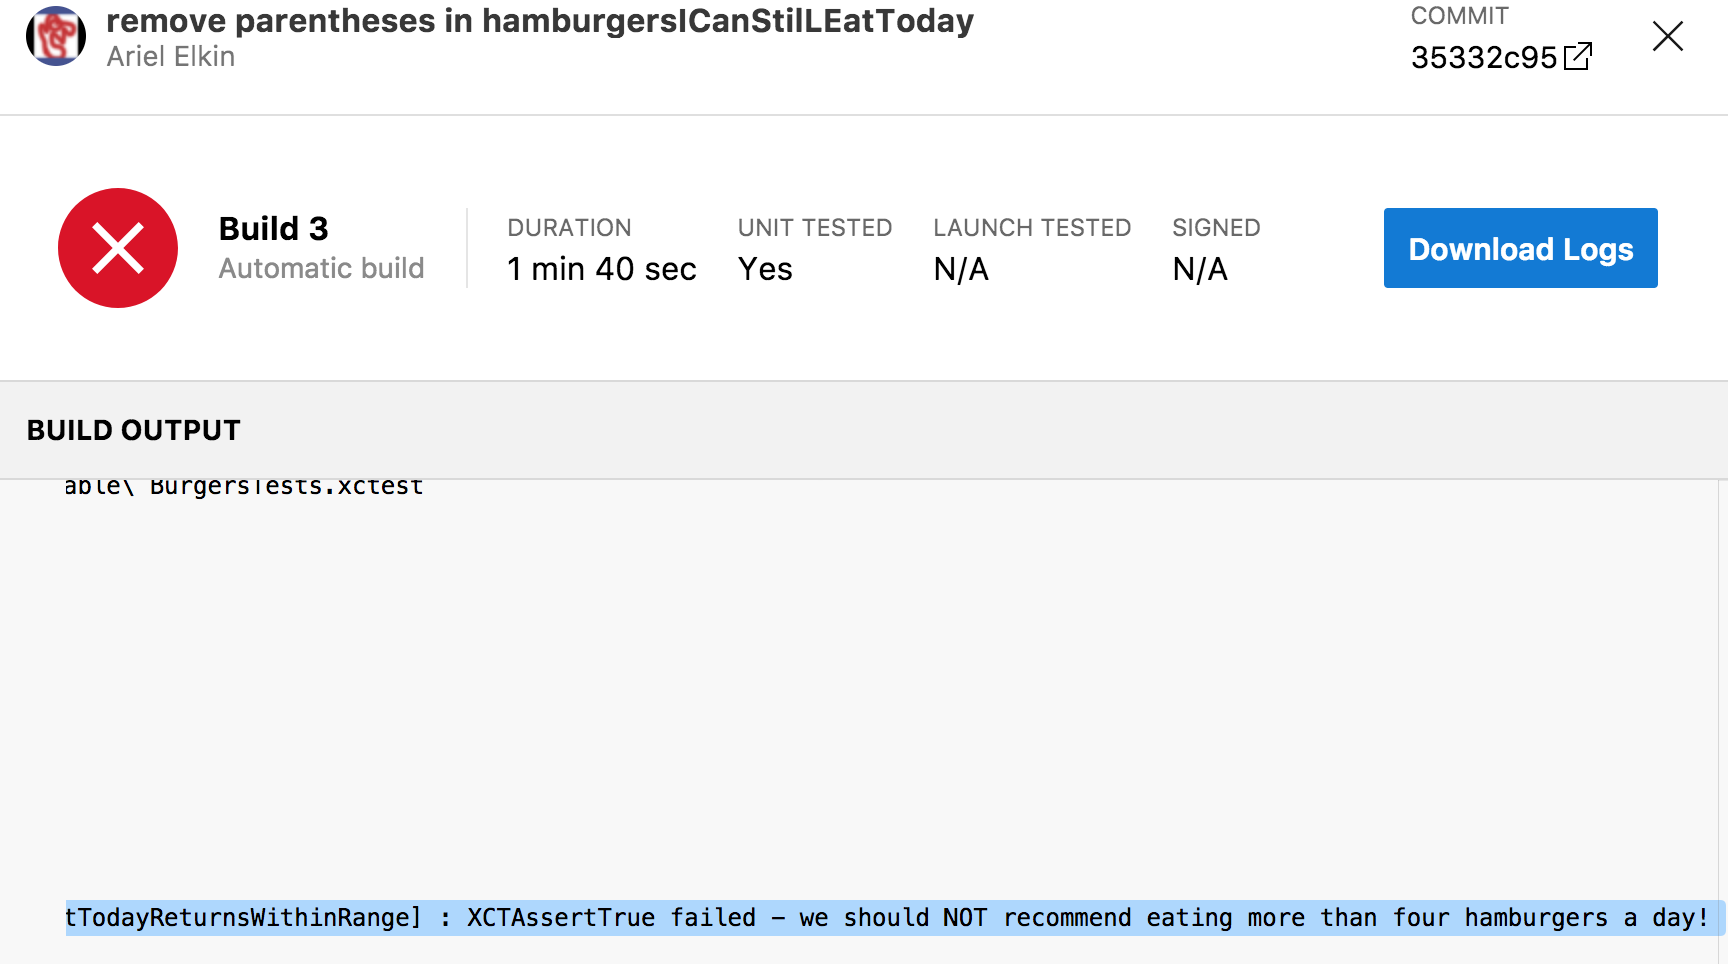
To demonstrate this, go into ViewController.swift, delete the parentheses we added to hamburgersICanStillEatToday:
var hamburgersICanStillEatToday: Int {
    return maxDailyCalories - totalCaloriesConsumedToday / caloriesPerBurger
}
It may look like an exercise in sabotage, but on the other hand, this emulates a (more likely) scenario in which, say, a teammate commits these changes accidentally.
Commit, push, and a build is triggered in App Center. Whoops, it looks like it fails:
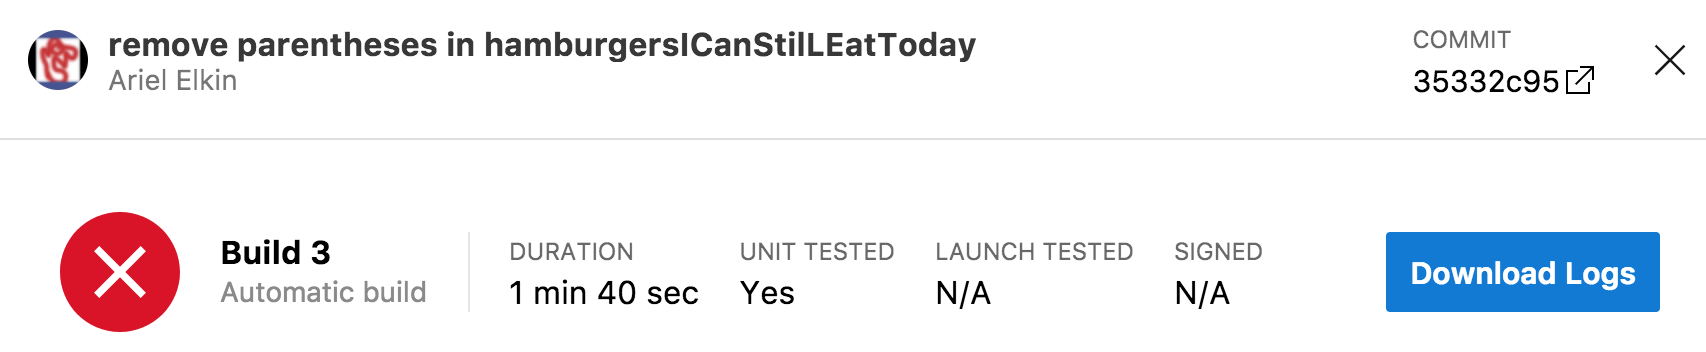
If you click on the build, and scroll through the logs, you’ll see the reason why. Just as expected:
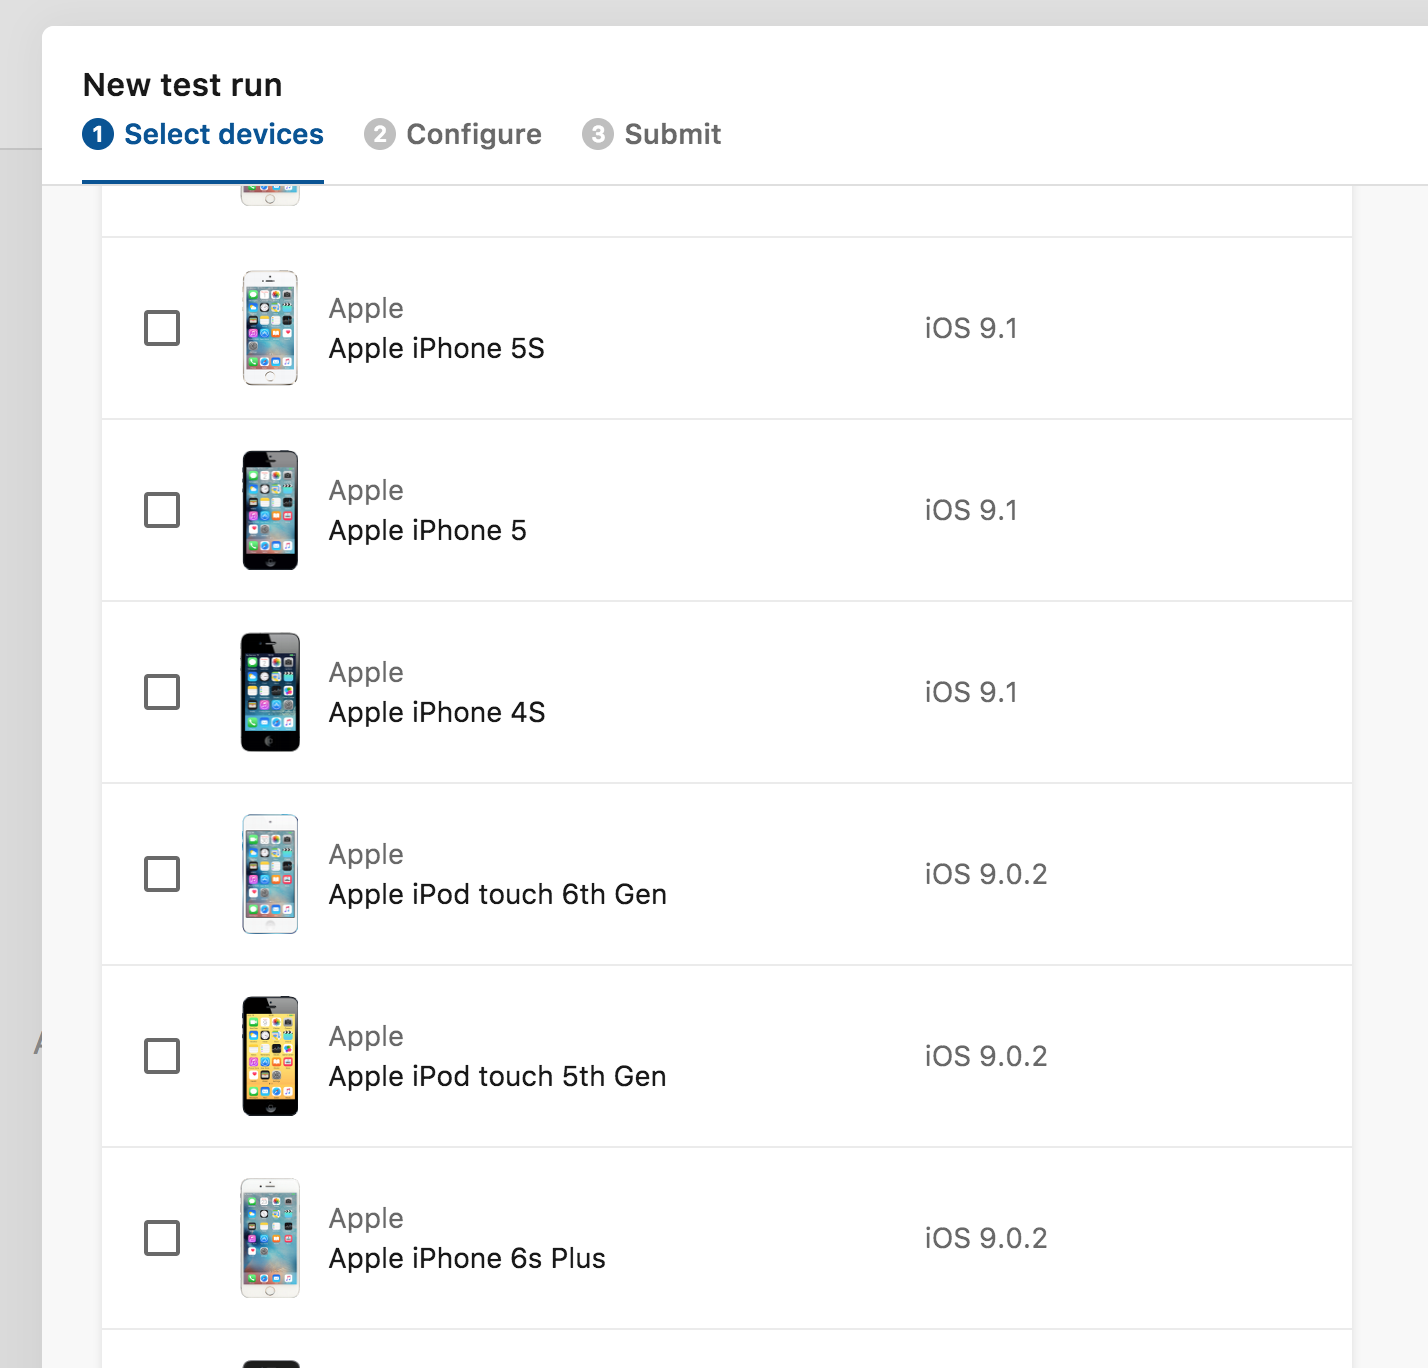
Testing on real devices
So far App Center built and tested our app on virtual machines, but App Center can also test your app on real iOS devices, with different versions of iOS to suit your needs:
Most apps feature complex UI workflows your users go through. This is a result of the many different possible combinations of views, view controllers, and segues between them. Auto Layout does a lot of the work ensuring that the layout stays consistent across different OSes and devices. Ultimately, UI Testing is the best way to ensure that your app’s dozens (or hundreds) of possible UI workflows stay the same as your codebase evolves.
One killer feature of App Center is that it allows you to run automated UI tests across hundreds of device configurations with every build (or on demand). This means it will run your tests on a massive combination of iOS devices and OS versions. App Center Test uses devices that are not rooted or jailbroken, which allows you to reliably and automatically reproduce your users’ environments. It even provides you screenshots and device logs for each test run.
You can create detailed UI tests in XCUITest or other frameworks and execute across any number of devices, or you can get started quickly with a single-device launch test:
- Click on Test in the left-hand column
- Click on Test Runs
- Select Start Testing Your App
You’ll also need to sign your builds and turn on the Test on a Real Device option in App Center’s build configuration.
I definitely recommend you take a close look at this feature (you can open the relevant documentation in a new tab and come back to it when you’re done with our tutorial!)
Continuous Delivery with App Center Distribute
Let’s get this app into our users’ hands! I’ll now go over the steps required to send a build to testers.
Creating a Distribution Group
We first define a Distribution Group, then send the build to it. These groups are very useful to ensure the right build goes to the right people. For instance, you may create a group for internal testers (such as QA), and another for external testers (such as those in a public or private beta).
In App Center’s left-hand column, click on Distribute and then on Groups.
Click on New Group on the top right corner.
This will be the group of internal testers (for instance, all the stakeholders at Reliable Burgers), so go ahead and create a group called “Internal”. (Note the Allow public access switch which allows you to effectively make the app available to anyone with the download link, a feature you may use for external testers).
In the section Who would you like to invite to the group? add your email address.
Select Create Group.
Signing the Build
Next, we need to code sign the app. We’ll need a Provisioning Profile and a .p12 Certificate. Both ensure that only the people you specify are allowed to distribute the app.
- Sign into your Apple Developer account over at the Apple Developer Portal
- Go into the Certificates, IDs & Profiles section
- Go into the Provisioning Profiles section. Find the provisioning profile you need (with a .mobileprovision file extension), select it and click download. Otherwise, you can create a new provisioning profile (one for iOS App Development if you’re sending it to testers, one for App Store if you’re sending the build to the store). Make sure that all devices meant to receive the app have been added to this profile!
- Now we download the certificate. Go into the Certificates section. Select your certificate, and click Download. Open the file that’s downloaded (it should automatically open in Keychain Access) and select Add. Then, in Keychain Access, select the My Certificates section, right-click on the certificate you just added, and select Export. It will allow you to save it as a .p12 file (set a password and note it down, as you’ll need it in the next step).
- In App Center, select your build, and select Build Configuration by clicking on the wrench icon on the top right part of the screen. Scroll down to the Sign section, and upload the two files you’ve just downloaded. Include the password for the p12 file.
- Set the Distribute Builds switch to On, and click on the group we just created.
- Click Save & Build
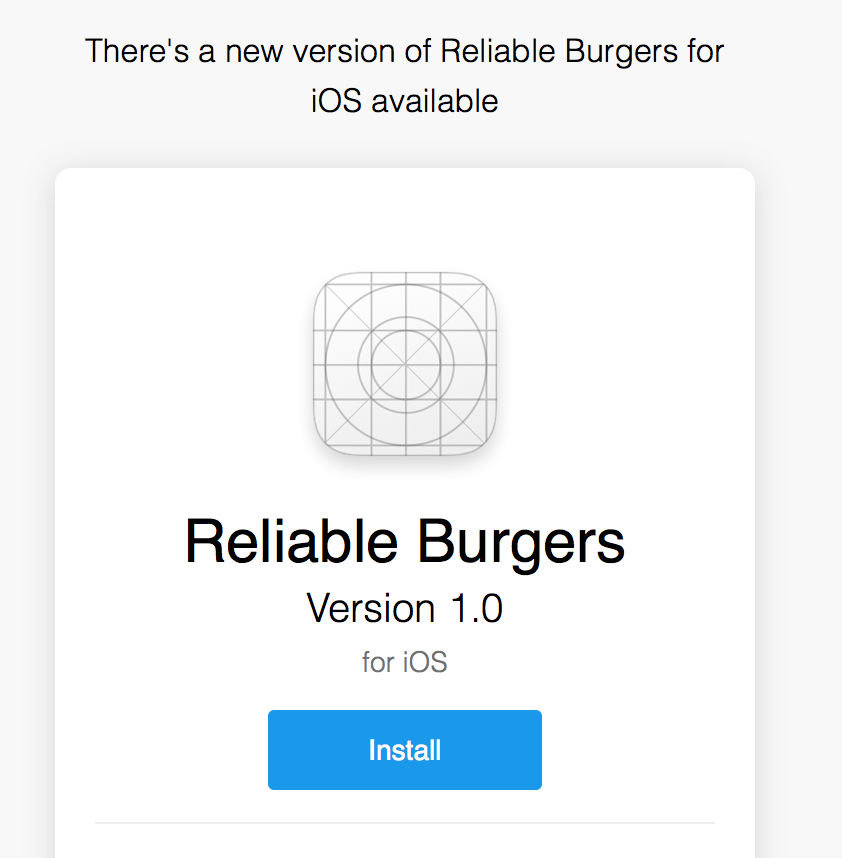
When the app finishes building, you’ll receive an email notifying you that the build is available for downloading to your device:
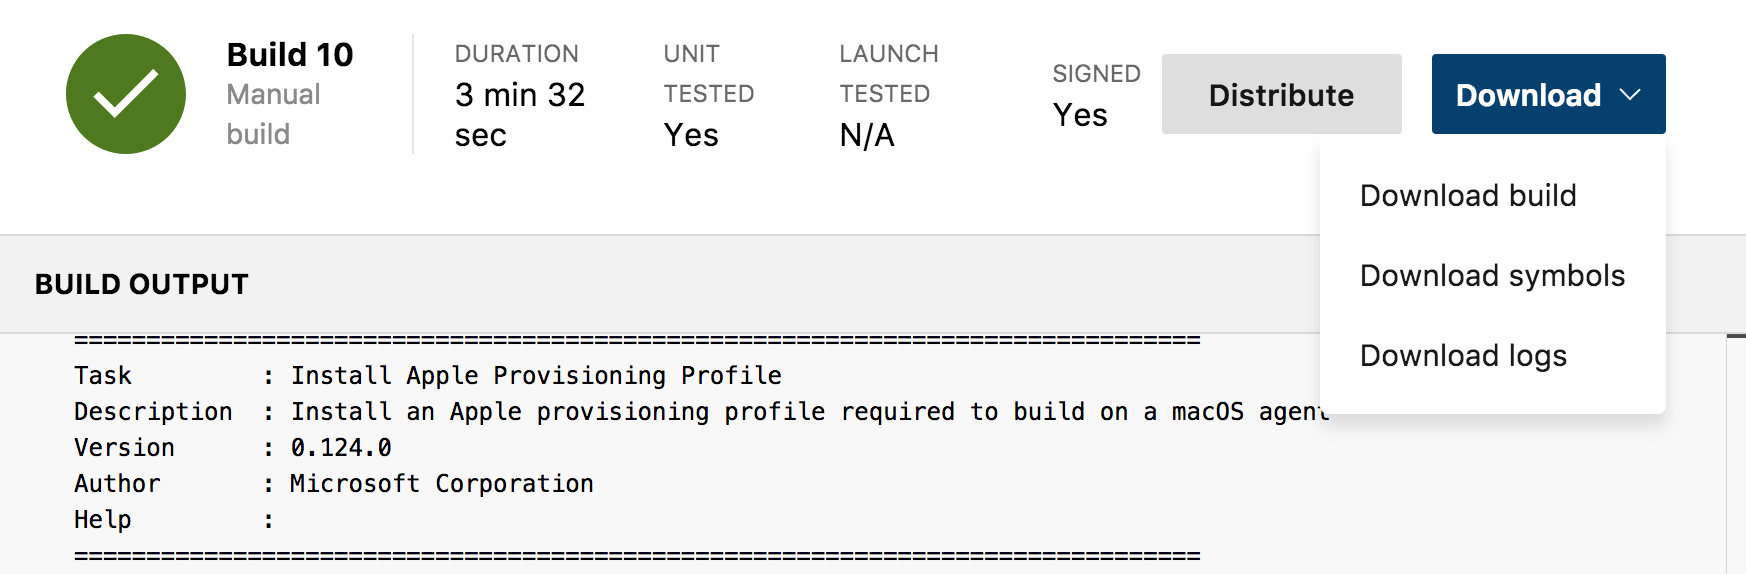
App Center also allows you to separately download the IPA file, symbols, and build logs:
If you encounter code signing problems:
Archive and export the app in Xcode, and use this command-line tool to extract the provisioning profile and certificate from the resulting ipa.
That’s a Wrap
In this tutorial, we’ve noticed how Visual Studio App Center smoothly helps us centralise all our Continuous Integration and Continuous Delivery needs in a single place, as all the above steps are exactly the same for Android, Windows, macOS, Xamarin, and React Native builds. The Continuous Integration features in App Center allow you to constantly build apps, test them, and catch bugs before they go to production, while the Continuous Delivery features allow you to easily and automatically send apps to your testers and the App Store. (Cherry on top, App Center can also take care of your app’s analytics, and we’ll cover App Center analytics in our next tutorial.
By thus allowing you to iterate faster, this great tool will help you build and ship great apps for the years to come.

Frequently Asked Questions (FAQs) about Microsoft App Center for iOS Apps
What are the key features of Microsoft App Center for iOS Apps?
Microsoft App Center offers a comprehensive set of features for iOS app development. It provides a centralized platform for building, testing, and delivering iOS apps. Key features include continuous integration and delivery, automated testing on real devices, distribution to beta testers and app stores, and monitoring of app performance and usage in real-time. It also supports integration with GitHub, Bitbucket, and Azure DevOps for seamless code sharing and collaboration.
How does Microsoft App Center support automated testing?
Microsoft App Center supports automated testing through its Test Cloud feature. This allows developers to run automated UI tests on thousands of real-world devices in the cloud. It supports popular testing frameworks like Appium, Espresso, and XCUITest. Test results, including screenshots, performance data, and stack traces, are available in a detailed report.
How does Microsoft App Center facilitate app distribution?
Microsoft App Center simplifies app distribution by allowing developers to release updates directly to beta testers and app stores. It supports distribution to the Apple App Store, Google Play, and Microsoft Intune. Developers can also create distribution groups to send updates to a specific set of users.
How does Microsoft App Center help in monitoring app performance?
Microsoft App Center provides powerful analytics and diagnostics tools for monitoring app performance. It tracks key metrics like session duration, active users, and crash-free users. It also captures detailed crash reports and stack traces to help developers identify and fix issues quickly.
Can I integrate Microsoft App Center with other development tools?
Yes, Microsoft App Center can be integrated with popular development tools like GitHub, Bitbucket, and Azure DevOps. This allows developers to share code, track issues, and manage projects seamlessly across different platforms.
How does Microsoft App Center ensure the quality of my iOS app?
Microsoft App Center ensures the quality of your iOS app through automated testing and continuous monitoring. It runs UI tests on real devices in the cloud to catch issues before they reach your users. It also monitors app performance and usage in real-time to help you understand how your app is being used and how it’s performing.
What kind of apps can I build with Microsoft App Center?
Microsoft App Center supports the development of native and hybrid apps for iOS, Android, and Windows. It also supports React Native, Xamarin, and Cordova for cross-platform development.
How does Microsoft App Center support continuous integration and delivery?
Microsoft App Center supports continuous integration and delivery through automated build, test, and release workflows. It can automatically build your app on every commit, run tests on real devices in the cloud, and distribute the app to beta testers and app stores.
How secure is Microsoft App Center?
Microsoft App Center is designed with security in mind. It uses industry-standard security protocols and practices to protect your data. It also provides features like access control and audit logs to help you manage and monitor access to your app.
How can I get started with Microsoft App Center?
You can get started with Microsoft App Center by signing up for a free account. Once you’ve signed up, you can add your app to the App Center dashboard and start using the various features. The App Center documentation provides detailed guides and tutorials to help you get started.