
Sticking with tradition, we’re going to create a very simple ‘Hello, World!’ application, without using a graphical user interface builder; we’re just writing code, to give you a rough feel for how iOS applications hang together.
Key Takeaways
- To begin iOS development, you need a copy of Xcode and the iOS Software Development Kit (SDK). You must sign up for the Apple Developer Program to publish your app and test it on Apple hardware.
- Xcode 4 is used to create iOS applications, often utilizing Apple’s UI design tools unless building complex, dynamic interfaces. Apps are written in Objective-C and objects and data structures are declared in ‘header’ files (*.h) and implemented in separate files (*.m).
- iOS apps usually have a common structure with a main.m file that instantiates the AppController. The AppController is the first entry point for OS messages into the application. Apps also need a View and a Controller for that View, known as ViewControllers in iOS.
- Xcode 4 offers a robust environment for developers with features like a streamlined interface, a powerful source editor, live rendering, a visual design canvas, advanced debugging tools, performance analysis tools, and a simulator for testing apps. It supports collaborative development through its integration with Git, a popular version control system.
Prerequisites
To start with we’re going to need a copy of Xcode and the iOS Software Development Kit (SDK).
Apple maintains control over their developer tools, so you’ll eventually need to sign up for the Apple Developer Program if you want to publish your app. Xcode is free to download once you’ve signed up for the iOS Developer program, and being a member is the only way to test your app on real-deal Apple hardware.
When signing up to the iOS Developer Program, you can use an existing iTunes, Apple Online Store, or MobileMe account. Once you have established your account, you can download Xcode and the iOS Developer Kit from the iOS Dev Center.
You can also purchase Xcode 4 on the Mac App store for AU$4.99. This will give you the ability to run your iOS programs in the Simulator on your Mac (a software emulation of an iPad or iPhone), but you won’t be able to run your programs on actual Apple hardware until you sign up for the iOS Developer Program.
Let’s Go!
Normally when making an iOS application, you’ll be advised to use Apple’s UI design tools (formerly known as ‘Interface Builder’). That’s definitely the way to go, unless you’re building very complex, dynamic interfaces (games, data visualisation tool, and so on). Once your app starts to get even slightly complex, futzing with your UI in code becomes a real pain – adjust, compile, test, repeat ad nauseam!
It’s good to know what’s happening under the hood though, so to begin with we’ll create a really basic app purely in code. The next article in this series will discuss using Interface Builder.
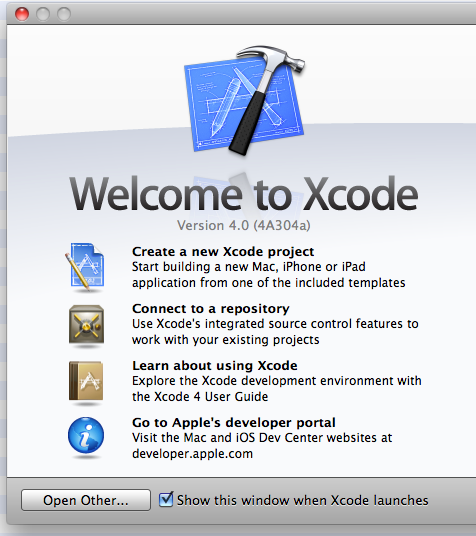
Start Xcode, and you’ll come upon the welcome screen; the left side will look like Figure 1, “Welcome to Xcode”.
Click New Project, and Xcode’s New Project dialog will appear, as shown in Figure 2. You can reach this dialog at any time by selecting File > New Project.

To find out more about the different types of iOS applications, see iOS Development Quick Start in the iOS Developmer Library.
We’ll start with a Window-based Application. This is the barest-bones of the options. Name your project as you see fit, but note that we’ll use ‘HelloWorld’ as a token in our examples to represent whatever name you choose if it is different. We configure the rest of our settings as displayed in Figure 3.
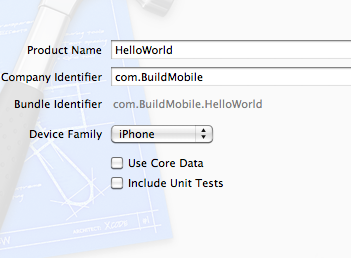
Because the Company Identifier is just a string used to identify who made the application, it can be anything. Often, companies use the convention of a reversed domain name as their identifier, e.g. com.buildmobile. This string is concatenated with the Product Name to generate the Bundle Identifier, which should as a result be a unique, human-readable string identifying your application.
We’re going to keep things simple for now, so change Device Family to ‘iPhone’. It’s possible to write applications that run on both iPhone and iPad devices (without having to make separate versions of your app). We won’t do that (yet).
For the purposes of this exercise, make sure ‘Use Core Data’ and ‘Include Unit Tests’ are unchecked. We’ll revisit these options in a later tutorial.
Hit ‘Next’ and you’ll be asked where you want to save your application. Down the bottom of that dialog box is an option labelled ‘Source Control – Create local git repository for this project’. Use of source control in Xcode 4 goes beyond the scope of this article, but it’s good to have, and we’ll revisit this later too. Hit ‘Create’, and you’re ready.
Welcome to your Application
iPhone apps all have a fairly common structure. Each app will (usually) have a main.m file (under Supporting Files in the File Browser) that instantiates the AppController (more on this in a bit).
iOS applications are written in a language called Objective-C. Sometimes this is referred to as Cocoa, but strictly speaking Cocoa refers to the libraries and APIs Apple provides. We declare objects and data structures in ‘header’ files (*.h) and then write the code that implements them in separate implementation files (*.m). According to many sources, the ‘m’ stands for ‘message’, which is a core feature of the Objective-C language.
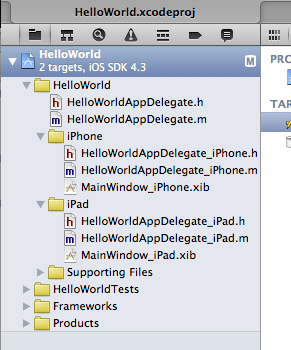
The Supporting Files directory (formerly ‘Resources’ in Xcode3) is where all of your non-code files should live. Once you start developing more intricate apps, you’ll want to put images, text files, and other miscellanea here. Figure 4 displays our file and directory structure so far.
The AppController is the first entry point for OS messages into your application. It’s worth taking a look through HelloWorldAppDelegate.m for an idea of the events your app will need to respond to. Some of these methods are more or less optional if you’re creating very simple applications, but if you’re planning to store data based on user input that’s of any significant complexity, you’ll want to implement methods like applicationWillResignActive and applicationDidBecomeActive. These methods allow you to respond to changes in your application’s life cycle, such as when it’s about to be terminated.
An AppDelegate on its own doesn’t do much. We need to add a View. And because most iOS apps follow the Model-View-Controller pattern, we’ll also want a Controller for that View. They’re called ViewControllers in iOS; they let you switch between programmatically created Views like we’re using here, or Views designed via Xcode’s GUI, which are stored in XIB files. Note, using ViewControllers is highly recommended.
Create a new file using File > New File (or Command+N). One of the options Xcode gives us is a UIViewController subclass. Neat! Select that. The first screen that appears will ask which class you want to sub-class from. You might want to subclass one of your own custom ViewController classes at times, but right now, select UIViewController as in Figure 5.

By default, ‘targeted for iPad’ and ‘With XIB for user interface’ should be unchecked. If you find different defaults, uncheck both this time around. Check your selections against Figure 6 and click ‘Next’ when you are happy.

You’ll be asked to ‘Save As’. Give your class a name in the ‘Save As’ field. We will be using HelloWorldViewController as in Figure 7 so you will need to substitute this with your own name, if it is different, during the remainder of this tutorial. Note that Xcode will automatically generate a header file for us (*.h), too.

You should have two new files. These comprise your ViewController, which is in charge of receiving input events and responding to them by manipulating the View. Typically, one ViewController should be responsible for one View. That’s not a hard rule, though; it’s up to you if you want to organize your application differently.

If you take a look at your ViewController’s implementation file (that’s the HelloWorldViewController.m file) you’ll see Apple has provided us with a bunch of pre-built functions, commented out, as above in Figure 8. We can implement the ones we need but which ones will they be? We have a ViewController, but we need a View. Let’s go ahead and create a View in our ViewController. Uncomment loadView, and make it look like the following:
- (void)loadView {

    UIScreen *screen = [UIScreen mainScreen];

    self.view = [[UIView alloc] initWithFrame:[screen applicationFrame]];

    self.view.backgroundColor = [UIColor greenColor];

}
If you hit ‘Run’ now… you’ll be disappointed. We’ve built our View, but we still need to tell our AppDelegate about the existence of the ViewController we created, and ask the AppDelegate to instantiate the View. Switch to HelloWorldAppDelegate.h and add the ViewController as a property of the AppDelegate, like so:
#import <UIKit/UIKit.h>

#import "HelloWorldViewController.h"
@interface HelloWorldAppDelegate : NSObject  {

    HelloWorldViewController *viewController;

}
@property (nonatomic, retain) IBOutlet UIWindow *window;

@property (nonatomic, retain) HelloWorldViewController *viewController;
@end
You’ll notice we added the ViewController as a property of the AppDelegate in the @interface definition. Later, we use @property, which is a bit of syntactic sugar to automatically declare getters and setters for that property, making it ‘public’ (by default, properties in objects in Objective-C are private).
Switch over to your AppDelegate implementation file now. That’s the HelloWorldAppDelegate.m file. Did you know there is nice keyboard shortcut for switching between an implementation (*.m) and header (*.h) file, and vice-versa: its Command+Ctrl+Up.
First, we need to create the getter and setter methods for our AppDelegate’s viewController property. We could declare these methods ourselves, but there’s a simpler (syntactically magical) way to do it, using @synthesize like so:
@implementation HelloWorldAppDelegate
@synthesize window=_window;

@synthesize viewController;
We can use @synthesize because we declared viewController to be a @property in the header file. @synthesize calls should, by convention, always follow your @implementation declaration and precede any method definitions.
We’ve declared that we want to use our new class in the AppDelegate, and created accessor methods to get and set it on our AppController. Now we need to tell the AppController to instantiate the class. We’ll modify the method applicationDidFinishLaunchingWithOptions to do so:
- (BOOL)application:(UIApplication *)applicationdidFinishLaunchingWithOptions:(NSDictionary *)launchOptions {
    [self.window makeKeyAndVisible];

    self.viewController = [HelloWorldViewController alloc];

    [self.window addSubview:self.viewController.view];
    return YES;

}
We added one line to allocate (alloc) the ViewController, and one to add the ViewController’s View to the Window. This is critical, because the Window needs to know about Views that it contains, and Views need to know about any other Views or UI elements they contain. We’re creating a nested hierarchy of Views.
If you hit ‘Run’ now (Command+R) you should see an eye-shatteringly bright-green screen inside the Simulator. Well done! You’ve created a view. It’s quite boring here, though so let’s spice it up a little. You can close the Simulator now if you want to, with Command+Q just like a separate app.
Let’s add a label. This is a simple visual element that contains some text. In your HelloWorldViewController.m loadView method, add to the code so that it is updated to the below:
- (void)loadView {

    UIScreen *screen = [UIScreen mainScreen];

    self.view = [[UIView alloc] initWithFrame:[screen applicationFrame]];

    self.view.backgroundColor = [UIColor greenColor];
    UILabel *label = [[UILabel alloc] initWithFrame:CGRectMake(50, 200, 200, 80)];

    label.text = @"Hello, World!";

    label.textAlignment = UITextAlignmentCenter;

    label.shadowOffset = CGSizeMake(1,1);

    label.backgroundColor = [UIColor greenColor];

    [self.view addSubview:label];

    [label release];

}
We’ve allocated memory for a UILabel element. We’ve initialized it with a width of 50 units and a height of 200 units, offset the x-axis 200 (up and down) and y-axis 80 (left to right). Hit ‘Run’ now and you should see the label appear in your View, as shown in Figure 9, ‘Our bright-green “Hello, World!” app’.

Well done! It’s worth noting that by default, the application is also loading some elements (specifically the Window) from XIB (*.xib or *.nib) files included in the project. We’re overlaying our custom View on top of those. In our next article, we’ll learn to work with Interface Builder and XIB files to create an application.
The “Orny” Series
Andy White provides an intense meditation of developing apps on the iOS platform. With the prerequisite of having a tasty refreshing beverage in hand, use the tag to all Orny articles, or jump straight into an article specifically from this index.
- iOS Development Basics with Xcode 4
- iOS Apps with Tasty UI
- An Interactive Orny
- Managing Information with CoreData
Frequently Asked Questions (FAQs) about iOS Development Basics with Xcode4
What are the key features of Xcode4 for iOS development?
Xcode4 is a comprehensive suite of tools designed by Apple for developing software for macOS, iOS, iPadOS, and watchOS. It provides a robust environment for developers to design, code, and debug applications. Key features include a streamlined interface, a powerful source editor, live rendering, and a visual design canvas. It also offers advanced debugging tools, performance analysis tools, and a simulator for testing your apps.
How can I start with iOS development using Xcode4?
To start with iOS development using Xcode4, you need to first install it on your Mac. After installation, you can create a new project and select the appropriate template for your app. Xcode4 provides a variety of templates for different types of apps. Once you’ve selected a template, you can start coding your app using Swift or Objective-C.
What are the system requirements for Xcode4?
Xcode4 requires a Mac running macOS 10.6.6 or later. It also requires at least 2GB of RAM (4GB recommended) and 12GB of available disk space. For optimal performance, a Mac with an Intel Core i7 processor and 8GB of RAM is recommended.
How can I debug my app in Xcode4?
Xcode4 provides a powerful debugger that allows you to inspect the state of your app at any point in time. You can set breakpoints in your code, step through your code line by line, and inspect variables and expressions. The debugger also provides a view of the call stack, which shows the sequence of function calls that led to the current point in your code.
Can I use Xcode4 for cross-platform development?
Xcode4 is primarily designed for developing apps for Apple’s platforms, including macOS, iOS, iPadOS, and watchOS. However, with the right tools and libraries, it’s possible to use Xcode4 for cross-platform development. For example, you can use frameworks like Xamarin or React Native to develop apps that run on both iOS and Android.
How can I optimize my app’s performance in Xcode4?
Xcode4 provides a suite of performance analysis tools that can help you optimize your app. These tools allow you to profile your app’s performance, identify bottlenecks, and optimize your code. You can also use the simulator to test your app under different conditions and identify performance issues.
Can I collaborate with other developers in Xcode4?
Yes, Xcode4 supports collaborative development through its integration with Git, a popular version control system. You can create a Git repository for your project, commit changes, and push them to a remote repository. You can also pull changes from a remote repository and merge them into your project.
How can I design the user interface of my app in Xcode4?
Xcode4 provides a visual design canvas that allows you to design your app’s user interface. You can drag and drop interface elements onto the canvas, arrange them as needed, and configure their properties. The design canvas also provides a live preview of your interface, so you can see how it will look and behave in your app.
Can I develop games with Xcode4?
Yes, you can develop games with Xcode4. It supports SpriteKit, a powerful framework for 2D game development, and SceneKit, a framework for 3D game development. You can also use Metal, Apple’s high-performance graphics API, to develop games with advanced graphics.
What resources are available for learning iOS development with Xcode4?
There are many resources available for learning iOS development with Xcode4. Apple provides extensive documentation, tutorials, and sample code. There are also many books, online courses, and tutorials available from third-party sources. Additionally, you can find a wealth of information and help from the developer community on forums and websites like Stack Overflow.