Joomla (TM) is among the most popular Open Source content management systems that exist today, in the company of Drupal and WordPress. If you just need to build a web site for yourself and are unfamiliar with all this HTML stuff, or you develop web sites for other people, or if you’re at the pointy end of developing web-based applications, then Joomla really should be on your evaluation list. It’s easy to install, use, and extend.
Installation
The server requirements for Joomla are fairly minimal. You need a host that supports PHP and MySQL, and an account with at least 50MB of disk space. This allows for the Joomla install, the database, and room for a bit of media. While Joomla can run on earlier versions of PHP, for security reasons your host should be running on the latest version of PHP4 (4.4.9 was the final version of PHP4 after development was halted) or PHP5. Joomla does run better on PHP5 but watch out for buggy versions like 5.0.4. The most desirable version of MySQL to use is version 4. It’s also wise to choose a host that runs PHP in CGI mode as this takes care of a great many annoying problems caused by file permissions. More information on the technical requirements is available on the Joomla web site.
You can download the latest version of Joomla from the Joomla site as well. When a new version comes out you’re able to download incremental patch packages that only contain the changed files between versions, thus saving you a little upload time and bandwidth.
Transfer the files to your server in the normal fashion, either by uploading the package and unpacking on your server, or unpacking first and then uploading all individual files (the latter takes a while). Once that’s done, that’s generally the last time you need to touch your FTP Client; the rest of the set up is done in your browser.
Point your browser to the URL of your site – including any subfolder path if required – where you unpacked all the Joomla files, http://www.example.com/joomla/. You will be taken to the Joomla installation wizard, as shown in the following screen:
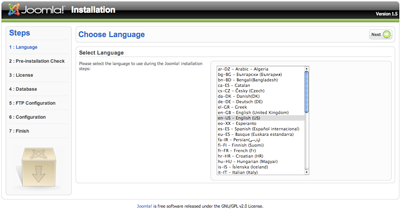
On this screen you can select the language for the installation process (there are over 40 to choose from). Click Next and you come to the Pre-Installation Check screen.
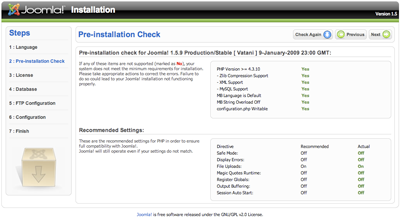
This screen gives you an indication of whether your host has all of the required or desired settings for the Joomla site to run. Assuming all is well, click Next and you will come to the License Information screen. This screen presents you with a copy of the GNU General Public License under which the Joomla source code is released. Peruse at your leisure and click Next. This brings you to the Database Configuration screen.
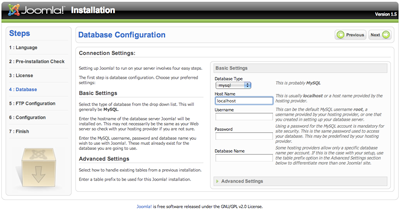
This is probably the most complicated part of the process because you have to know your database credentials for the site to work properly. Often this is done using Plesk, Cpanel, phpMyAdmin, or the command line if you are a true geek. But if you’re unsure you need to ask your hosting service. I’m going to assume that you already know how to create your database and user account:
- The database type is likely to be “mysql” (if you know what “mysqli” is then you probably know if you should select it).
- The hostname is likely to be “localhost” but check with your hosting service or IT department.
- The username and password will either have been created by you or given to you by your hosting service.
- The database name is either one you have created, or if the database user account you have has permissions to create a database, then you can enter a new name.
If this is a first-time install, don’t worry about the Advanced Settings slider. It’s only needed if you are installing over the top of an existing database.
Click Next. There might be a short delay while the database scripts are run and, if no errors were encountered, you will be presented with the FTP Configuration screen. Unless you know you’re going to have problems with file permissions (from previous experience), then you can skip past this screen. Joomla’s “FTP Layer” attempts to address some file permission issues but, as stated before, if the host is running PHP in CGI mode, you’re quite safe to omit this step.
Live on the wild side and just click Next; this will bring you to the Main Configuration screen.
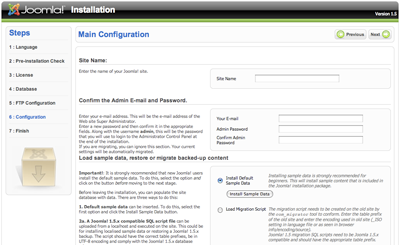
On this screen we set the Site Name and then the Super Administrator email address and password. We can also optionally install some sample data that will produce a fully fledged web site – to give you an example of what you can do – or your can load a migration script from the previous version of Joomla. In this example we’ll bypass loading any sample data because we want a clean site to work with.
Click Next and you’ll be taken to the Finish screen. Now, I told a lie before. You’ll have to use your FTP Client or File Manager to remove the folder called installation. This is really important because the site will fail to work otherwise. Besides, there are some unscrupulous people out there and, armed with a strong knowledge of Joomla, they could well do some nasty things to your site if you leave it there.
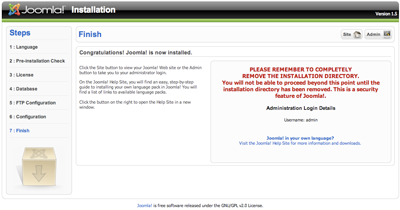
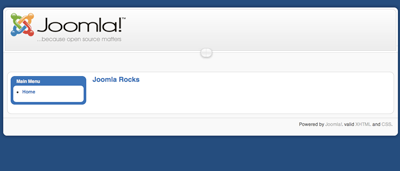
Opting to be lazy and just renaming the folder is unwise – make sure you delete it completely. When you have done that click the Site button. You will be presented with a fairly bland site and a Home link. We need to fix this!
For more information on installing Joomla, see the Joomla Documentation site.
Using Joomla
Well, the entire scope of what you can do with Joomla is far too much for a single article. The Absolute Beginner’s Guide to Joomla is a reference that gently leads you through what you need to know to become a seasoned Joomla master. For now though, we’ll look at how to place a few articles on the site.
Joomla is one of the few content management systems that completely separates administrative duties from the actual web site that your visitors see. We reach the Administrator by adding “/administrator/” to the URL path in your browser, for example: http://www.example.com/joomla/administator/.
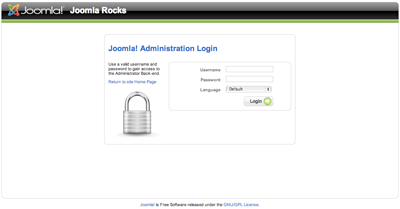
You’ll be asked for a login Username and Password. The Username is “admin” by default and the password is what you set during the installation process. Once you’re in, you’ll see what is called the Control Panel, a screen that will become very familiar to you over time.
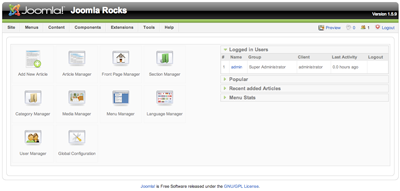
We want to start writing some cool stuff, so find and click the Article Manager icon in the Control Panel (or from the menu bar hover over Content and then select Article Manager).
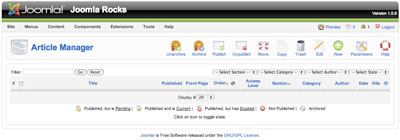
This is a very typical page in the Joomla Administrator. Below the menu bar is the Toolbar, and below that a table that will eventually show all the articles we’ve written. The Toolbar has icons for performing operations on selected items in the list, or standalone operations. For now, let’s create an article. Click New in the Toolbar.
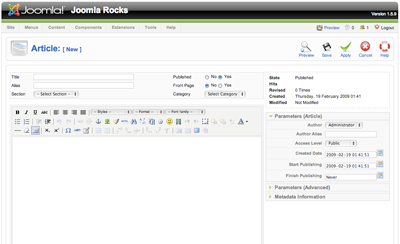
This is the screen in which you create or edit your articles. There are many fields but the basics for an article are:
- Title – the article’s title, naturally
- Alias – used in search-friendly URLs (called SEF in Joomla) when enabled
- Published – whether the article is visible to visitors on the site
- Front Page – enables you to make the article appear on your web site’s front page
In addition, Joomla has a two-level hierarchical system:
- Section – the top level
- Category – the second level
For this example, provide a suitable Title but leave the Alias field blank (this will be automatically generated). Select Yes for Published and Yes for Front Page. In the Section drop-down menu, select Uncategorized. The Category drop-down list will automatically select Uncategorized as well.
Under the top fieldset is usually a WYSIWYG editor for the body content of your article. In this editor you can place whatever content you want for the article. Joomla supports the concept of separate introductory text and article content (it also supports pages within articles, but we’ll look at that another time). To see how this works, type in a paragraph that represents the introductory text you want your visitors to see on the Front Page. Then click the Read More button under the editor box. A dashed, red line will appear. Under that dashed line, add some more paragraphs for the rest of the body of your article. Note that completing the Read More section is not vital.
Now click Save in the Toolbar. When the page refreshes you’ll see that your article is now in the articles list.

To see the fruits of your labor, click the Preview link that resides just above the Toolbar (or use whatever key or mouse-click combination you need to open it as a new tab).
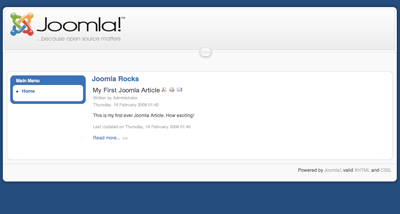
Viola! You have content.
That’s about all we can cover in this introductory overview. Next time (if they’ll have me back) we’ll look at making the site sizzle with a new template (honestly, the stock one we ship is nice, but really boring) and adding a cool Ajax-driven comments system so that we can start a blog happening.
Useful Links
In the meantime, there are a number of links you absolutely have to know about when beginning your journey into the Joomla-sphere.
www.joomla.org is the main site. The homepage is useful as it aggregates feeds from various locations, and there is some information about the project if you’re interested in that kind of stuff.
community.joomla.org is the hub of the Joomla information universe. It hosts all of the official blogs that come from various working groups in the project, as well as a really cool aggregator of Joomla-related sites (take a look at JoomlaConnect – it will connect you with the highflyers in the Joomla community ).
You’ll need to bring your shopping bag to extensions.joomla.org because it’s the place where you find out what’s available to add on to Joomla. There are literally thousands of different bits to add – some free, some commercial.
If you really want to be in the mood you can buy a T-shirt, but your main focus will probably be all the books available about Joomla.
Perhaps less exciting than the other sites but useful nonetheless, the documentation wiki site holds a wealth of community-contributed information about using and extending Joomla.
Joomla® is the trademark of Open Source Matters, Inc. in the United States and other countries.
 Andrew Eddie
Andrew Eddie is the owner of a small web consultancy based near Toowoomba, Australia and co-owner of the product solutions company JXtended which makes several free and commercial extensions for Joomla!, the award winning Content Management System and a project he co-founded. Andrew has been involved in the Open Source Software movement in professional, volunteer and leadership capacities since 2002, and he currently serves as one of the Development Coordinators of Joomla!. He also speaks regularly in Australia and internationally, advocating the cost effectiveness of Open Source software and generally sharing his knowledge about how individuals and business can be empowered by using Joomla!.