
This article was peer reviewed by Tom Greco and Marc Towler. Thanks to all of SitePoint’s peer reviewers for making SitePoint content the best it can be!
With support for the native video element and its API being fairly comprehensive, now is a great time to look at ways in which you can leverage video to create something fancy and interactive for your users.
Throughout this article we will look into the basics of the API and after we get our bearings we will work on a practical example. This will be a multi-video slider in which videos are played one after the other, seamlessly loading and animating in content as they play.
Key Takeaways
- Leverage the Video API to create interactive video showcases that engage users by playing videos sequentially with synchronized animations.
- Ensure broad browser compatibility by including video files in multiple formats such as mp4, ogg, and webm.
- Implement a fallback static image display for mobile devices that do not support autoplay, enhancing accessibility and user experience.
- Utilize HTML and JavaScript to structure interactive elements like progress bars and captions that animate in sync with video playback.
- Enhance user interaction with manual video control features, allowing viewers to click or drag on a progress bar to seek through the video.
- Explore additional functionalities such as expanding the progress bar on hover and slowing down playback when hovering over captions, to create a more dynamic and engaging user experience.
Video API – a Brief Introduction
In essence when we talk about the Video API we are really talking about the Media API — a JavaScript API that allows you to interact with audio and video elements on a web page.
This API implements an interface called HTMLMediaElement which adds the properties, methods and events needed to support basic operations common to audio and video (such as loading media, changing the seek position, finishing playback etc). It is extended by both HTMLVideoElement and HTMLAudioElement which provide special properties and methods of their own.
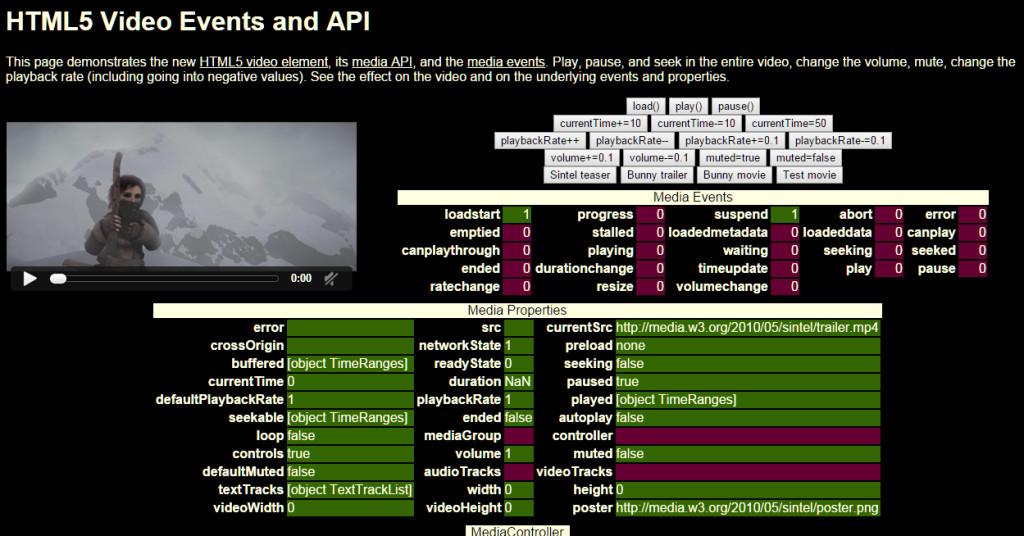
We are mainly concerned with the video element so we will be focusing on interactions with this part of the API. To get a feel for the API you can visit the Interactive HTML5 Video Example page that showcases the most commonly used elements.
Browser Support
While Chrome, Firefox, Safari, Opera and Internet Explorer all support the video element, they differ in the formats they can play, each browser has a list of video formats it supports which may also be based on the version of the browser itself.
At the time of writing, all modern desktop and mobile browsers will play the mp4 format. In addition most browsers will have long support for either (or both) theogg or webm formats. Here is a comprehensive overview of the current state of support.
While you can get by with just supplying the mp4 version you should probably include both the ogg and webm formats as a comprehensive solution.
An Interactive Video Showcase
We will be creating a showcase feature using the video element. Our showcase will play a series of small video clips back to back and trigger animations at certain times. Using the video element like this we investigate some of its properties, methods and events and show the level of control you can achieve using this API.

As ever, you can find the code for this tutorial on our GitHub repo, as well as a demo of the finished showcase at the end of the article.
Structuring the HTML Layout
Our slider example will play each of the videos one after the other, fading in the related captions for each video as we play. If we don’t support video playback / are on a mobile device we will fallback to a static image will caption text.
Create outline wrapper for your slider and inside of it add each of the video sections you want to define
<!--Main video wrapper-->
<div class="video-wrapper" id="video-container">
  <!--first video-->
  <div class="video-container"></div>
  <!--second video-->
  <div class="video-container"></div>
  <!--Nth video-->
  ...
</div>
Markup for Each Video Section
For each of the videos we want to play, we will have to set up a few elements so that we can display the video, fade in the caption elements and track the video’s overall progress.
<!--Progress bar-->
<div class="progress-bar">
  <div class="progress">
    <div class="progress-inner">
      <span class="progress-time"></span>
      <span class="progress-value"></span>
    </div>
  </div>
</div>

<!--Progress bar overlay-->
<div class="progress-overlay"></div>

<!--Video Elements-->
<video preload="none">
  <source src="videos/video1/video1.mp4" type="video/mp4">
  <source src="videos/video1/video1.webm" type="video/webm">
  <source src="videos/video1/video1.ogg" type="video/ogg">
</video>

<!--Video overlay-->
<div class="overlay"></div>

<!--Caption Elements-->
<div class="caption">
  <h1 data-animation-percent="10">Amazing New Adventures</h1>
  <h3 data-animation-percent="20">Come visit new parts of the world</h3>
  <p data-animation-percent="40">
    Don't wait, there is a wide world out there that you can explore!
    Contact us to see what we can do
  </p>
  <div class="readmore" data-animation-percent="60">Find out more</div>
</div>
The video elements will contain the video tag with all of it’s source children set to different data types to maximize compatibility. Read more about adding support for multiple video formats.
The caption elements will contain all the markup you want to fade in as the video plays. You can add anything you want but it must have the data-animation-percent attribute with a value between 0 and 100. This will tell the slider on which percentage of video completion to fade the element in.
The progress bar displays the current video progress (in both seconds and percentage). This will be updated periodically. The bar will be interactive; When you hover over it, the video will pause and you will be able to seek through it, updating the video position.
Providing a Fallback for Mobile Browsers
To help cover all of our bases we will also set up a fallback element that will be used in case the current browser is a mobile device.
Add the following markup just before the end of main video wrapper
<!--Fallback-->
<div class="fallback-container">
<div class="image"></div>
<div class="overlay"></div>
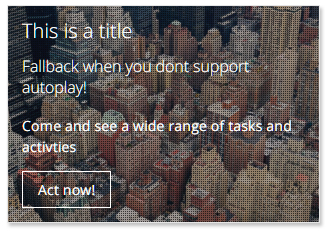
<div class="caption">
<h1 data-animation-percent="15">This is a title</h1>
<h3 data-animation-percent="25">Fallback when you dont support autoplay!</h3>
<p data-animation-percent="50">Come and see a wide range of tasks and activities</p>
<div class="readmore" data-animation-percent="70">Act now!</div>
</div>
</div>
This will function in a similar way to our videos. When the user loads the page will we will trigger all of its caption elements to fade in depending on the value set in the data-animation-percent attribute. Instead of a video we are using a background image.
Detecting Mobile Browsers
Our slider will be using the autoplay attribute of the video element to automatically play the first video. However, most mobile browsers block this functionality (so as to limit data usage) meaning that the best policy is to detect if we are on a mobile device and display the fallback content accordingly. Normally we would do this using feature detection, however, detecting support for the autoplay attribute is tricky.
As ugly as browser / UA sniffing may be, it will give us a way to test the current browser against a known list of mobile devices and from there detect how we should proceed. We can do this using the following regular expression:
var mobile = navigator.userAgent.match(/Android|BlackBerry|iPhone|iPad|iPod|Opera Mini|IEMobile|IEMobile/i);
Which we can then use like so:
if(!mobile){
  //main video slider functionality
} else {
  //fallback functionality
}
Current and next Video Setup
Note: For the JavaScript functionality I’m using jQuery, so go grab yourselves a copy and include it at the bottom of the page.
Once we are happy we’re not on mobile we search for all of our elements with the video-container class and assign the collection to our videos variable. These elements will be the main wrappers for each video and its caption content. We then find each container’s video element and assign it to the local video variable.
Now that we have our current video, we need to find the next video element so that we can trigger it to start loading and play it when the current one has finished.
If we have another video-container element we assign that to the nextVideo variable. If we don’t have another video-container element we loop back to the first.
var videos = $('.video-container');

videos.each(function(index){
  var video = $(this).find('video'),
      nextVideo;

  if(index !== (videos.length - 1)){
    nextVideo = $(this).next('.video-container').find('video');
  } else {
    nextVideo = videos.first().find('video');
  }
});
You can add as many video-container elements as you want, and define additional videos and captions. The slider will find the next video and create a loop so that it continues indefinitely.
Starting Video Playback for the First Video
For our first video, we need to set up a few things so we can get everything moving.
- We add the
activeclass to the.video-containerof the first video (this styles the video with relative positioning so that it’s displayed) - Set the video’s
preloadattribute toautoto tell the browser to start fetching the video -
Call the video’s
play()method so that the playback starts immediately
//first video, preload and play
if(index === 0){
  video.parents(‘.video-container’).addClass(‘active’);
  video[0].preload = ‘auto’;
  video[0].play();
}
Helper Variables for the Video
For each of the videos, we need to set up a few variables that we will use later in our events
var caption = video.siblings('.caption');
var captionItems = caption.find('[data-animation-percent]');
var videoBar = video.siblings('.progress-bar');
var dragging = false;
var nextLoaded = false;
captionis the container for all animated caption elementscaptionItemsholds each element that will be animated in during playbackvideoBarrefers to the progress bar on each video (used later during our events to visually update what’s happening)draggingwill be used when we seek / skip through the video to change its playback positionnextLoadedwill be used so that we known when we’ve already started loading the next video towards the end of the current video playback (prevents us callingload()multiple times)
The timeUpdate Event
As our video plays it periodically calls the timeupdate event. We will use this event to do some of our processing:
$(video).on('timeupdate', function(){
  //processing to go in here
});
In the callback (the anonymous function we are passing to jQuery’s on method) we want to get the current video’s time. We set the videoTime variable by finding the video’s currentTime and dividing it by its duration times 100. This will let us know percentage wise how complete the video is.
var videoTime = ((this.currentTime / this.duration) * 100);
Triggering the Animation for the Caption Elements
If the current video has caption elements we will need to check the current time of the video to see if we should be making the elements either active or inactive.
Inside our function we add the following
$(video).on('timeupdate', function(){
  var videoTime = ((this.currentTime /  this.duration) * 100);

  if(captionItems.length > 0){
    captionItems.each(function(){
      var item = $(this);
      var animTime = parseInt(item.attr('data-animation-percent'));

      if(videoTime >= animTime){
        item.addClass('active');
      } else {
        item.removeClass('active');
      }
    });

    if(captionItems.filter('.active').length !== 0){
      caption.addClass('active');
    } else {
      caption.removeClass('active');
    }

    if(videoTime >= 90){
      caption.removeClass('active');

      captionItems.each(function(){
        $(this).removeClass('active');
      });
    }
  }
});
Here’s a breakdown of what we are doing
- If the length of our
captionItemsis greater than0it means we have elements we need to keep track of.- For each of the
captionItemswe need to collect the value stored in itsdata-animation-percentattribute and assign it toanimTime(which should be a value between0and100). - If the current
videoTimeis greater than our elementsanimTimethen we need to make the element active by adding theactiveclass.
- For each of the
- We also get the
captionItemscollection and use jQuery’s .filter method to check if we have anyactiveclass items. If we do, we want to add the active class to the caption wrapper (thecaptionvariable). - We also check to see if the current
videoTimeis greater than90(meaning we are 90% finished). If we are close to finishing we go through all of the captions and remove theiractiveclass and also remove it from thecaption
Loading the next Video
Inside the same timeupdate event we also want to check our current video’s duration and see if we should start loading the next video.
if(videoTime >= 70 && nextLoaded === false){
  nextVideo.preload = 'auto';
  nextVideo.load();
  nextLoaded = true;
}
You can see this in action in the finished demo — the next video should appear / load in the network tab of your console at around 70% completion of the current video, giving it a few seconds before the end event will trigger calling it to play.

Updating the Progress Bar during Playback
Since we want the progress bar to be updated frequently we can’t put it inside the timeupdate function (since the browser detetmines how offen it is called). We instead call setInterval and assign it to our videoInterval variable. Every 100ms we will call the updateProgressAuto function and pass in the currently playing video
setInterval(function(){
  updateProgressAuto(video);
}, 100);
Updating the Progress Bar Automatically with UpdateProgressAuto
Every 100ms the progress bar will need to be updated. We use this function for that purpose.
function updateProgressAuto(video){
  var videoBar = $(video).siblings('.progress-bar');
  var videoPercent = ((video[0].currentTime / video[0].duration ) * 100);

  videoBar.find('.progress').css('width', videoPercent + '%');
  videoBar.find('.progress-value').html(parseFloat(video[0].currentTime).toFixed(2) + ' : ' + parseFloat(video[0].duration).toFixed(2));
  videoBar.find('.progress-time').html(parseInt(videoPercent) + '%');
}
Here’s whats happening.
- We are getting the progress bar element and finding the
videoPercentby diving the video’scurrentTimeby itsdurationand multiplying by 100. - We update the width of the progress bar to reflect the
currentTimepercentage - We update the current time / duration of the video so we know exactly when the video will finish.
- We update the percentage shown on the video bar with the current percentage
The OnEnded Event
When the current video ends it triggers the onEnded event. It’s here we will switch the active class to the container of the nextVideo and then call its play function to start playback
video[0].onended = function() {
   nextVideo.parents('.video-container').addClass('active');
   video.parents('.video-container').removeClass('active');
   nextVideo[0].play();
};
Manually Updating the Playback of the Video
As an added feature, the slider also lets you manually seek through the video, changing it’s current playback time as you click or drag (letting you rewind or forward the video).
We bind several event handlers to the click, mousedown, mouseup and mousemove events for the videoBar variable. The purpose of this is to translate the click position / drag position of the mouse to update the video’s position.

//seeking with the video bar
videoBar.on('click', function(e){
  updateProgressManual((e.pageX - $(this).offset().left) , video);
});

//mouse moving
videoBar.on('mousedown',function(e) {
  dragging = true;
  updateProgressManual(e.pageX - $(this).offset().left, video);
});

//mouse up (choose time to seek to)
videoBar.on('mouseup',function(e) {
  dragging = false;
  updateProgressManual(e.pageX - $(this).offset().left, video);
});

//mouse dragging (actively seeking)
videoBar.on('mousemove',function(e) {
  if(dragging === true){
    updateProgressManual(e.pageX - $(this).offset().left, video);
  }
});
All of these events call the updateProgressManual function, which will update the playback time of the video. The value we collect will be the current pageX position minus the current left offset of the video bar (which will give us the correct location on the progress bar)
Manually Updating the Playback with the UpdateProgressManual Function
This function is called when we are manually seeking through the current video. It’s purpose is to get the position that was clicked and convert it into the time that the video should seek to.
//Manually updates the video when we seek using the progress bar
function updateProgressManual(progressBarPosition, video){
  var videoBar = $(video).siblings('.progress-bar');
  var videoPercentage = ((progressBarPosition / videoBar.outerWidth()) * 100);

  videoBar.find('.progress').css('width', videoPercentage + '%');
  videoBar.find('.progress-value').html(parseFloat(video[0].currentTime).toFixed(2) + " : " + parseFloat(video[0].duration).toFixed(2));
  videoBar.find('.progress-time').html(parseInt(videoPercentage) + '%');
  video[0].currentTime = ((video[0].duration * videoPercentage) / 100);
}
Here’s a breakdown of what’s happening
- We calculate the
videoPercentageby getting the current passed in position and dividing it by theouterWidthof the video bar times by 100. This will tell us what percentage we want to seek to. - We set the width of the
progresselement inside thevideoBarto the percentage we are seeking to. - We also want to update the visual playback time in the bar. This is done by getting the video’s
currentTimeandduration - Finally, we set the video’s
currentTimevalue to make the video seek to that specified time period.
Additional Functionality
The slider also has a few other features that you might find useful.
When the videoBar intersects with our mouse we expand the progress bar to make it easier to click on / drag (to seek the video). In addition we also pause the video and activate our overlay. When the mouse moves away it all reverts back, starting playback and removing classes.
We also check if you move your mouse onto the caption area and its elements. If the caption is currently active it will slow down the video via the playbackRate property (making it play back half as fast). When we move the mouse away the video returns back to it’s normal speed.
//When hovering over progress bar, pause video and restyle
videoBar.on('mouseover', function(){
  $(this).siblings('.progress-overlay').addClass('active');
  $(this).addClass('expanded');
  video[0].pause();
});

//When not hovering, unpause video and restyle back to normal
videoBar.on('mouseout', function(){
  $(this).siblings('.progress-overlay').removeClass('active');
  $(this).removeClass('expanded');
  video[0].play();
});

//if we have caption elements, slow playback on hover
if(captionItems.length !==0){
  video.parents('.video-container').on('mouseover','.caption.active', function(){
    video[0].playbackRate = 0.5;
  });
  video.parents('.video-container').on('mouseout','.caption.active', function(){
    video[0].playbackRate = 1;
  });
}
Our Mobile Only Fall-back Content
If we’re on a mobile device we won’t be showing our videos, instead we will show the fallback content. You can test this in the demo by setting the mobile variable to be true.
The majority of the functionality is similar to how we have processed each video. We look for all of its elements and then determine when they need to be faded in.
var fallbackInterval = setInterval(function(){
  currentTime = (parseInt(currentTime) + timeInterval);
  fallbackElements.each(function(){
    var animationPercent = parseInt($(this).attr('data-animation-percent'));
    if((currentTime / animationDuration * 100) >= animationPercent){
      $(this).addClass('active');
    } else {
     $(this).removeClass('active');
    }
  });

  //if we have any caption elements faded in
  if(fallbackElements.filter('.active').length !== 0){
    fallbackElements.parents('.caption').addClass('active');
  }

  //if we have ended, finish
  if(currentTime >= animationDuration){
    clearInterval(fallbackInterval);
  }

}, timeInterval);
Let’s go through what’s happening
- We find the
fallbackandfallbackElementsand set thefallbackcontainer to be activate. - We set the
currentTimeto0which gives us our starting time. We then setanimationDurationto5000to indicate that the complete animation will take 5 seconds. Finally we set thetimeIntervalto be50which means every 50ms we will have an update. - We create our main loop with the
setIntervalfunction (assigning it to ourfallbackIntervalvariable). We set the interval to run every 50ms. - Inside the main interval we get the new current time (by adding the
timeIntervalto thecurrentTimevariable). - We check each of the caption elements against the percentage of this new time to see if we should activate this element.
- If our
currentTimeis greater than ouranimationDurationwe clear thefallbackIntervalusing clearInterval to finish everything up.
Demo
And finally, here’s a demo of the finished showcase. You can click on the video to toggle playback.
See the Pen Video API Interactive Showcase by SitePoint (@SitePoint) on CodePen.
Where to from Here?
Now that you see how the Video API can be used to create interesting elements you can take the example code from this and expand it to make it even more awesome.
There are plenty of things that you could do to improve upon this, here’s some of them:
- Create a fancier animation that is applied to the caption elements as they fade in. You could also create several different animations in case you wanted to differentiate them.
- Serve up an entirely different experience if you are on mobile. Maybe you could have an image slider or some other interactive content.
- You could try and provide multiple fallback containers with their own images and content to mimic what the video slider does.
- Use additional events, methods and properties from the API to make the slider even better.
If you end up creating something great feel free to share it with us, I’d love to hear from you in the comments below.
Frequently Asked Questions (FAQs) about Interactive Video API
What is an Interactive Video API and how does it work?
An Interactive Video API is a set of protocols and tools that allow developers to embed interactive video content into their applications or websites. It works by providing a framework for developers to control video playback, add interactive elements, and collect data on viewer engagement. This can include features like clickable hotspots, quizzes, branching narratives, and more. The API communicates with the video player and the server, enabling the interactive elements to function seamlessly within the video content.
How can I use an Interactive Video API to enhance my website or application?
An Interactive Video API can significantly enhance your website or application by making your video content more engaging and interactive. For instance, you can use it to create interactive tutorials, product demonstrations, or educational content. It can also be used to collect valuable data on viewer behavior, which can be used to improve your content and marketing strategies.
What are the benefits of using an Interactive Video API?
The benefits of using an Interactive Video API are numerous. Firstly, it can make your video content more engaging and memorable, leading to increased viewer retention and conversion rates. Secondly, it can provide valuable insights into viewer behavior, helping you to tailor your content and marketing strategies more effectively. Lastly, it can save you time and resources by providing a ready-made framework for creating interactive video content.
How does an Interactive Video API compare to traditional video APIs?
Unlike traditional video APIs, an Interactive Video API allows for a much higher level of interactivity and engagement. While traditional video APIs simply allow for video playback and basic controls, an Interactive Video API enables developers to add a wide range of interactive elements to their video content. This can include clickable hotspots, quizzes, branching narratives, and more.
What skills do I need to use an Interactive Video API?
To use an Interactive Video API, you will need a basic understanding of web development and programming. This includes knowledge of HTML, CSS, and JavaScript, as well as familiarity with API usage. However, many Interactive Video APIs come with detailed documentation and support, making them accessible to developers of all skill levels.
Can I use an Interactive Video API to create interactive live streams?
Yes, some Interactive Video APIs do support live streaming. This allows you to add interactive elements to your live streams, such as live polls, quizzes, and viewer comments. This can greatly enhance viewer engagement and participation during live events.
How can I integrate an Interactive Video API into my existing video content?
Integrating an Interactive Video API into your existing video content typically involves adding the API’s JavaScript library to your web page, and then using the API’s functions to control video playback and add interactive elements. The exact process can vary depending on the specific API and your video content.
What are some examples of applications that use an Interactive Video API?
Interactive Video APIs are used in a wide range of applications, from e-learning platforms to e-commerce websites. For instance, they can be used to create interactive tutorials, product demonstrations, and educational content. They can also be used in video games, virtual tours, and interactive storytelling.
Are there any limitations or challenges when using an Interactive Video API?
While Interactive Video APIs offer many benefits, they can also present some challenges. For instance, creating interactive video content can be more time-consuming and complex than creating traditional video content. Additionally, not all viewers may be familiar with interactive video, which could impact their viewing experience. However, these challenges can often be overcome with careful planning and design.
How can I choose the right Interactive Video API for my needs?
Choosing the right Interactive Video API depends on your specific needs and goals. Factors to consider include the level of interactivity you require, the types of interactive elements you want to include, your technical skills and resources, and your budget. It’s also important to consider the API’s documentation and support, as well as its compatibility with your existing technology stack.