

The Amazon Echo is a voice enabled speaker and personal assistant that has a range of capabilities which grow every day. As a developer who is fascinated by both the Internet of Things and artificial intelligence — the Echo holds so much potential!
The best way to begin experimenting with your own Echo customizations is via IFTTT (If This Then That), a service that allows rule based actions and triggers between a range of devices and services with no programming required. In this article, we will explore a few examples of functionality that the Echo can achieve when paired with IFTTT.
If you are in Australia — like me — and aren’t quite sure how to get your hands on an Echo and set it up to work here, I have a quick guide on how to set up an Amazon Echo in Australia that I wrote at Dev Diner on this very topic! Whilst you can’t get everything to work just yet, developers can get enough working that you’ll be able to develop for the Echo in no time.
Key Takeaways
- IFTTT (If This Then That) is a service that allows rule-based actions and triggers between devices and services, like Amazon Echo, without any programming required.
- Connecting Amazon Alexa to IFTTT can enable capabilities such as turning on lights when an alarm goes off, triggering Android SMS messages, emailing your to-do list, and adding to-dos into a Google Spreadsheet.
- To connect Amazon Echo to IFTTT, users need to add the Amazon Alexa channel to IFTTT and grant it the right permissions.
- It is possible to customize the trigger phrases for IFTTT recipes to make them more natural sounding and easier to remember.
Completely New to IFTTT?
If you are completely new to IFTTT, we have a more generic overview of how it works in an earlier piece on Connecting LIFX Light Bulbs to the IoT Using IFTTT. We’ve also connected it to Node.js via the IFTTT Maker channel and WordPress via the IFTTT WordPress channel. Throughout this article, if you find any concepts in IFTTT a bit confusing, check the earlier articles — however I’ve aimed to structure this so that most readers can pick things up solely from this article.
Connecting Your Echo to IFTTT
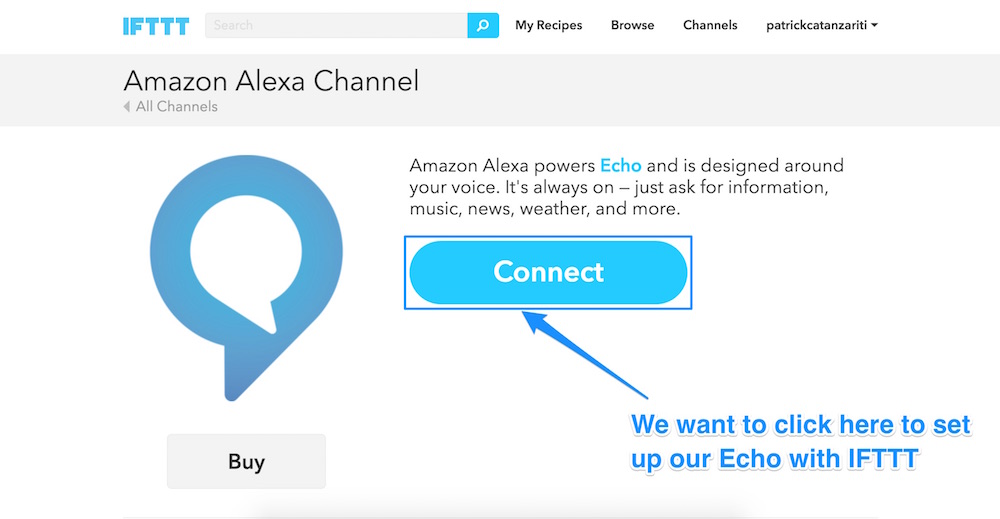
To enable any of the below capabilities, we need to add the Amazon Alexa channel to IFTTT. Head to the Amazon Alexa page and click “Connect”:
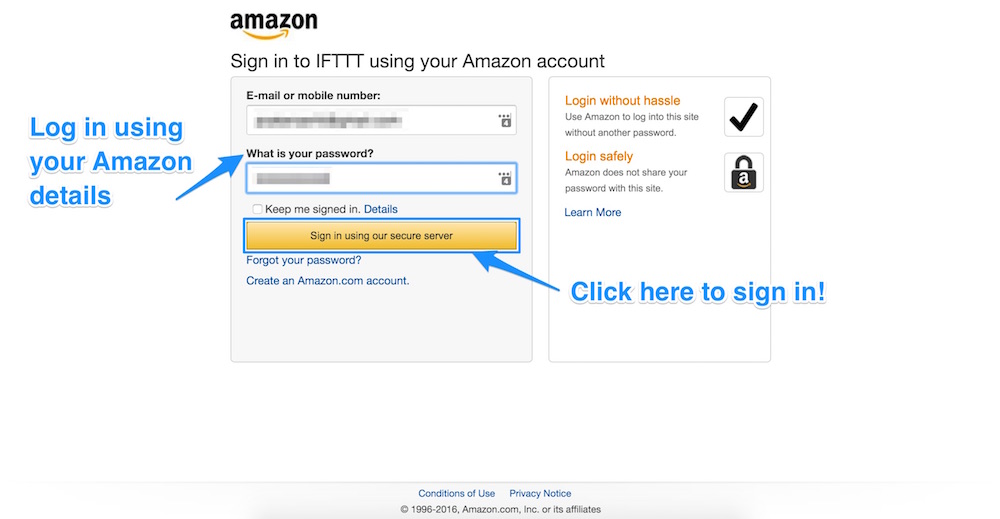
From here, you will be prompted to enter in your Amazon account details. Make sure you put in the account details for the account which your Echo is assigned to (if you have multiple accounts):
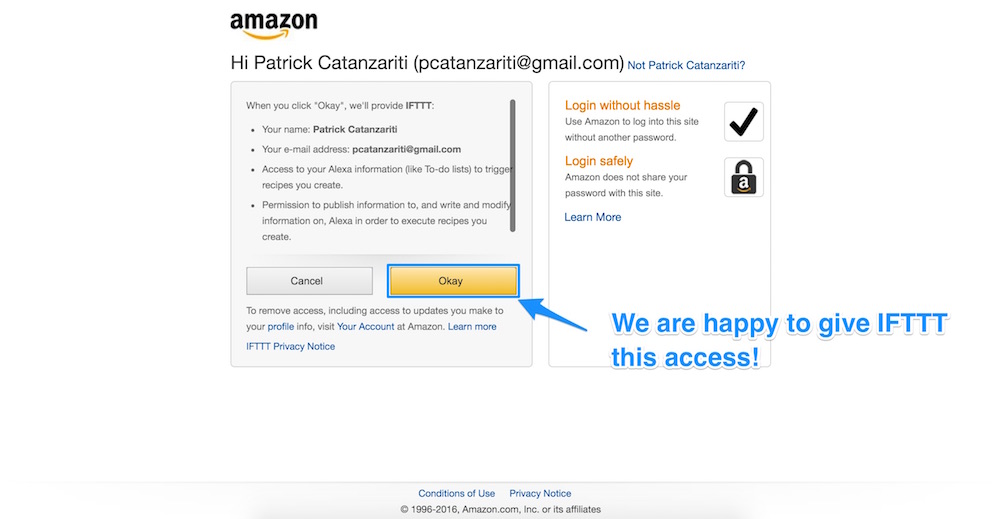
Agree to give IFTTT access to all of your Alexa information by clicking “Okay”:
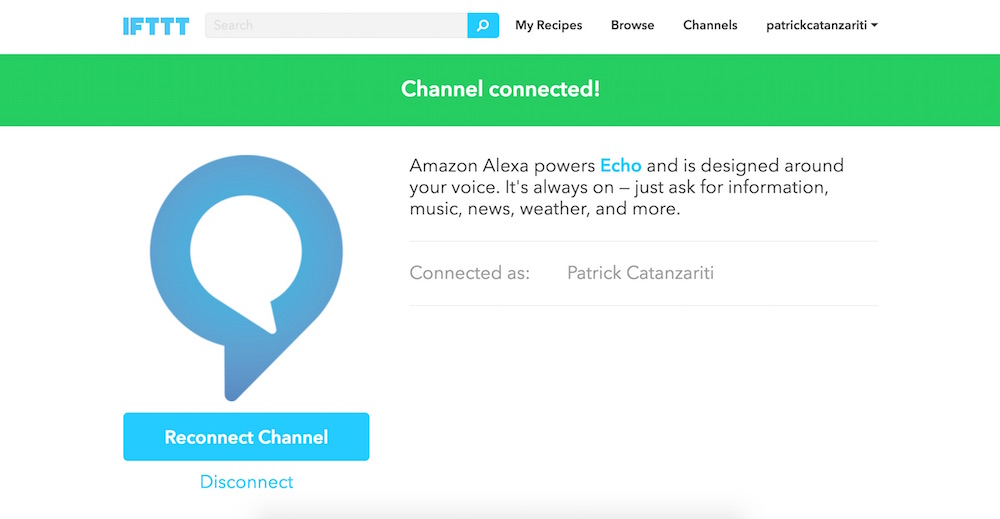
When you’ve granted it the right permissions, you’ll be directed back to IFTTT and should see a “Channel Connected!” message:
From there, the steps for beginning a new recipe with the Echo are always the same, as the Echo is only a trigger in IFTTT — not an action. In other words, you can only use the Echo in IFTTT to cause actions to occur, you cannot get IFTTT to make the Echo speak back to you or look up information (I hold out hope that this will be a future addition!).
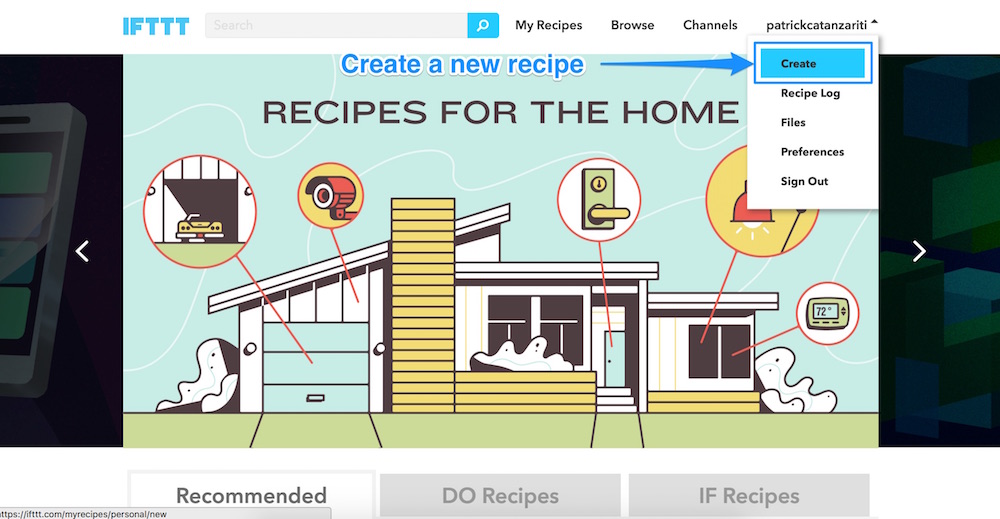
To create a new recipe, as always, you head to the top right hand corner and click your username. Then click “Create”:
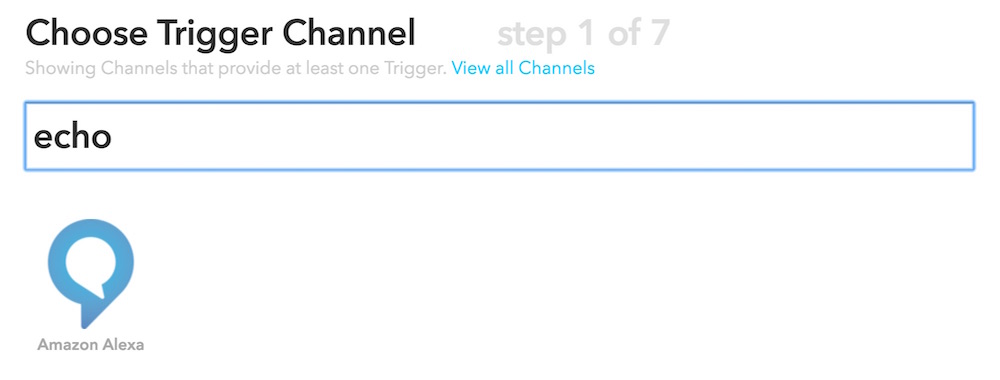
From there, search for the Amazon Alexa channel. It will also appear if you search for “echo”, so you can find it in a range of ways!
From here, the trigger option chosen will differ depending on the recipe we want to create. Each recipe below will start from this point in the process.
Connecting the Echo to LIFX Light Bulbs
Whilst there is a LIFX skill you can install onto the Echo, it didn’t work for me when I tried to use it. If you also have the same issue, you can use IFTTT to achieve the same results, just as we did within the Connecting LIFX Light Bulbs to the IoT Using IFTTT article here at SitePoint.
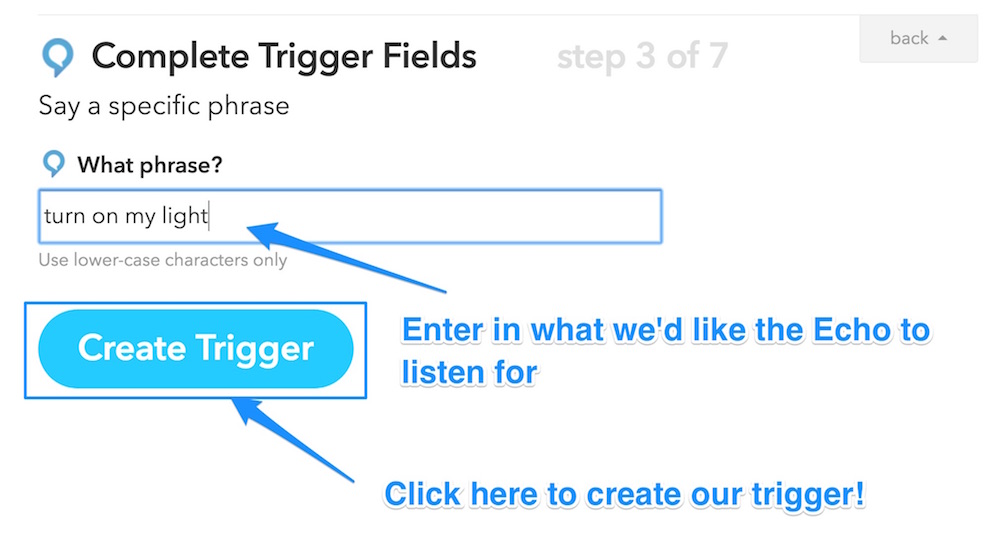
We want to trigger our lights via voice. To do this, we use the Echo trigger channels “Say a specific phrase” trigger:

From here, we set up which phrase we want to use. As an initial test, we can put down “turn on my light” and then click “Create Trigger” (note — your phrase needs to be all lowercase for it to be accepted):
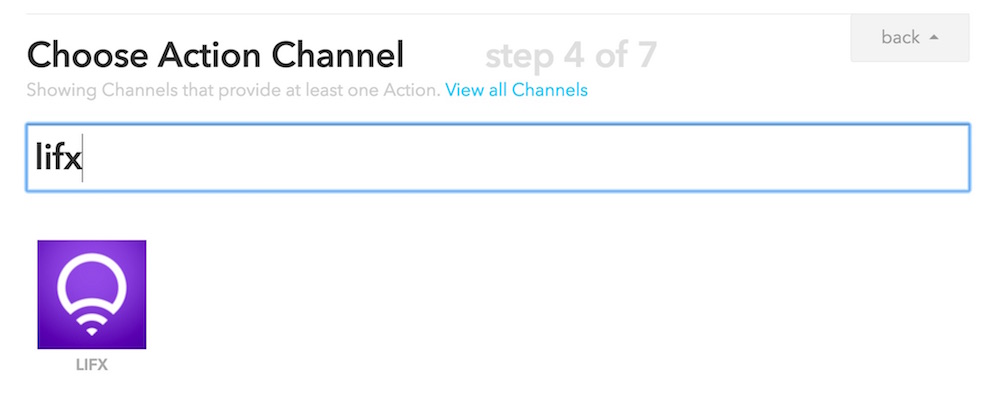
To connect up your Echo to your LIFX light bulbs, choose the LIFX action channel:
Then, choose the action of “Turn lights on”:
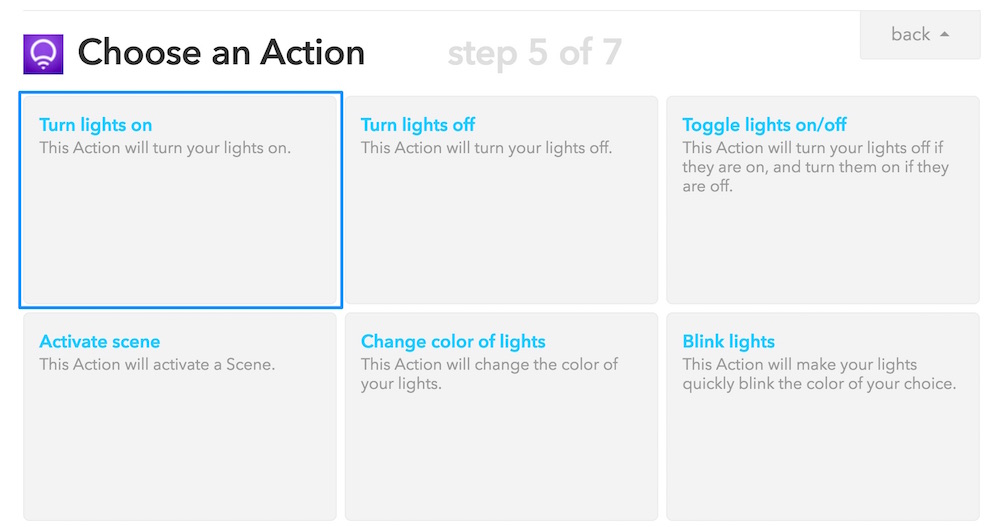
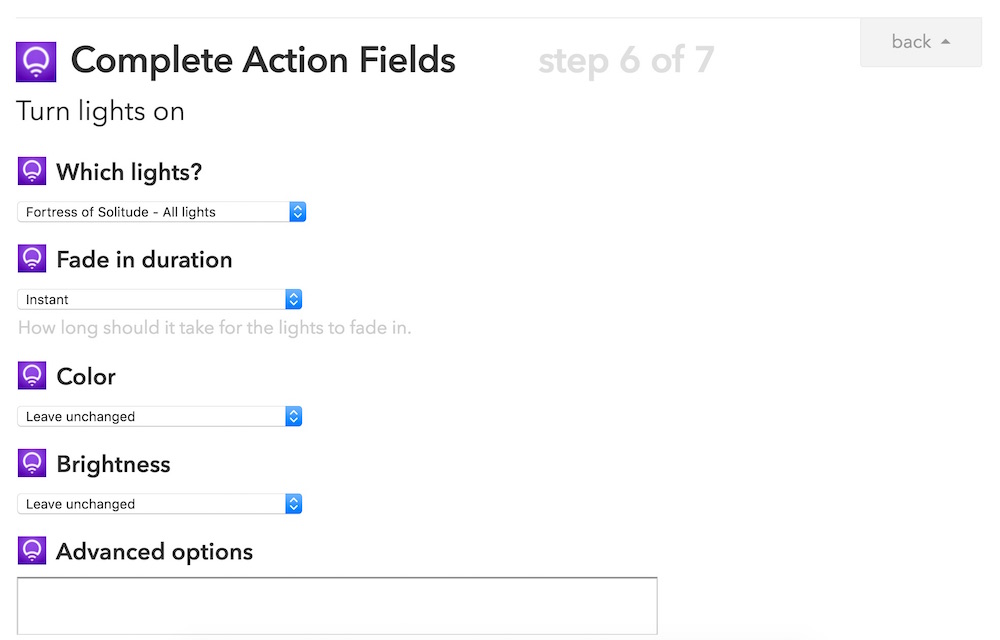
Finally, select which light you want the command to turn on (you could write more specific phrases in the Echo trigger, such as “turn on my bedroom light” and set specifics within this rule). Choose how quickly you’d like the lights to fade in — we’ve chosen “Instant” as we want them to turn straight on. You can choose to set the color and brightness of the light when you give this command, however we’ve left this as is so that it remains at the last setting the bulb was given. The advanced options aren’t necessary for this one! Click to continue to create the recipe.
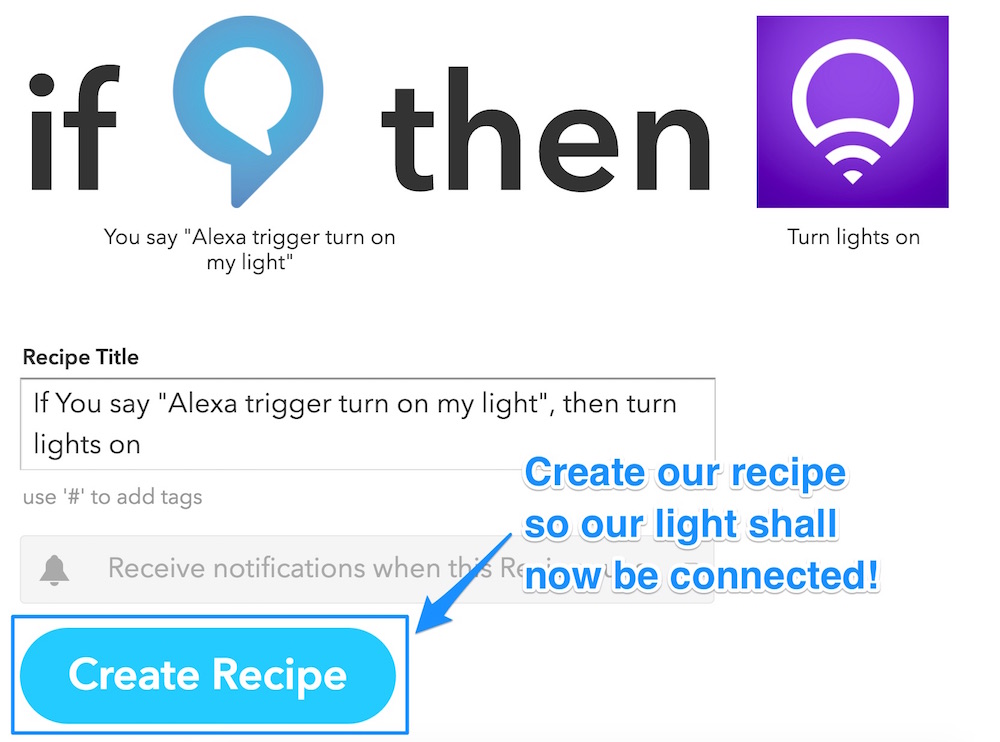
You should then have a confirmation of the recipe and the trigger sentence. It shows that our trigger sentence is “Alexa trigger turn on my light” — this is because any sentence we give within IFTTT will begin with “trigger”. I’ll show you a workaround I use for this soon! For now, choose “Create Recipe” to finalize the process:
If you now speak to your Echo and say “Alexa trigger turn on my light”, you should find that your LIFX light turns on! It is the Internet of Things magic at work!
You can use the same process to create a recipe to allow Alexa to turn off your light in the same way.
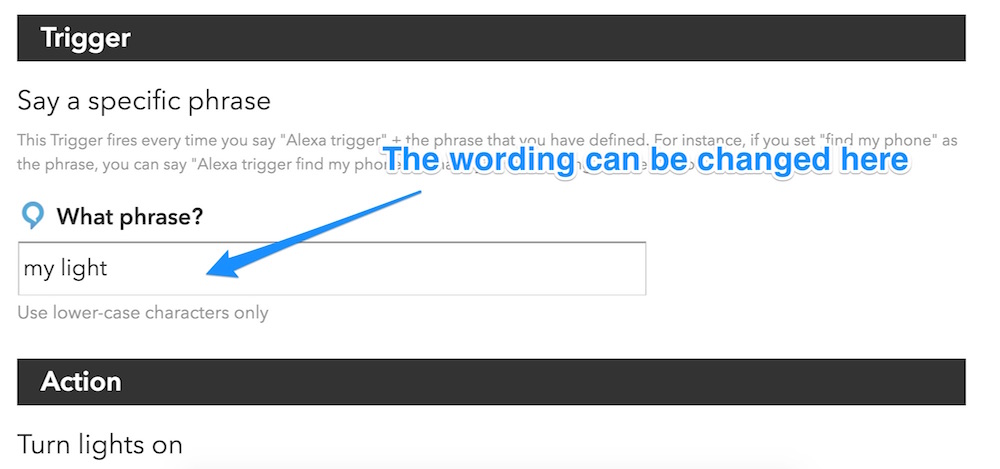
Renaming Triggers in a More Natural Way
Saying “Alexa trigger turn on my light” is a bit awkward. Instead, you can try out a few phrases to see what feels right by editing the recipe.
To do so, go to the My Recipes page on IFTTT and find your recipe. Scroll down and you’ll find the “What phrase?” section. I find it is best to write the phrase in the shortest format possible, building upon the word “trigger” in the sentence. For my light, we’ve now got just the phrase “my light”. Which results in “Alexa, trigger my light” — a much more natural sounding phrase to remember!
Turn On Light When Alarm Goes Off
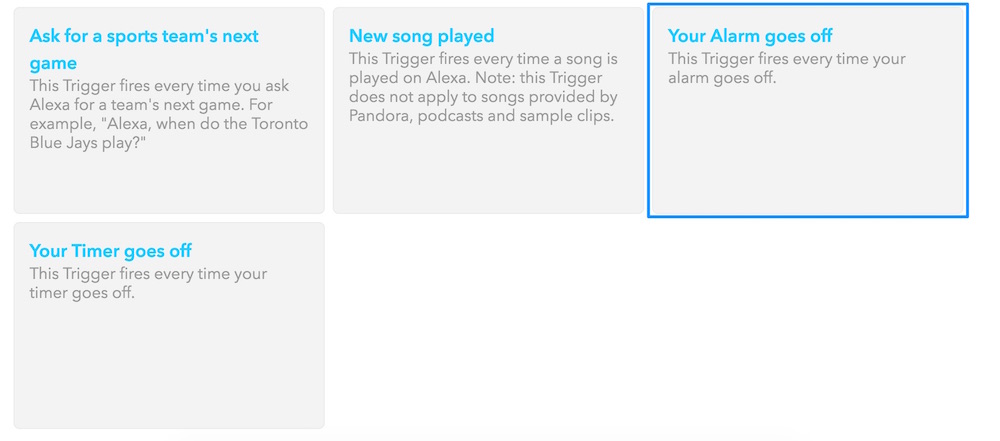
We can bring more intelligence to this idea of triggering LIFX lights by triggering them with other non-voice triggers. If you need a bit of added incentive to wake up in the morning, you can set your LIFX lights to turn on when your Echo’s alarm goes off. To do this, the LIFX action would be exactly the same, just set the Echo trigger to “Your Alarm goes off”:
Triggering Android SMS Messages
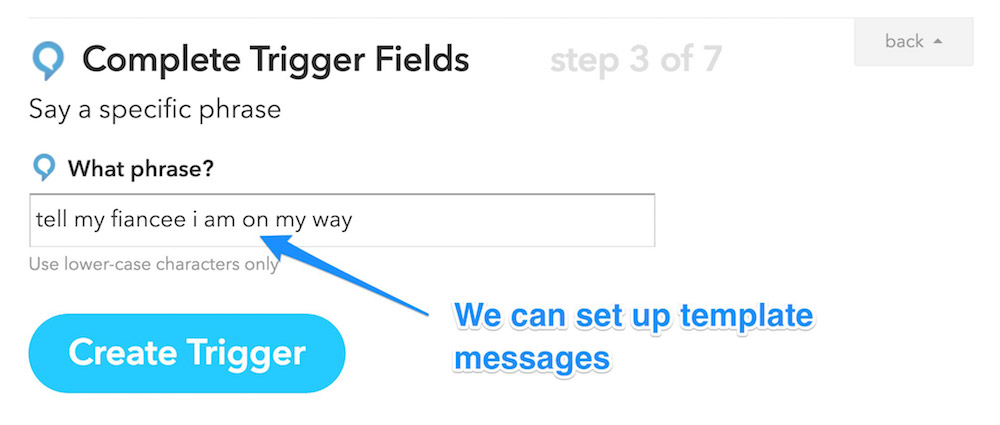
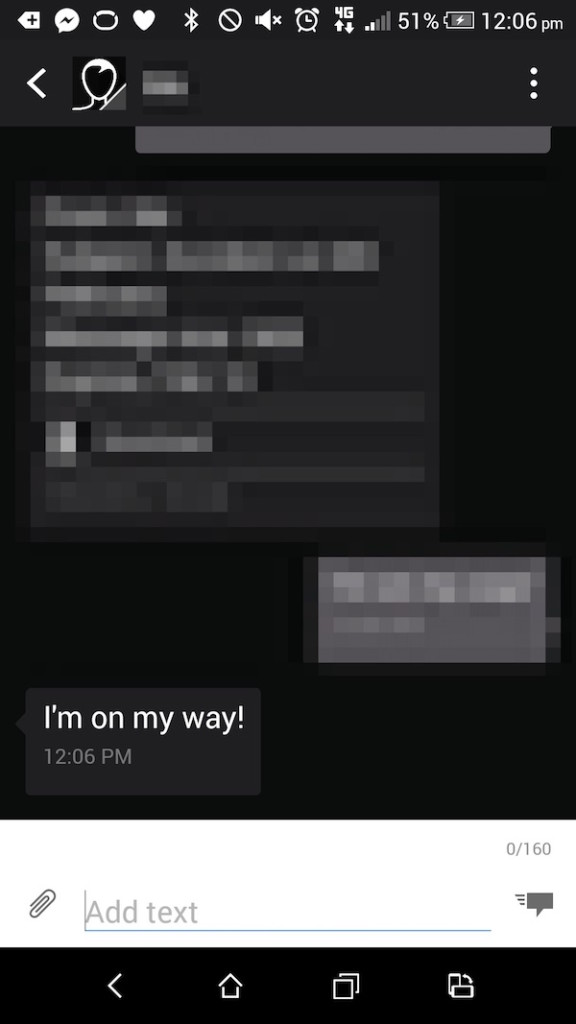
Using IFTTT, we can send SMSes via an Android device. IFTTT has a generic “SMS” channel, but this only lets you send SMSes to yourself. The Android SMS channel lets you send them to any number you define. I have set up a trigger to get my Echo to be able to send my fiancée a message to let her know I’m on my way to see her.
With these sorts of triggers, we can set up a range of template messages for IFTTT and the Echo. My message says “tell my fiancee i am on my way”:
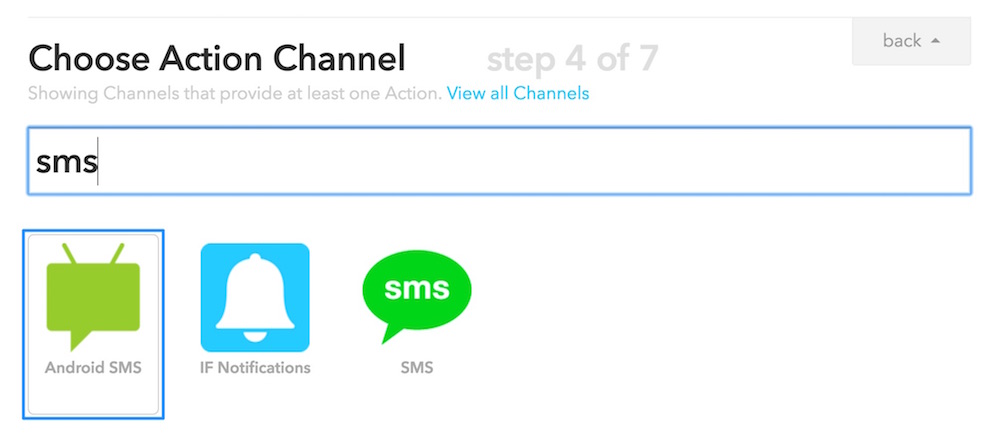
We then choose the “Android SMS” action channel:
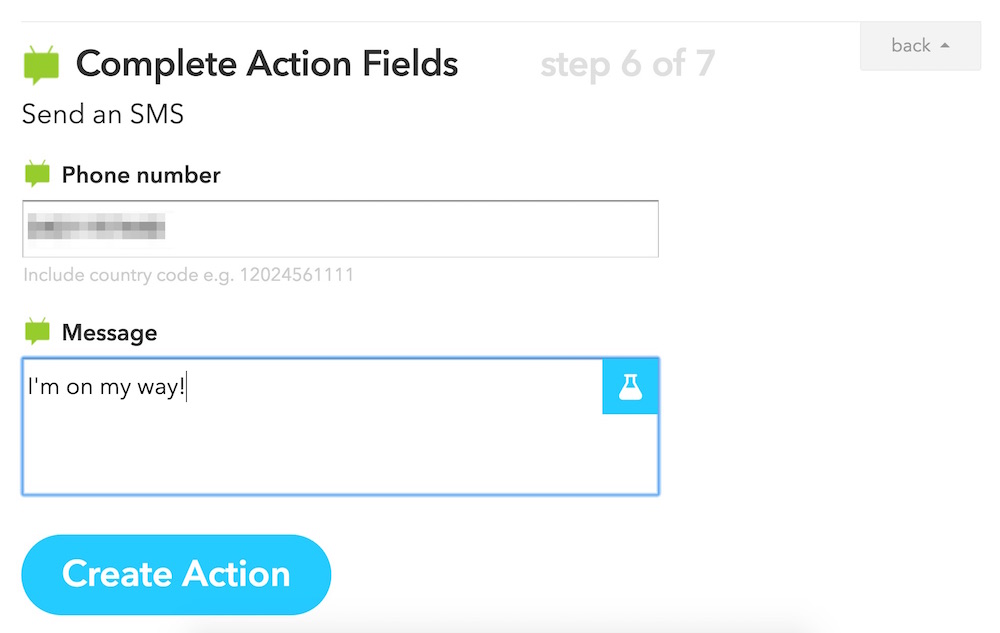
Within the settings for this action, we include the phone number we want to SMS along with the message we want to send:
When I trigger this by saying “Alexa, trigger tell my fiancee i am on my way”, it sends her an SMS:
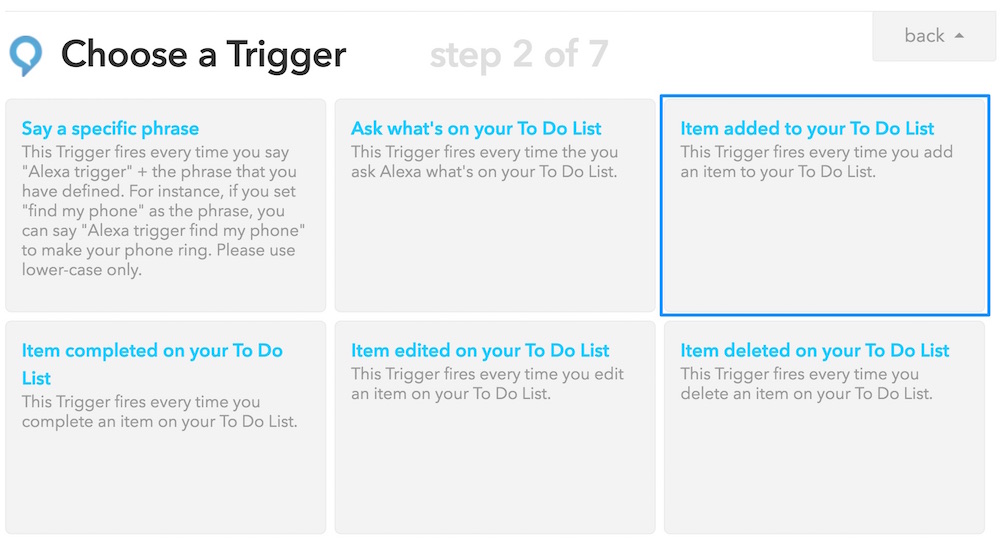
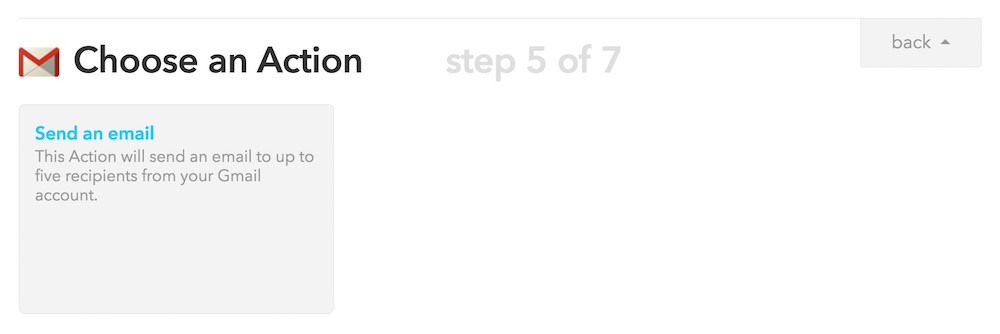
E-mailing Your To-Do List
The Echo also has a to-do list which you can add things to by saying things like “Alexa, add ‘Buy Milk’ to my to-do list”. IFTTT can trigger actions any time an item is added to this to-do list. For example, we can email our to-do list to our Gmail account each time something is added to it.
To start this concept, we choose “Item added to your To Do List” as our Echo trigger:
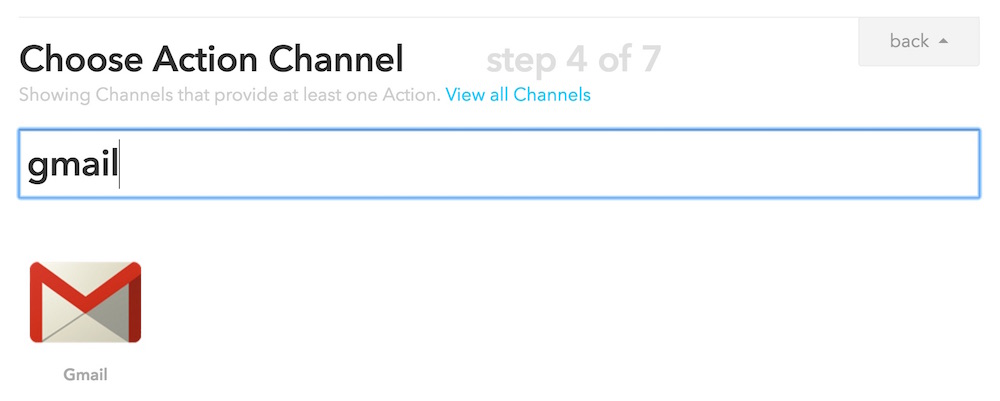
Then, we continue onto adding the action. You can use the “email” action channel or the “Gmail” action channel. We’ve used the “Gmail” action channel here:
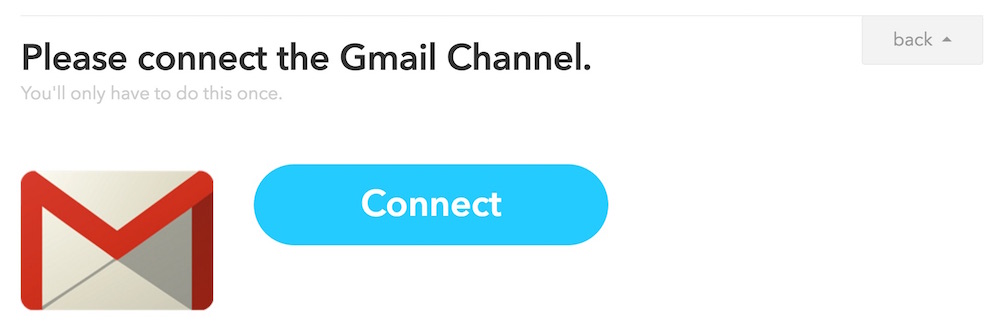
If you haven’t used the Gmail channel before, you’ll need to give it access:
Once IFTTT has access to our Gmail, we choose the one action available — “Send an email”:
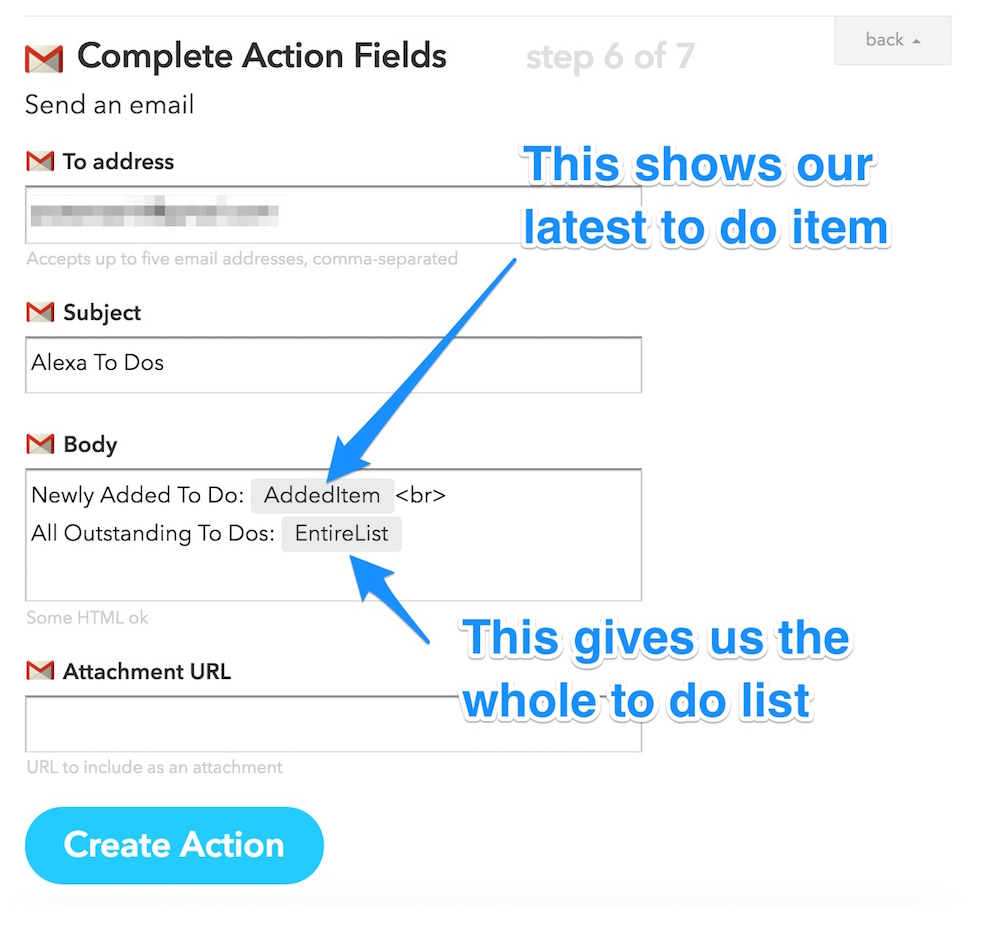
We then add in the email address and subject line we want to send these emails to. Within the Body, we have two tags that embed data into our email — AddedItem and EntireList. AddedItem will print out the item we just added to the to-do list and EntireList will print out the whole to-do list. Once we are happy with how the email is laid out, we click “Create Action”:
Once we’ve added in that recipe, if you add an item to your to do list it will email you with that item and a list of all items on your list:
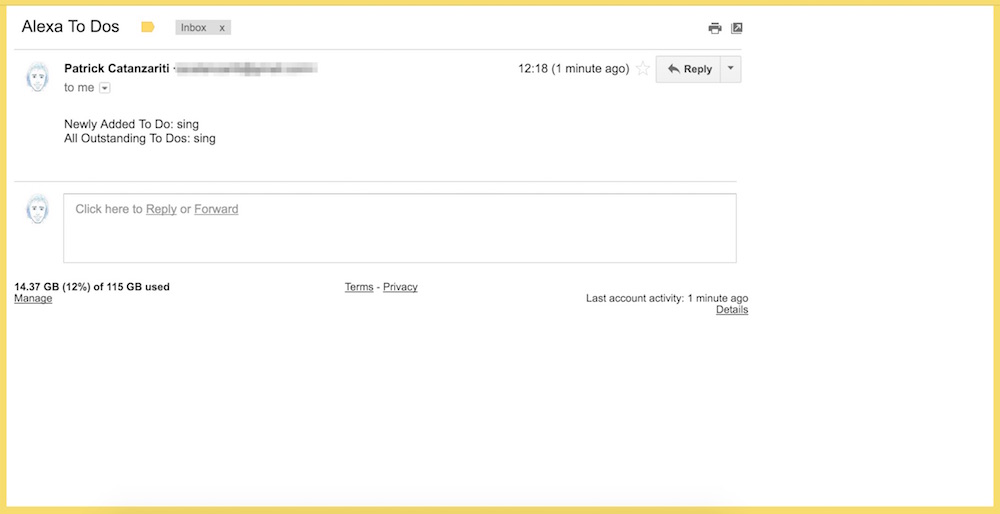
I’ve got “sing” added to my to-do list because when I asked the Echo to “Add something to my to do list”, it misunderstood me… but I thought it was kinda funny and left it.
Add Your To-Dos Into a Google Spreadsheet
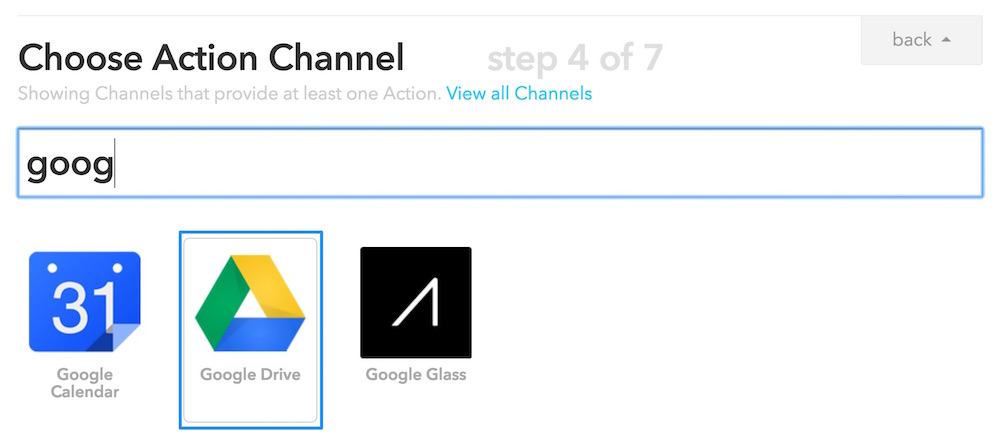
E-mails might be a bit messy for some. IFTTT also connects to Google Drive, so you can add items into spreadsheets too. To add to-do list items into a spreadsheet, we instead set the action channel to “Google Drive”:
Then choose “Add row to spreadsheet” for the action:

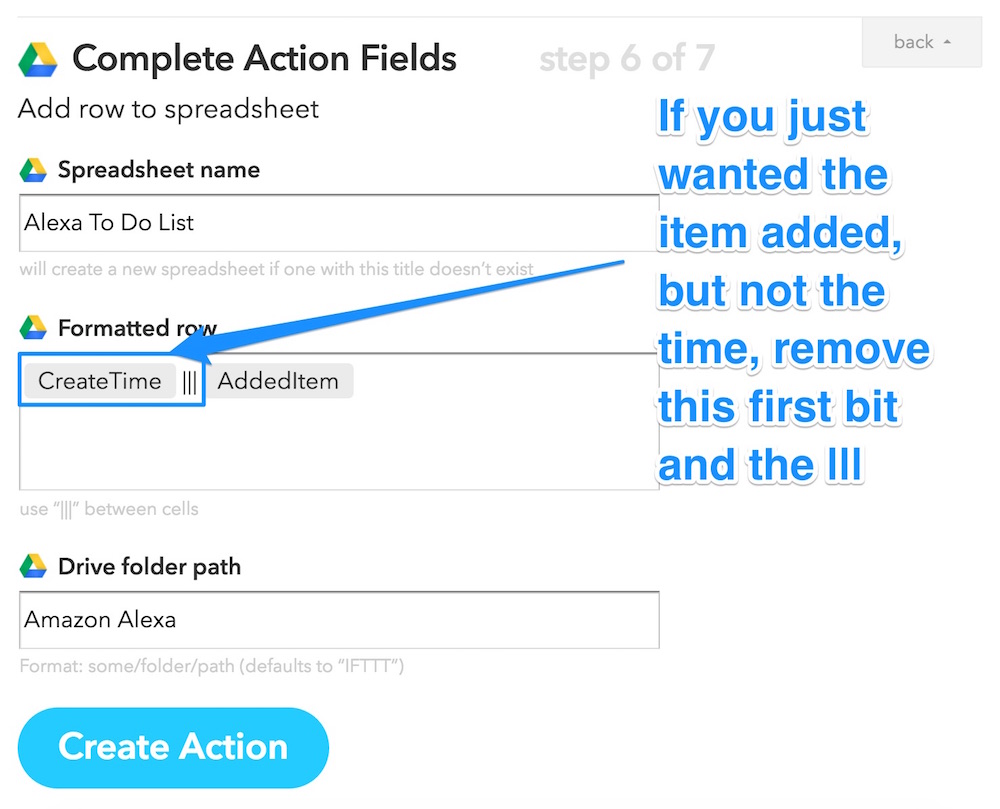
Within the action fields for this action, we set a name for our spreadsheet (e.g. “Alexa To Do List”) and set up how we want the row to be formatted. Within our example, we have got “CreateTime ||| AddedItem“. The “|||” represents a column break, so CreateTime would be in one column and AddedItem would be in the other. CreateTime adds a timestamp of when the to-do list item was created and AddedItem shows the actual to-do list item itself.
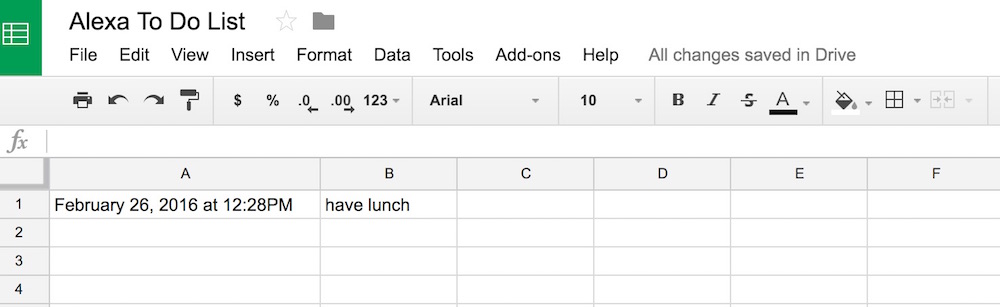
When you add a new to-do list item, it will create the spreadsheet for you (if you don’t already have one set up) and then add the to-do list item into the spreadsheet:
Conclusion
There is a whole range of possibilities that combining the powers of the Echo and IFTTT can enable. Hopefully the examples above have spurred on some ideas of your own!
In the coming months, we’ll be exploring how to go beyond IFTTT to program the Echo with completely customised functionality, including AI and more!
If you have an Echo and give IFTTT integration a go, I’d love to hear what you pair together! What have you connected the Echo to via IFTTT? Let me know in the comments below, or get in touch with me on Twitter at @thatpatrickguy.
Frequently Asked Questions (FAQs) about Empowering Amazon Echo with IFTTT
How can I connect my Amazon Echo with IFTTT?
To connect your Amazon Echo with IFTTT, you need to first download and install the IFTTT app on your smartphone. Once installed, open the app and sign up or log in to your account. In the search bar, type ‘Amazon Alexa’ and select it. You will be prompted to connect your Amazon account with IFTTT. Follow the instructions to complete the connection. Once connected, you can start creating or using existing applets for Amazon Echo.
What are some useful IFTTT applets for Amazon Echo?
There are numerous IFTTT applets that can enhance the functionality of your Amazon Echo. For instance, you can use an applet to send a text message when your Echo timer ends, or to add items to your iOS Reminders when you add them to your Alexa shopping list. Other popular applets include turning on your lights when you dismiss an Echo alarm, or sending an email when you set a reminder on Echo.
Can I create my own IFTTT applets for Amazon Echo?
Yes, you can create your own IFTTT applets for Amazon Echo. To do this, open the IFTTT app and tap on ‘Get more’ at the bottom. Then tap on ‘Make more applets from scratch’. Select ‘Amazon Alexa’ as the ‘If This’ service and choose the trigger. Then select the ‘Then That’ service and choose the action. Finally, review and finish your applet.
Why can’t I connect my Amazon Echo with IFTTT?
If you’re having trouble connecting your Amazon Echo with IFTTT, it could be due to several reasons. You might not have the latest version of the IFTTT app, or there could be a temporary issue with the IFTTT or Amazon servers. Try updating the app or waiting for a while and trying again. If the problem persists, contact IFTTT support for assistance.
Can I use IFTTT with other Amazon devices?
Yes, you can use IFTTT with other Amazon devices that support Alexa, such as the Amazon Echo Dot, Echo Show, and Echo Plus. You can connect these devices with IFTTT in the same way as the Amazon Echo.
Is there a limit to the number of IFTTT applets I can use with Amazon Echo?
No, there is no limit to the number of IFTTT applets you can use with Amazon Echo. You can use as many applets as you need to customize your Echo to your liking.
Can I use IFTTT applets with multiple Amazon Echo devices?
Yes, you can use IFTTT applets with multiple Amazon Echo devices. However, you need to connect each device with IFTTT separately.
Can I disconnect my Amazon Echo from IFTTT?
Yes, you can disconnect your Amazon Echo from IFTTT at any time. To do this, open the IFTTT app, go to ‘My services’, find ‘Amazon Alexa’, and tap on ‘Settings’. Then tap on ‘Disconnect’ to disconnect your Echo from IFTTT.
Are there alternatives to IFTTT for Amazon Echo?
Yes, there are several alternatives to IFTTT for Amazon Echo, such as Yonomi, Stringify, and Home Assistant. These services offer similar functionality to IFTTT and can be used to create custom automations for your Echo.
Is it safe to connect my Amazon Echo with IFTTT?
Yes, it is safe to connect your Amazon Echo with IFTTT. IFTTT uses secure protocols to connect with your Amazon account, and it does not have access to your Amazon password. However, as with any online service, it’s important to use a strong, unique password and to be cautious of phishing attempts.

