 Halftone effects can bring a nice tactile effect to a web graphics, giving the impression of printed work. I’m going to show you how to create this effect in Photoshop using the Bitmap Image Mode.
1. Create a new Photoshop document with a white background, width 600 x 200 pixels. Select the Type tool (T) and add some text to the document. I’ve used a font called Blackoak Std but any big, fat, bold typefaces work really well when creating this effect.
 2. We need to blur so that it looks like more of a blob than readable text. Choose Filter > Blur > Gaussian Blur. Set the Radius to about 10 pixels or until your text looks something like this:
 I’d like the effect to be a little darker so, duplicate the layer by pressing Ctrl + J (win) or Cmd + J (mac). It should look a bit like this.
 3. We’re going to change from RGB mode to Bitmap mode, but we can’t go there in one step. We need to change firstly to Grayscale mode. To do this choose Image > Mode > Grayscale. You’ll see the following message.
 Click Flatten. You’ll probably get another message about Discarding Color Information, click Discard.
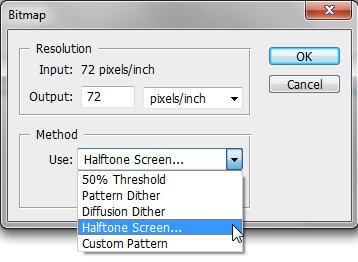
4. Now choose Image > Mode > Bitmap. On the Bitmap dialog box leave the output at 72 for web graphics and choose Halftone Screen from the Use dropdown box.
 Click OK.
5. On the next dialog box that opens you set up how your halftone dots will look. There’s a bit of trial and error here, so you might like to play around with the numbers. The higher the frequency, the more dots will appear. I kept the number fairly low here at 15. You can also choose the angle of the halftone screen and the shape of the dots.
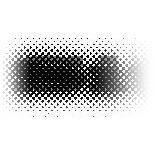
 When you click OK, the former blurry blob turns into a halftone blob, like this.
 6. So that’s the effect created. Although it looks reasonably cool on its own I still want to include some readable text with it. To add more text we’ll get back to RGB mode. First choose Image > Mode > Grayscale, then choose Image > Mode > RGB.
7. Now we’re back in RGB mode, select the Type tool again and with the same settings as before type in the same text in black. Reduce the opacity of the text to about 50-60% and voila!
 Working With Images
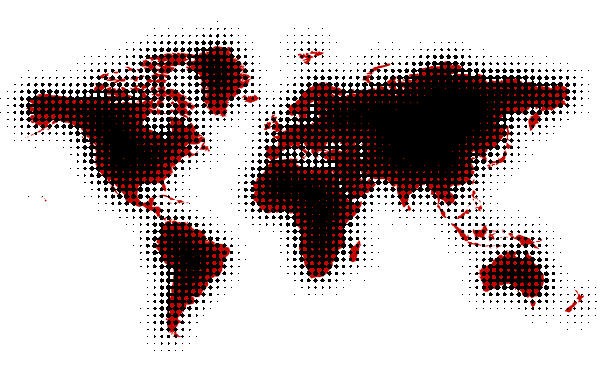
The process is EXACTLY the same if you want to create this effect with an image. Here’s a world map I created using the same steps as outlined above.
 The only step I took here that was different was in the final stage. When I put the duplicate map of the world on top of my blurred halftone image, I set the blending mode to Multiply so that the original red color of the map can be seen in some of the dots.
So that’s how to create halftone images. I love the dirty, retro look that this effect can bring to a design. What do you think? Is is it an effect you’ve used or would be interested in using?
Frequently Asked Questions about Creating a Halftone Effect with Text Images in Photoshop
How can I create a more detailed halftone effect in Photoshop?
To create a more detailed halftone effect, you can adjust the frequency of the halftone dots. Go to the ‘Image’ menu, select ‘Mode’ and then ‘Grayscale’. Then, go back to ‘Image’, select ‘Mode’ again and choose ‘Bitmap’. In the ‘Bitmap’ dialog box, select ‘Halftone Screen’ from the ‘Method’ dropdown menu. Here, you can adjust the frequency, angle, and shape of the halftone dots to create a more detailed effect.
Can I apply a halftone effect to a colored image?
Yes, you can apply a halftone effect to a colored image. However, you will first need to convert the image to grayscale. After applying the halftone effect, you can then colorize the image using the ‘Color Balance’ or ‘Hue/Saturation’ adjustment layers.
How can I create a halftone effect with different shapes?
Photoshop allows you to create a halftone effect with different shapes such as circles, lines, or squares. When you select ‘Halftone Screen’ in the ‘Bitmap’ dialog box, you can choose the shape from the ‘Shape’ dropdown menu.
Can I apply a halftone effect to text?
Yes, you can apply a halftone effect to text. Simply create a text layer, convert it to a smart object, and then apply the halftone effect using the ‘Bitmap’ mode.
How can I create a halftone pattern in Photoshop?
To create a halftone pattern, go to the ‘Edit’ menu and select ‘Define Pattern’. Then, create a new layer and fill it with the pattern using the ‘Paint Bucket’ tool.
Can I adjust the size of the halftone dots?
Yes, you can adjust the size of the halftone dots by changing the frequency in the ‘Halftone Screen’ dialog box. A higher frequency will result in smaller dots, while a lower frequency will result in larger dots.
How can I create a halftone effect with varying dot sizes?
To create a halftone effect with varying dot sizes, you can use the ‘Gradient’ tool before applying the halftone effect. The gradient will result in a variation in dot sizes, creating a more dynamic effect.
Can I apply a halftone effect to a specific area of an image?
Yes, you can apply a halftone effect to a specific area of an image by using the ‘Lasso’ tool to select the area before applying the effect.
How can I create a halftone effect with a specific color?
To create a halftone effect with a specific color, you can apply the effect to a grayscale image and then colorize it using the ‘Color Balance’ or ‘Hue/Saturation’ adjustment layers.
Can I save a halftone effect as a preset?
Unfortunately, Photoshop does not allow you to save a halftone effect as a preset. However, you can save the settings in the ‘Bitmap’ dialog box for future use.
Jennifer Farley is a designer, illustrator and design instructor based in Ireland. She writes about design and illustration on her blog at Laughing Lion Design.

