Not too long ago I took it upon myself to recreate the SitePoint logo in Sketch App and then use it to create a loading screen animation for a hypothetical iOS app using Atomic.io. It involved making the two halves of the SitePoint logo fly in from the sides of the screen with an easing animation, and then transitioning the entire screen to the left, revealing the first app screen.
But now that Atomic.io is officially out of beta, we have access to new features that can create more complex animations by applying delays, timings and effects to individual layers.
What does that mean? Possibilities…lots of them.
Advanced Animation Control
Atomic calls this feature Advanced Motion Control, shortened to “Motion” in the user interface. Before (when Atomic was in beta), each layer had to have the same delay and easing effect, so what we wanted to achieve wasn’t always possible.
‘Delay’ relates to the interval of time the screen waits before starting the animation, but while Atomic was in beta (which it isn’t anymore), ‘delay’ was applied to all layers, as was the type of animation. Advanced Animation Control (I’ll abbreviate this as AAC from now on) lets you specific different delays, durations and animation styles for different layers; which means more flexibility and better, more finely-tuned animations.
Lets create an example – signing up is free.
Setting Up the Pages, Artboards and Shapes
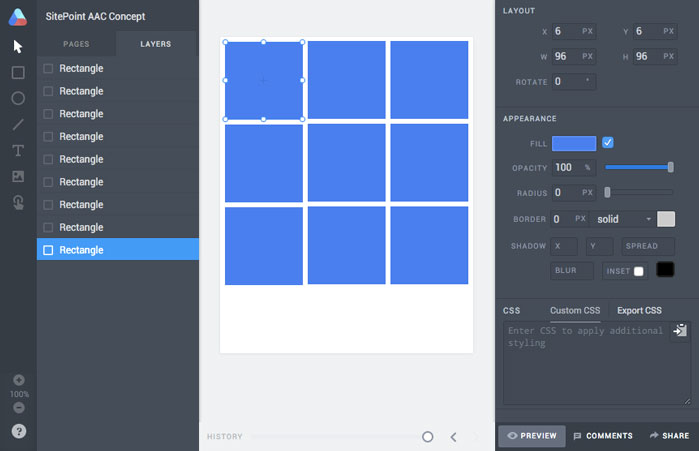
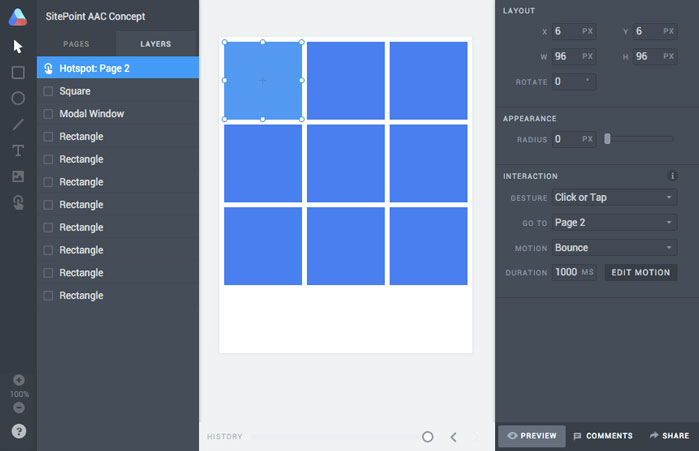
We won’t need a huge artboard for this concept so start by selecting the Apple Watch 42mm 312 × 390 Preset. Press “R” and draw out a Rectangle that’s 96x96px. You might find it easier to hold shift while you do this because that will force the selection to be completely square, or else you can use the form fields to declare the exact values. If you’re a user of Sketch App by Bohemian Coding, this will feel very familiar.
Press command+d to Duplicate that rectangle, and then make sure that both of them have a gutter width of 6px. Repeat that step a few more times until you have a 3×3 grid, like so:
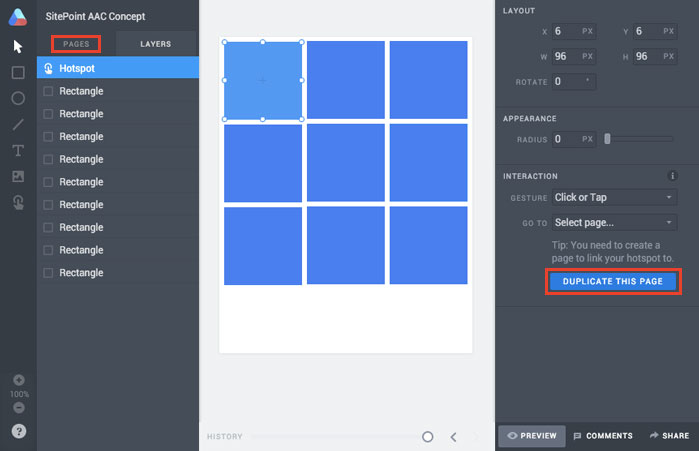
Creating a Hotspot to Be Interacted With
Press “H” and draw out a Hotspot with the same dimensions as one of our rectangles; the concept is exactly the same, only that this rectangle is invisible and marks the area of our interaction. Pick a square, any square, and move the hotspot region so that it appears directly above that square.
Like any design tool, there’s a layer control interface where you can drag layers to appear below or above other layers (in Atomic this is on the left-hand side). Don’t forget to make sure that the hotspot appears at the top of the layer tree – many a time have I stupidly wondered why my clicks weren’t working!
Let’s leave the animation alone for the time being, though. In the “Interaction” tab, there is a button that says “Duplicate This Page” – click that and then navigate to Page 2.
Creating the Next Stage of the Interaction
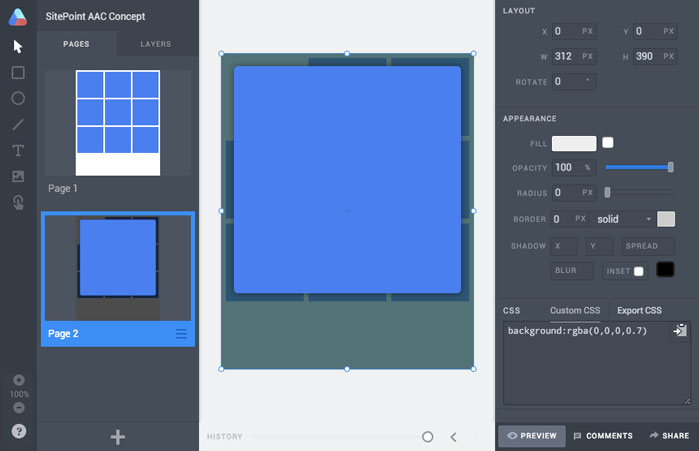
Page 2 – this is the state where our interaction will end up.
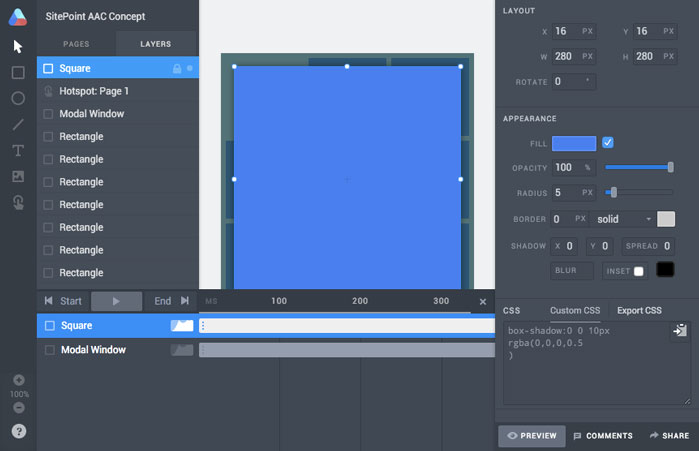
Press “R” to create another rectangle and set the dimensions to cover the entire contents of the artboard; also, make sure that it appears at the top of the file tree. In the “Custom CSS” field, type “background: rgba(0,0,0,0.7)” and this will serve as a semi-opaque background to a modal, but make sure that you un-tick the “Fill” style otherwise it won’t appear.
It’s often advised to have the modal react to a click interaction to dismiss the modal, so move the hotspot that is already there to the top of the file tree and also make sure that it fills the entire artboard as well. Choose “Page 1” for the Go To option in the interaction tab.
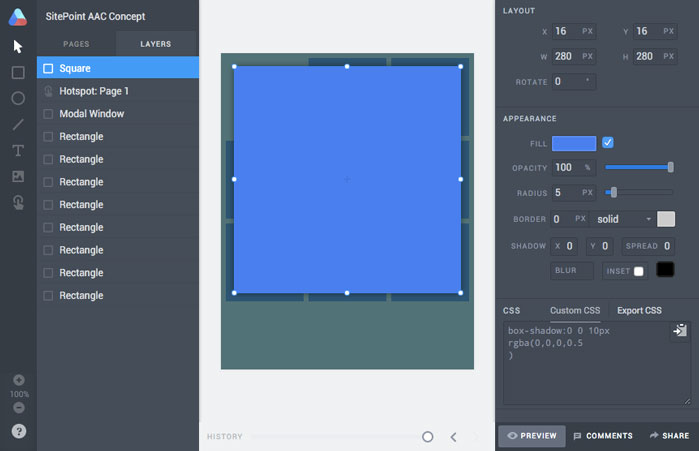
Lastly, move your interactive square to the top of the file tree and use these values to create an expanded view of the square:
- X: 16px
- Y: 16px
- W: 280px
- H: 280px
- Radius: 5px
And once you add “box-shadow: 0 0 10px rgba(0,0,0,0.5 )” to the CSS box, you’ll have a typical open/close modal.
If you click the “Preview” button you should be able to click on the hotspots to navigate back and forth between the two states.
Animating the Modal Window
Switch back to Page 1 and select the hotspot. In the interaction tab, choose “Bounce” for the Motion and “1000ms” for the Duration. At this moment in time you’ll notice that something weird is happening with the modal window if you Preview the interaction (command+enter by the way) – this is because the modal window doesn’t appear in the original state, so copy that layer from Page 2 into Page 1.
But something is still not quite right.
While the bouncy square looks really snazzy, the effect is also being applied to the modal window, which causes it to falter in varying degrees of opacity. It doesn’t look nice at all, but that’s where Advanced Animation Control (AAC) comes in.
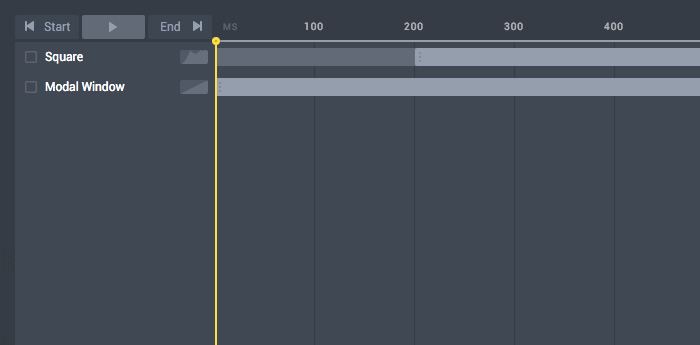
Controlling Different Aspects of the Animation
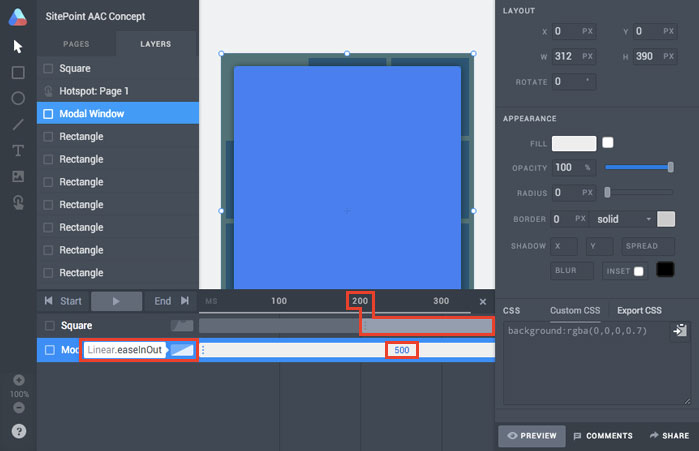
In the same tab, click “Edit Motion”. Between the two states, two layers are being changed and they both appear in the AAC interface. You might have noticed by now that I’ve renamed these layers “Square” and “Modal Window”. At the moment, the animation duration of both layers is 1000ms and both layers are set to begin animating right away because each layer has a duration bar that starts at 0ms and ends at 1000ms.
Drag the beginning of “Square”‘s bar to 200ms. Now the modal window will have a 200ms head-start and then the square will begin animating – this is how animation delay works.
But we still want the modal window to have a different type of animation, or “easing” to be specific, so select the icon next to the bar and choose something more subtle like “Linear”.
We don’t want modal window animation to take that long, though, so trace the bar to the end of the line and shorten it to something like 500ms. Press command+enter to “Preview” the animation.
Much better. For the dismissal interaction, I used a linear transition with 250ms duration – nothing fancy.
Wrapping up..
Before AAC, all layers would animate the same way, at the same time and for the same length of time, but interaction design has an important role in user experience these days and we’re becoming more specific in our craft; not to mention the fact that CSS transitions are widely supported now. I’ve always shied away from animation because it’s an area that I’ve never felt especially comfortable in, but Atomic.io lets me create beautiful interactions with a very simple toolset.
Here’s the final, interactive design.
 Daniel Schwarz
Previously, design blog editor at Toptal and SitePoint. Now Daniel advocates for better UX design alongside industry leaders such as Adobe, InVision, Marvel, Wix, Net Magazine, LogRocket, CSS-Tricks, and more.