In the previous article you learned about the basics of Fuel CMS: how to create views and simple pages. Most websites these days are not that simple though, they have a blog, a gallery, etc. In this part, I’ll explain how Fuel CMS modules work and create a basic guestbook module to demonstrate.
What are Modules?
Most of Fuel CMS’s functionality is packaged into modules. A Fuel CMS module contains at least one model with an accompanying database table and can be extend with controllers and views. In the MVC pattern, models are classes that define different data fields and are used for working with the data stored in tables. For more information about models in CodeIgniter (the framework which Fuel CMS is written in), see the framework’s documentation. In a default Fuel CMS installation, standard modules are included by default. For example, the blog system is built up from three modules: Posts, Categories, and Authors. Each of these modules has its own table in your database. In this article we’ll be creating our own guestbook module. Everyone can post new comments and an administrator can moderate them through the administration menu.Writing the Model
Start with creating the directorymodules/guestbook. From now on, I will refer to this directory as the “guestbook folder”.
To register the module, open application/config/MY_fuel_modules.php and add the following line to:
<?php
$config['modules']['guestbook'] = array(
'model_name' => 'guestbookcomments_model',
'model_location' => 'guestbook'
);CREATE TABLE IF NOT EXISTS guestbook_comments (
id INTEGER UNSIGNED NOT NULL AUTO_INCREMENT,
author VARCHAR(25) NULL NULL,
comment VARCHAR(100) NOT NULL,
`date` DATETIME NOT NULL,
visible ENUM('yes', 'no') NOT NULL DEFAULT 'yes',
PRIMARY KEY (id)
);visible column is special to Fuel CMS).
Next let’s turn our attention to creating the model class which acts as a kind of translator between PHP and the database. Go to the guestbook folder and create a new directory in it named models. Then add the model file in it named guestbookcomments_model.php:
<?php
if (!defined('BASEPATH')) exit('No direct script access allowed');
require_once(FUEL_PATH . 'models/base_module_model.php');

class GuestbookComments_model extends Base_module_model
{
public function __construct()
{
parent::__construct('guestbook_comments');
}
}

class GuestbookComment_model extends Base_module_record
{
}GuestbookComments_model extends the Base_module_model class which will handle our listing and administration interactions automatically. The string passed into the parent constructor is the name of the database table this model will use. GuestbookComment_model extends Base_module_record which handles working with individual records.
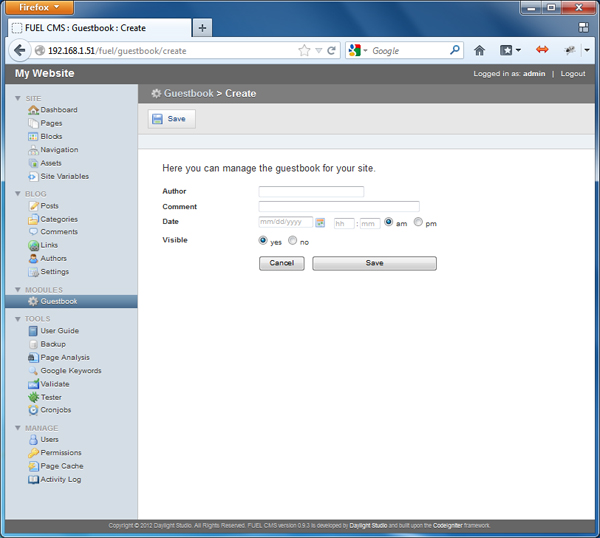
If you want you can test it out and see if it works, log in into your dashboard and select ‘Guestbook’ from the Modules submenu. Normally there would be a list of comments, but as we don’t have any data yet the list is empty, so click on the Create button to add one.
 When you return to the list, you should see the comment you just added. As more and more people will leave comments in the guestbook, this is the place where you’ll go to moderate them and keep your guestbook free from spam.
Creating the Controller
This is all very cool and such, but you obviously don’t want to be the only person able to add comments! We need to create a controller to handle the public-facing actions. Create the directorycontrollers in the guestbook folder, and then in that create the file guestbook.php with the following:
<?php
class Guestbook extends CI_Controller
{
function view()
{
echo '<h1>Guestbook</h1>';
$this->load->module_model('guestbook', 'GuestbookComments_model');
$comments = $this->GuestbookComments_model->find_all();
foreach ($comments as $comment) {
echo '<h2>' . $comment->author . '</h2>';
echo $comment->comment;
}
}
}module_model() method. The first argument is the name of the modules directory, in our case ‘guestbook’, and the second argument is the name of our model class that extended Base_module_model.
After we’ve registered our module’s model, we use it’s find_all() method and we loop through the results to display them. (It’s preferable to use a view instead of having display logic in your controller, but I want to keep things simple for the sake of this article.)
A guestbook isn’t really useful without an option to add a new comment, is it? Add a new method to the controller:
<?php
public function add()
{
$this->load->library(
'form_builder',
array(
'id'=>'addComment',
'form_attrs' => array(
'method' => 'post',
'action' => 'newcomment'
),
'submit_value' => 'Add new comment',
'textarea_rows' => '5',
'textarea_cols' => '28'
)
);

$fields = array(
'name' => array(
'label' => 'Full Name',
'required' => true
),
'comment' => array(
'type' => 'text',
'label' => 'Comment',
'required' => true
)
);
$this->form_builder->set_fields($fields);
echo $this->form_builder->render();
}<?php
public function newcomment()
{
$this->load->module_model('guestbook', 'GuestbookComments_model');
$comment = $this->GuestbookComments_model->create();
$comment->author = $this->input->post('name');
$comment->date = date('Y-m-d G:i:s');
$comment->comment = $this->input->post('comment');
$comment->save();
echo 'comment successfully added';
}Summary
As you’ve seen, Fuel CMS doesn’t provide pre-packaged solutions for many things like large CMS platforms do; a lot is left up to you as a developer. But luckily, it’s not hard thanks to the CodeIgniter framework and Fuel CMS’s helper libraries. Image via FotoliaFrequently Asked Questions (FAQs) about Getting Started with Fuel CMS
What is Fuel CMS and why should I use it?
Fuel CMS is a flexible, modular, and customizable Content Management System (CMS) built on the CodeIgniter PHP framework. It offers a simple and intuitive interface that makes it easy for developers to create, manage, and modify website content. Fuel CMS stands out for its flexibility, allowing you to create your own modules and extend its functionality according to your needs. It also supports multiple languages, making it a great choice for international websites.
How do I install Fuel CMS?
Installing Fuel CMS is a straightforward process. First, you need to download the latest version of Fuel CMS from its official website. Then, you need to extract the downloaded file and move it to your web server directory. After that, you need to configure your database settings in the fuel/application/config/database.php file. Finally, you need to install the CMS by accessing the install script at http://yourserver/fuel/install.
How do I create a new module in Fuel CMS?
Creating a new module in Fuel CMS involves several steps. First, you need to create a new folder in the fuel/modules/ directory with the name of your module. Then, you need to create a controller, a model, and a views folder within your module folder. After that, you need to create the necessary files within these folders. Finally, you need to configure your module in the fuel/application/config/MY_fuel_modules.php file.
How do I use the Fuel CMS admin interface?
The Fuel CMS admin interface is where you manage your website content. It’s divided into several sections, including Dashboard, Pages, Blocks, Navigation, Assets, Site Variables, and Users. Each section has its own set of features and functions. For example, in the Pages section, you can create, edit, and delete pages. In the Blocks section, you can manage reusable content blocks.
How do I customize the look and feel of my Fuel CMS website?
Customizing the look and feel of your Fuel CMS website involves working with views and layouts. Views are PHP files that contain the HTML of your pages. Layouts are special views that provide the overall structure of your pages. You can create your own views and layouts and apply them to your pages. You can also use CSS and JavaScript to further customize your website.
How do I handle errors in Fuel CMS?
Fuel CMS provides several ways to handle errors. You can use the show_error() function to display a custom error message. You can also use the log_message() function to log errors to a file. In addition, Fuel CMS has a built-in error reporting system that you can configure in the fuel/application/config/config.php file.
How do I upgrade Fuel CMS to a newer version?
Upgrading Fuel CMS to a newer version involves downloading the latest version, replacing the old files with the new ones, and running the upgrade script. However, before upgrading, it’s recommended to backup your website and test the upgrade in a development environment.
How do I optimize my Fuel CMS website for search engines?
Fuel CMS includes several features to help you optimize your website for search engines. You can use the Meta module to manage your meta tags. You can also use the Pages module to create SEO-friendly URLs. In addition, Fuel CMS supports Google Analytics integration, allowing you to track your website traffic and performance.
How do I secure my Fuel CMS website?
Securing your Fuel CMS website involves several steps. You should always keep your CMS and server software up to date. You should also configure your file permissions correctly and protect sensitive files. In addition, you should use strong passwords and enable HTTPS. Fuel CMS also includes several security features, such as CSRF protection and XSS filtering.
How do I extend the functionality of Fuel CMS?
Extending the functionality of Fuel CMS can be done by creating your own modules or by using third-party modules. You can create your own modules by following the module creation guide in the Fuel CMS documentation. You can also find third-party modules in the Fuel CMS community.
 SitePoint Sponsors


