Easy Retouching With The Spot Healing Brush In Photoshop

The Spot Healing Brush tool (J) first appeared in Photoshop CS2. And although this is a great way to quickly and easily remove blemishes and other imperfections from photos, it tends to be overlooked or forgotten about by Photoshop users. It works by painting with sampled pixels from an image or pattern and matches the texture, lighting, transparency of the sampled pixels to the pixels being “healed”. Unlike the Clone Tool, the Spot Healing Brush doesn’t require you to specify a sample spot first. It automatically samples from around the retouched area. This tool still amazes me every time I use it because it so simple to use and so fast, with great results.
The Spot Healing Brush is superb for retouching blemishes (or zits) in portraits, but for this example I’m using it to remove spots from a butterfly’s wings. You can use it anywhere you need to remove small imperfections.
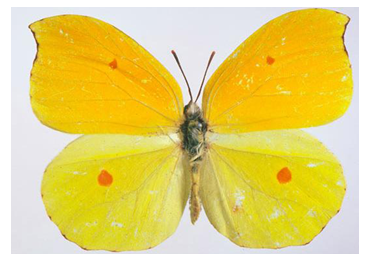
1. I’m using this image of a yellow butterfly with 4 orange spots on its wings.

1. In the toolbox, select the Spot Healing Brush tool (![]() ).
).

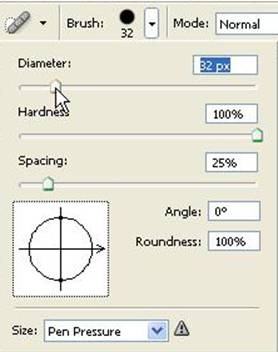
- On the tool options bar, click the Brush pop-up menu and make the brush slightly larger than the spot you want to remove. In this case I set the brush to be about 32 pixels and set the hardness to 25%.

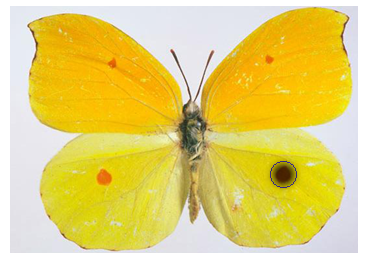
- Using the Spot Healing Brush, click just once over the spot you want to remove.

When you press down with the mouse, the shape of the brush will appear black or dark grey. However, once you release the mouse button, the area will be “healed” and the spot will disappear. 
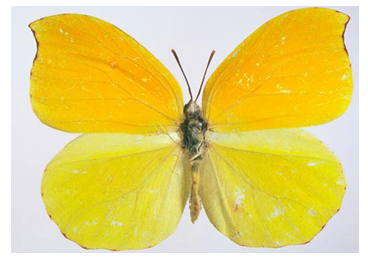
The magical part of the Healing Brush is the way it holds on to the texture and colors but removes the spot.
To remove all spots on the butterfly, just adjust the brush size for each spot so that it’s only slightly larger and click once. If you leave the brush the same size for each spot you won’t get good results. This is a much quicker way to deal with blemishes than using the Clone tool.

Ta da!
Frequently Asked Questions about Spot Healing Brush in Photoshop
What is the Spot Healing Brush tool in Photoshop and how does it work?
The Spot Healing Brush tool in Photoshop is a powerful feature that allows you to correct imperfections, blemishes, and other unwanted parts of your photos. It works by sampling pixels around the area you want to correct and blending them to create a seamless result. This tool is particularly useful for retouching photos, as it can easily remove spots, scratches, and other minor defects.
How do I select the Spot Healing Brush tool in Photoshop?
To select the Spot Healing Brush tool, simply go to the Tools panel on the left side of your Photoshop interface. The Spot Healing Brush tool icon looks like a band-aid. If you can’t see it, it might be hidden under the Healing Brush tool or the Patch tool. You can access it by clicking and holding on either of these tools, then selecting the Spot Healing Brush tool from the drop-down menu that appears.
What are the different types of Spot Healing Brush tools?
There are three types of Spot Healing Brush tools in Photoshop: the Spot Healing Brush, the Healing Brush, and the Patch tool. The Spot Healing Brush automatically samples pixels from around the retouched area. The Healing Brush allows you to manually select the source of the sampled pixels. The Patch tool lets you select an area to be repaired and then drag it to a spot you want to sample from.
How can I adjust the size and hardness of the Spot Healing Brush tool?
You can adjust the size and hardness of the Spot Healing Brush tool by going to the options bar at the top of the screen when the tool is selected. The size slider adjusts the diameter of the brush, while the hardness slider adjusts the edge hardness. A lower hardness value will give a softer, more feathered edge, while a higher value will give a harder, more defined edge.
Can I use the Spot Healing Brush tool on a separate layer?
Yes, you can use the Spot Healing Brush tool on a separate layer. This is a non-destructive way of editing, as it allows you to make changes without affecting the original image. To do this, create a new layer by clicking on the “New Layer” icon at the bottom of the Layers panel, then select the “Sample All Layers” option in the options bar.
What is the difference between the Spot Healing Brush tool and the Clone Stamp tool?
The Spot Healing Brush tool and the Clone Stamp tool both allow you to correct imperfections in your photos, but they work in slightly different ways. The Spot Healing Brush tool automatically samples pixels from around the retouched area and blends them for a seamless result. The Clone Stamp tool, on the other hand, requires you to manually select the source of the sampled pixels, giving you more control over the result.
How can I remove a large object with the Spot Healing Brush tool?
While the Spot Healing Brush tool is great for removing small imperfections, it might not be the best choice for removing large objects. For larger areas, you might want to use the Patch tool or the Content-Aware Fill feature. These tools are more suitable for larger areas and can provide a more seamless result.
Can I use the Spot Healing Brush tool to fix wrinkles or blemishes on a person’s face?
Yes, the Spot Healing Brush tool is perfect for retouching portraits and can be used to smooth out wrinkles or remove blemishes on a person’s face. Just be careful not to overdo it, as this can make the person’s skin look unnatural.
Why is my Spot Healing Brush tool not working?
If your Spot Healing Brush tool is not working, there could be several reasons. You might be working on a layer that doesn’t have any pixel information, such as an adjustment layer or a blank layer. Make sure you’re working on a layer with pixel information, or select the “Sample All Layers” option if you’re working on a separate layer. Also, check your brush settings in the options bar to make sure they’re set correctly.
Can I use the Spot Healing Brush tool in other Adobe applications?
The Spot Healing Brush tool is specific to Adobe Photoshop. However, similar retouching tools are available in other Adobe applications. For example, Adobe Lightroom has a Spot Removal tool that works in a similar way.
Jennifer Farley is a designer, illustrator and design instructor based in Ireland. She writes about design and illustration on her blog at Laughing Lion Design.
