 Link 1 is active.
 Link 2 is active.
 Link 3 is active.
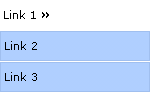
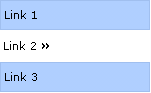
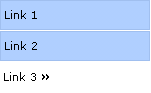
As you can see, these are shots of how the navigation menu appears at different pages depending on which links is active. These menus are generated by a single javascript file.
It’s possible to create such a menu using only Cascading Style Sheets (CSS), by defining a class (say
Link 3 is active.
As you can see, these are shots of how the navigation menu appears at different pages depending on which links is active. These menus are generated by a single javascript file.
It’s possible to create such a menu using only Cascading Style Sheets (CSS), by defining a class (say .links) for the menus, and assigning different properties for .links:active. So you can create the menu just by using a CSS file.
Though this is perfect, there is an advantage to using Javascript here. As you can see in the above shots, the active link has the “»” character in the end. This is created only for the active link, therefore it’s created dynamically. With JavaScript, you can use any character or iconic image that will make the link really look active.
Implementation
To implement this type of menu, first of all you will need is a CSS file, say links_style.css, to define the styles for the links. Next comes the Javascript file nav.js. In the file nav.js, first of all we declare three arrays. One array, called “links“, includes the names of the links. Another array is called “links_text“, and consists of the text of the links (eg. Link 1). The former will be used for comparison against this file. Name the various elements in the links array using the titles from the link files, excluding the extension (i.e. if the first link takes you to index.htm, name it index). The third array, called “links_url” includes the URL to which a link will take the user.
Now, what we want is to compare each element in the array links to the current page’s file name without the extension. We’ll then accordingly assign the link a style, and whatever extra text or image you’ve decided to add to the link text to highlight the active page.
Let loc be the comparison string. loc can be found as :
var loc=String(this.location);
loc=loc.split("/");
loc=loc[loc.length-1].split(".");
loc=loc[loc.length-2];
Thus if current page is https://www.sitepoint.com/index.htm then loc
will be index. Now we compare this with each element in the array links. The first element of this array and loc are equal, thus we write this link in the following way.
document.write('<table class="explorer_active"
onmouseover="this.className='explorer_active';return true"
onmouseout="this.className='explorer_active';return true"
onmousedown="this.className='explorer_active';return true"
onclick="location.href='' + links_url[i] + ''"><tr><td>
<a href="' + links_url[i] + '" class="menu">'
+ links_text[i] + ' <b>»</b></a></td></tr></table>');
As the other elements in the links array are not equal to loc, they will be written as:
document.write('<table class="explorer"
onmouseover="this.className='explorer_over';return true"
onmouseout="this.className='explorer';return true"
onmousedown="this.className='explorer_down';return true"
onclick="location.href='' + links_url[i] + ''"><tr><td>
<a href="' + links_url[i] + '" class="menu">'
+ links_text[i] + '</a></td></tr></table>');
And that’s your dynamic menu!
The code you’ll have to place in all your pages is:
<script language="javascript" src="nav.js"></script>
Place this code wherever you need the navigation menu to appear on the page.
The other code that you’ll require is
<link rel="stylesheet" href="links_style.css" />
which must be placed in the <head>
section of your HTML page.
Therefore, listing 1 nav.js is:
/* The link details */
var links = new Array ("link1", "link2", "link3");
var links_text = new Array ("Link 1", "Link 2", "Link 3");
var links_url = new Array ("link1.htm", "link2.htm",
"link3.htm");

/* Resolve the location */
var loc=String(this.location);
loc=loc.split("/");
loc=loc[loc.length-1].split(".");
loc=loc[loc.length-2];

/* Menu generating function */
function dyn_menu_gen()
{
for(var i=0; i<links.length; i++)
{
if(loc==links[i])
{
document.write('<table class="explorer_active"
onmouseover="this.className='explorer_active';return true"
onmouseout="this.className='explorer_active';return true"
onmousedown="this.className='explorer_active';return true"
onclick="location.href='' + links_url[i] + ''"><tr><td>
<a href="' + links_url[i] + '" class="menu">'
+ links_text[i] + ' <b>»</b></a></td></tr></table>');
}
else
{
document.write('<table class="explorer" onmouseover="this.
className='explorer_over';return true" onmouseout="this.className=
'explorer';return true" onmousedown="this.className=
'explorer_down';return true" onclick="location.href=''
+ links_url[i] + ''"><tr><td><a href="' + links_url[i] +
'" class="menu">'
+ links_text[i] + '</a></td></tr></table>');
}
document.write('<table cellspacing="0" cellpadding="0"
bgcolor="#FFFFFF"><tr><td></td></tr></table>');
}
}

/* Generate the menu */
dyn_menu_gen();
Listing 2, links_style.css is:
.explorer{font-family:verdana,arial,helvetica; font-size:8pt;
font-weight:normal; text-decoration:none; color:#000000;
background:#B5D0FF; cursor:hand; width:150px;
height:30px; border:1 solid #A6C0ED}
.explorer_over{font-family:verdana,arial,helvetica; font-size:8pt;
font-weight:normal; text-decoration:none; color:#000000;
background:#A7C0EB; cursor:hand; width:150px;
height:30px; border-right:1 solid #5C6980; border-bottom:1
solid #5C6980; border-left:1 solid #B8D3FF; border-top:1
solid #B8D3FF}
.explorer_down{font-family:verdana,arial,
helvetica; font-size:8pt; font-weight:normal;
text-decoration:none; color:#000000; background:#A7C0EB;
cursor:hand; width:150px; height:30px; border-left:1
solid #5C6980; border-top:1 solid #5C6980; border-right:1
solid #B8D3FF; border-bottom:1 solid #B8D3FF}
.explorer_active{font-family:verdana,arial,helvetica; font-size:8pt;
font-weight:normal; text-decoration:none; color:#000000;
background:#FFFFFF; cursor:hand; width:150px;
height:30px}
.menu{font-family:verdana,arial,helvetica; font-size:8pt;
font-weight:normal; text-decoration:none; color:#000000}
I hope this script simplifies the creation of dynamic JavaScript navigation for your Web pages!
Frequently Asked Questions about Dynamic Menu in JavaScript
How can I add a submenu to a dynamic menu in JavaScript?
Adding a submenu to a dynamic menu in JavaScript involves creating a new menu item and then appending it as a child to the parent menu item. You can use the appendChild() method to achieve this. Here’s a simple example:var parentMenuItem = document.getElementById('parentMenuItem');var submenuItem = document.createElement('li');submenuItem.innerHTML = 'Submenu Item';parentMenuItem.appendChild(submenuItem);
In this example, ‘parentMenuItem’ is the ID of the menu item you want to add a submenu to. ‘SubmenuItem’ is the new submenu item that you’re adding.
How can I remove a menu item from a dynamic menu in JavaScript?
To remove a menu item from a dynamic menu in JavaScript, you can use the removeChild() method. This method removes a specified child node of the specified element. Here’s an example:var menuItem = document.getElementById('menuItem');menuItem.parentNode.removeChild(menuItem);
In this example, ‘menuItem’ is the ID of the menu item you want to remove.
How can I change the text of a menu item in a dynamic menu in JavaScript?
Changing the text of a menu item in a dynamic menu in JavaScript can be done using the innerHTML property. Here’s an example:var menuItem = document.getElementById('menuItem');menuItem.innerHTML = 'New Menu Item Text';
In this example, ‘menuItem’ is the ID of the menu item you want to change the text of, and ‘New Menu Item Text’ is the new text you want to set.
How can I add an event listener to a menu item in a dynamic menu in JavaScript?
Adding an event listener to a menu item in a dynamic menu in JavaScript can be done using the addEventListener() method. This method attaches an event handler to the specified element. Here’s an example:var menuItem = document.getElementById('menuItem');menuItem.addEventListener('click', function() {
alert('Menu item clicked!');});
In this example, ‘menuItem’ is the ID of the menu item you want to add an event listener to. The event listener will display an alert when the menu item is clicked.
How can I style a menu item in a dynamic menu in JavaScript?
Styling a menu item in a dynamic menu in JavaScript can be done using the style property. This property sets or returns the style attributes of an element. Here’s an example:var menuItem = document.getElementById('menuItem');menuItem.style.color = 'red';menuItem.style.fontSize = '20px';
In this example, ‘menuItem’ is the ID of the menu item you want to style. The style property is used to change the color and font size of the menu item.
How can I create a dynamic menu in JavaScript using an array?
Creating a dynamic menu in JavaScript using an array involves iterating over the array and creating a new menu item for each element in the array. Here’s an example:var menuItems = ['Home', 'About', 'Contact'];var menu = document.getElementById('menu');for (var i = 0; i < menuItems.length; i++) {
var menuItem = document.createElement('li');
menuItem.innerHTML = menuItems[i];
menu.appendChild(menuItem);}
In this example, ‘menuItems’ is an array of menu item texts, and ‘menu’ is the ID of the menu you want to add the menu items to.
How can I create a dynamic menu in JavaScript using JSON data?
Creating a dynamic menu in JavaScript using JSON data involves parsing the JSON data and creating a new menu item for each object in the parsed data. Here’s an example:var jsonData = '[{"text": "Home"}, {"text": "About"}, {"text": "Contact"}]';var menuItems = JSON.parse(jsonData);var menu = document.getElementById('menu');for (var i = 0; i < menuItems.length; i++) {
var menuItem = document.createElement('li');
menuItem.innerHTML = menuItems[i].text;
menu.appendChild(menuItem);}
In this example, ‘jsonData’ is a JSON string of menu item objects, and ‘menu’ is the ID of the menu you want to add the menu items to.
How can I create a dynamic menu in JavaScript using data from a server?
Creating a dynamic menu in JavaScript using data from a server involves making an AJAX request to the server to fetch the data, and then creating a new menu item for each piece of data returned by the server. Here’s an example using the fetch API:fetch('https://example.com/menuItems')
.then(response => response.json())
.then(data => {
var menu = document.getElementById('menu');
for (var i = 0; i < data.length; i++) {
var menuItem = document.createElement('li');
menuItem.innerHTML = data[i].text;
menu.appendChild(menuItem);
}
});
In this example, ‘https://example.com/menuItems‘ is the URL of the server endpoint that returns the menu items data.
How can I create a dynamic dropdown menu in JavaScript?
Creating a dynamic dropdown menu in JavaScript involves creating a new select element and adding option elements to it for each menu item. Here’s an example:var menuItems = ['Home', 'About', 'Contact'];var dropdownMenu = document.createElement('select');for (var i = 0; i < menuItems.length; i++) {
var option = document.createElement('option');
option.value = menuItems[i];
option.text = menuItems[i];
dropdownMenu.appendChild(option);}document.body.appendChild(dropdownMenu);
In this example, ‘menuItems’ is an array of menu item texts.
How can I create a dynamic context menu in JavaScript?
Creating a dynamic context menu in JavaScript involves creating a new menu element and adding menu items to it, and then displaying the menu at the mouse position when the right mouse button is clicked. Here’s an example:var menuItems = ['Cut', 'Copy', 'Paste'];var contextMenu = document.createElement('ul');contextMenu.style.display = 'none';contextMenu.style.position = 'absolute';for (var i = 0; i < menuItems.length; i++) {
var menuItem = document.createElement('li');
menuItem.innerHTML = menuItems[i];
contextMenu.appendChild(menuItem);}document.body.appendChild(contextMenu);document.addEventListener('contextmenu', function(e) {
e.preventDefault();
contextMenu.style.left = e.pageX + 'px';
contextMenu.style.top = e.pageY + 'px';
contextMenu.style.display = 'block';});document.addEventListener('click', function() {
contextMenu.style.display = 'none';});
In this example, ‘menuItems’ is an array of context menu item texts.
 Premshree Pillai
Premshree studies engineering in Information Technology at Mumbai University, India. He's written articles for a range of popular Indian IT magazines, and his site, QikSearch has featured in 'Digit' Magazine - India's No. 1 technology magazine.