

The Internet is full of so many resources nowadays that you can sometimes find yourself overwhelmed in your search for the perfect texture for your design project. From free to premium texture packs, the choices are endless, but they even a set of thousands of textures might miss the mark and detract from your design. Even if you find a close candidate after lots of searching, trying to make adjustments to a flat, unlayered texture file can be tedious and time consuming.
No one wants to have to search for hours and rifle through hundreds of files to find the right texture. So, why not make your own? Photoshop offers endless possibilities when it comes to creating, and it’s no different when it comes to creating textures. Not everyone has a high-end camera to go out and photograph their own textures, so today I will show you how to easily create your own textures for use in your design work. We will learn how to make both a rock and a metal texture.
Build Your Own Rock Texture
Step 1
Start by creating a new canvas and setting the dimensions to 1000 x 600 pixels

Step 2
Next you will need to set your foreground to #ACACAC and your background to #5F5F5E
![]()
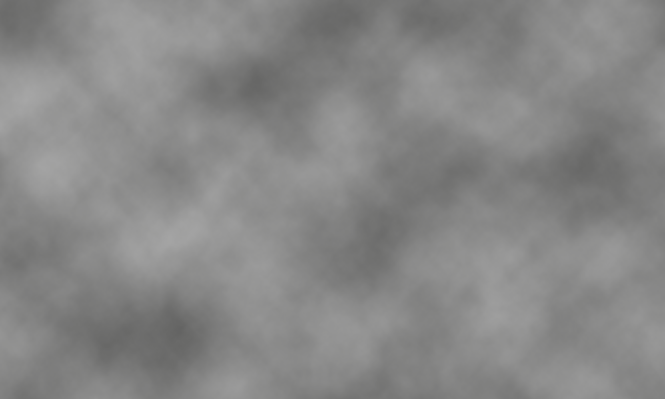
Step 3
Underneath the filters tab, you will need to render clouds. Select “Filter” > “Render” >”Clouds.” You should now have your image looking something like this:
Step 4
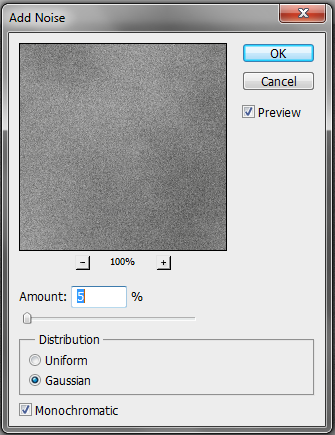
Add some noise to your canvas by going to “Filter” > “Noise” > “Add Noise” and input the values shown below.
Step 5
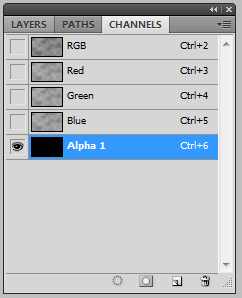
Under the “Channels” tab (which should be located in your floating layers dialog box), create a new alpha channel. This will turn your entire canvas black.
Step 6
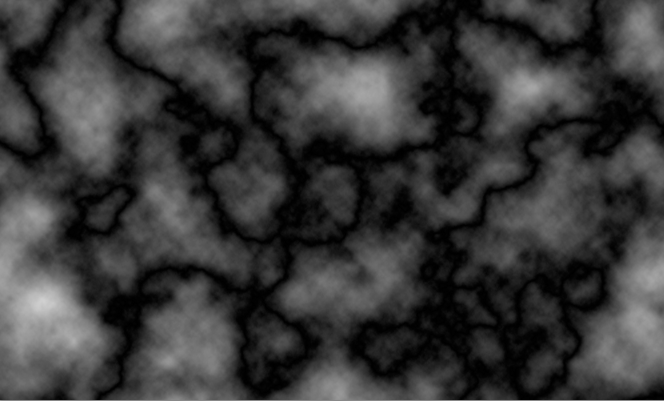
Staying on the alpha channel layer, you will then go to “Filter” > “Render” > “Difference Clouds.” Do this twice (depending on the desired look, you may need to do this several more times). Afterwards, you will need to add noise to the alpha channel layer, the same way that you did before.
Step 7
Return back to your clouds layer, making sure to click on it, and go to “Filter” > “Render” > “Lighting Effects.” Adjust the position of the light to taste, and make sure to change the texture layer to your alpha layer as shown below.

Finish
You now have a fairly decent looking rock texture that is ready to be modified and tailored to your exact purposes.

You can finish up by customizing your texture by adding gradients using the burn tool or adding colors and filters as I have done below.

Build Your Own Metal Texture
Step 1
Create a new layer with the same dimensions (1000×600) as before.
Step 2
With the same foreground and background colors used before, go to “Filter” > “Noise” > “Add Noise” and set the amount to 100%.

Step 3
Next, go to “Filter” > “Blur” > “Motion Blur” and enter the same increments as shown in the image below. After pressing “OK,” make sure you use the transform tool to pull the left and right edges out so that the slightly distorted edges are not shown.

Step 4
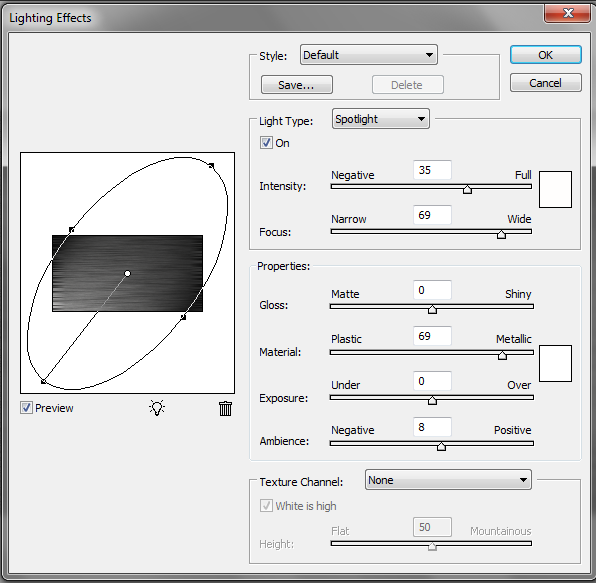
Go to “Filter” > “Render” > “Lighting Effects” and adjust the lighting as desired.
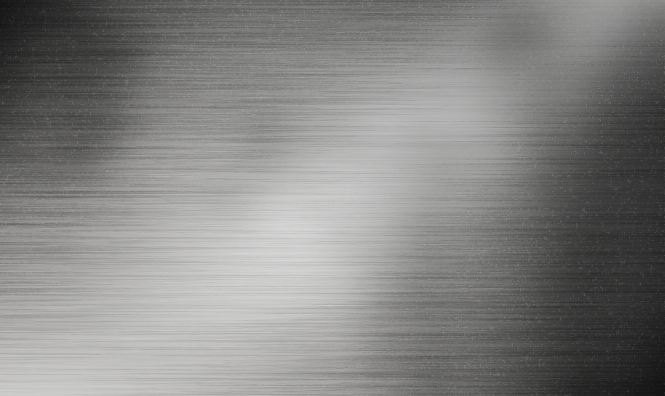
Finish
Finish your metal texture off by adding a thick diagonal white line across your canvas and adding a blur to the new line in order to create a shine.

Just like with your rock texture you can customize your metal texture by adding gradients, colors and other filters, as I have done below.
Conclusion
As you have seen, it doesn’t matter if you lack your own camera to take photos for your texture resources, or you just don’t have the time to look at hundreds of sites to find the perfect texture for your project. If you have Photoshop and a few minutes, then you are fast on your way to creating your very own tailor-made, malleable texture stock.
Frequently Asked Questions about Creating Textures in Photoshop
What are the basic steps to create a texture in Photoshop?
Creating a texture in Photoshop involves several steps. First, you need to open a new document and set the dimensions. Then, you can use the paint bucket tool to fill the background with a solid color. After that, you can use the brush tool to add different elements to your texture. You can also use the filter gallery to apply different effects to your texture. Finally, you can save your texture as a JPEG or PNG file for future use.
How can I use textures to enhance my Photoshop designs?
Textures can add depth and realism to your Photoshop designs. You can use them as backgrounds, overlays, or even to create unique effects. For example, you can use a grunge texture to give your design a distressed look, or a wood texture to create a rustic feel. You can also use textures to create shadows and highlights, which can make your designs more three-dimensional.
Can I create my own textures in Photoshop?
Yes, you can create your own textures in Photoshop. This can be done by using various tools and filters in Photoshop, such as the brush tool, the noise filter, and the texture filter. You can also create textures by photographing or scanning real-world objects, such as fabric, paper, or wood, and then importing these images into Photoshop.
What are some good resources for free textures?
There are many online resources where you can find free textures for Photoshop. Some of these include Unsplash, Texture Labs, and Adobe’s own texture library. These sites offer a wide variety of textures, from grunge and distressed textures to natural textures like wood and stone.
How can I apply a texture to a specific area in my design?
To apply a texture to a specific area in your design, you can use the selection tools in Photoshop. First, select the area where you want to apply the texture. Then, open the texture image and copy it. Go back to your design and paste the texture into the selected area. You can then use the blending modes to blend the texture with your design.
Can I use textures in Photoshop to create a 3D effect?
Yes, you can use textures in Photoshop to create a 3D effect. This can be done by using the displacement map feature in Photoshop. A displacement map uses the values of a texture to distort another image, creating a 3D effect.
How can I create a seamless texture in Photoshop?
To create a seamless texture in Photoshop, you need to make sure that the edges of your texture image match up perfectly. This can be done by using the offset filter in Photoshop. After applying the offset filter, you can use the clone stamp tool to blend the seams together.
What are some common mistakes to avoid when creating textures in Photoshop?
Some common mistakes to avoid when creating textures in Photoshop include not paying attention to the resolution of your texture, not making your texture seamless, and not saving your texture in the correct format. It’s also important to avoid overusing textures, as this can make your design look cluttered and unprofessional.
How can I use textures to create a vintage or retro effect in Photoshop?
To create a vintage or retro effect in Photoshop, you can use textures that have a distressed or aged look. You can apply these textures to your design using the blending modes in Photoshop. You can also use the color adjustment tools to give your design a faded or sepia-toned look.
Can I use textures in Photoshop to create a realistic painting effect?
Yes, you can use textures in Photoshop to create a realistic painting effect. This can be done by using the brush tool in combination with a texture. You can also use the smudge tool to blend the colors and create a more painterly effect.

