

Key Takeaways
- AWS Lambda is a serverless computing platform that runs code in response to events and automatically manages the necessary computing resources. It is an ideal solution for running cron jobs without the need for a dedicated server running 24/7.
- Setting up a Lambda in AWS requires configuring several services such as S3 Bucket, IAM Role, CloudWatch Events Rule, and Lambda Permission. These services work together to ensure the successful execution of the Lambda function as a cron job.
- Implementing a cron job on AWS involves creating a Lambda function and adding rules that define how often and how the Lambda will be executed. Amazon automatically takes care of permissions and roles, using default settings.
- AWS Lambda cron jobs can be used to perform a variety of tasks, such as fetching updated cryptocurrency prices. The data fetched can be stored or sent to different services, offering flexibility and scalability for businesses.
Cron jobs are really useful tools in any Linux or Unix-like operating systems. They allow us to schedule scripts to be executed periodically. Their flexibility makes them ideal for repetitive tasks like backups and system cleaning, but also data fetching and data processing.
For all the good things they offer, cron jobs also have some downsides. The main one is that you need a dedicated server or a computer that runs pretty much 24/7. Most of us don’t have that luxury. For those of us who don’t have access to a machine like that, AWS Lambda is the perfect solution.
AWS Lambda is an event-driven, serverless computing platform that’s a part of the Amazon Web Services. It’s a computing service that runs code in response to events and automatically manages the computing resources required by that code. Not only is it available to run our jobs 24/7, but it also automatically allocates the resources needed for them.
Setting up a Lambda in AWS involves more than just implementing a couple of functions and hoping they run periodically. To get them up and running, several services need to be configured first and need to work together. In this tutorial, we’ll first go through all the services we’ll need to set up, and then we’ll implement a cron job that will fetch some updated cryptocurrency prices.
Understanding the Basics
As we said earlier, some AWS services need to work together in order for our Lambda function to work as a cron job. Let’s have a look at each one of them and understand their role in the infrastructure.
S3 Bucket
An Amazon S3 bucket is a public cloud storage resource available in Amazon Web Services’ (AWS) Simple Storage Service (S3), an object storage offering. Amazon S3 buckets, which are similar to file folders, store objects, which consist of data and its descriptive metadata. — TechTarget
Every Lambda function needs to be prepared as a “deployment package”. The deployment package is a .zip file consisting of the code and any dependencies that code might need. That .zip file can then be uploaded via the web console or located in an S3 bucket.
IAM Role
An IAM role is an IAM identity that you can create in your account that has specific permissions. An IAM role is similar to an IAM user, in that it is an AWS identity with permission policies that determine what the identity can and cannot do in AWS. — Amazon
We’ll need to manage permissions for our Lambda function with IAM. At the very least it should be able to write logs, so it needs access to CloudWatch Logs. This is the bare minimum and we might need other permissions for our Lambda function. For more information, the AWS Lambda permissions page has all the information needed.
CloudWatch Events Rule
CloudWatch Events support cron-like expressions, which we can use to define how often an event is created. We’ll also need to make sure that we add our Lambda function as a target for those events.
Lambda Permission
Creating the events and targeting the Lambda function isn’t enough. We’ll also need to make sure that the events are allowed to invoke our Lambda function. Anything that wants to invoke a Lambda function needs to have explicit permission to do that.
These are the building blocks of our AWS Lambda cron job. Now that we have an idea of all the moving parts of our job, let’s see how we can implement it on AWS.
Implementing a Cron Job on AWS
A lot of the interactions we described earlier are taken care of by Amazon automatically. In a nutshell, all we need to do is to implement our service (the actual lambda function) and add rules to it (how often and how the lambda will be executed). Both permissions and roles are taken care of by Amazon; the defaults provided by Amazon are the ones we’ll be using.
Lambda function
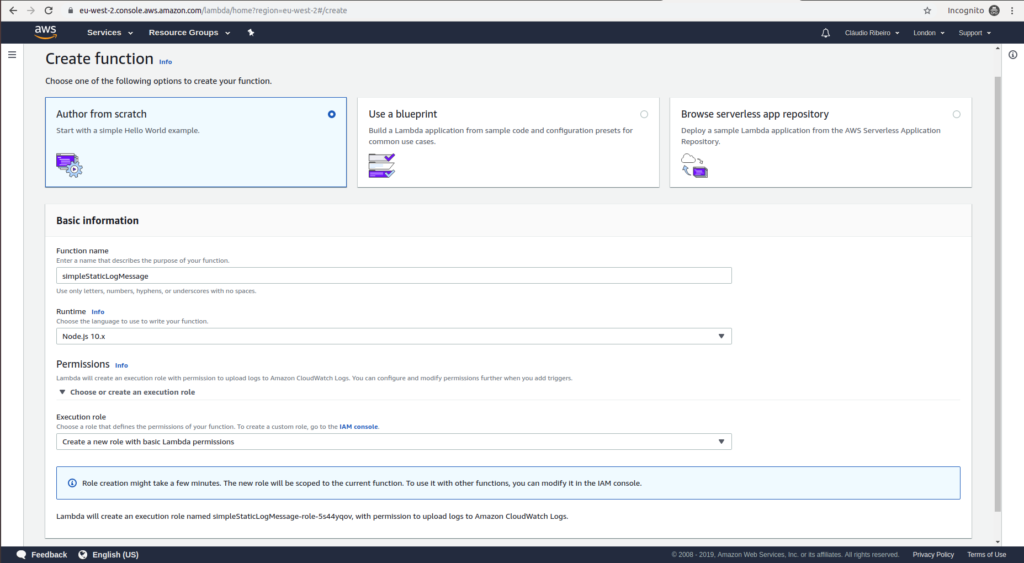
First, let’s start by implementing a very simple lambda function. In the AWS dashboard, use the Find Services function to search by lambda. In the lambda console, select Create a function. At this point, we should be in Lambda > Functions > reate Function.
To get things going, let’s start with a static log message. Our service will only be a print function. For this, we’ll use Node.js 10x as our runtime language. Give it a function name, and on Execution Role let’s stay with Create a new role with basic lambda permissions. This is a basic set of permissions on IAM that will allow us to upload logs to Amazon CloudWatch logs. Click Create Function.
Our function is now created with an IAM Role. In the code box, substitute the default code with the following:
exports.handler = async (event) => {
    console.log("Hello Sitepoint Reader!");
    return {};
};
To check if the code is executing correctly, we can use the Test function. After giving a name to our test, it will execute the code and show its output in the Execution Result field just below our code.
If we test the code above we can see that we have no response, but in the function logs, we can see we have our message printed. This indicates that our service is running correctly so we can proceed with our cron implementation.
Rules
The next step in our Cron creation is to create recurring CloudWatch triggers. These will ensure that our lambda function is executed recurrently.
So let’s go to the Services menu and select Cloudwatch under Management & Governance. Because we need to create a new rule, just select the Rules option on the menu on the left. We can find it right under Events. On the Rules console, just click the New Rule button.
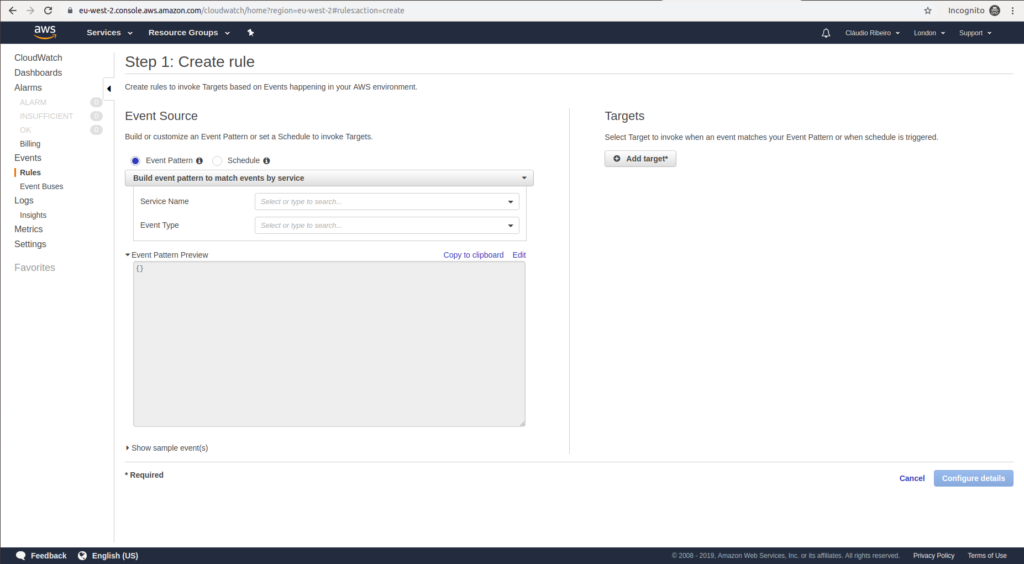
If we take a closer look, right under Event Source, we can see two options: Event Pattern and Schedule. We want to schedule the invocation of a particular target, so let’s select the Schedule option. Now we can either enter a fixed execution rate using the form, or we can enter a crontab rule. For this particular case, we’ll use a fixed rate of one minute. With our rate selected we know need to select what will be our invocation target. In the right side, under the Targets menu, let’s click Add Target. Select Lambda Function on the drop-down menu and on the Function dropdown select our simpleStaticLogMessage lambda function.
Then we’ll have to click Configure Details to add a name and a description for our newly created rule. The state needs to be Enabled. Finally, click Create Rule to create our rule.
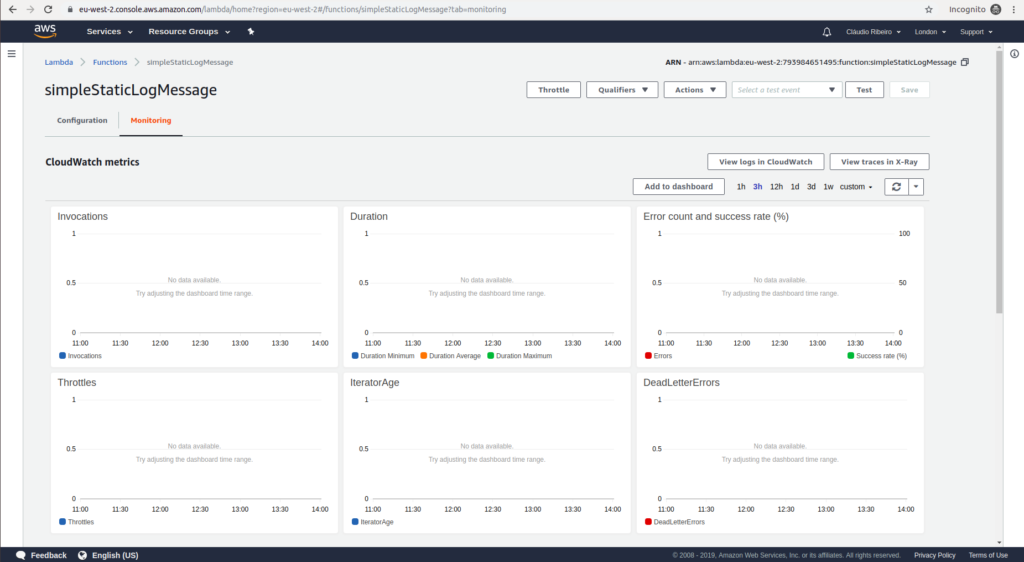
With our Lambda function and our scheduling rule created, let’s finally set it in action. Let’s go back to the Lambda console, select our simpleStaticLogMessage function and click on Monitoring on the top left. This monitoring dashboard has a plethora of graphics to show the usage of our services. From invocations, duration and errors to DeadLetterErrors, this dashboard has all the information we need to analyze the usage of our services.
Remember that this lambda function has no outbound traffic, so we’ll need to check the logs to see if it’s working. So select the View logs in CloudWatch in the right side.
Just open the log stream for our function and we should be able to see our “Hello Sitepoint Reader!” message pop up every minute!
This was a very simple service with no practical use, so let’s disable it by going back to the Rules menu in the CloudWatch console, select the rule and under Actions hit the delete option.
Our Cryptocurrency Service
Now that we know how to create a cron job using AWS Lambda, we can focus on creating a service that can bring some value. We’ll be using a Python 3.7 runtime to create a Lambda function that will fetch the current value (in US dollars) of the top three cryptocurrencies. We’ll then print them just like we did for our simple example. This way, every minute we’ll have the updated values of Bitcoin, Ethereum and Litecoin.
Create a new Lambda function, just like we did for the static log, and add the following code:
import json
from botocore.vendored import requests

def lambda_handler(event, context):

    bitcoin_api_url = 'https://api.coinmarketcap.com/v1/ticker/bitcoin/'
    ethereum_api_url = 'https://api.coinmarketcap.com/v1/ticker/ethereum/'
    litecoin_api_url = 'https://api.coinmarketcap.com/v1/ticker/litecoin/'

    bitcoin_response = requests.get(bitcoin_api_url)
    bitcoin_response_json = bitcoin_response.json()

    ethereum_response = requests.get(ethereum_api_url)
    ethereum_response_json = ethereum_response.json()

    litecoin_response = requests.get(litecoin_api_url)
    litecoin_response_json = litecoin_response.json()

    print("BTC: " + bitcoin_response_json[0]['price_usd'])
    print("ETH: " + ethereum_response_json[0]['price_usd'])
    print("LTC: " + litecoin_response_json[0]['price_usd'])

    return {}
Some quick notes about the code above. The requests library is not available by default on Lambda. So, we either install it or use the from botocore.vendored import requests line to access it. We’ll then use the requests library to fetch the information from the coinmarketcap API. In the end, we print just the values of each cryptocurrency.
From here we need to add a rule and then finally watch it working on CloudWatch. Having this information on logs is not that useful, but from here we have a bunch of ways we can take the information fetched. We can store it in a DynamoDB database, we can send it to different services using SQS and SNS or any other use we can think of.
Conclusion
Being able to have cron jobs on the cloud can make a huge difference in a business. With AWS Lambda we stop having the need for dedicated machines with limited resources doing expensive computations 24/7. We now have access to almost unlimited computational power without the need for lowering the speed and availability of our business.
Frequently Asked Questions (FAQs) about AWS Lambda Cron Jobs
What is the Role of AWS CloudWatch in AWS Lambda Cron Jobs?
AWS CloudWatch plays a crucial role in AWS Lambda Cron Jobs. It is a monitoring service that allows you to collect and track metrics, collect and monitor log files, and set alarms. In the context of AWS Lambda Cron Jobs, CloudWatch Events helps to set up scheduled events that trigger your Lambda function. You can set up a rule to run your function on a schedule (for example, every 15 minutes or at a specific time of day).
How Can I Debug My AWS Lambda Cron Job?
Debugging AWS Lambda Cron Jobs involves using CloudWatch Logs. When your Lambda function is triggered and executed, it will automatically log information about the execution and any error messages to CloudWatch Logs. You can view these logs to troubleshoot any issues with your function. Additionally, you can add custom logging statements in your function code to provide more detailed information during execution.
Can I Use AWS Lambda Cron Jobs with Other AWS Services?
Yes, AWS Lambda Cron Jobs can be used in conjunction with other AWS services. For instance, you can use AWS S3 to store the output of your Lambda function or AWS DynamoDB to store and retrieve data. The integration of AWS Lambda with other AWS services provides a powerful and flexible environment for running your applications.
How Can I Secure My AWS Lambda Cron Jobs?
Security in AWS Lambda Cron Jobs is achieved through AWS Identity and Access Management (IAM). You can create an IAM role with the necessary permissions for your Lambda function. This role is assumed by your function at runtime, ensuring that it only has the permissions necessary to perform its tasks.
What are the Limitations of AWS Lambda Cron Jobs?
While AWS Lambda Cron Jobs are powerful, they do have some limitations. For instance, the maximum execution time for a Lambda function is 15 minutes. Also, there are limits on the amount of memory and CPU power that your function can use. It’s important to understand these limitations when designing your application.
How Can I Optimize the Performance of My AWS Lambda Cron Jobs?
Performance optimization for AWS Lambda Cron Jobs can be achieved in several ways. One way is by adjusting the memory allocation for your function. More memory means more CPU power, which can make your function run faster. Another way is by using provisioned concurrency, which keeps a specified number of function instances initialized and ready to respond immediately to your application.
Can I Use AWS Lambda Cron Jobs for Long-Running Tasks?
AWS Lambda is designed for short-lived, stateless tasks. If you have a long-running task, you may need to break it up into smaller, discrete functions that can be run in parallel or sequence. Alternatively, you can use other AWS services like AWS Batch or AWS Step Functions for long-running tasks.
How Can I Test My AWS Lambda Cron Jobs?
AWS provides several ways to test Lambda functions. You can use the AWS Management Console, AWS CLI, or AWS SDKs to invoke your function manually with a sample event. This allows you to verify that your function behaves as expected.
How Can I Monitor the Performance of My AWS Lambda Cron Jobs?
Monitoring the performance of AWS Lambda Cron Jobs can be done using AWS CloudWatch. CloudWatch provides metrics for Lambda functions such as the number of invocations, execution duration, and error rates. You can set up alarms based on these metrics to notify you when there are issues with your function.
How Can I Schedule My AWS Lambda Cron Jobs?
Scheduling AWS Lambda Cron Jobs is done using AWS CloudWatch Events. You can create a rule that specifies a cron or rate expression, which determines when your function is invoked. For example, a cron expression of ‘0 12 * * ? *’ would run your function at noon every day.