

Pricing tables play a very important role in any eCommerce site. After taking such painstaking care to make sure that the layout, colors, and typography of your website have maximum appeal to prospective customers, it would be a shame to lose them at the final stage of the sales funnel—when they’re comparing your various products and services and choosing one to purchase. If your pricing tables are confusing or unappealing, customers might not take you up on any of your offers. In order to convert as many of these interested viewers as possible, your pricing tables need to be clear and consistent. Shoppers need to be able to quickly compare your options and understand the strong points of each. So, today we are going to take clear pricing (get it?) to a whole new level by creating a stylish transparent pricing table in Photoshop. We are going to use different textures, effects, and blending techniques to achieve a “rippled glass” approach that will give your pricing a polished appearance and a classy… glassy appeal.
Resources:
Fabric Texture
Grungy Texture
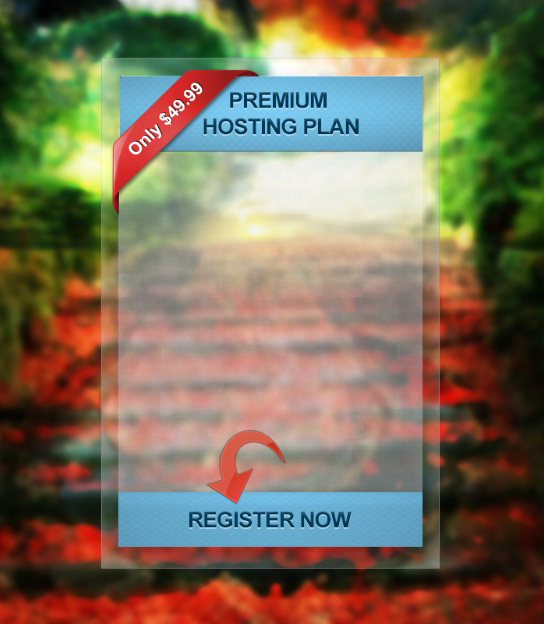
Now, before we start, let’s have a look at our final product:

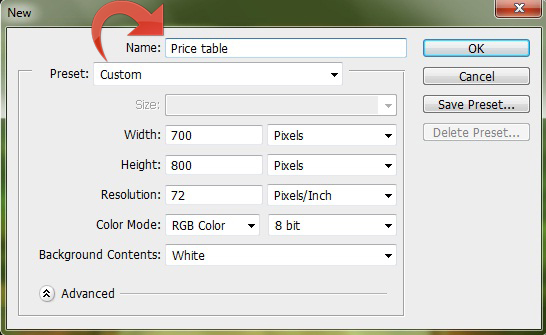
Step 1:
Open Photoshop and create a new file with a 700px width and an 800px height.
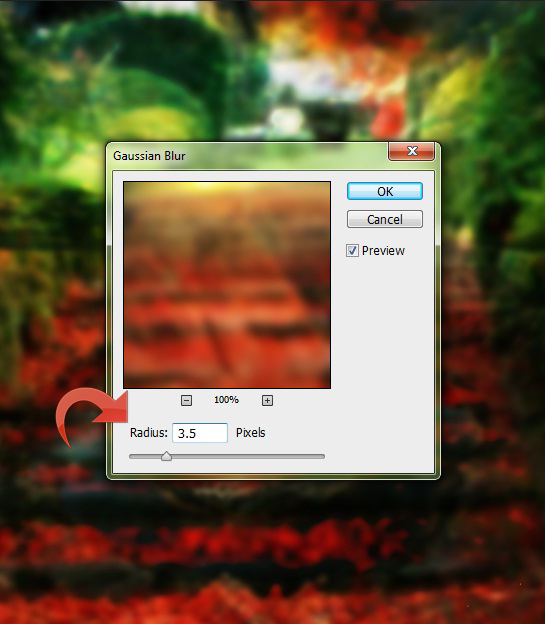
Step 2:
Now, open the background image and paste it into our Photoshop document. Then click on “Filter” > “Blur” > “Gaussian Blur.” You could also make it brighter by using “Image” > “Adjustments” > “Brightness/Contrast.”
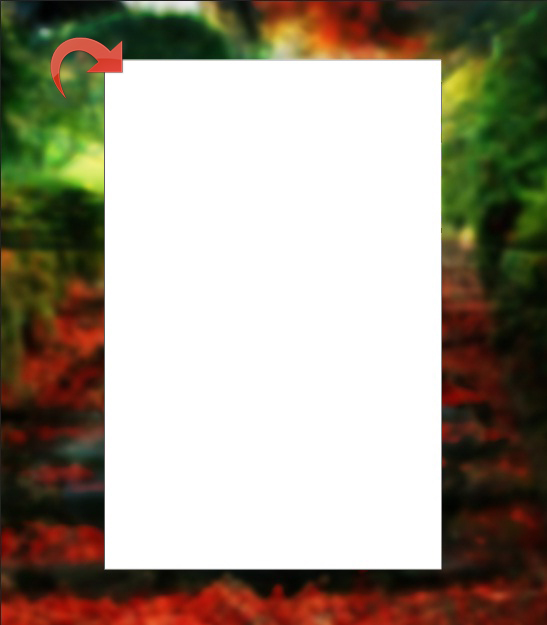
Step 3:
Select the rectangle tool and create a rectangle using color #ffffff.
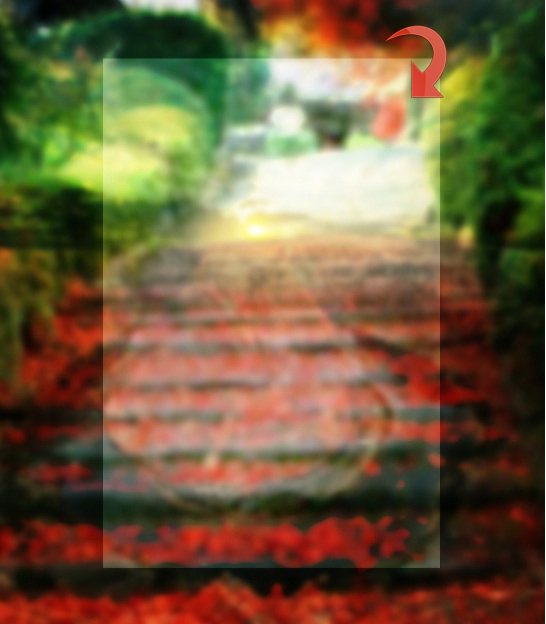
Step 4:
Now, change the blending mode to “Soft Light” and reduce the fill opacity to 90%.
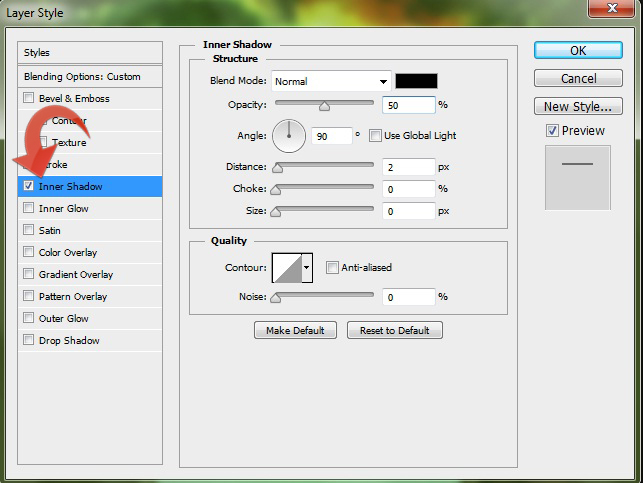
Step 5:
Double-click on the rectangle layer to open the “Layer Style” window. Apply the following layer style settings:


Step 6:
Select the rectangle tool and create a small rectangle. Reduce the opacity of this new layer to 30%.

Step 7:
Now, click on “Layer” > “Layer Style” > “Pattern Overlay,” and add a bit of pattern to the rectangle. This will make your pricing table look like rippled glass.

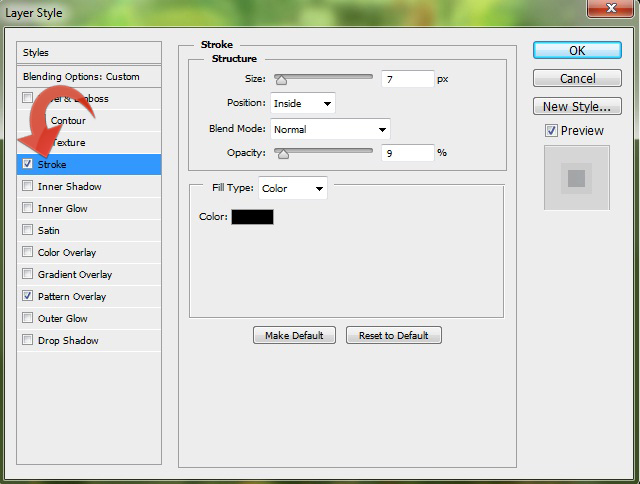
Step 8:
Click on “Layer” > “Layer style” > “Stroke,” and add a stroke using the following settings.
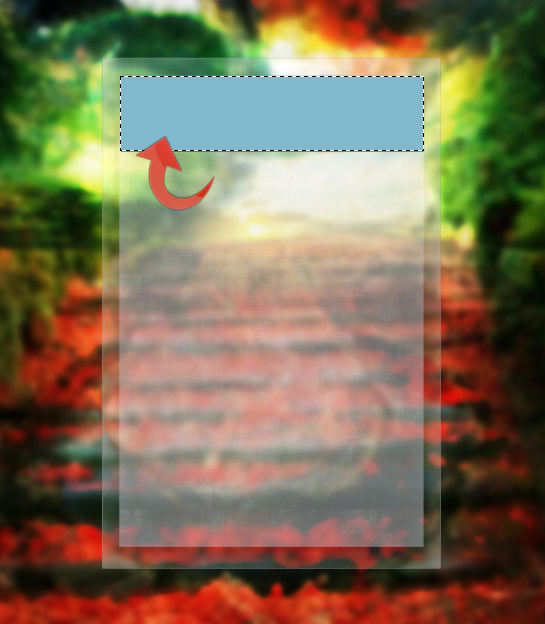
Step 9:
Now we will start building title area, so select the rectangular marquee tool and select the topmost part of your rectangle. Then, fill it with color #83b8cc.
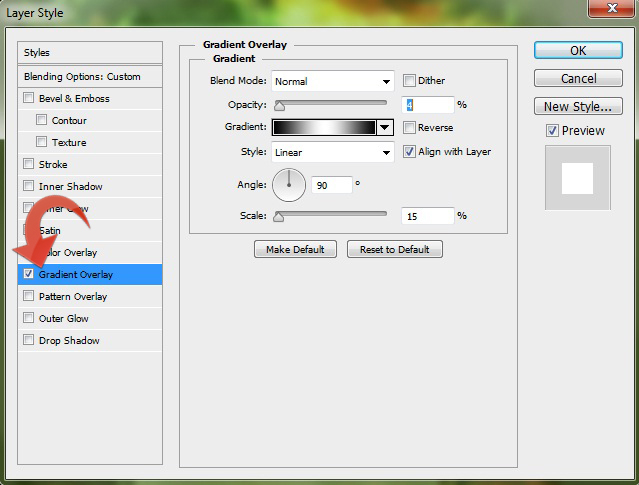
Step 10:
Let’s add some pattern and gradient to the rectangle that we just created. Use the following settings:

Step 11:
Repeat the same process and create an identical rectangle at the bottom.

Step 12:
Let’s start with the banner, select the pen tool and create the shape shown below. Right-click on the path and click on “Make selection.” Then, fill it with color #c72424.

Step 13:
Create a new layer, select a small round brush, and use it on the sides of our banner with a slightly darker color.

Step 14:
Now, let’s add some styles. Add the following layer styles using the settings provided below.


Step 15:
Create a new layer, select the pen tool, and create a small rectangle. Fill it with color #ffffff and reduce the opacity to 25%.

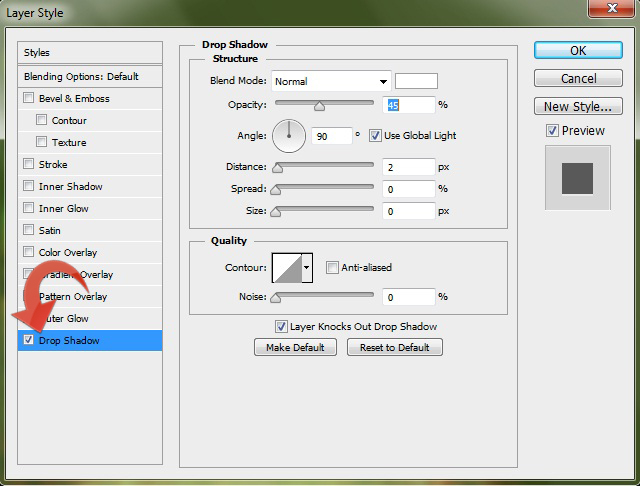
Step 16:
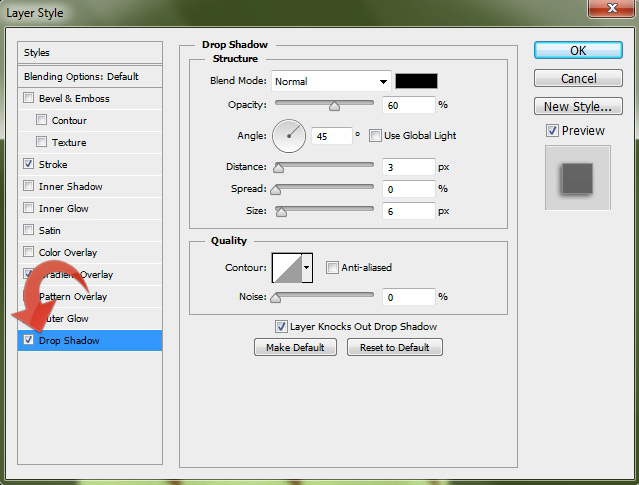
Now select text tool and add the desired text. Then, click on “Layer” > “Layer Style” > “Drop Shadow,” and use the following settings.

Step 17:
Again, select the text tool and add the title text using color #003a58.

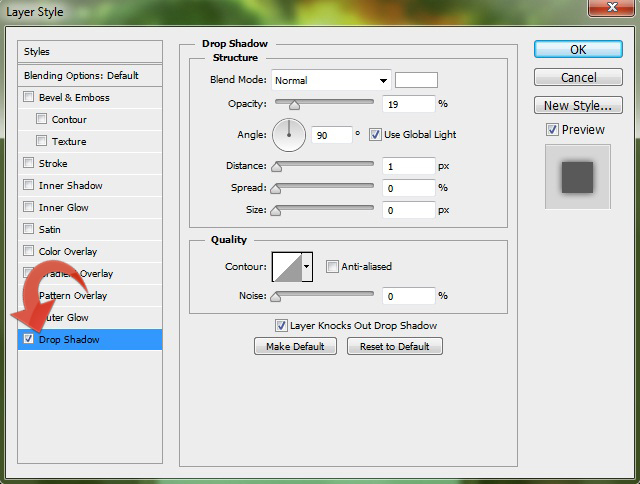
Step 18:
Now, click on “Layer” > “Layer Styles” > “Drop Shadow,” and use the same settings provided below.
Step 19:
Repeat the same process and add the “Register Now” at the bottom.
Step 20:
Select the line tool and create a horizontal line with a 1px weight and color #030303. This line will separate our text so that it appears neat and organized.

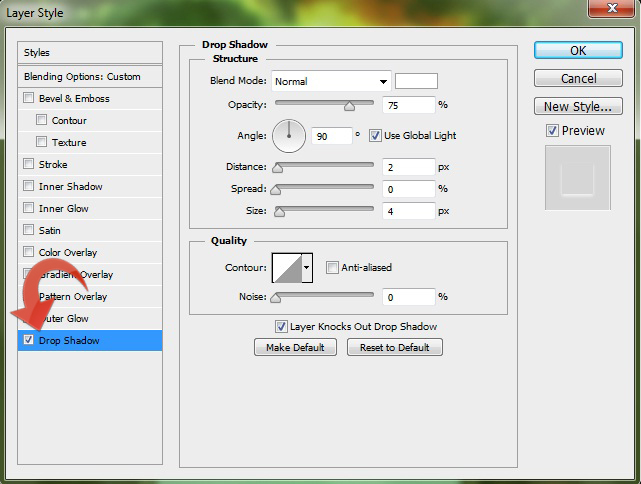
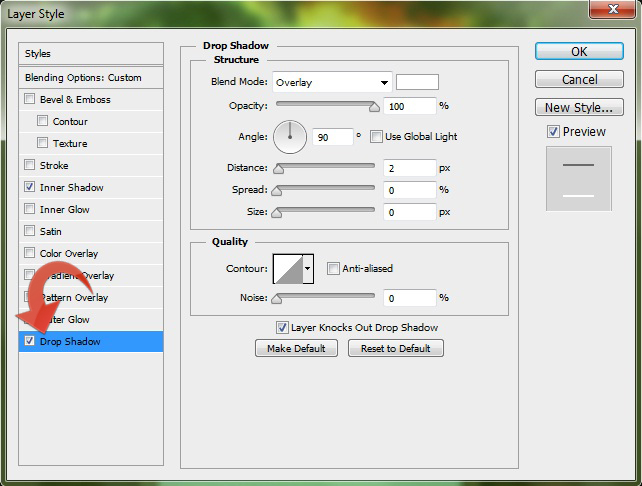
Step 21:
Let’s add a bit of drop shadow and outer glow to this line; open the “Layer Style” window and apply the following layer styles:

Step 22:
Repeat the step above to create few more lines/separators.

Step 23:
Select the text tool and add text using color #464646. Then, click on layer styles and add some drop shadow. Use the following settings:
Step 24:
Add rest of your text using the same process and layer styles.

Step 25:
Select the hard round brush and create a small arrow using color #464646. Then click on “Layer Styles” and add some inner shadow and drop shadow to it. Use the following settings:
Step 26:
Add arrows to the rest of your text by duplicating your work from the last step.

Step 27:
Lastly, let’s add shine to our table. Use the ellipse tool on the right side with color #ffffff.

Right-click on the newly-created layer and select “Rasterize Layer.” Then, change the blending mode to “Overlay” and reduce the opacity to 25%. Use the eraser tool to remove the unwanted parts of this transparent ellipse.

Our stylish transparent price table is done. I hope you learned something and like the final result. Thanks for following along!
Frequently Asked Questions about Creating a Stylish Transparent Pricing Table in Photoshop
How can I add more rows or columns to my table in Photoshop?
To add more rows or columns to your table in Photoshop, first, select the table by clicking on it. Then, go to the “Table” menu at the top of the screen. From there, you can choose “Insert” and then either “Row” or “Column”. You can specify the number of rows or columns you want to add and whether they should be added above, below, or to the left or right of the current selection.
Can I change the color of my table in Photoshop?
Yes, you can change the color of your table in Photoshop. To do this, select the table or the specific cells you want to change. Then, go to the “Table” menu and choose “Table Properties”. In the dialog box that appears, you can choose a new color for the table or cells.
How can I make my table transparent in Photoshop?
To make your table transparent in Photoshop, you need to adjust the opacity of the layer that the table is on. First, select the layer in the Layers panel. Then, use the Opacity slider at the top of the panel to adjust the transparency of the table. The lower the percentage, the more transparent the table will be.
Can I add text to my table in Photoshop?
Yes, you can add text to your table in Photoshop. To do this, select the Text tool from the Tools panel. Then, click inside the cell where you want to add text and start typing. You can adjust the font, size, color, and other text properties in the options bar at the top of the screen.
How can I resize my table in Photoshop?
To resize your table in Photoshop, first, select the table by clicking on it. Then, go to the “Edit” menu and choose “Free Transform”. You can then drag the handles that appear around the table to resize it. Press Enter or Return when you’re done to apply the transformation.
Can I copy and paste my table in Photoshop?
Yes, you can copy and paste your table in Photoshop. To do this, first, select the table by clicking on it. Then, go to the “Edit” menu and choose “Copy”. Next, go to the location where you want to paste the table, go back to the “Edit” menu, and choose “Paste”.
How can I delete a row or column from my table in Photoshop?
To delete a row or column from your table in Photoshop, first, select the row or column by clicking on it. Then, go to the “Table” menu and choose “Delete”, then either “Row” or “Column”.
Can I merge cells in my table in Photoshop?
Yes, you can merge cells in your table in Photoshop. To do this, first, select the cells you want to merge by clicking and dragging across them. Then, go to the “Table” menu and choose “Merge Cells”.
How can I add a border to my table in Photoshop?
To add a border to your table in Photoshop, first, select the table by clicking on it. Then, go to the “Table” menu and choose “Table Properties”. In the dialog box that appears, you can specify the width, color, and style of the border.
Can I save my table as a separate image in Photoshop?
Yes, you can save your table as a separate image in Photoshop. To do this, first, select the table by clicking on it. Then, go to the “File” menu and choose “Save As”. In the dialog box that appears, choose the format you want to save the image in, specify a name and location for the file, and click “Save”.