
“Retro” refers to an image or a design from a previous time period, such as the ’50s, ’60s, ’70s, or ’80s. Just like any other design style, these styles have their place. For example, you might be asked to create an album cover for an artist that has a ’80s rock n’ roll sound, or perhaps you’re tasked with designing a dinner menu for a retro diner. It’s important to be able to achieve these styles so that you can create a convincing vintage look.
Key Takeaways
- Creating a retro effect in Photoshop involves several key steps including finding and duplicating your image, applying the image to itself, blurring the duplicate layer, lessening the effect, and adding blue and yellow photo filters.
- Adding texture and lightening the center of the image can also enhance the vintage look, while color grading, adding grain or noise, and using filters and blending modes can add depth and complexity to the image.
- Another method to achieve a vintage look without decay involves duplicating your image, tweaking your colors, bending your image’s colors, adjusting to taste, adding a warming filter and adding a vignette.
- The Lomography technique involves selecting your image, duplicating the background layer, lowering your exposure, adding a vignette, adding a general curves adjustment, adding a more precise curves adjustments layer, adjusting your levels, lowering the impact with a gradient map, adding some saturation, and adding a slight amount of texture.
Retro ’70s Photography
We have all seen those vintage photographs where the color is a little off. The look was so common with vintage photographs that the look reminds most people of ’70s photography. The key characteristics of this era of photography are accentuated blue and yellow tones in the photograph.
Step 1: Find Your Image
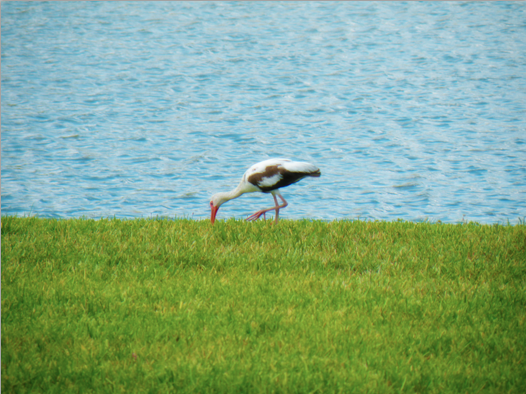
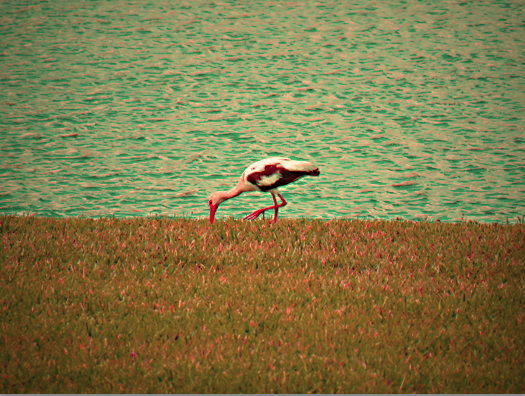
I have selected a photo of a bird near the water. The grass is a vibrant green, and the water is a true-to-life blue.

Step 2: Duplicate the Image
Duplicate the background image. We do this because we want to leave the original to work untouched, just in case we make a major mistake and need something to come back to. We also do this because we are going to apply different effects to the duplicated layer.
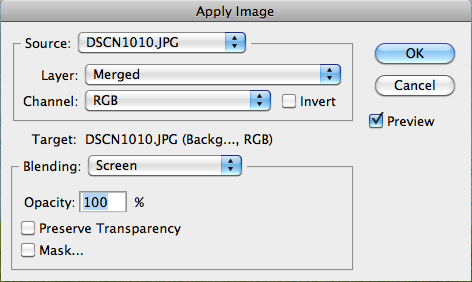
Step 3: Apply the Image to Itself
With the duplicate layer selected, select “Image” > “Apply Image.” A window will pop up, and we will be applying the source image (the one that we are working on) to itself. The default is for the blending to be set to “multiply,” but we are going to change this to “screen.”
Step 4: Blur the Duplicate Layer
We need to apply a slight blur to the duplicate image layer, to give it the “fuzzy” quality usually found in vintage photos. Go to “Filter” > “Blur” > “Gaussian Blur.” For this image, I set the blur to 3.0.


Step 5: Lessen the Effect
You only want this effect to soften the image slightly, but you still want the original layer to show through. Go to the layers panel, and with the blurred layer selected, change its blend mode to “soft light.”
Step 6: Add a Blue Photo Filter
We need to add blue to the image to help create the vintage look we are after. Go to the Layers Panel, click the adjustment layer icon, and choose Photofilter. Select blue as the color, and set the density to 35.

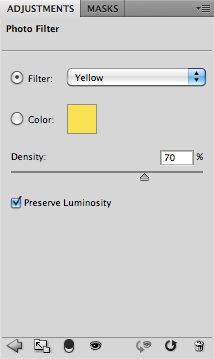
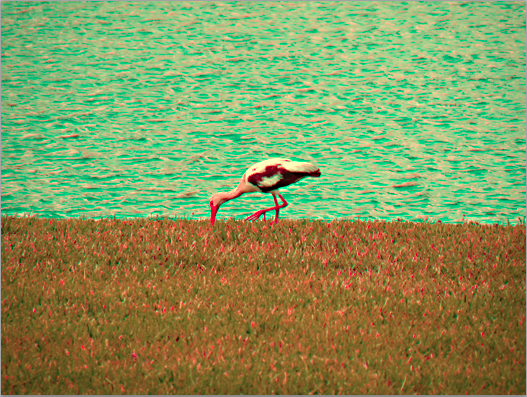
Step 7: Add A Yellow Photo Filter
We need to add yellow to the image to help give it the vintage look we are going for. In your Layers panel, click the adjustments layer icon and select Photo Filter. A window will pop up. Select Yellow from the list and set the density to 70. This will create a slightly yellow tone to the image.
Step 8: Add Some Texture
Texture is one of the key elements to most vintage or retro styles. The look of decay or imperfection really makes your work look convincing, as if the image had been around for decades. You can find thousands of free grunge textures online. Import a rich grunge texture into your Photoshop file, and change the blend mode to either “multiply” or “overlay.” Your choice depends on how dense your texture file is. If it is too dark, then your whole image will look muddy. I set our example to “overlay.” I also dropped the opacity to 75%.

Step 9: Lighten the Center
To add a slight vignette look to your work, create a new layer, and select your brush tool. Set the hardness to 0, and make the size as large as the middle portion of your image. Select white as your foreground color and click once to create a blurred white area in the center of your image. Set the blend mode of this layer to “lighten.”


Option 2: Vintage Without Decay
Sometimes you just want to achieve a vintage look without the decay and destruction. There is another method where you can add a vintage look to your photographs without having them look so aged.
Step 1: Duplicate Your Image
Hit Command/Ctrl + “J” to duplicate your layer.
Step 2: Tweak Your Colors
Create a new layer above your photo layer. Select your marquee tool, and select the left portion of your image. Go to your swatches panel, and click on the bright red color to make it active. Fill the selection with red by hitting Command/CTRL + Delete. Select the other half of your image and go to your Swatches panel again. Select bright green to make it your active foreground color. Hit Command/Ctrl + Delete to fill your selection with green.

Step 3: Bend Your Image’s Colors to Your Will
With your duplicate photo layer elected, go to “Image” > “Adjustments” > “Replace Color.” A dialog box will come up. Click on Source, and select the name of your Photoshop document. Under this menu, there will be another menu where you can select the layer. Select the red/green layer that we created earlier and click “OK.”

Step 4: Adjust to Taste
This step is a subjective one. You really have to decide on the effect that you are going for. I set both Fade and Color Intensity to 70. Here, I am already getting that ’60s look and feel to my image.
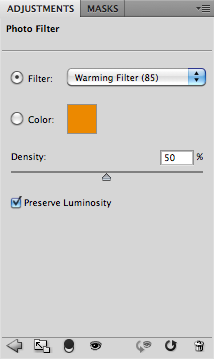
Step 5: Add a Warming Filter
This really just depends on the look you are going for. For the example, I clicked the New Adjustment Layer icon and chose Photofilter. I selected a warming filter and set the density to 50.

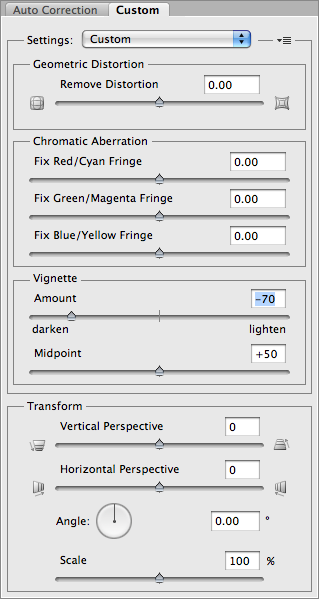
Step 6: Add a Vignette
Choose black as your foreground color. Go to “Layer” > “New Fill Layer” > “Gradient.” Choose a radial gradient and make sure that the gradient is foreground to transparent. You may have to check the reverse option in order to get the vignette. Set the scale between 140-150. Set the opacity to 30-40%, and your will have a vintage vignette look.
Either method will add age and character to a digital image, which could serve you well during retro design projects.
Lomography
Lomography has a distinct look that seems to be popular with fans of vintage or retro-style photography. It is pretty easy to get this effect with Photoshop.
Step One: Select Your Image, Duplicate the Background Layer
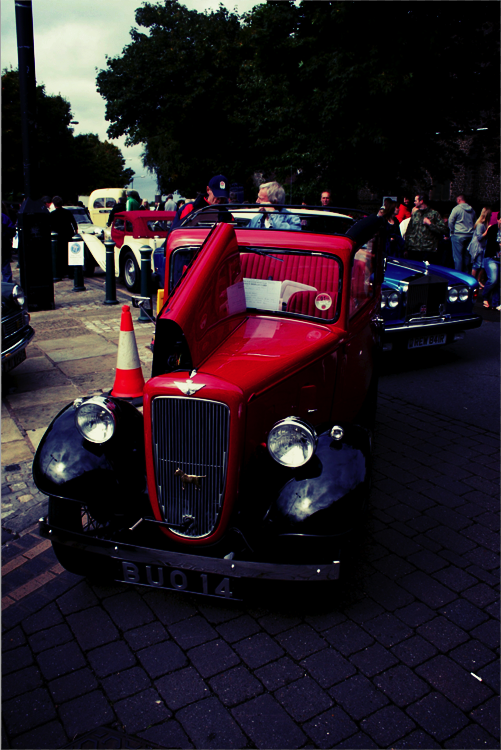
You can download the sample image from here. I chose a vintage car which seems to work well with the effect. With your image, Hit command/ctrl+J to duplicate your background layer.

Step 2: Lower Your Exposure
Click the new adjustment layer icon and select Exposure. You will have to adjust this setting to your photo, but I set the exposure to -0.66. This will darken your image, which won’t look good at first, but we are integrating more blacks and shadows, which works well for the effect.

Step 3: Add a Vignette
Lomo images usually have a vignette around the edges. Go to Filter> Lens Corection and move the vignette slider to somewhere between -80 or -90.
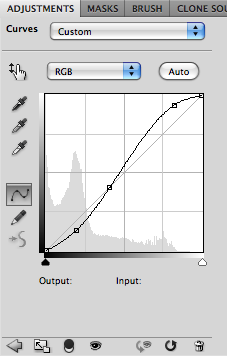
Step 4: Add a General Curves Adjustment
Click the New Adjustment Layer icon and select Curves. We need to enrich the colors with this adjustment, so we will bring up the highlights and darken the shadows with an S curve shown below:
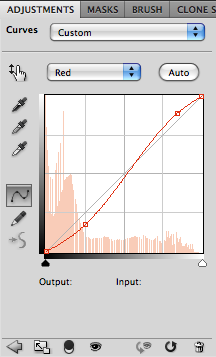
Step 5: Add a More Precise Curves Adjustments Layer
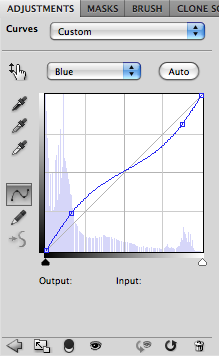
Click the New Adjustment Layer icon and select Curves again. This time we are going to control each channel. Select the Red and Green channels and make an s curve similar to the one in the previous step. The difference is, on the Blue channel, you will make the curve in the opposite direction. You will lower the highlights, and increase the shadows as in the examples below:
Reds:
Greens:

Blues:
Step 6: Adjust Your Levels
Click the New Adjustment Layer icon and select Levels. Slide the Gray slider in the middle to the left to bring up some of the areas that are way too dark.
Step 7: Lower the Impact with A Gradient Map
Click the New Adjustment Layer icon and select Gradient Map. Choose the black-to-white gradient to give your image a more muted look. 100% is too muted though, so now we should lower the opacity to 50% or less.
Step 8: Add Some Saturation
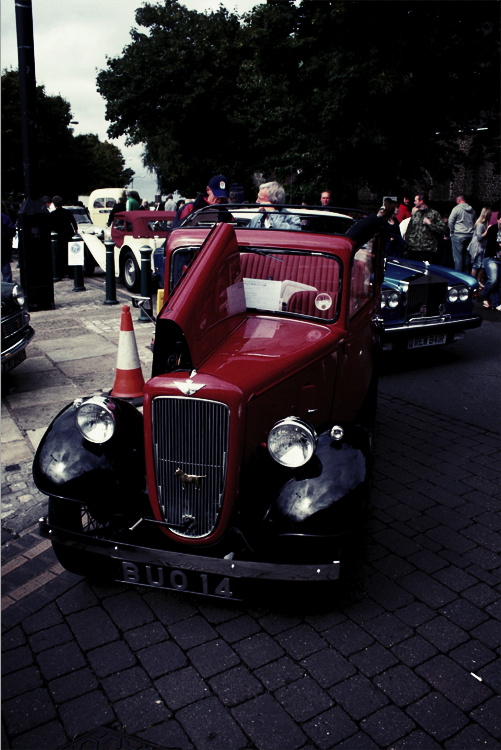
We want Saturated colors, but part of the Lomo look is having an slightly off colors such as exaggerated blues or orange-reds. Create a new Saturation Adjustment Layer and increase the saturation until the focal color, such as the red in the vintage car, really pops. Then, for the Hue, adjust it to taste. I adjusted the hue for this image to the right 27.
Step 9: Add a Slight Amount of Texture
Create a new layer and hold down shift and click Delete. A dialog box will come up asking what fill you want to use. Choose 50% gray and click ok. Then go to Filter> Noise> Add Noise. Choose Gaussian and Monochromatic and set the amount to around 20 and click ok. The key here is subtlety, so lower the opacity of your layer to around 20%.

Frequently Asked Questions on Creating a Retro Effect in Photoshop
What are the key elements to consider when creating a retro effect in Photoshop?
When creating a retro effect in Photoshop, there are several key elements to consider. Firstly, color grading plays a significant role in achieving a vintage look. This involves adjusting the colors in your image to mimic the color palette of old photographs. Secondly, adding grain or noise to your image can help to replicate the texture of old film. Thirdly, using filters and blending modes can help to add depth and complexity to your image, enhancing the retro effect. Lastly, don’t forget about the importance of composition and lighting in creating a convincing vintage aesthetic.
How can I use Photoshop’s adjustment layers to create a retro effect?
Photoshop’s adjustment layers are a powerful tool for creating a retro effect. You can use them to adjust the color balance, brightness, contrast, and saturation of your image, among other things. For example, you might use a Curves adjustment layer to increase the contrast of your image, or a Color Balance adjustment layer to shift the colors towards a more vintage palette. Remember to experiment with different combinations of adjustment layers to achieve the desired effect.
Can I create a retro effect in Photoshop without using filters?
Yes, it’s possible to create a retro effect in Photoshop without using filters. This can be achieved through careful manipulation of the image’s colors, contrast, and texture. For example, you might use adjustment layers to alter the color balance and contrast of your image, and add grain or noise to mimic the texture of old film. However, filters can be a useful tool for quickly and easily achieving a vintage look, so don’t be afraid to use them if you find them helpful.
How can I add grain or noise to my image in Photoshop to create a retro effect?
Adding grain or noise to your image in Photoshop can help to replicate the texture of old film, enhancing the retro effect. This can be done using the Add Noise filter, which is found under the Filter > Noise menu. You can adjust the amount of noise and the distribution (Uniform or Gaussian) to suit your needs. Remember to add the noise to a new layer so that you can adjust its opacity and blending mode as needed.
What are some common mistakes to avoid when creating a retro effect in Photoshop?
When creating a retro effect in Photoshop, it’s important to avoid overdoing it. Too much color grading, noise, or filtering can make your image look artificial rather than vintage. It’s also important to pay attention to the details. For example, if you’re adding text to your image, make sure to use a font that fits with the vintage aesthetic. Lastly, remember that not every image will look good with a retro effect. Choose your images carefully and experiment with different techniques to see what works best.
How can I use blending modes in Photoshop to create a retro effect?
Blending modes in Photoshop can be used to create a variety of effects, including a retro look. For example, you might use the Overlay or Soft Light blending mode to enhance the contrast and saturation of your image, or the Screen blending mode to lighten it. Experiment with different blending modes and opacity levels to achieve the desired effect.
Can I create a retro effect in Photoshop using only the basic tools?
Yes, it’s possible to create a retro effect in Photoshop using only the basic tools. This might involve adjusting the color balance, brightness, and contrast of your image, adding grain or noise, and using blending modes to enhance the effect. However, using advanced tools and techniques can help to create a more convincing and complex retro effect.
How can I use Photoshop’s filters to create a retro effect?
Photoshop’s filters can be a useful tool for creating a retro effect. For example, you might use the Film Grain or Dust & Scratches filters to add texture to your image, or the Photo Filter to adjust the color balance. Remember to use filters sparingly and in combination with other techniques to achieve a balanced and convincing retro effect.
What are some tips for choosing the right image to create a retro effect in Photoshop?
When choosing an image to create a retro effect in Photoshop, look for one that has good contrast and a range of colors. Images with a simple composition and clear subject matter often work best. Avoid images with modern elements, as these can be difficult to make look vintage. Remember, not every image will look good with a retro effect, so don’t be afraid to experiment with different images and techniques.
How can I use Photoshop’s color grading tools to create a retro effect?
Color grading is a key element of creating a retro effect in Photoshop. This involves adjusting the colors in your image to mimic the color palette of old photographs. You can do this using Photoshop’s color adjustment tools, such as the Color Balance, Hue/Saturation, and Curves adjustment layers. Experiment with different color combinations and adjustments to achieve the desired effect.