Censor Your Images With A Mosaic In Photoshop
You frequently see censored images in newspapers, magazines and on the television. Pixelation is most often used to blur out the features of people to preserve their privacy. Whether it’s to protect the children of celebrities, a car number plate or a person’s private parts that have wrestled their way out of their clothes, there is a Photoshop filter to help censor those images. Here’s a really quick way to give your images that censored look using the Pixelate filter in Photoshop.
1. Open up the image that you want to censor. I’m using a wallpaper of the movie poster for Leap Year which I downloaded from MovieWallpaper.net. I don’t know anything about the movie, I was just looking for an image with a couple of faces in it.
2. Draw a circular selection around the man’s face using the Elliptical Marquee tool (M).
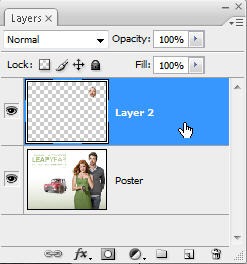
3. Press Ctrl + J (win) or Cmd + J (Mac) to duplicate and copy the selection onto a new layer.
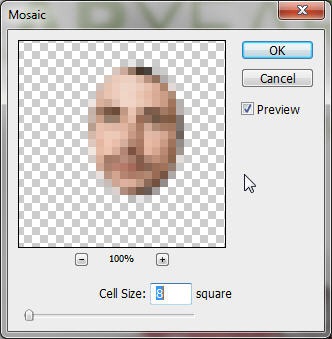
4. With the new layer selected, choose Filter > Pixelate > Mosaic. This opens the Mosaic dialog box. Make sure the Preview check box is selected so you can see how the image will be affected.
Choosing a low number for the cell size produces a small but noticeable level of pixelation. Dragging the slider to higher cell sizes produces massive “pixels”. For this image I chose a cell size of 8. The final image looks like this. Now who on earth is that man?
The Pixelate filter is good fun to play around with. Here’s another example, this time using an movie still from the film “The Hurt Locker” (best film of 2009 for me). Using the same method as above, I selected a strip across the main character’s face and duplicated it on a new layer and applied a mosaic with a cell size of about 20. Then I added a drop shadow and an inner glow to make the mosaic strip stand out a little more and finally added some text.
And there you have it. Do you ever use the Pixelate filter?
If you enjoyed reading this post, you’ll love Learnable; the place to learn fresh skills and techniques from the masters. Members get instant access to all of SitePoint’s ebooks and interactive online courses, like Foundations of Photoshop.
Comments on this article are closed. Have a question about Photoshop? Why not ask it on our forums?
Frequently Asked Questions (FAQs) about Mosaic Censorship in Photoshop
How Can I Adjust the Size of the Mosaic Tiles in Photoshop?
The size of the mosaic tiles can be adjusted in Photoshop by changing the ‘Cell Size’ in the Mosaic filter settings. The larger the cell size, the larger the mosaic tiles will be. This allows you to control the level of detail that is obscured in the image. Remember, the goal is to censor the image while still maintaining its overall context.
Can I Use the Mosaic Censorship Effect on a Specific Part of an Image?
Yes, you can apply the mosaic censorship effect to a specific part of an image. To do this, you need to first select the area you want to censor using any of the selection tools available in Photoshop, such as the Lasso tool, Quick Selection tool, or Marquee tool. Once the area is selected, you can then apply the Mosaic filter to that area only.
Is There a Way to Preview the Mosaic Effect Before Applying It?
Yes, Photoshop allows you to preview the mosaic effect before applying it. When you select the Mosaic filter from the Filter menu, a dialog box will appear with a preview window. You can adjust the cell size and see how the effect will look in the preview window before clicking OK to apply the effect.
Can I Undo the Mosaic Effect After Applying It?
Yes, you can undo the mosaic effect after applying it by using the Undo command (Ctrl+Z on Windows, Command+Z on Mac). If you want to revert to the original image after making multiple changes, you can use the History panel to go back to the state before the Mosaic filter was applied.
How Can I Save the Censored Image in Photoshop?
After applying the mosaic censorship effect, you can save the image by going to File > Save As. You can choose the format you want to save the image in, such as JPEG or PNG, and choose the location where you want to save the file.
Can I Apply the Mosaic Effect to a Video in Photoshop?
Yes, you can apply the mosaic effect to a video in Photoshop. However, the process is a bit more complex than applying the effect to a still image. You need to convert the video layer into a Smart Object, then apply the Mosaic filter to the Smart Object.
What Other Effects Can I Use to Censor an Image in Photoshop?
Besides the mosaic effect, there are other effects you can use to censor an image in Photoshop. These include the Blur and Smudge tools, which can be used to obscure details in an image. You can also use the Clone Stamp tool to replace the area you want to censor with another part of the image.
Can I Use the Mosaic Effect in Other Adobe Applications?
Yes, the mosaic effect is also available in other Adobe applications such as After Effects and Premiere Pro. The process of applying the effect is similar to Photoshop.
How Can I Improve the Quality of the Mosaic Effect?
The quality of the mosaic effect can be improved by increasing the resolution of the image before applying the effect. This will result in more detailed mosaic tiles. However, keep in mind that increasing the resolution will also increase the file size of the image.
Can I Apply the Mosaic Effect to a Text Layer in Photoshop?
Yes, you can apply the mosaic effect to a text layer in Photoshop. To do this, you need to rasterize the text layer first. Once the text layer is rasterized, you can apply the Mosaic filter to it just like any other layer.
Jennifer Farley is a designer, illustrator and design instructor based in Ireland. She writes about design and illustration on her blog at Laughing Lion Design.


