


If you’re a developer who currently uses frameworks such as Django, Laravel or Rails, you’ve probably heard about Node.js. You might already be using a popular front-end library such as Angular or React in your projects. By now, you should be thinking about doing a complete switchover to a server technology based on Node.js.
However, the big question is where to start. Today, the JavaScript world has grown at an incredibly fast pace in the last few years, and it seeming to be ever expanding.
If you’re afraid of losing your hard-earned programming experience in the Node universe, fear not, as we have Sails.js.
Sails.js is a real-time MVC framework designed to help developers build production-ready, enterprise-grade Node.js apps in a short time. Sails.js is a pure JavaScript solution that supports multiple databases (simultaneously) and multiple front-end technologies. If you’re a Rails developer, you’ll be happy to learn that Mike McNeil, the Sails.js founder, was inspired by Rails. You’ll find a lot of similarities between Rails and Sails.js projects.
In this article, I’ll teach you the fundamentals of Sails.js, by showing you how to build a simple, user-friendly chat application. The complete source code for the sails-chat project can be found in this GitHub repo.
Key Takeaways
- Sails.js is an MVC framework that allows rapid development of real-time, enterprise-grade Node.js applications, inspired by the simplicity of Rails.
- The tutorial demonstrates building a basic real-time chat application, using Sails.js without external front-end frameworks or database integrations.
- Utilizing Sails.js’s built-in features, such as the local-disk file-based database and EJS templating, simplifies initial setup and development.
- The project setup includes user authentication, chat message handling, and basic front-end design using Semantic UI, all managed through Sails.js’s architecture.
- Real-time functionalities are handled through Sails.js’s integration with WebSockets, allowing seamless real-time user and chat message updates.
- The tutorial covers essential development steps from setting up the environment, creating models and controllers, to writing client-side JavaScript for dynamic content updates.
- Key Sails.js features such as Blueprints API, routing, and policies are utilized to simplify CRUD operations and secure the application.
Prerequisites
Before you start, you need at least to have experience developing applications using MVC architecture. This tutorial is intended for intermediate developers. You’ll also need at least to have a basic foundation in these:
To make it practical and fair for everyone, this tutorial will use core libraries that are installed by default in a new Sails.js project. Integration with modern front-end libraries such as React, Vue or Angular won’t be covered here. However, I highly recommend you look into them after this article. Also, we won’t do database integrations. We’ll instead use the default, local-disk, file-based database for development and testing.
Project Plan
The goal of this tutorial is to show you how to build a chat application similar to Slack, Gitter or Discord.
Not really! A lot of time and sweat went into building those wonderful platforms. The current number of features developed into them is quite huge.
Instead, we’ll build a minimum viable product version of a chat application which consists of:
- single chat room
- basic authentication (passwordless)
- profile update.
I’ve added the profile feature as a bonus in order to cover a bit more ground on Sails.js features.
Installing Sails.js
Before we start installing Sails.js, we need first to set up a proper Node.js environment. At the time of writing, the latest stable version currently available is v0.12.14. Sails.js v1.0.0 is also available but is currently in beta, not recommended for production use.
The latest stable version of Node I have access to is v8.9.4. Unfortunately, Sails.js v0.12 doesn’t work properly with the current latest LTS. However, I’ve tested with Node v.7.10 and found everything works smoothly. This is still good since we can use some new ES8 syntax in our code.
As a JavaScript developer, you’ll realize working with one version of Node.js is not enough. Hence, I recommend using the nvm tool to manage multiple versions of Node.js and NPM easily. If you haven’t done so, just purge your existing Node.js installation, then install nvm to help you manage multiple versions of Node.js.
Here are the basic instructions of installing Node v7 and Sails.js:
# Install the latest version of Node v7 LTS
nvm install v7

# Make Node v7 the default
nvm default alias v7

# Install Sails.js Global
npm install -g sails
If you have a good internet connection, this should only take a couple of minutes or less. Let’s now go ahead and create our new application using the Sails generator command:
# Go to your projects folder
cd Projects

# Generate your new app
sails generate new chat-app

# Wait for the install to finish then navigate to the project folder
cd chat-app

# Start the app
sails lift
It should take a few seconds for the app to start. You need to manually open the url http://localhost:1337 in your browser to see your newly created web app.
Seeing this confirms that we have a running project with no errors, and that we can start working. To stop the project, just press control + c at the terminal. User your favorite code editor (I’m using Atom) to examine the generated project structure. Below are the main folders you should be aware of:
api: controllers, models, services and policies (permissions)assets: images, fonts, JS, CSS, Less, Sass etc.config: project configuration e.g. database, routes, credentials, locales, security etc.node_modules: installed npm packagestasks: Grunt config scripts and pipeline script for compiling and injecting assetsviews: view pages — for example, EJS, Jade or whatever templating engine you prefer.tmp: temporary folder used by Sails to build and serve your project while in development mode.
Before we proceed, there are a couple of things we need to do:
- Update EJS package. If you have EJS 2.3.4 listed in
package.json, you need to update it by changing it to 2.5.5 immediately. It contains a serious security vulnerability. After changing the version number, do an npm install to perform the update. - Hot reloading. I suggest you install sails-hook-autoreload to enable hot reloading for your Sails.js app. It’s not a perfect solution but will make development easier. To install it for this current version of Sails.js, execute the following:
npm install sails-hook-autoreload@for-sails-0.12 --save
Installing Front-end Dependencies
For this tutorial, we’ll spend as little time as possible building an UI. Any CSS framework you’re comfortable with will do. For this tutorial, I’ll go with the Semantic UI CSS library.
Sails.js doesn’t have a specific guide on how to install CSS libraries. There are three or more ways you can go about it. Let’s look at each.
1. Manual Download
You can download the CSS files and JS scripts yourself, along with their dependencies. After downloading, place the files inside the assets folder.
I prefer not to use this method,
as it requires manual effort to keep the files updated. I like automating tasks.
2. Using Bower
This method requires you to create a file called .bowerrc at the root of your project. Paste the following snippet:
{
"directory" : "assets/vendor"
}
This will instruct Bower to install to the assets/vendor folder instead of the default bower_components folder. Next, install Bower globally, and your front-end dependencies locally using Bower:
# Install bower globally via npm-
npm install -g bower

# Create bower.json file, accept default answers (except choose y for private)
bower init

# Install semantic-ui via bower
bower install semantic-ui --save

# Install jsrender
bower install jsrender --save
I’ll explain the purpose of jsrender later. I thought it best to finish the task of installing dependencies in one go. You should take note that jQuery has been installed as well, since it’s a dependency for semantic-ui.
After installing, update assets/style/importer.less to include this line:
@import '../vendor/semantic/dist/semantic.css';
Next include the JavaScript dependencies in tasks/pipeline.js:
var jsFilesToInject = [

// Load Sails.io before everything else
'js/dependencies/sails.io.js',

// Vendor dependencies
'vendor/jquery/dist/jquery.js',
'vendor/semantic/dist/semantic.js',
'vendor/jsrender/jsrender.js',

// Dependencies like jQuery or Angular are brought in here
'js/dependencies/**/*.js',

// All of the rest of your client-side JS files
// will be injected here in no particular order.
'js/**/*.js'
];
When we run sails lift, the JavaScript files will automatically be injected into views/layout.ejs file as per pipeline.js instructions. The current grunt setup will take care of injecting our CSS dependencies for us.
Important: add the word vendor in the .gitignore file. We don’t want vendor dependencies saved in our repository.
3. Using npm + grunt.copy
The third method requires a little bit more effort to set up, but will result in a lower footprint. Install the dependencies using npm as follows:
npm install semantic-ui-css jsrender --save
jQuery will be installed automatically, since it’s also listed as a dependency for semantic-ui-css. Next we need to place code in tasks/config/copy.js. This code will instruct Grunt to copy the required JS and CSS files from node_modules to the assets/vendor folder for us. The entire file should look like this:
module.exports = function(grunt) {

grunt.config.set('copy', {
  dev: {
    files: [{
      expand: true,
      cwd: './assets',
      src: ['**/*.!(coffee|less)'],
      dest: '.tmp/public'
    },
    //Copy JQuery
    {
      expand: true,
      cwd: './node_modules/jquery/dist/',
      src: ['jquery.min.js'],
      dest: './assets/vendor/jquery'
    },
    //Copy jsrender
    {
      expand: true,
      cwd: './node_modules/jsrender/',
      src: ['jsrender.js'],
      dest: './assets/vendor/jsrender'
    },
    // copy semantic-ui CSS and JS files
    {
      expand: true,
      cwd: './node_modules/semantic-ui-css/',
      src: ['semantic.css', 'semantic.js'],
      dest: './assets/vendor/semantic-ui'
    },
    //copy semantic-ui icon fonts
    {
      expand: true,
      cwd: './node_modules/semantic-ui-css/themes',
      src: ["*.*", "**/*.*"],
      dest: './assets/vendor/semantic-ui/themes'
    }]
  },
  build: {
    files: [{
      expand: true,
      cwd: '.tmp/public',
      src: ['**/*'],
      dest: 'www'
    }]
  }
});

grunt.loadNpmTasks('grunt-contrib-copy');
};
Add this line to assets/styles/importer.less:
@import '../vendor/semantic-ui/semantic.css';
Add the JS files to config/pipeline.js:
// Vendor Dependencies
'vendor/jquery/jquery.min.js',
'vendor/semantic-ui/semantic.js',
'vendor/jsrender/jsrender.js',
Finally, execute this command to copy the files from node_modules the assets/vendor folder. You only need to do this once for every clean install of your project:
grunt copy:dev
Remember to add vendor to your .gitignore.
Testing Dependencies Installation
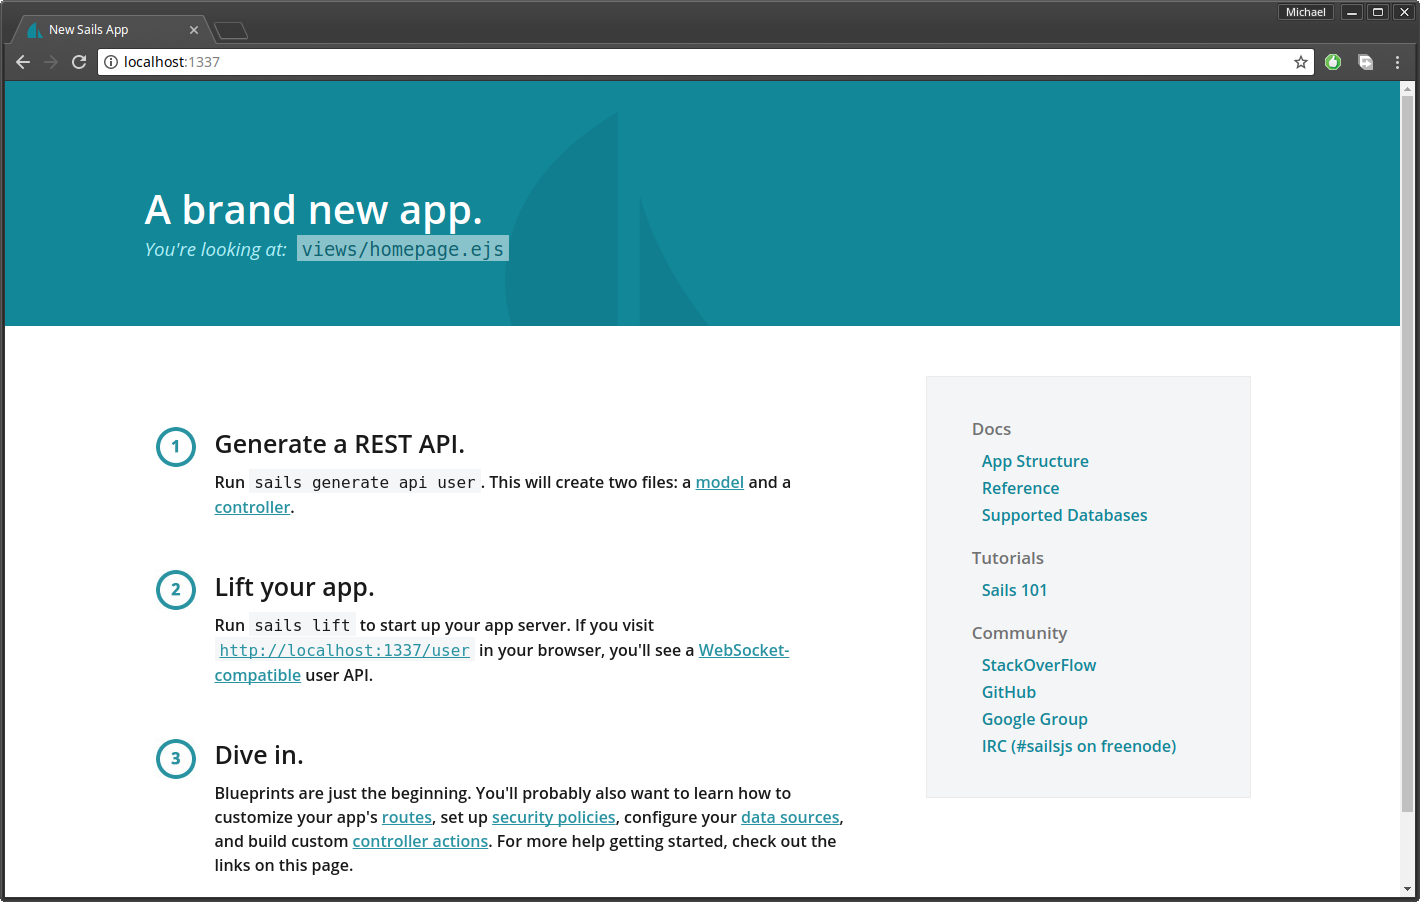
Whichever method you’ve chosen, you need to ensure that the required dependencies are being loaded. To do this, replace the code in view/homepage.ejs with the following:
<h2 class="ui icon header">
<i class="settings icon"></i>
<div class="content">
  Account Settings
  <div class="sub header">Manage your account settings and set e-mail preferences.</div>
</div>
</h2>
After saving the file, do a sails lift. Your home page should now look like this:
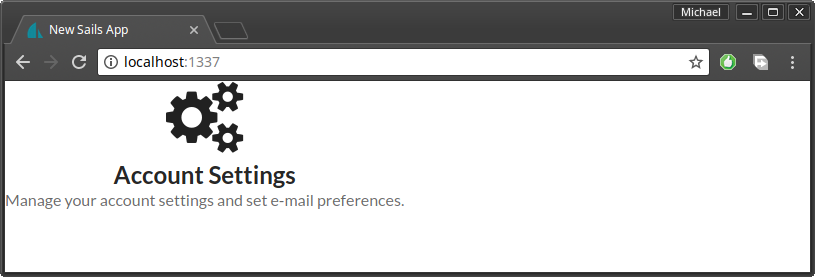
Always do a refresh after restarting your app. If the icon is missing or the font looks off, please review the steps carefully and see what you missed. Use the browser’s console to see which files are not loading. Otherwise, proceed with the next stage.
Creating Views
When it comes to project development, I like starting with the user interface. We’ll the use the Embedded JavaScript Template to create the views. It’s a templating engine that’s installed by default in every Sails.js project. However, you should be aware it has limited functionality and is no longer under development.
Open config/bootstrap.js and insert this line in order to give a proper title to our web pages. Place it right within the existing function before the cb() statement:
sails.config.appName = "Sails Chat App";
You can take a peek at views/layout.ejs to see how the title tag is set. Next, we begin to build our home page UI.
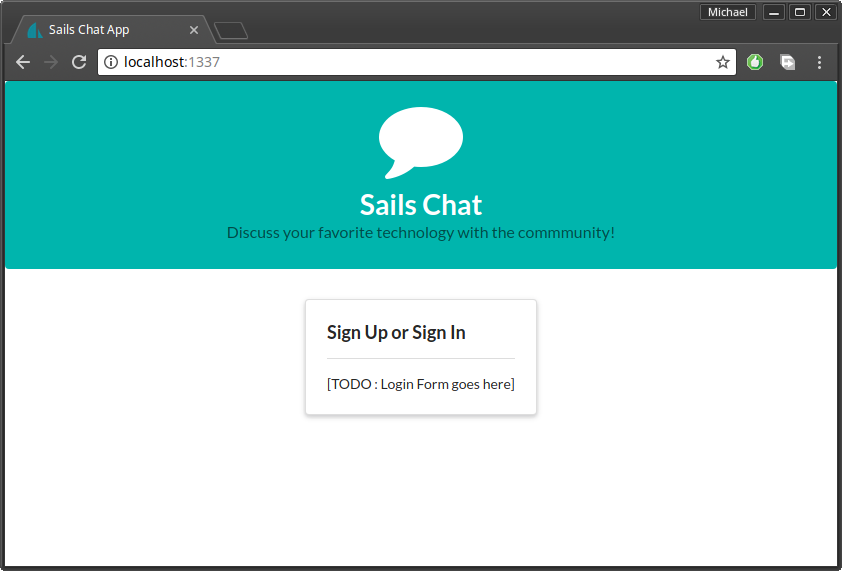
Home Page Design
Open /views/homepage.ejs and replace the existing code with this:
<div class="banner">
<div class="ui segment teal inverted">
  <h1 class="ui center aligned icon header">
    <i class="chat icon"></i>
    <div class="content">
      <a href="/">Sails Chat</a>
      <div class="sub header">Discuss your favorite technology with the community!</div>
    </div>
  </h1>
</div>
</div>
<div class="section">
<div class="ui three column grid">
  <div class="column"></div>
  <div class="column">
    <div class="ui centered padded compact raised segment">
      <h3>Sign Up or Sign In</h3>
      <div class="ui divider"></div>
      [TODO : Login Form goes here]
    </div>
  </div>
  <div class="column"></div>
</div>
</div>
To understand the UI elements used in the above code, please refer to the Semantic UI documentation. I’ve outlined the exact links below:
Create a new file in assets/styles/theme.less and paste the following content:
.banner a {
color: #fff;
}

.centered {
margin-left: auto !important;
margin-right: auto !important;
margin-bottom: 30px !important;
}

.section {
margin-top: 30px;
}

.menu {
border-radius: 0 !important;
}

.note {
font-size: 11px;
color: #2185D0;
}

#chat-content {
height: 90%;
overflow-y: scroll;
}
These are all the custom styles we’ll use in our project. The rest of the styling will come from the Semantic UI library.
Next, update assets/styles/importer.less to include the theme file we just created:
@import 'theme.less';
Execute sails lift. Your project should now look like this:
Next, we’ll look at building the navigation menu.
Navigation Menu
This will be created as a partial since it will be shared by multiple view files. Inside the views folder, create a folder called partials. Then create the file views/partials/menu.ejs and paste the following code:
<div class="ui labeled icon inverted teal menu">
<a class="item" href="/chat">
  <i class="chat icon"></i>
  Chat Room
</a>
<a class="item" href="/profile">
  <i class="user icon"></i>
  Profile
</a>
<div class="right menu">
  <a class="item" href="/auth/logout">
    <i class="sign out icon"></i>
    Logout
  </a>
</div>
</div>
To understand the above code, just refer to the Menu documentation.
If you inspect the above code, you’ll notice that we’ve created a link for /chat, /profile and /auth/logout. Let’s first create the views for profile and chat room.
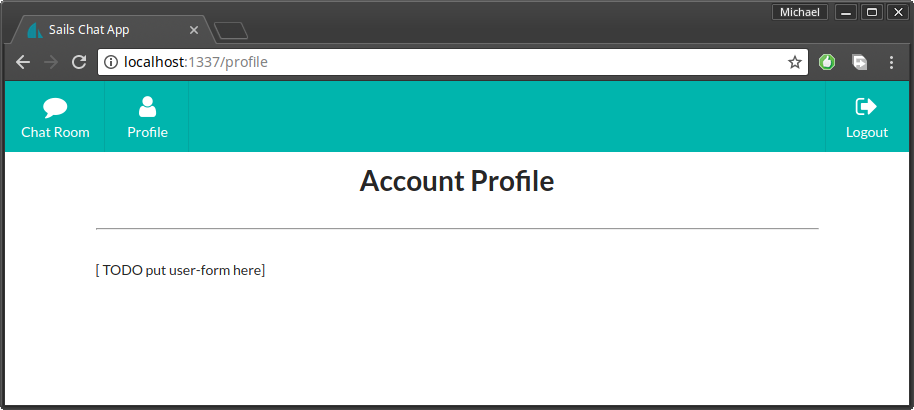
Profile
Create the file view/profile.ejs and paste the following code:
<% include partials/menu %>

<div class="ui container">
<h1 class="ui centered header">Profile Updated!</h1>
<hr>
<div class="section">
  [ TODO put user-form here]
</div>
</div>
By now you should be familiar with header and grid UI elements if you’ve read the linked documentation. At the root of the document, you’ll notice we have a container element. (Find out more about this in the Container documentation.
We’ll build the user form later, once we’ve built the API. Next we’ll create a layout for the chat room.
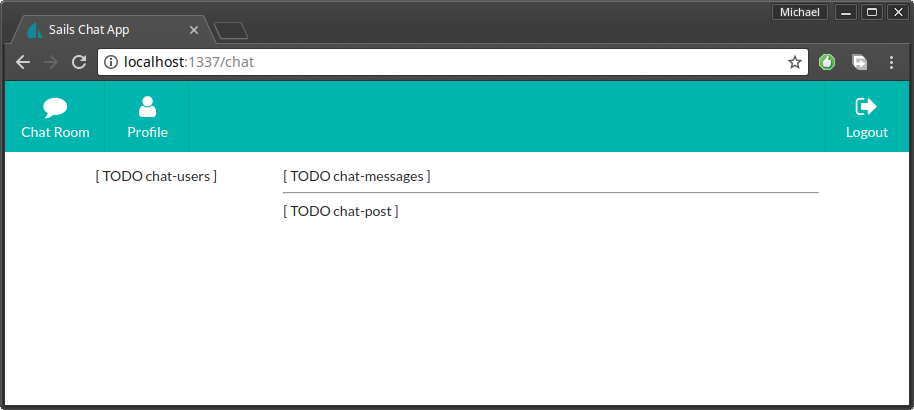
Chat Room Layout
The chat room will be made up of three sections:
- Chat users — list of users
- Chat messages — list of messages
- Chat post — form for posting new messages.
Create views/chatroom.ejs and paste the following code:
<% include partials/menu %>

<div class="chat-section">
<div class="ui container grid">

  <!-- Members List Section -->
  <div class="four wide column">
    [ TODO chat-users ]
  </div>

  <div class="twelve wide column">

    <!-- Chat Messages -->
    [ TODO chat-messages ]

    <hr>

    <!-- Chat Post -->
    [ TODO chat-post ]

  </div>
</div>
</div>
Before we can view the pages, we need to set up routing.
Routing
Open config/routes.js and update it like this:
'/': {
view: 'homepage'
},
'/profile': {
view: 'profile'
},
'/chat': {
view: 'chatroom'
}
Sails.js routing is quite flexible. There are many ways of defining routing depending on the scenario. This is the most basic version where we map a URL to a view.
Fire up your Sails app or just refresh your page if it’s still running in the background. Currently there’s no link between the home page and the other pages. This is intentional, as we’ll later build a rudimentary authentication system that will redirect logged in users to /chat. For now, use your browser’s address bar and add /chat or /profile at the end URL.
At this stage you should be having the above views. Let’s go ahead and start creating the API.
Generating a User API
We’re going to use the Sails.js command-line utility to generate our API. We’ll need to stop the app for this step:
sails generate api User
Within a second, we get the message “Created a new api!” Basically, a User.js model and a UserController.js has just been created for us. Let’s update the api/model/User.js with some model attributes:
module.exports = {

attributes: {

  name: {
    type: 'string',
    required: true
  },

  email: {
    type: 'string',
    required: true,
    unique: true
  },

  avatar: {
    type: 'string',
    required: true,
    defaultsTo: 'https://s.gravatar.com/avatar/e28f6f64608c970c663197d7fe1f5a59?s=60'
  },

  location: {
    type: 'string',
    required: false,
    defaultsTo: ''
  },

  bio: {
    type: 'string',
    required: false,
    defaultsTo:''
  }
}
};
I believe the above code is self-explanatory. By default, Sails.js uses a local disk database which is basically a file located in the .tmp folder. In order to test our app, we need to create some users. The easiest way to do this is to install the sails-seed package:
npm install sails-seed --save
After installing, you’ll find that the file config/seeds.js has been created for you. Paste the following seed data:
module.exports.seeds = {
user: [
  {
    name: 'John Wayne',
    email: 'johnnie86@gmail.com',
    avatar: 'https://randomuser.me/api/portraits/men/83.jpg',
    location: 'Mombasa',
    bio: 'Spends most of my time at the beach'
  },
  {
    name: 'Peter Quinn',
    email: 'peter.quinn@live.com',
    avatar: 'https://randomuser.me/api/portraits/men/32.jpg',
    location: 'Langley',
    bio: 'Rather not say'
  },
  {
    name: 'Jane Eyre',
    email: 'jane@hotmail.com',
    avatar: 'https://randomuser.me/api/portraits/women/94.jpg',
    location: 'London',
    bio: 'Loves reading motivation books'
  }
]
}
Now that we’ve generated an API, we should configure the migration policy in the file config/models.js:
migrate: 'drop'
There are three migration strategies that Sails.js uses to determine how to rebuild your database every time it’s started:
- safe — don’t migrate, I’ll do it by hand
- alter — migrate but try to keep the existing data
- drop — drop all tables and rebuild everything
I prefer to use drop for development, as I tend to iterate a lot. You can set alter if you’d like to keep existing data. Nevertheless, our database will be populated by the seed data every time.
Now let me show you something cool. Fire up your Sails project and navigate to the addresses /user and /user/1.
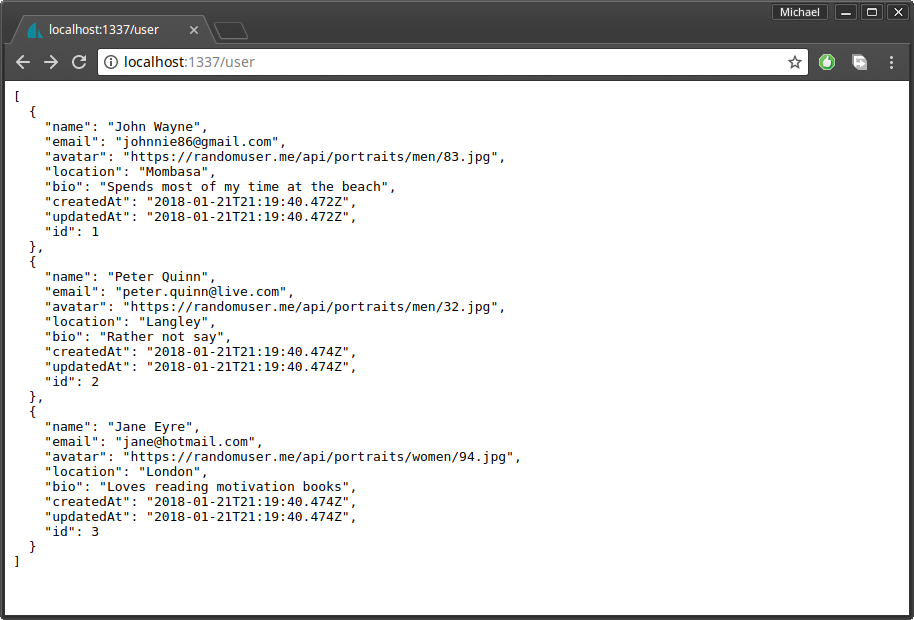
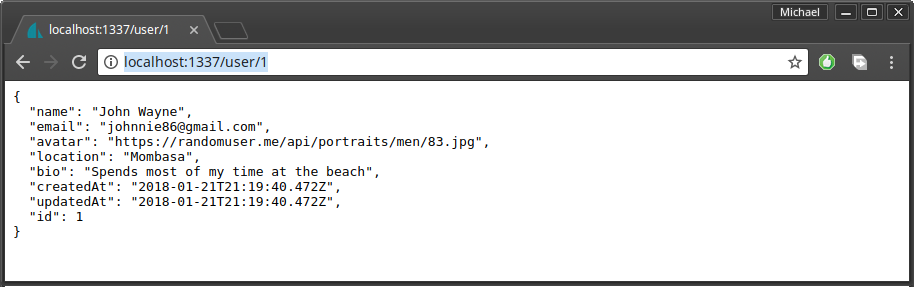
Thanks to the Sails.js Blueprints API, we have a fully functional CRUD API without us writing a single line of code. You can use Postman to access the User API and perform data manipulation such as creating, updating or deleting users.
Let’s now proceed with building the profile form.
Profile Form
Open view/profile.ejs and replace the existing TODO line with this code:
<img class="ui small centered circular image" src="<%= data.avatar %>">
<div class="ui grid">
  <form action="<%= '/user/update/'+  data.id %>" method="post" class="ui centered form">
    <div class="field">
      <label>Name</label>
      <input type="text" name="name" value="<%= data.name %>">
    </div>
    <div class="field">
      <label>Email</label>
      <input type="text" name="email" value="<%= data.email %>">
    </div>
    <div class="field">
      <label>Location</label>
      <input type="text" name="location" value="<%= data.location %>">
    </div>
    <div class="field">
      <label>Bio</label>
      <textarea name="bio" rows="4" cols="40"><%= data.bio %></textarea>
    </div>
    <input type="hidden" name="avatar" value=<%=data.avatar %>>
    <button class="ui right floated  orange button" type="submit">Update</button>
  </form>
</div>
We’re using Semantic-UI Form to build the form interface. If you examine the form’s action value, /user/update/'+ data.id, you’ll realize that I’m using a Blueprint route. This means when a user hits the Update button, the Blueprint’s update action will be executed.
However, for loading the user data, I’ve decided to define a custom action in the User Controller. Update the api/controllers/UserController with the following code:
module.exports = {

render: async (request, response) => {
  try {
    let data = await User.findOne({
      email: 'johnnie86@gmail.com'
    });
    if (!data) {
      return response.notFound('The user was NOT found!');
    }
    response.view('profile', { data });
  } catch (err) {
    response.serverError(err);
  }
}
};
In this code you’ll notice I’m using the async/await syntax to fetch the User data from the database. The alternative is to use callbacks, which for most developers is not clearly readable. I’ve also hardcoded the default user account to load temporarily. Later, when we set up basic authentication, we’ll change it to load the currently logged-in user.
Finally, we need to change the route /profile to start using the newly created UserController. Open config/routes and update the profile route as follows:
...
'/profile': {
  controller: 'UserController',
  action: 'render'
},
...
Navigate to the URL /profile, and you should have the following view:
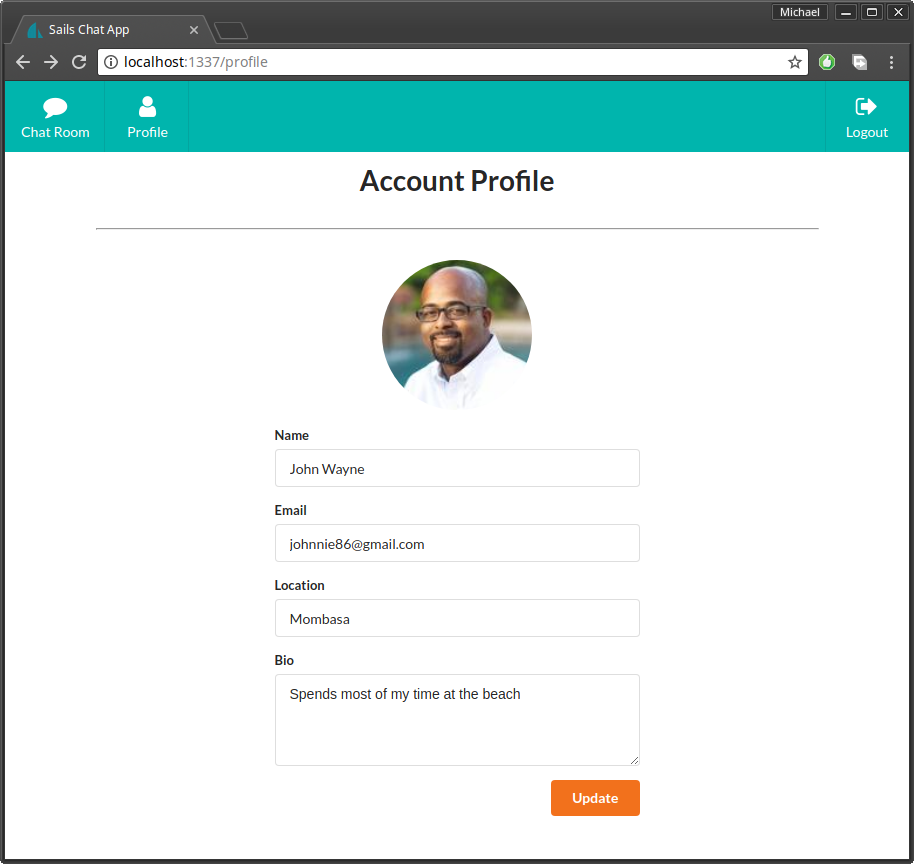
Try changing one of the form fields and hit the update button. You’ll be taken to this view:
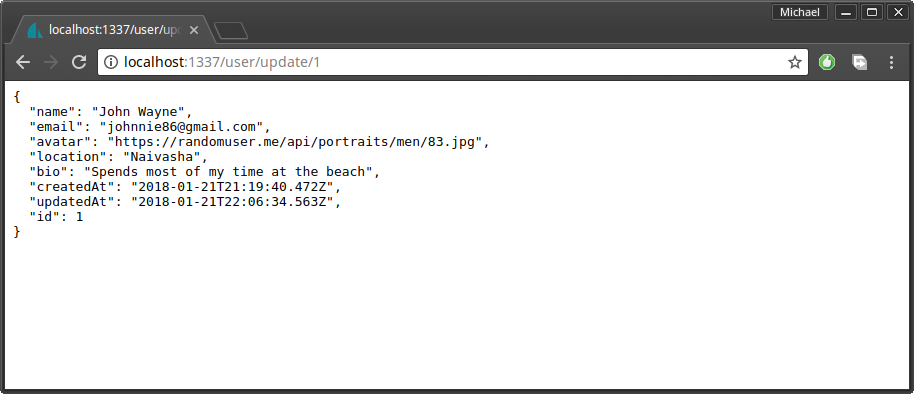
You’ll notice that the update has worked, but the data being displayed is in JSON format. Ideally, we should have a view-only profile page in views/user/findOne.ejs and an update profile page in /views/user/update.ejs. The Blueprint system will guess the views to use for rendering information. If it can’t find the views it will just output JSON. For now, we’ll simply use this neat trick. Create the file /views/user/update.ejs and paste the following code:
<script type="text/javascript">
window.location = '/profile';
</script>
Next time we perform an update, we’ll be redirected to the /profile page. Now that we have user data, we can create the file views/partials/chat-users.js to be used in views/chatroom.ejs. After you’ve created the file, paste this code:
<div class="ui basic segment">
<h3>Members</h3>
<hr>
<div id="users-content" class="ui middle aligned selection list"> </div>
</div>

// jsrender template
<script id="usersTemplate" type="text/x-jsrender">
<div class="item">
  <img class="ui avatar image" src="{{:avatar}}">
  <div class="content">
    <div class="header">{{:name}}</div>
  </div>
</div>
</script>

<script type="text/javascript">

function loadUsers() {
  // Load existing users
  io.socket.get('/user', function(users, response) {
    renderChatUsers(users);
  });

  // Listen for new & updated users
  io.socket.on('user', function(body) {
    io.socket.get('/user', function(users, response) {
      renderChatUsers(users);
    });
  });
}

function renderChatUsers(data) {
  const template = $.templates('#usersTemplate');
  let htmlOutput = template.render(data);
  $('#users-content').html(htmlOutput);
}

</script>
For this view, we need a client-side rendering approach to make the page update in real time. Here, we’re making use of the jsrender library, a more powerful templating engine than EJS. The beauty of jsrender is that it can either take an array or a single object literal and the template will still render correctly. If we were to do this in ejs, we’d need to combine an if statement and a for loop to handle both cases.
Let me explain the flow of our client-side JavaScript code:
loadUsers(). When the page first loads, we use the Sails.js socket library to perform aGETrequest for users. This request will be handled by the Blueprint API. We then pass on the data received torenderChatUsers(data)function.- Still within the
loadUsers()function, we register a listener usingio.socket.onfunction. We listen for events pertaining to the modeluser. When we get notified, we fetch the users again and replace the existing HTML output. renderChatUsers(data). Here we grab a script with the idusersTemplateusing a jQuerytemplates()function. Notice the type istext/x-jsrender. By specifying a custom type, the browser will ignore and skip over that section since it doesn’t know what it is. We then use thetemplate.render()function to merge the template with data. This process will generate an HTML output which we then take and insert it into the HTML document.
The template we wrote in profile.ejs was rendered on the Node server, then sent to the browser as HTML. For the case of chat-users, we need to perform client-side rendering. This will allow chat users to see new users joining the group without them refreshing their browser.
Before we test the code, we need to update views/chatroom.ejs to include the newly created chat-users partial. Replace [ TODO chat-users ] with this code:
...html
<% include partials/chat-users.ejs %>
...
Within the same file, add this script at the end:
<script type="text/javascript">
window.onload = function() {
  loadUsers();
}
</script>
This script will call the loadUsers() function. To confirm this is working, let’s perform a sails lift and navigate to the /chat URL.
Your view should like like the image above. If it does, let’s proceed with building the Chatroom API.
ChatMessage API
Same as before, we’ll use Sails.js to generate the API:
sails generate api ChatMessage
Next, populate api/models/ChatMessage.js with these attributes:
module.exports = {

attributes: {

  message: {
    type: 'string',
    required: true
  },

  createdBy : {
    model: 'user',
    required: true
  }
}
};
Notice that we’ve declared a one-to-one association with the User model through the createdBy attribute. Next we need to populate our disk database with a few chat messages. For that, we’ll use config/bootstrap.js. Update the entire code as follows. We’re using async/await syntax to simplify our code and avoid callback hell:
module.exports.bootstrap = async function(cb) {

sails.config.appName = "Sails Chat App";

// Generate Chat Messages
try {
  let messageCount = ChatMessage.count();
  if(messageCount > 0){
    return; // don't repeat messages
  }

  let users = await User.find();
  if(users.length >= 3) {
    console.log("Generating messages...")

    let msg1 = await ChatMessage.create({
      message: 'Hey Everyone! Welcome to the community!',
      createdBy: users[1]
    });
    console.log("Created Chat Message: " + msg1.id);

    let msg2 = await ChatMessage.create({
      message: "How's it going?",
      createdBy: users[2]
    });
    console.log("Created Chat Message: " + msg2.id);

    let msg3 = await ChatMessage.create({
      message: 'Super excited!',
      createdBy: users[0]
    });
    console.log("Created Chat Message: " + msg3.id);

  } else {
    console.log('skipping message generation');
  }
}catch(err){
  console.error(err);
}

// It's very important to trigger this callback method when you're finished with Bootstrap! (Otherwise your server will never lift, since it's waiting on Bootstrap)
cb();
};
The great thing is that the seeds generator runs before bootstrap.js. This way, we’re sure Users data has been created first so that we can use it to populate the createdBy field. Having test data will enable us to quickly iterate as we build the user interface.
Chat Messages UI
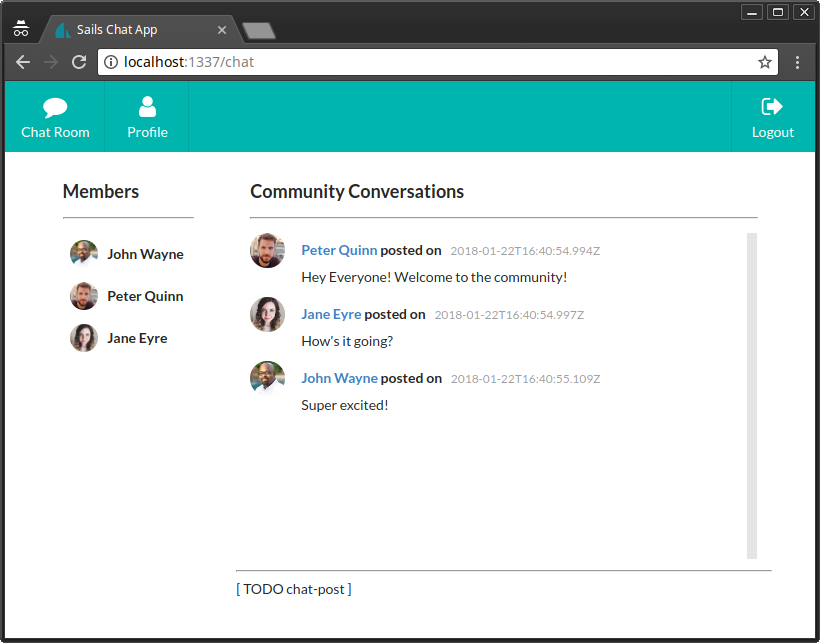
Go ahead and create a new file views/partials/chat-messages.ejs, then place this code:
<div class="ui basic segment" style="height: 70vh;">
<h3>Community Conversations</h3>
<hr>
<div id="chat-content" class="ui feed"> </div>
</div>

<script id="chatTemplate" type="text/x-jsrender">
<div class="event">
  <div class="label">
     <img src="{{:createdBy.avatar}}">
  </div>
  <div class="content">
    <div class="summary">
      <a href="#"> {{:createdBy.name}}</a> posted on
      <div class="date">
        {{:createdAt}}
      </div>
    </div>
    <div class="extra text">
         {{:message}}
    </div>
  </div>
</div>
</script>

<script type="text/javascript">

function loadMessages() {
  // Load existing chat messages
  io.socket.get('/chatMessage', function(messages, response) {
    renderChatMessages(messages);
  });

  // Listen for new chat messages
  io.socket.on('chatmessage', function(body) {
    renderChatMessages(body.data);
  });
}

function renderChatMessages(data) {
  const chatContent = $('#chat-content');
  const template = $.templates('#chatTemplate');
  let htmlOutput = template.render(data);
  chatContent.append(htmlOutput);
  // automatically scroll downwards
  const scrollHeight = chatContent.prop("scrollHeight");
  chatContent.animate({ scrollTop: scrollHeight }, "slow");
}

</script>
The logic here is very similar to chat-users. There’s one key difference on the listen section. Instead of replacing the rendered output, we use append. Then we do a scroll animation to the bottom of the list to ensure users see the new incoming message.
Next, let’s update chatroom.ejs to include the new chat-messages partial and also to update the script to call the loadMessages() function:
...
<!-- Chat Messages -->
    <% include partials/chat-messages.ejs %>
...

<script type="text/javascript">
...
  loadMessages();
...
</script>
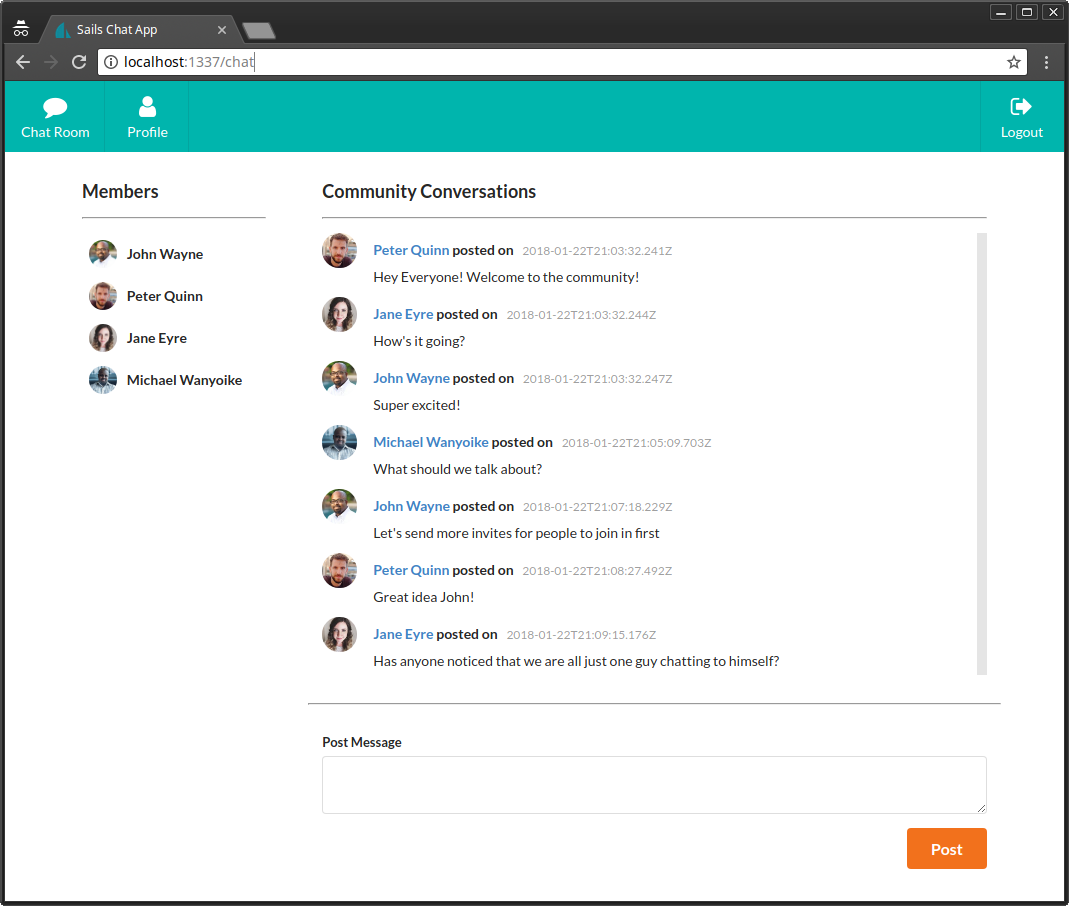
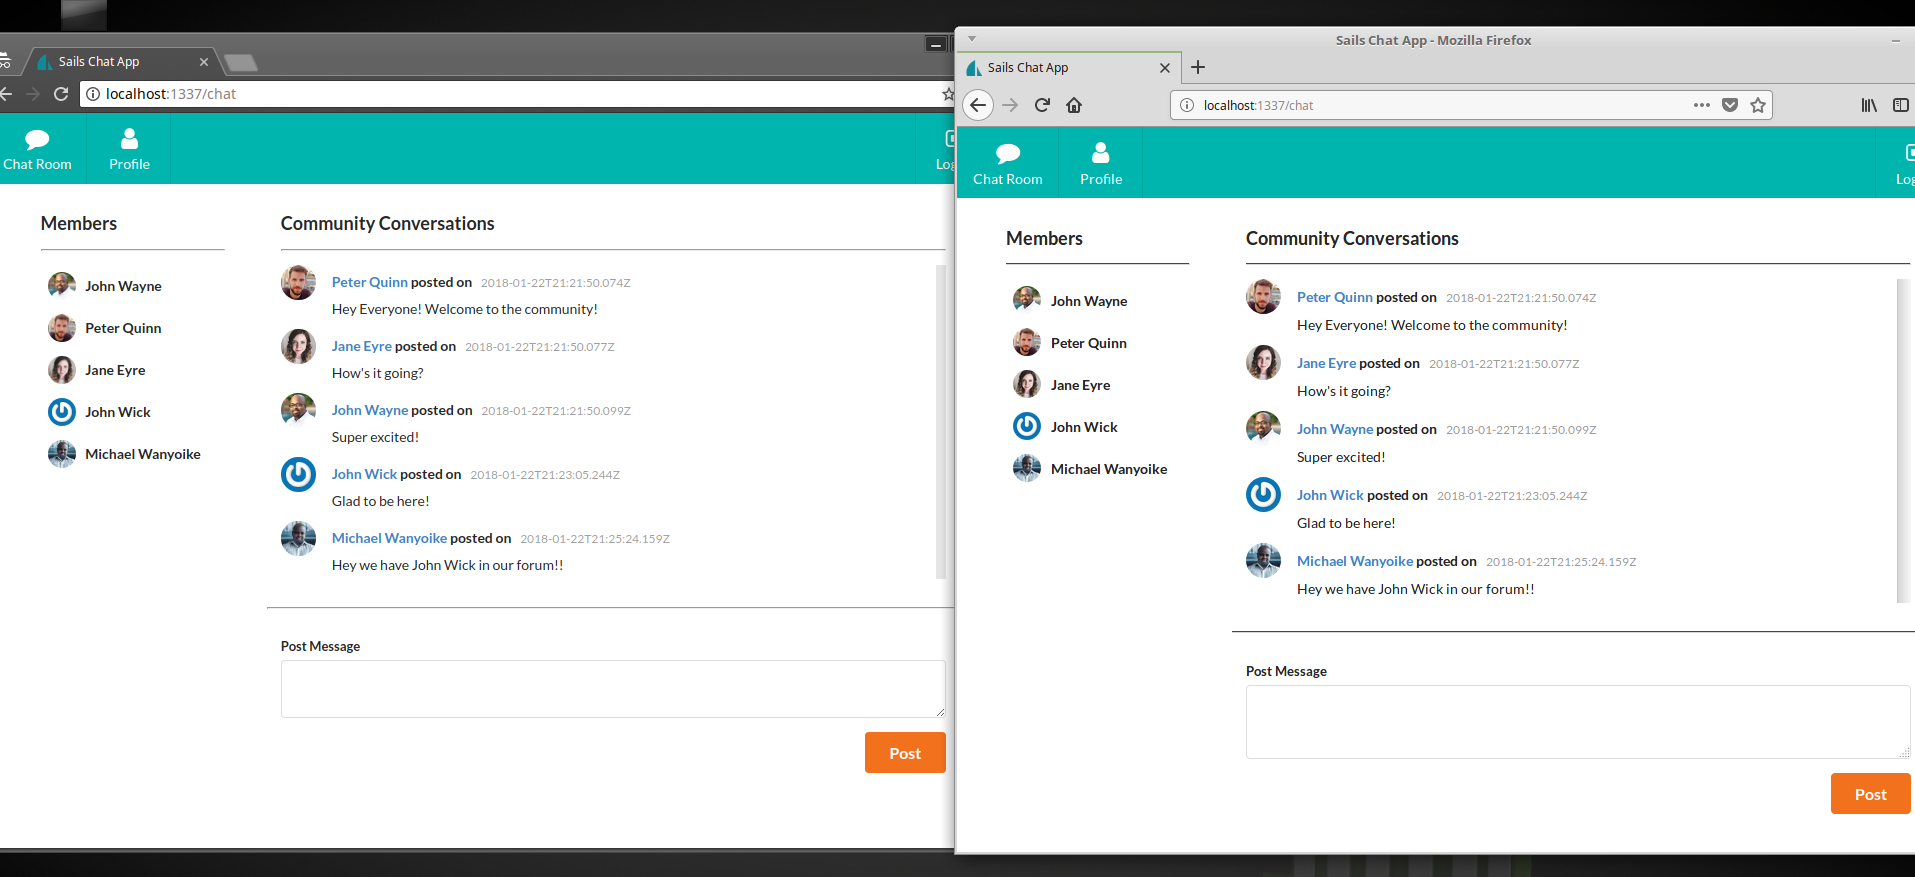
Your view should now look like this:
Let’s now build a simple form that will allow users to post messages to the chat room.
Chat Post UI
Create a new file views/partial/chat-post.ejs and paste this code:
<div class="ui basic segment">
<div class="ui form">
  <div class="ui field">
    <label>Post Message</label>
    <textarea id="post-field" rows="2"></textarea>
  </div>
  <button id="post-btn" class="ui right floated large orange button" type="submit">Post</button>
</div>
<div id="post-err" class="ui tiny compact negative message" style="display:none;">
  <p>Oops! Something went wrong.</p>
</div>
</div>
Here we’re using a using semantic-ui elements to build the form. Next add this script to the bottom of the file:
<script type="text/javascript">

function activateChat() {
  const postField = $('#post-field');
  const postButton = $('#post-btn');
  const postErr = $('#post-err');

  // Bind to click event
  postButton.click(postMessage);

  // Bind to enter key event
  postField.keypress(function(e) {
    var keycode = (e.keyCode ? e.keyCode : e.which);
    if (keycode == '13') {
        postMessage();
    }
  });

  function postMessage() {
    if(postField.val() == "") {
      alert("Please type a message!");
    } else {
      let text = postField.val();
      io.socket.post('/postMessage', { message: text }, function(resData, jwRes) {
        if(jwRes.statusCode != 200) {
            postErr.html("<p>" +  resData.message +"</p>")
            postErr.show();
        } else {
          postField.val(''); // clear input field
        }
      });
    }
  }
}

</script>
This script is made up of two functions:
activateChat(). This function binds the post button to a click event and the message box (post field) to a key press (enter) event. When either is fired, thepostMessage()function is called.postMessage. This function first does a quick validation to ensure the post input field is not blank. If there’s a message is provided in the input field, we use theio.socket.post()function to send a message back to the server. Here we’re using a classic callback function to handle the response from the server. If an error occurs, we display the error message. If we get a 200 status code, meaning the message was captured, we clear the post input field, ready for the next message to be typed in.
If you go back to the chat-message script, you’ll see that we’ve already placed code to detect and render incoming messages. You should have also noticed that the io.socket.post() is sending data to the URL /postMessage. This is not a Blueprint route, but a custom one. Hence, we need to write code for it.
Head over to api/controllers/UserController.js and insert this code:
module.exports = {

postMessage: async (request, response) => {
    // Make sure this is a socket request (not traditional HTTP)
  if (!request.isSocket) {
    return response.badRequest();
  }

    try {
        let user = await User.findOne({email:'johnnie86@gmail.com'});
        let msg = await ChatMessage.create({message:request.body.message, createdBy:user });
        if(!msg.id) {
            throw new Error('Message processing failed!');
        }
        msg.createdBy = user;
        ChatMessage.publishCreate(msg);
    } catch(err) {
        return response.serverError(err);
    }

    return response.ok();
}
};
Since we haven’t set up basic authentication, we are hardcoding the user johnnie86@gmail.com for now as the author of the message. We use the Model.create() Waterline ORM function to create a new record. This is a fancy way of inserting records without us writing SQL code. Next we send out a notify event to all sockets informing them that a new message has been created. We do that using the ChatMessage.publishCreate() function, which is defined in the Blueprints API. Before we send out the message, we make sure that the createdBy field is populated with a user object. This is used by chat-messages partial to access the avatar and the name of the user who created the message.
Next, head over to config/routes.js to map the /postMessage URL to the postMessage action we just defined. Insert this code:
...
'/chat': {
view: 'chatroom'
}, // Add comma here
'/postMessage': {
controller: 'ChatMessageController',
action: 'postMessage'
}
...
Open views/chatroom.js and include the chat-post partial. We’ll also call the activateChat() function right after the loadMessages() function:
...
<% include partials/chat-messages.ejs %>
...

<script type="text/javascript">
...
  activateChat();
...
</script>
Refresh the page and try to send several messages.
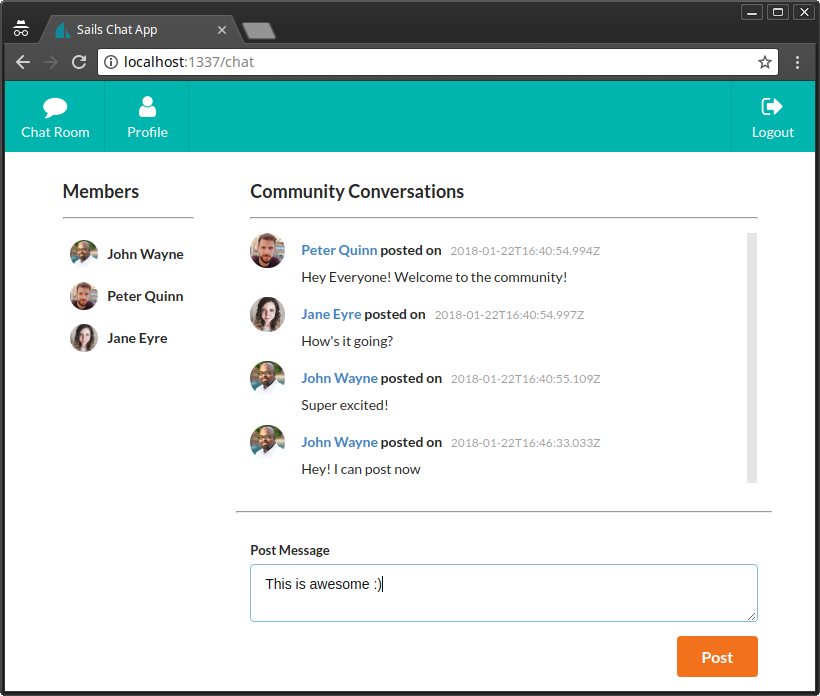
You should now have a functional chat system. Review the project source code in case you get stuck.
Basic Authentication
Setting up a proper authentication and authorization system is outside the scope of this tutorial. So we’ll settle for a basic password-less authentication system. Let’s first build the signup and login form.
Login/Sign Up Form
Create a new file views/auth-form.ejs and paste the following content:
<form method="post" action="/auth/authenticate" class="ui form">
<div class="field">
  <label>Full Names</label>
  <input type="text" name="name" placeholder="Full Names" value="<%= typeof name != 'undefined' ? name : '' %>">
</div>
<div class="required field">
  <label>Email</label>
  <input type="email" name="email" placeholder="Email" value="<%= typeof email != 'undefined' ? email : '' %>">
</div>
<button class="ui teal button" type="submit" name="action" value="signup">Sign Up & Login</button>
<button class="ui blue button" type="submit" name="action" value="login">Login</button>
<p class="note">*Provide email only for Login</p>
</form>
<% if(typeof error != 'undefined') { %>
<div class="ui error message">
<div class="header"><%= error.title %></div>
<p><%= error.message %></p>
</div>
<% } %>
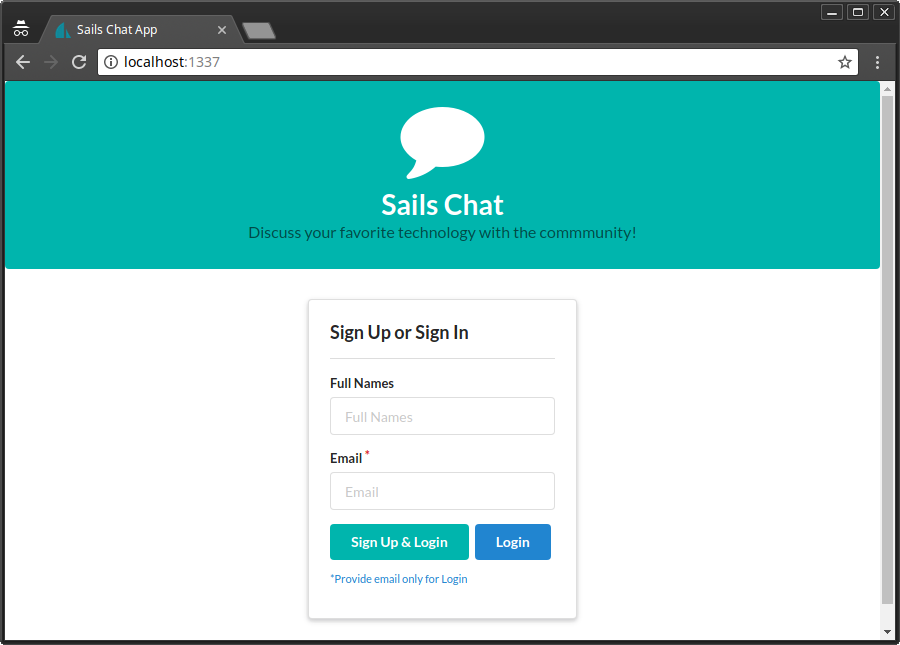
Next open views/homepage.ejs and replace the TODO line with this include statement:
...
<% include partials/auth-form.ejs %>
...
We’ve created a form that allows you to create a new account by providing an input for name and email. When you click Signup & Login, a new user record is created and you get logged in. However, if the email is already being used by another user, an error message will be displayed. If you just want to log in, just provide the email address and click the Login button. Upon successful authentication, you’ll be redirected to the /chat URL.
Right now, everything I’ve just said isn’t working. We’ll need to implement that logic. First, let’s navigate to / address to confirm that the auth-form looks goods.
Policy
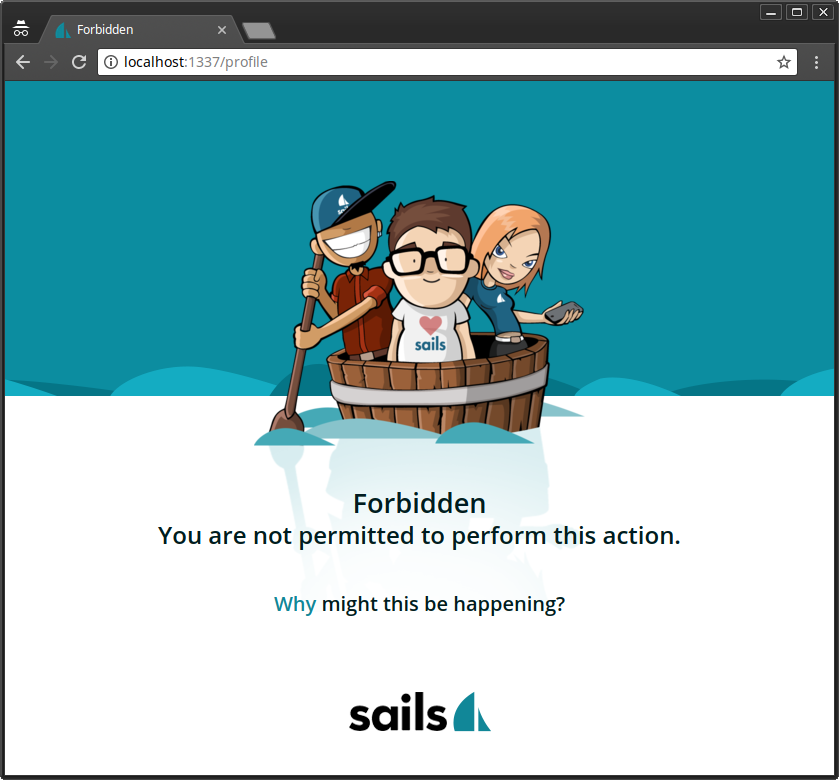
Now that we’re setting up an authentication system, we need to protect /chat and /profile routes from public access. Only authenticated users should be allowed to access them. Open config/policies.js and insert this code:
ChatMessageController: {
'*': 'sessionAuth'
},

UserController: {
'*': 'sessionAuth'
},
By specifying the name of the controller, we have also effectively blocked all routes provided by the Blueprint API for Users and Chat Messages. Unfortunately, policies only work with controllers. This means the route /chat can’t be protected in its current state. We need to define a custom action for it. Open api/controller/ChatroomController.js and insert this code:
...
render: (request, response) => {
    return response.view('chatroom');
},
Then replace the route config for /chat with this one one config/routes.js:
...
'/chat': {
     controller: 'ChatMessageController',
     action: 'render'
 },
 ...
The /chat route should now be protected from public access. If you restart your app and try to access /profile, /chat, /user or /chatmessage, you’ll be met with the following forbidden message:
If you’d like to redirect users to the login form instead, head over to api/policies/sessionAuth and replace the forbidden call with a redirect call like this:
...
// return res.forbidden('You are not permitted to perform this action.');
return res.redirect('/');
...
Try accessing the forbidden pages again, and you’ll automatically be redirected to the home page. Let’s now implement the Signup and Login code.
Auth Controller and Service
You’ll need to stop Sails.js first in order to run this command:
sails generate controller Auth
This will create a blank api/controllers/AuthController for us. Open it and insert this code:
authenticate: async (request, response) => {

    // Sign up user
    if(request.body.action == 'signup') {
        // Validate signup form

        // Check if email is registered

        // Create new user
    }

    // Log in user
},

logout: (request, response) => {
    // Logout user
}
I’ve placed in comments explaining how the logic will flow. We can place the relevant code here. However, Sails.js recommends we keep our controller code simple and easy to follow. To achieve this, we need to write helper functions that will help us with each of the above commented tasks. To create these helper functions, we need to create a service. Do this by creating a new file api/services/AuthService.js. Insert the following code:
/**
* AuthService.js
*
**/
const gravatar = require('gravatar')
// Where to display auth errors
const view = 'homepage';
module.exports = {
sendAuthError: (response, title, message, options) => {
options = options || {};
const { email, name} = options;
response.view(view, { error: {title, message}, email, name });
return false;
},
validateSignupForm: (request, response) => {
if(request.body.name == '') {
return AuthService.sendAuthError(response, 'Signup Failed!', "You must provide a name to sign up", {email:request.body.email});
} else if(request.body.email == '') {
return AuthService.sendAuthError(response, 'Signup Failed!', "You must provide an email address to sign up", {name:request.body.name});
}
return true;
},
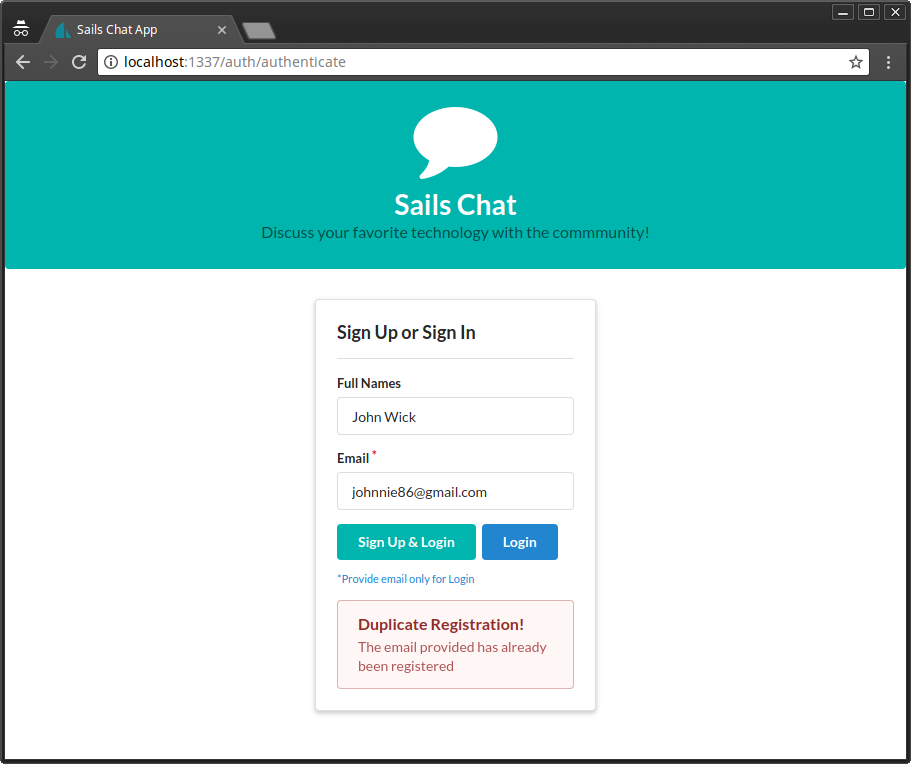
checkDuplicateRegistration: async (request, response) => {
try {
let existingUser = await User.findOne({email:request.body.email});
if(existingUser) {
const options = {email:request.body.email, name:request.body.name};
return AuthService.sendAuthError(response, 'Duplicate Registration!', "The email provided has already been registered", options);
}
return true;
} catch (err) {
response.serverError(err);
return false;
}
},
registerUser: async (data, response) => {
try {
const {name, email} = data;
const avatar = gravatar.url(email, {s:200}, "https");
let newUser = await User.create({name, email, avatar});
// Let all sockets know a new user has been created
User.publishCreate(newUser);
return newUser;
} catch (err) {
response.serverError(err);
return false;
}
},
login: async (request, response) => {
try {
let user = await User.findOne({email:request.body.email});
if(user) { // Login Passed
request.session.userId = user.id;
request.session.authenticated = true;
return response.redirect('/chat');
} else { // Login Failed
return AuthService.sendAuthError(response, 'Login Failed!', "The email provided is not registered", {email:request.body.email});
}
} catch (err) {
return response.serverError(err);
}
},
logout: (request, response) => {
request.session.userId = null;
request.session.authenticated = false;
response.redirect('/');
}
}
Examine the code carefully. As an intermediate developer, you should be able to understand the logic. I haven’t done anything fancy here. However, I would like to mention a few things:
- Gravatar. You need to install Gravatar. It’s a JavaScript library for generating Gravatar URLs based on the email address.
```bash npm install gravatar --save ``` User.publishCreate(newUser). Just likeChatMessages, we fire an event notifying all sockets that a new user has just been created. This will cause all logged-in clients to re-fetch the users data. Reviewviews/partial/chat-users.jsto see what I’m talking about.request.session. Sails.js provides us with a session store which we can use to pass data between page requests. The default Sails.js session lives in memory, meaning if you stop the server the session data gets lost. In theAuthService, we’re using session to storeuserIdandauthenticatedstatus.
With the logic inAuthService.js firmly in place, we can go ahead and update api/controllers/AuthController with the following code:
module.exports = {

authenticate: async (request, response) => {
    const email  = request.body.email;

    if(request.body.action == 'signup') {
        const name = request.body.name;
        // Validate signup form
        if(!AuthService.validateSignupForm(request, response)) {
            return;
        }
        // Check if email is registered
        const duplicateFound = await AuthService.checkDuplicateRegistration(request, response);
        if(!duplicateFound) {
            return;
        }
        // Create new user
        const newUser = await AuthService.registerUser({name,email}, response);
        if(!newUser) {
            return;
        }
    }

    // Attempt to log in
    const success = await AuthService.login(request, response);
},

logout: (request, response) => {
    AuthService.logout(request, response);
}
};
See how much simple and readable our controller is. Next, let’s do some final touches.
Final Touches
Now that we have authentication set up, we should remove the hardcoded value we placed in the postMessage action in api/controllers/ChatMessageController. Replace the email code with this one:
...
let user = await User.findOne({id:request.session.userId});
...
I’d like to mention something you may not have noticed, if you look at the logout URL in views/partials/menu.ejs, we’ve placed this address /auth/logout. If you look at config/routes.js, you’ll notice that we haven’t placed a URL for it. Surprisingly, when we run the code, it works. This is because Sails.js uses a convention to determine which controller and action is needed to resolve a particular address.
By now you should be having a functional MVP chat application. Fire up your app and test the following scenarios:
- sign up without entering anything
- sign up by filling only name
- sign up by only filling email
- sign up by filling name and a registered email — for example,
johnnie86@gmail.comorjane@hotmail.com - sign up using your name and email
- update your profile
- try posting a blank message
- post some messages
- open another browser and log in as another user, put each browser side by side and chat
- log out and create a new account.
Phew! That’s a lot of functionality we’ve just implemented in one sitting and then tested. With a few more weeks, we could whip out a production ready chat system integrated with more features, such as multiple chat rooms, channel attachments, smiley icons and social accounts integration!
Summary
During this tutorial, we didn’t put the name of the logged-in user somewhere at the top menu. You should be capable of fixing this yourself. If you’ve read the entire tutorial, you should now be proficient in building applications using Sails.js.
The goal of this tutorial is to show you that can come from a non-JavaScript MVC framework and build something awesome with relatively few lines of code. Making use of the Blueprint API will help you implement features faster. I also recommend you learn to integrate a more powerful front-end library — such as React, Angular or Vue — to create a much more interactive web application. In addition, learning how to write tests for Sails.js to automate the testing process is a great weapon in your programming arsenal.
Frequently Asked Questions about Building a Real-Time Chat App with Sails.js
How can I integrate Sails.js with other databases?
Sails.js is a versatile framework that can be integrated with a variety of databases. It uses Waterline as its ORM (Object-Relational Mapping) which provides a simple and powerful abstraction for using different databases. To integrate a different database, you need to install the corresponding adapter. For example, if you want to use MySQL, you would install the sails-mysql adapter. Once installed, you can configure your database connection in the config/datastores.js file.
Can I use Sails.js for building non-real-time applications?
Absolutely. While Sails.js is excellent for building real-time applications due to its built-in support for WebSockets, it’s also a great choice for building more traditional web applications. It provides a robust set of features for building single-page applications, multi-page applications, and APIs.
How can I secure my Sails.js application?
Sails.js provides several built-in security measures. For example, it includes CSRF (Cross-Site Request Forgery) protection out of the box. You can also use policies to implement access control and protect your routes. Additionally, you can use the Passport.js authentication middleware with Sails.js to implement authentication.
How can I handle file uploads in Sails.js?
Sails.js provides a built-in file upload feature through the Skipper body parser. You can use this feature to handle file uploads in your application. You can also configure Skipper to upload files to a variety of destinations, including the local disk, S3, and more.
How can I test my Sails.js application?
You can use a variety of testing frameworks and libraries with Sails.js. For example, you can use Mocha for writing your tests, Chai for assertions, and Sinon for spies, stubs, and mocks. Sails.js also provides a test runner that you can use to run your tests.
How can I deploy my Sails.js application?
There are several ways to deploy a Sails.js application. You can use traditional deployment methods, such as uploading your application to a server and running it there. You can also use modern deployment platforms like Heroku, which can simplify the deployment process.
Can I use Sails.js with front-end frameworks like React or Angular?
Yes, you can use Sails.js with any front-end framework. Sails.js is a back-end framework, and it can serve as the API for your front-end application. You can use it with React, Angular, Vue.js, or any other front-end framework.
How can I scale my Sails.js application?
Sails.js applications can be scaled horizontally by running multiple instances of the application behind a load balancer. You can also use the cluster module in Node.js to take advantage of multi-core systems.
How can I handle errors in Sails.js?
Sails.js provides a built-in mechanism for handling errors. You can use the res.serverError and res.badRequest methods to send error responses. You can also define custom error responses in the api/responses directory.
How can I use WebSockets in Sails.js?
Sails.js provides built-in support for WebSockets through the socket.io library. You can use this feature to implement real-time functionality in your application. You can use the sails.sockets methods to send and receive messages over WebSockets.