

Besides providing us with features like creating post and pages, WordPress also offers good support for enhancing site functionality through plugins. In this article we are going to see how to create a simple contact form plugin in WordPress and post data via AJAX.
Key Takeaways
- WordPress provides robust support for enhancing website functionality through plugins, including creating a simple contact form plugin that uses AJAX to post data. This process involves creating the plugin, the form, an AJAX handler, and a shortcode.
- The AJAX handler for the contact form plugin is essential for handling AJAX requests. It gets user-typed values, performs data validation, and sends an email to the WordPress admin using the wp_mail() function. It’s important to register the AJAX handler with WordPress to start handling AJAX requests.
- Creating a shortcode for the contact form plugin allows it to be added to any page or post. This involves creating a function that starts output buffering, calls the contact form function, gets the output in a variable, cleans the buffer, and returns the output. Then, the shortcode can be created from this function.
Creating the Plugin
Let’s start by creating a plugin. To create a plugin in WordPress in the wp-contentplugins folder, make a folder for the plugin called ajaxcontactform. Inside this, create a file called ajaxcontactform.php, which will be the main file of our plugin.
In this file, let’s now put the plugin header as follows:
<?php

/*

Plugin Name: Ajax Contact Form

Plugin URI:

Description:Uses a short code for contact form

Author: Abbas Suterwala

Version:

Author URI:

*/
This header is necessary for WordPress to identify the plugin. Now login to the admin section of your WordPress installation, and if everything has worked correctly, you should be able to see your WordPress plugin in the plugin list, as shown below. Let’s activate the plugin now.
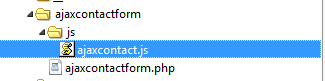
We are going to use jQuery to take care of our AJAX request. For this, let’s create a folder called js in our ajaxcontactform folder, in which you can create an ajaxcontact.js file. This file will contain the code for our AJAX call.
Our folder structure will be as follows:
Now let’s define some basic variables which we will use in our plugin and enqueue our JavaScript file. We will do it as follows:
define('ACFSURL', WP_PLUGIN_URL."/".dirname( plugin_basename( __FILE__ ) ) );

define('ACFPATH', WP_PLUGIN_DIR."/".dirname( plugin_basename( __FILE__ ) ) );


function ajaxcontact_enqueuescripts()

{

wp_enqueue_script('ajaxcontact', ACFSURL.'/js/ajaxcontact.js', array('jquery'));

wp_localize_script( 'ajaxcontact', 'ajaxcontactajax', array( 'ajaxurl' => admin_url( 'admin-ajax.php' ) ) );

}

add_action('wp_enqueue_scripts', ajaxcontact_enqueuescripts);
Creating the Form
Now let’s create the UI for our contact form. The function to create the UI for our contact form is as follows:
function ajaxcontact_show_contact()

{

?>


<form id="ajaxcontactform" action="" method="post"enctype="multipart/form-data">

<div id="ajaxcontact-text">

<div id="ajaxcontact-response" style="background-color:#E6E6FA ;color:blue;"></div>

<strong>Name </strong> <br/>

<input type="text" id="ajaxcontactname" name="ajaxcontactname"/><br />

<br/>

<strong>Email </strong> <br/>

<input type="text" id="ajaxcontactemail" name="ajaxcontactemail"/><br />

<br/>

<strong>Subject </strong> <br/>

<input type="text" id="ajaxcontactsubject" name="ajaxcontactsubject"/><br />

<br/>

<strong>Contents </strong> <br/>

<textarea id="ajaxcontactcontents" name="ajaxcontactcontents"  rows="10" cols="20"></textarea><br />

<a onclick="ajaxformsendmail(ajaxcontactname.value,ajaxcontactemail.value,ajaxcontactsubject.value,ajaxcontactcontents.value);" style="cursor: pointer"><b>Send Mail</b></a>

</div>

</form>


<?php


}
In this function we create a <form> tag area for our contact form plugin. Inside the tags we have text fields for Name, Email and Subject. We have used a text area for the contents of the contact form.
Then we have created a link called Send mail, clicking on which will call the function ajaxformsendmail(). We’ll define this function below. In this function we pass the values of the Name, Email, Subject and Contents fields.
To inspect our UI, we can call this function from some place in our theme. If we call the function in our theme, the contact form should look as follows:

The AJAX handler
Now let’s create the function which will handle our AJAX request. The $_POST request which will be linked to this handler will post the name, email, subject and content values the user has typed in.
Here’s the code for the handler:
function ajaxcontact_send_mail()
{
$results = '';
$error = 0;
$name = $_POST['acfname'];
$email = $_POST['acfemail'];
$subject = $_POST['acfsubject'];
$contents = $_POST['acfcontents'];
$admin_email = get_option('admin_email');
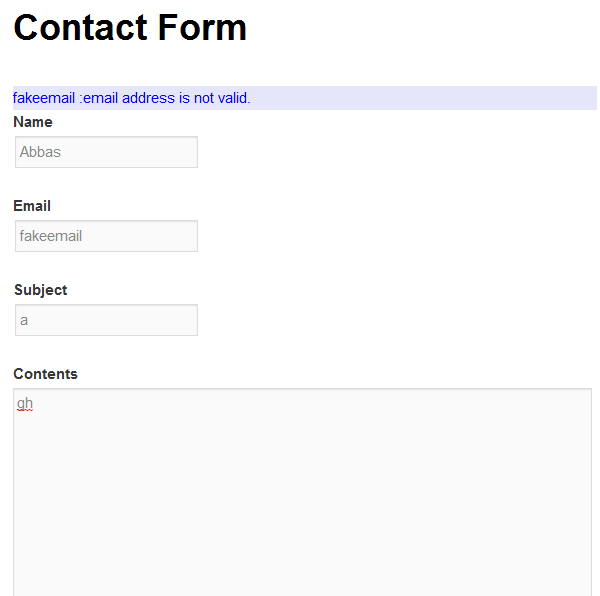
if (!filter_var($email, FILTER_VALIDATE_EMAIL))
{
$results = $email." :email address is not valid.";
$error = 1;
}
elseif( strlen($name) == 0 )
{
$results = "Name is invalid.";
$error = 1;
}
elseif( strlen($subject) == 0 )
{
$results = "Subject is invalid.";
$error = 1;
}
elseif( strlen($contents) == 0 )
{
$results = "Content is invalid.";
$error = 1;
}
if($error == 0)
{
$headers = 'From:'.$email. "rn";
if(wp_mail($admin_email, $subject, $contents, $headers))
{
$results = "*Thanks for you mail.";
}
else{
$results = "*The mail could not be sent.”
}
}
// Return the String
die($results);
}In the handler we first get the name, email, subject, and content from the $_POST variable. Then we perform some validations on the data. To check if the email is a valid address, we use the PHP function filter_var($email, FILTER_VALIDATE_EMAIL) which basically validates the email address for us. Then we perform simple validations for the other parameters are not empty. If we find an error we return the error so that the UI can display an error message to the user.
In the case of a failed validation, the following error message will be seen:
Once the basic validations are done we will get the WordPress admin email by the function get_option(‘admin_email’). Then we use the WordPress function wp_mail() via which the mail is sent to the WordPress admin. If there is an error, the error message is set, which will be displayed to the user.
Registering the AJAX Handler
Now our AJAX handler is ready, let’s register is with WordPress so that it can start handling AJAX requests. We can do it as follows:
// creating Ajax call for WordPress

add_action( 'wp_ajax_nopriv_ajaxcontact_send_mail', 'ajaxcontact_send_mail' );

add_action( 'wp_ajax_ajaxcontact_send_mail', 'ajaxcontact_send_mail' );
This basically registers our function ajaxcontact_send_mail() to handle AJAX requests coming to WordPress with the action name ajaxcontact_send_mail.
Sending the AJAX Request
Now let’s write the JavaScript function ajaxformsendmail() which will take the form values as input.
The function is as follows:
function ajaxformsendmail(name,email,subject,contents)

{

jQuery.ajax({

type: 'POST',

url: ajaxcontactajax.ajaxurl,

data: {

action: 'ajaxcontact_send_mail',

acfname: name,

acfemail: email,

acfsubject:subject,

acfcontents:contents

},


success:function(data, textStatus, XMLHttpRequest){

var id = '#ajaxcontact-response';

jQuery(id).html('');

jQuery(id).append(data);

},


error: function(MLHttpRequest, textStatus, errorThrown){

alert(errorThrown);

}


});

}
In this function we use the jQuery .ajax function to post our AJAX request. We use the ajaxcontactajax.ajaxurl which we had set. We set the action to ‘ajaxcontact_send_mail’ so that the request goes to our AJAX handler. We also post the required information.
When the request is successful the success: function is called, in which we set the data which came from the request handler, and add it to the <div> ajaxcontact-response.
In case the AJAX request fails, we just show up an alert with the error.
Creating the shortcode
Now let’s create a shortcode so we can add our contact form to any page or post. We first create a function as below:
function ajaxcontact_shortcode_func( $atts )

{

ob_start();

ajaxcontact_show_contact();

$output = ob_get_contents();

ob_end_clean();

return $output;

}
This function will start output buffering first, so that the output is not printed to the screen directly. Then we basically call our ob_get_contents() function which has the code for the contact form. We get the output in a variable, clean the buffer and return the output.
To create a shortcode out of this function we do the following:
add_shortcode( 'ajaxcontact', 'ajaxcontact_shortcode_func' );Now we can create a separate page and add the shortcode [ajaxcontact] to display the form.
Our finished contact form will look as follows:
Frequently Asked Questions on Building a WordPress Plugin to Create an AJAX Contact Form
How can I ensure the security of my AJAX contact form in WordPress?
Security is a crucial aspect when creating an AJAX contact form in WordPress. To ensure the security of your form, you should use nonces in WordPress. Nonces are unique identifiers that can help protect URLs and forms from certain types of misuse, malicious or otherwise. You can create a nonce using the wp_create_nonce function and then verify it with the check_ajax_referer function. This will help prevent CSRF attacks.
How can I customize the look and feel of my AJAX contact form?
You can customize the look and feel of your AJAX contact form using CSS. WordPress allows you to add custom CSS to your plugin. You can style your form elements such as input fields, buttons, labels, etc., according to your preference. You can also use JavaScript to add animations or other interactive features to your form.
How can I handle form validation in my AJAX contact form?
Form validation is an important aspect of any form. In WordPress, you can handle form validation using PHP and JavaScript. You can use PHP to validate the form data on the server-side and JavaScript to validate the form data on the client-side. You can use the wp_send_json_error function to send a JSON response back to the JavaScript in case of an error.
How can I handle form submissions in my AJAX contact form?
In WordPress, you can handle form submissions using AJAX. You can use the admin-ajax.php file to handle the AJAX request. You can use the wp_ajax_ and wp_ajax_nopriv_ hooks to handle the AJAX request for logged-in and non-logged-in users, respectively. You can use the wp_send_json_success function to send a JSON response back to the JavaScript upon successful form submission.
How can I add a CAPTCHA to my AJAX contact form?
Adding a CAPTCHA to your AJAX contact form can help prevent spam submissions. You can use a plugin like Google’s reCAPTCHA or any other CAPTCHA plugin compatible with WordPress. You can then integrate the CAPTCHA into your form using the plugin’s API.
How can I add file upload functionality to my AJAX contact form?
You can add file upload functionality to your AJAX contact form using the HTML file input type and AJAX. You can handle the file upload on the server-side using PHP. WordPress provides the wp_handle_upload function to handle file uploads.
How can I add a date picker to my AJAX contact form?
You can add a date picker to your AJAX contact form using jQuery UI’s datepicker. You can enqueue the datepicker script using the wp_enqueue_script function and then initialize the datepicker on your form field using JavaScript.
How can I add a dropdown menu to my AJAX contact form?
You can add a dropdown menu to your AJAX contact form using the HTML select element. You can populate the dropdown menu with options using PHP. You can handle the selected option on the server-side using PHP.
How can I add a checkbox to my AJAX contact form?
You can add a checkbox to your AJAX contact form using the HTML input type checkbox. You can handle the checked state of the checkbox on the server-side using PHP.
How can I add a radio button to my AJAX contact form?
You can add a radio button to your AJAX contact form using the HTML input type radio. You can handle the selected radio button on the server-side using PHP.

