

This article was originally published on the Okta developer blog. Thank you for supporting the partners who make SitePoint possible.
Today’s internet users expect a personalized experience. Developers must learn to develop websites that provide that personalized experience while keeping their user’s information private. Modern web applications also tend to have a server-side API and a client-side user interface. it can be challenging to get make both ends aware of the currently logged in user. In this tutorial, I will walk you through setting up a Node API that feeds a React UI, and build a user registration that keeps the user’s information private and personal.
In this tutorial, I won’t use any state management libraries like Redux or ReduxThunk. In a more robust application, you’ll probably want to do that, but it will be easy to wire up Redux and ReduxThunk and then add the fetch statements used here as your thunks. For the sake of simplicity, and to keep this article focused on adding user management, I’ll be adding fetch statements into componentDidMount functions.
Key Takeaways
- Simplified Setup: Setting up user registration with Node, React, and Okta does not require state management libraries like Redux, simplifying the initial development process.
- Practical Integration: The tutorial provides a hands-on approach to integrating Okta for authentication in a React application, highlighting the use of Okta’s React SDK and React Router.
- Code Organization: The structure of the application separates concerns appropriately, with distinct folders for API and client sides, enhancing maintainability.
- Secure User Authentication: Okta is utilized to handle user authentication securely, ensuring that user credentials are managed safely and efficiently.
- Component-Based Structure: React’s component-based architecture is leveraged to organize the UI, with separate components for login, registration, and user profiles.
- Comprehensive Tutorial: The guide covers from basic setup to advanced user handling, providing a thorough understanding of building a full-fledged user registration system using Node, React, and Okta.
Install the Node and React Prerequisites
To set up the base application, make sure you have these basic tools installed:
- Node (8+)
- npm (5+)
- create-react-app (npm package)
- express-generator (npm package)
You’ll also need an Okta developer account.
To install Node and npm, you can follow the instructions for your operating system at https://nodejs.org/en/.
Then just install the two npm packages with the npm command line:
npm i -g create-react-app express-generator
Now you’re ready to set up the basic application structure.
Scaffold the Base Application
Go to the folder where you want your application to live and create a new folder for it:
mkdir MembershipSample
cd MembershipSample
express api
create-react-app client
This will create two folders in the MembershipSample folder called api and client, with a NodeJS and Express application in the api folder and a base React application in the client folder. So your folder structure will look like:
- MembershipSample
- api
- client
To make this next part easier, open two terminals or terminal tabs; one to the express app folder api and the other to the React app folder client.
By default, the React app and the Node app will both run on port 3000 in development, so you’ll need to get the API to run on a different port and then proxy it in the client app.
In the api folder, open the /bin/www file and change the port the API will be running on to 3001.
/**
 * Get port from environment and store in Express.
 */

var port = normalizePort(process.env.PORT || '3001');
app.set('port', port);
Then set up the proxy for the API in the client application so that you can still call /api/{resource} and have it proxied from port 3000 to port 3001. In the client/package.json file, add the proxy setting below name:
"name": "client",
"proxy": "http://localhost:3001"
Lastly, don’t forget to run npm install or yarn install for each subfolder (api and client) to ensure that the dependencies are installed.
You can now run both applications by running npm start or yarn start in the appropriate folders for the API and the client application.
Add an Okta Application
If you haven’t already done so, create a free forever developer account at https://developer.okta.com/signup/.
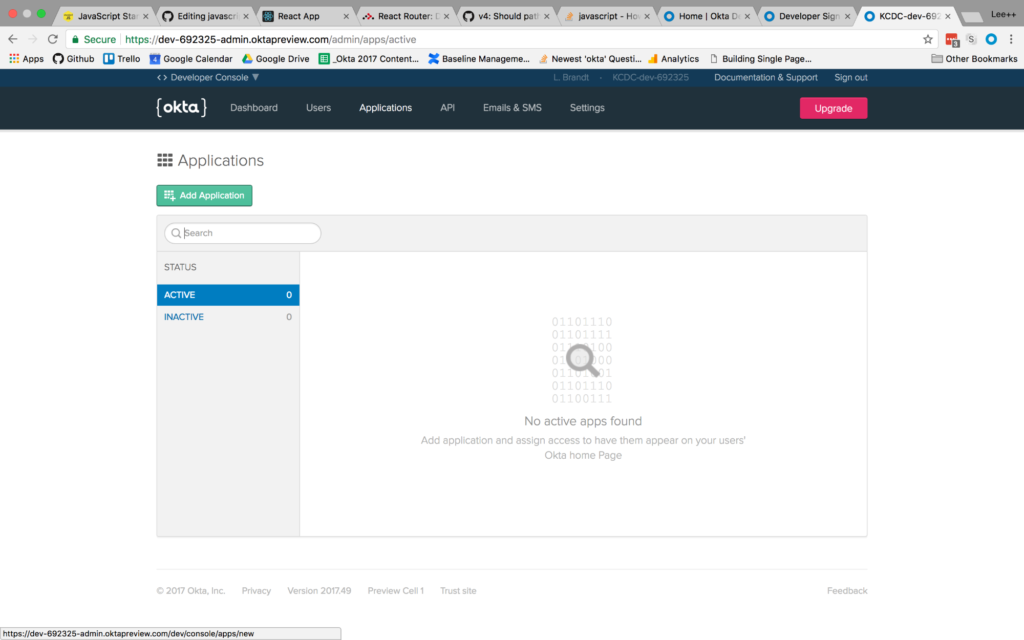
Once you’ve registered, click on Applications in the top menu. Then click the Add Application button.
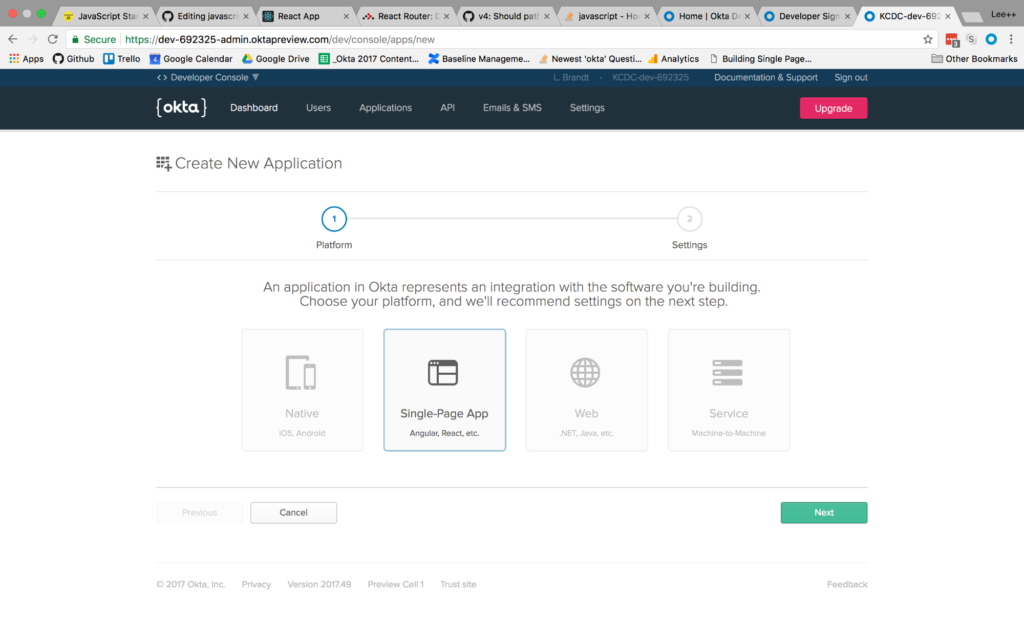
You will then be taken to the application creation wizard. Choose the Single-Page App button and click Next at the bottom.
On the next screen, you will see the default settings provided by the single-page application template. Change the name of the application to something more descriptive, like “Membership Application”. Also, change the base URIs and the login redirect URIs settings to use port 3000 because that is where your application will be running. The rest of the default settings are fine.
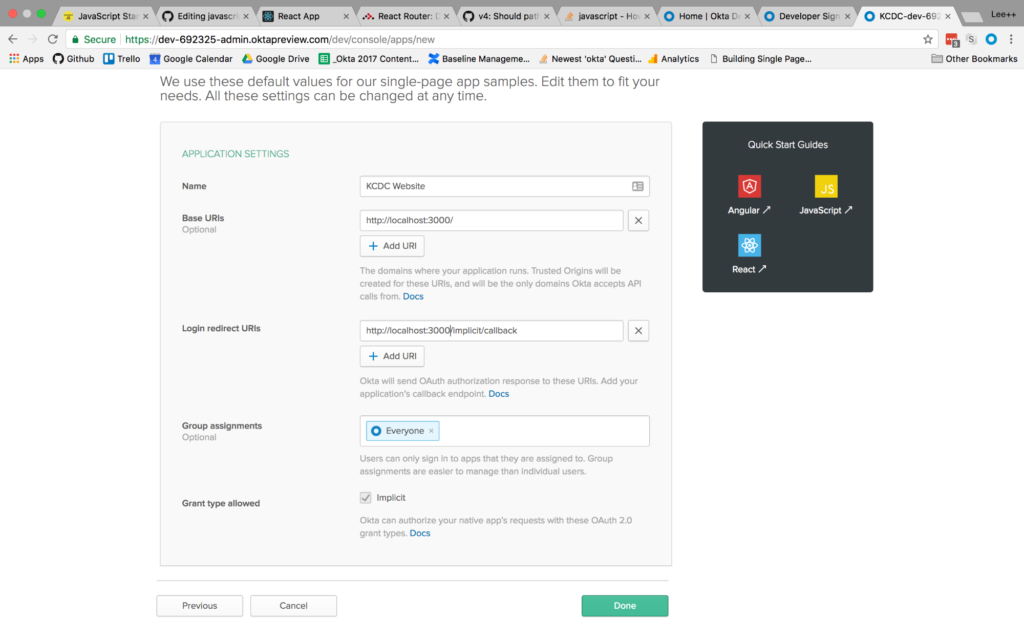
Then click the Done button at the bottom.
Once the application has been created, select it from the applications listing, and click on the General tab to view the general settings for your application.
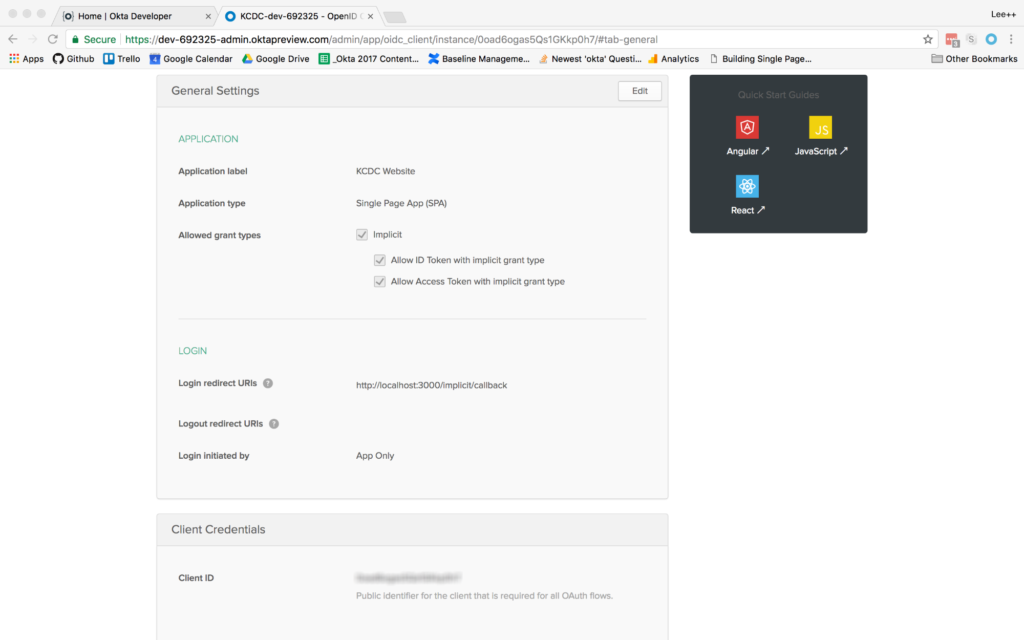
At the bottom, you will see a Client ID setting (yours won’t be blurred out, obviously). Copy this to use in your React application. You will also need your Okta organization URL, which you can find at the top left of the dashboard page. It will probably look something like “https://dev-XXXXXX.oktapreview.com”.
Add Authentication to the ReactJS Application
Now that the application is created, add authentication using Okta by adding a couple of npm dependencies. From the client folder run:
npm install @okta/okta-react react-router-dom --save
Or, if you’re using the yarn package manager:
yarn add @okta/okta-react react-router-dom
Add a file to the client/src folder called app.config.js. The contents of the file are:
export default {
  url: '{yourOktaDomain}',
  issuer: '{yourOktaOrgUrl}/oauth2/default',
  redirect_uri: window.location.origin + '/implicit/callback',
  client_id: '{yourClientID}'
}
Then, setup the index.js file to use the React Router and Okta’s React SDK. When the index.js file is complete, it will look like this:
import React from 'react';
import ReactDOM from 'react-dom';
import { BrowserRouter as Router } from 'react-router-dom';
import { Security } from '@okta/okta-react';

import './index.css';
import config from './app.config';
import App from './App';
import registerServiceWorker from './registerServiceWorker';

function onAuthRequired({ history }) {
  history.push('/login');
}

ReactDOM.render(
  <Router>
    <Security issuer={config.issuer}
      client_id={config.client_id}
      redirect_uri={config.redirect_uri}
      onAuthRequired={onAuthRequired}>
      <App />
    </Security>
  </Router>,
  document.getElementById('root')
);
registerServiceWorker();
Once complete, you will have added the BrowserRouter component (aliased as “Router”) from the React Router, and the Security component from Okta’s React SDK. Also that the app.config.js file is imported as “config” so that you can use the config values in the properties required by the Security component.
You will also have surrounded the App component with the Router and Security components, passing in the values specified. The onAuthRequired method, simply tells Okta’s React SDK that when somebody tries to access a secure route and they are not logged in, redirect them to the login page.
Everything else will have come from the create-react-app command you ran previously.
Add Pages to the ReactJS App
Before adding any routes to the React app, create some components to handle the routes you want to add.
Add a components folder to the client/src folder. This is where all your components will live and the easiest way to organize them. Then create a home folder for your home page components. For now there will be just one, but there may be more components used only for the home page later. Add a HomePage.js file to the folder with the following contents:
import React from 'react';

export default class HomePage extends React.Component{
  render(){
    return(
      <h1>Home Page</h1>
    );
  }
}
This is all you really need for the home page at the moment. The most important point is to make the HomePage component a class type. Even though right now it only contains a single h1 tag, it is meant to be a “page”, meaning it will likely contain other components, so it’s important that it be a container component.
Next, create an auth folder in components. This is where all components that have to do with authentication will live. In that folder, create a LoginForm.js file.
The first thing to note is that you’ll be using the withAuth higher-order component from Okta’s React SDK to wrap the entire login form. This adds a prop to the component called auth, making it possible to access things like the isAuthenticated and redirect functions on that higher-order component.
The code for the LoginForm component is as follows:
import React from 'react';
import OktaAuth from '@okta/okta-auth-js';
import { withAuth } from '@okta/okta-react';

export default withAuth(class LoginForm extends React.Component {
  constructor(props) {
    super(props);
    this.state = {
      sessionToken: null,
      error: null,
      username: '',
      password: ''
    }

    this.oktaAuth = new OktaAuth({ url: props.baseUrl });

    this.handleSubmit = this.handleSubmit.bind(this);
    this.handleUsernameChange = this.handleUsernameChange.bind(this);
    this.handlePasswordChange = this.handlePasswordChange.bind(this);
  }

  handleSubmit(e) {
    e.preventDefault();
    this.oktaAuth.signIn({
      username: this.state.username,
      password: this.state.password
    })
      .then(res => this.setState({
        sessionToken: res.sessionToken
      }))
      .catch(err => {
        this.setState({error: err.message});
        console.log(err.statusCode + ' error', err)
      });
  }

  handleUsernameChange(e) {
    this.setState({ username: e.target.value });
  }

  handlePasswordChange(e) {
    this.setState({ password: e.target.value });
  }

  render() {
    if (this.state.sessionToken) {
      this.props.auth.redirect({ sessionToken: this.state.sessionToken });
      return null;
    }

    const errorMessage = this.state.error ?
    <span className="error-message">{this.state.error}</span> :
    null;

    return (
      <form onSubmit={this.handleSubmit}>
        {errorMessage}
        <div className="form-element">
          <label>Username:</label>
          <input
            id="username" type="text"
            value={this.state.username}
            onChange={this.handleUsernameChange} />
        </div>

        <div className="form-element">
          <label>Password:</label>
          <input
            id="password" type="password"
            value={this.state.password}
            onChange={this.handlePasswordChange} />
        </div>
        <input id="submit" type="submit" value="Submit" />
      </form>
    );
  }
});
The other thing of note here is the OktaAuth library being imported. This is the base library for doing things like signing in using the Okta application you created previously. You’ll notice an OktaAuth object being created in the constructor that gets a property of baseUrl passed to it. This is the URL for the issuer that is in your app.config.js file. The LoginForm component is meant to be contained in another component, so you’ll have to create a LoginPage.js file to contain this component. You’ll use the withAuth higher-order component again, to get access to the isAuthenticated function. The contents of LoginPage.js will be:
import React, { Component } from 'react';
import { Redirect } from 'react-router-dom';
import LoginForm from './LoginForm';
import { withAuth } from '@okta/okta-react';

export default withAuth(class Login extends Component {
  constructor(props) {
    super(props);
    this.state = { authenticated: null };
    this.checkAuthentication = this.checkAuthentication.bind(this);
    this.checkAuthentication();
  }

  async checkAuthentication() {
    const authenticated = await this.props.auth.isAuthenticated();
    if (authenticated !== this.state.authenticated) {
      this.setState({ authenticated });
    }
  }

  componentDidUpdate() {
    this.checkAuthentication();
  }

  render() {
    if (this.state.authenticated === null) return null;
    return this.state.authenticated ?

      <Redirect to={{ pathname: '/profile' }} /> :
      <LoginForm baseUrl={this.props.baseUrl} />;

  }
});
Although it’s a bit less than what’s in the login form component, there are still some important pieces to point out here.
Again, you’re using the withAuth higher-order component. This will be a recurring theme for every component that needs to use Okta’s authentication or authorization process. In this case, its primarily used to get the isAuthenticated function. The checkAuthentication() method is executed in the constructor and in the componentDidUpdate lifecycle method to ensure that when the component is created it is checked and every subsequent change to the component checks again.
When isAuthenticated returns true, then it is set in the component’s state. It is then checked in the render method to decide whether to show the LoginForm component, or to redirect to the user’s profile page, a component you’ll create next.
Now create the ProfilePage.js component inside the auth folder. The contents of the component are:
import React from 'react';
import { withAuth } from '@okta/okta-react';

export default withAuth(class ProfilePage extends React.Component {
  constructor(props){
    super(props);
    this.state = { user: null };
    this.getCurrentUser = this.getCurrentUser.bind(this);
  }

  async getCurrentUser(){
    this.props.auth.getUser()
      .then(user => this.setState({user}));
  }

  componentDidMount(){
    this.getCurrentUser();
  }

  render() {
    if(!this.state.user) return null;
    return (
      <section className="user-profile">
        <h1>User Profile</h1>
        <div>
          <label>Name:</label>
          <span>{this.state.user.name}</span>
        </div>
      </section>

    )
  }
});
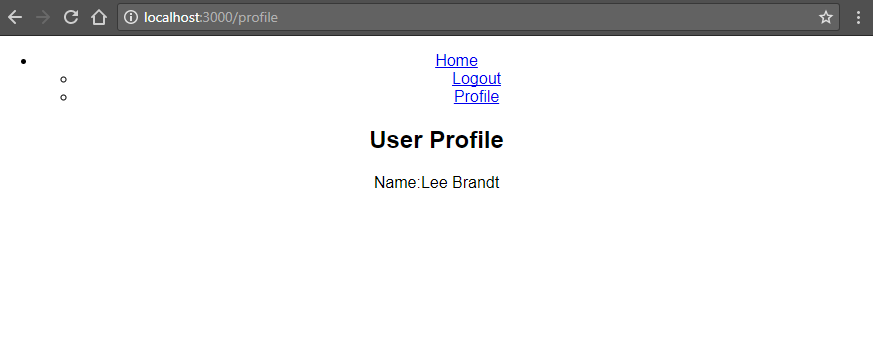
The withAuth component here gives you access to the getUser function. Here, it’s been called from componentDidMount which is a common place for pulling data that will be used in the render method. The only odd thing you might see is the first line of the render method that renders nothing until there is actually a user returned from the getUser asynchronous call. Once there is a user in the state, it then renders the profile content, which in this case is just displaying the currently logged in user’s name.
Next, you’ll add a registration component. This could be done just like the login form, where there is a LoginForm component that is contained in a LoginPage component. In order to demonstrate another way to display this, you’ll just create a RegistrationForm component that will be the main container component. Create a RegistrationForm.js file in the auth folder with the following content:
import React from 'react';
import OktaAuth from '@okta/okta-auth-js';
import { withAuth } from '@okta/okta-react';

import config from '../../app.config';

export default withAuth(class RegistrationForm extends React.Component{
  constructor(props){
    super(props);
    this.state = {
      firstName: '',
      lastName: '',
      email: '',
      password: '',
      sessionToken: null
    };
    this.oktaAuth = new OktaAuth({ url: config.url });
    this.checkAuthentication = this.checkAuthentication.bind(this);
    this.checkAuthentication();

    this.handleSubmit = this.handleSubmit.bind(this);
    this.handleFirstNameChange = this.handleFirstNameChange.bind(this);
    this.handleLastNameChange = this.handleLastNameChange.bind(this);
    this.handleEmailChange = this.handleEmailChange.bind(this);
    this.handlePasswordChange = this.handlePasswordChange.bind(this);
  }

  async checkAuthentication() {
    const sessionToken = await this.props.auth.getIdToken();
    if (sessionToken) {
      this.setState({ sessionToken });
    }
  }

  componentDidUpdate() {
    this.checkAuthentication();
  }

  handleFirstNameChange(e){
    this.setState({firstName:e.target.value});
  }
  handleLastNameChange(e) {
    this.setState({ lastName: e.target.value });
  }
  handleEmailChange(e) {
    this.setState({ email: e.target.value });
  }
  handlePasswordChange(e) {
    this.setState({ password: e.target.value });
  }

  handleSubmit(e){
    e.preventDefault();
    fetch('/api/users', {
      method: 'POST',
      headers: {
        'Accept': 'application/json',
        'Content-Type': 'application/json',
      },
      body: JSON.stringify(this.state)
    }).then(user => {
      this.oktaAuth.signIn({
        username: this.state.email,
        password: this.state.password
      })
      .then(res => this.setState({
        sessionToken: res.sessionToken
      }));
    })
    .catch(err => console.log);
  }

  render(){
    if (this.state.sessionToken) {
      this.props.auth.redirect({ sessionToken: this.state.sessionToken });
      return null;
    }

    return(
      <form onSubmit={this.handleSubmit}>
        <div className="form-element">
          <label>Email:</label>
          <input type="email" id="email" value={this.state.email}
          onChange={this.handleEmailChange}/>
        </div>
        <div className="form-element">
          <label>First Name:</label>
          <input type="text" id="firstName" value={this.state.firstName}
          onChange={this.handleFirstNameChange} />
        </div>
        <div className="form-element">
          <label>Last Name:</label>
          <input type="text" id="lastName" value={this.state.lastName}
          onChange={this.handleLastNameChange} />
        </div>
        <div className="form-element">
          <label>Password:</label>
          <input type="password" id="password" value={this.state.password}
          onChange={this.handlePasswordChange} />
        </div>
        <input type="submit" id="submit" value="Register"/>
      </form>
    );
  }

});
This component looks a lot like the LoginForm component with the exception that it calls the Node API (that you’ll build in a moment) that will handle doing the registration. Once the registration is completed by the Node API, the component logs the newly created user in, and the render method (when it sees a session token in the state) redirects the user to the home page of the application.
You may also notice the sessionToken property on the component’s state. This is set by the handleSubmit() function for the purpose of handling the login if the registration is successful. Then it is also used by the render() method to do the redirect once the login has completed, and a token has been received.
Add Routes to the React App
First, add a navigation component for the routes you’ll be adding. In the client/src/components folder, add a folder called shared. This will be the place where all components that are used in several places in the application will be located. In that new folder, add a file called Navigation.js. The file contains a basic component with links to all the pages in the app.
You’ll need to wrap the navigation component in the withAuth higher-order component. That way, you can check to see if there is an authenticated user and display the login or logout button as appropriate.
import React from 'react';
import { Link } from 'react-router-dom';
import { withAuth } from '@okta/okta-react';

export default withAuth(class Navigation extends React.Component {
  constructor(props) {
    super(props);
    this.state = { authenticated: null };
    this.checkAuthentication = this.checkAuthentication.bind(this);
    this.checkAuthentication();
  }

  async checkAuthentication() {
    const authenticated = await this.props.auth.isAuthenticated();
    if (authenticated !== this.state.authenticated) {
      this.setState({ authenticated });
    }
  }

  componentDidUpdate() {
    this.checkAuthentication();
  }

  render() {
    if (this.state.authenticated === null) return null;
    const authNav = this.state.authenticated ?
      <ul className="auth-nav">
        <li><a href="javascript:void(0)" onClick={this.props.auth.logout}>Logout</a></li>
        <li><Link to="/profile">Profile</Link></li>
      </ul> :
      <ul className="auth-nav">
        <li><a href="javascript:void(0)" onClick={this.props.auth.login}>Login</a></li>
        <li><Link to="/register">Register</Link></li>
      </ul>;
    return (
      <nav>
        <ul>
          <li><Link to="/">Home</Link></li>
          {authNav}
        </ul>
      </nav>
    )
  }
});
Now that you have components available to handle all the routes, create the routes to go with them. Update the App.js file so that the final version looks like:
import React, { Component } from 'react';
import { Route } from 'react-router-dom';
import { SecureRoute, ImplicitCallback } from '@okta/okta-react';

import Navigation from './components/shared/Navigation';
import HomePage from './components/home/HomePage';
import RegistrationForm from './components/auth/RegistrationForm';
import config from './app.config';
import LoginPage from './components/auth/LoginPage';
import ProfilePage from './components/auth/ProfilePage';
import './App.css';

export default class App extends Component {
  render() {
    return (
      <div className="App">
        <Navigation />
        <main>
          <Route path="/" exact component={HomePage} />
          <Route path="/login" render={() => <LoginPage baseUrl={config.url} />} />
          <Route path="/implicit/callback" component={ImplicitCallback} />
          <Route path="/register" component={RegistrationForm} />
          <SecureRoute path="/profile" component={ProfilePage} />
        </main>
      </div>
    );
  }
}
There are a couple of things of note here. The import of the SecureRoute and ImplicitCallback components from Okta’s React SDK. The ImplicitCallback component handles the callback from the authentication flow to ensure there is an endpoint within the React application to catch the return call from Okta. The SecureRoute component allows you to secure any route and redirect unauthenticated users to the login page.
The Route component from React Router does exactly what you’d expect: it takes a path that the user has navigated to and sets a component to handle that route. The SecureRoute component does an extra check to ensure the user is logged in before allowing access to that route. If they are not then the onAuthRequired function in index.js will be called to force the user to the login page.
The only other really odd-looking thing here is the route for the login path. Instead of simply setting a component to handle the path, it runs a render method that renders the LoginPage component and sets the baseUrl from the configuration.
Add API Endpoints to the Node App
You may remember that the Node API is doing the registration, so you’ll need to add the endpoint to the Node app to handle that call. To do that, you’ll need to add Okta’s Node SDK. From the `api` folder run:
npm install @okta/okta-sdk-nodejs --save
Then, you’ll change the users.js file in api/routes. The file will look like:
const express = require('express');
const router = express.Router();
const oktaClient = require('../lib/oktaClient');

/* Create a new User (register). */
router.post('/', (req, res, next) => {
  if (!req.body) return res.sendStatus(400);
  const newUser = {
    profile: {
      firstName: req.body.firstName,
      lastName: req.body.lastName,
      email: req.body.email,
      login: req.body.email
    },
    credentials: {
      password: {
        value: req.body.password
      }
    }
  };
  oktaClient.createUser(newUser)
    .then(user => {
      res.status(201);
      res.send(user);
    })
    .catch(err => {
      res.status(400);
      res.send(err);
    })
});

module.exports = router;
The biggest things of note here are the importing of the lib/oktaClient (which you’ll add in a moment), the call to the createUser function on oktaClient, and the shape of the newUser object. The shape of the newUser object is documented in Okta’s API documentation.
For your Node application to make calls to your Okta application, it will need an API token. To create one, go into your Okta developer dashboard, hover over the API menu option and click on Tokens.
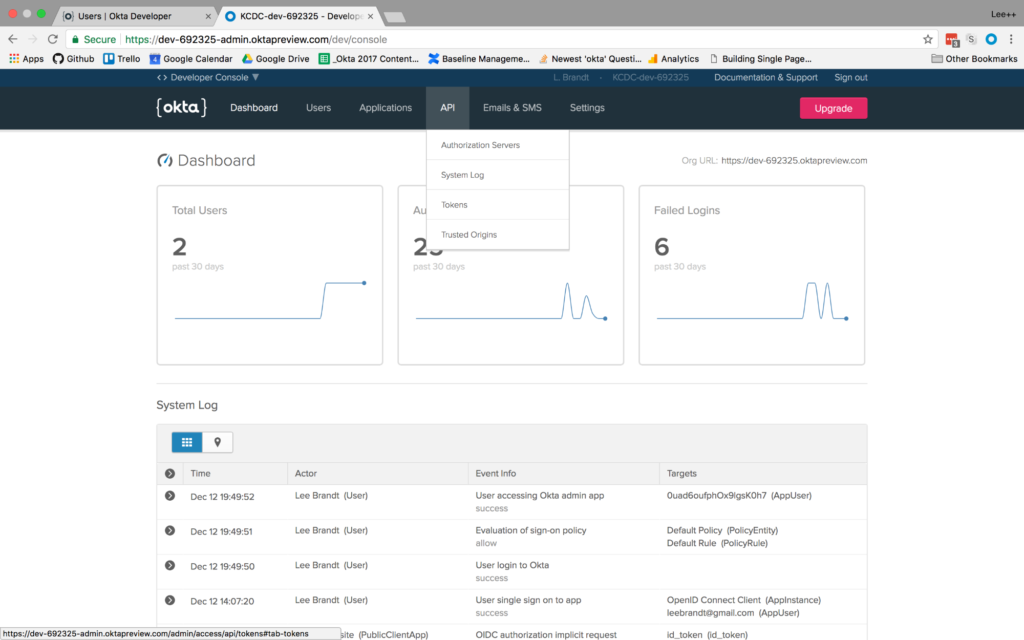
From there click Create Token. Give the token a name like “Membership” and click Create Token.
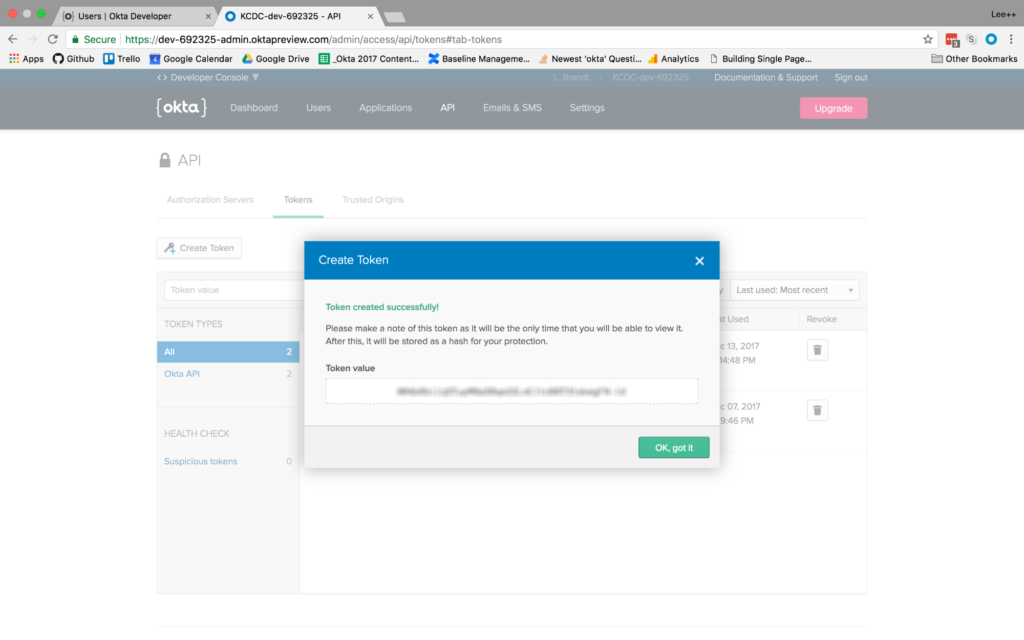
Copy the token to a safe location for use later.
Create a file called oktaClient.js in a new folder called lib in the Node application. The file will configure a Client object from Okta’s Node SDK using the API token you just created like this:
const okta = require('@okta/okta-sdk-nodejs');

const client = new okta.Client({
  orgUrl: '{yourOktaDomain}',
  token: '{yourApiToken}'
});

module.exports = client;
In the app.js file at the root of the Node app, update the file to have all calls route to /api/<something>. You’ll see a section below the block of app.use statements. Change the route set up so that it looks like this:
app.use('/api', index);
app.use('/api/users', users);
If your Node app is still running, you will need to stop the app (with CTRL+C) and rerun it (with npm start) for the updates to take effect.
Even though the site still needs some serious style love, you will now be able to register users, log in with the newly created user and get the logged in user’s profile for display on the profile page!
Learn More
If you want to learn more about the technologies used in this articles, you can check out the documentation for:
Also, check out other articles using Okta for authentication:
- Randall Degges’s article on Okta in a Simple Node Website
- My article using the Okta Sign-In Widget in React
- Matt Raible’s Article on Progressive Web Apps
As always, if you have questions, comments, or concerns about the article you can email me at lee.brandt@okta.com or post your questions to the developer forums. For more articles and tutorials, follow us on Twitter @OktaDev.
Frequently Asked Questions (FAQs) on Building User Registration with Node, React, and Okta
How Can I Implement Okta Authentication in a React App?
Implementing Okta authentication in a React app involves several steps. First, you need to install Okta React SDK using npm or yarn. Then, you need to create an Okta application in your Okta developer account. After creating the application, you will receive a client ID, which you will use to configure the Okta React SDK in your application. You will also need to set up routes for login, logout, and secure pages using the Okta React SDK components. Finally, you can use the useOktaAuth hook to access the authentication state and methods in your components.
What is the Role of Node.js in Building User Registration with Okta?
Node.js plays a crucial role in building user registration with Okta. It acts as the server-side environment where you can set up and run your application. You can use it to create a server, define routes, and handle requests and responses. In the context of Okta, you can use Node.js to interact with the Okta APIs for tasks such as creating users, verifying credentials, and managing sessions.
How Can I Secure My React App with Okta?
Securing your React app with Okta involves using the Okta React SDK to add authentication and authorization features to your app. You can use the Security component to wrap your app and provide it with the necessary authentication context. You can also use the SecureRoute component to protect certain routes and ensure that only authenticated users can access them. Additionally, you can use the useOktaAuth hook to access the authentication state and methods in your components.
How Can I Handle Errors When Implementing Okta Authentication?
When implementing Okta authentication, you may encounter various errors, such as invalid credentials, network errors, or server errors. You can handle these errors by using try-catch blocks in your code. In the catch block, you can log the error message and provide a user-friendly message to the user. You can also use the onError prop of the Security component to handle errors at the global level.
How Can I Test My Okta Authentication Implementation?
Testing your Okta authentication implementation involves checking whether the login, logout, and secure routes work as expected. You can do this manually by navigating to these routes and verifying the behavior. You can also write automated tests using testing libraries such as Jest and React Testing Library. These tests can simulate user actions and check whether the authentication state changes correctly.
How Can I Customize the Okta Login Page?
You can customize the Okta login page by navigating to the “Customizations” section in your Okta developer dashboard. Here, you can change the logo, colors, and text of the login page. You can also use the Okta Sign-In Widget, a JavaScript library that provides a fully customizable login experience.
How Can I Use Okta with Other Frontend Frameworks?
Okta provides SDKs for various frontend frameworks, including Angular and Vue. These SDKs work similarly to the React SDK and allow you to add authentication and authorization features to your apps. You can install the SDK using npm or yarn, configure it with your Okta application details, and use its components and hooks in your app.
How Can I Use Okta with Other Backend Technologies?
Okta provides libraries and SDKs for various backend technologies, including Java, .NET, and PHP. These libraries allow you to interact with the Okta APIs from your server-side code. You can use them to create users, verify credentials, manage sessions, and more.
How Can I Troubleshoot Issues with Okta Authentication?
Troubleshooting issues with Okta authentication involves checking the error messages, looking at the network requests and responses, and reviewing the Okta logs. The error messages can give you clues about what went wrong. The network requests and responses can show you the data sent to and received from Okta. The Okta logs can provide detailed information about the authentication events.
How Can I Learn More About Okta and Its Features?
You can learn more about Okta and its features by visiting the Okta developer website. Here, you can find guides, tutorials, API references, and more. You can also join the Okta developer forums to ask questions and share knowledge with other developers.

