


Key Takeaways
- Utilize Node.js and Express framework to build a simple web application with user registration and authentication features.
- Install and set up MongoDB locally or use MongoDB Atlas for database management, and use Mongoose for database interaction.
- Implement Pug as a templating engine to create dynamic HTML content for the web application.
- Handle form submissions in Express by validating and processing input data using body-parser and express-validator.
- Secure sensitive routes in your application using HTTP authentication with the http-auth module.
- Serve static assets like CSS and JavaScript files using Express’s built-in middleware function, express.static.
- Style the application using Bootstrap for a responsive design and enhance user interface aesthetics.
If you’re just getting started with Node.js and want to try your hand at building a web app, things can often get a little overwhelming. Once you get beyond the “Hello, World!” tutorials, much of the material out there has you copy-pasting code, with little or no explanation as to what you’re doing or why.
This means that, by the time you’ve finished, you’ve built something nice and shiny, but you also have relatively few takeaways that you can apply to your next Node.js projects.
In this tutorial, I’m going to take a slightly different approach. Starting from the ground up, I’ll demonstrate how to build a no-frills web app using Node.js, but instead of focusing on the end result, I’ll focus on a range of things you’re likely to encounter when building a real-world app. These include routing, templating, dealing with forms, interacting with a database and even basic authentication.
This won’t be a JavaScript 101. If that’s the kind of thing you’re after, look here. It will, however, be suitable for those people who feel reasonably confident with the JavaScript language and who are looking to take their first steps in Node.js.
What We’ll Be Building
We’ll be using Node.js and the Express framework to build a simple registration form with basic validation, which persists its data to a MongoDB database. We’ll add a view to list successful registrations, which we’ll protect with basic HTTP authentication, and we’ll use Bootstrap to add some styling. The tutorial is structured so that you can follow along step by step. However, if you’d like to jump ahead and see the end result, the code for this tutorial is also available on GitHub.
Basic Setup
Before we can start coding, we’ll need to get Node, npm and MongoDB installed on our machines. I won’t go into depth on the various installation instructions, but if you have any trouble getting set up, please visit our forums and ask for help there.
Node.js
Many websites will recommend that you head to the official Node download page and grab the Node binaries for your system. While that works, I would suggest that you use a version manager instead. This is a program which allows you to install multiple versions of Node and switch between them with ease. There are various advantages to using a version manager. For example, it negates potential permission issues which would otherwise see you installing packages with admin rights.
If you fancy going the version manager route, please consult our Install Multiple Versions of Node.js Using nvm quick tip. Otherwise, grab the correct binaries for your system from the link above and install those.
npm
npm is a JavaScript package manager which comes bundled with Node, so no extra installation is necessary here. We’ll be making quite extensive use of npm throughout this tutorial, so if you’re in need of a refresher, please consult A Beginner’s Guide to npm — the Node Package Manager.
MongoDB
MongoDB is a document database which stores data in flexible, JSON-like documents. If you’ve never worked with Mongo before, you might like to check out our beginner-friendly introduction to MongoDB.
The quickest way to get up and running with Mongo is to use a service such as MongoDB Atlas. It has a free plan which provides a single database with 512MB of storage running on a shared virtual machine. This is more than adequate for a simple app with a handful of users. If this sounds like the best option for you, please go to the Atlas home page and click the Try Free button to sign up for a free account. You’ll then be dropped into a wizard that will help you create and deploy a database. If you get stuck at any point, this video on getting your free MongoDB Atlas cluster is quite helpful.
You can also install Mongo locally. To do this, please visit the official download page and follow the instructions for your operating system. This will guide you through installing and configuring MongoDB on your machine.
A MongoDB GUI
Although not strictly necessary for following along with this tutorial, you might also like to install Compass, the official GUI for MongoDB. This tool helps you visualize and manipulate your data, allowing you to interact with documents with full CRUD functionality.
Note: if you’re using Windows and installing Mongo locally, you can install Compass as part of the Mongo installation process. No additional download is required.
Checking that everything is installed correctly
To check that Node and npm are installed correctly, open your terminal and type this:
node -v
Then follow it with this:
npm -v
This will output the version number of each program (18.16.0 and 9.5.1 respectively at the time of writing).
If you installed Mongo locally you should be able to check the version number with this:
mongod --version
This should output a bunch of information, including the version number (6.0.6 at the time of writing).
Note: if you’re on Windows and you haven’t added MongoDB to your path, you’ll need to use the full path to the MongoDB Server binaries, as described on the installation page.
Checking the database connection using Compass
Assuming that MongoDB is running, open Compass.
Note: depending on how you installed Mongo, you might first need to start it with the mongod command.
You should be able to accept the defaults (server: localhost, port: 27017), press the CONNECT button, and establish a connection to the database server.
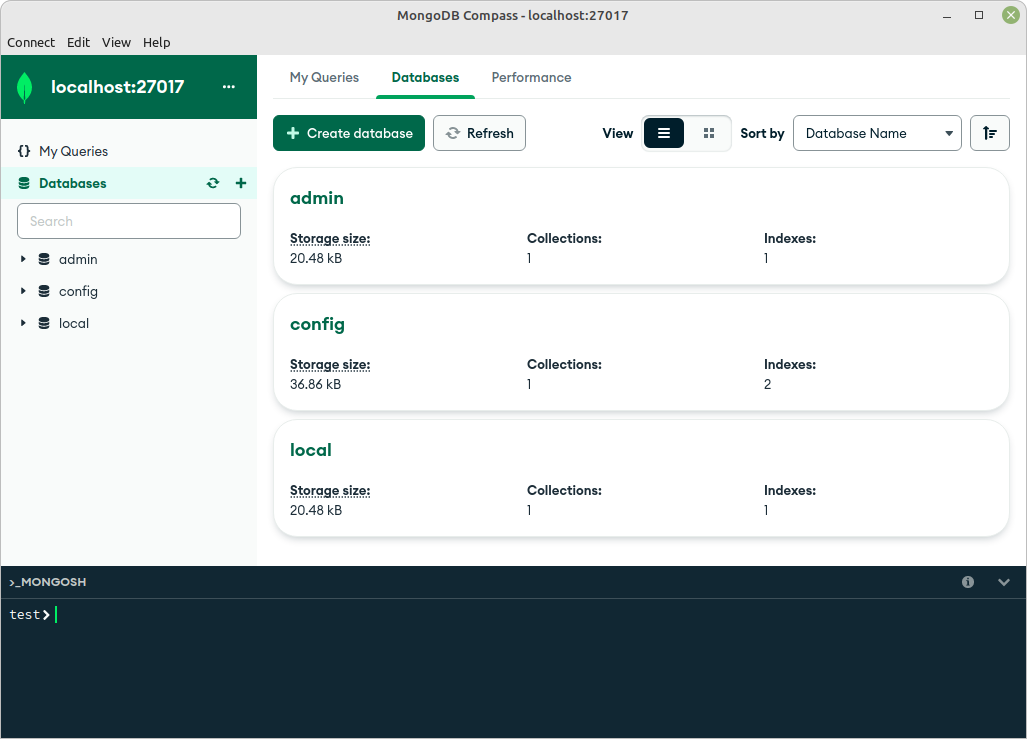
MongoDB Compass connected to localhost
The databases admin, config and local are created automatically.
Using a cloud-hosted solution
If you’re using Mongo Atlas, create your database, set up user authentication, configure IP whitelisting, then make a note of the connection details.
Open Compass, click New connection, then paste your connection string into the text area. This should be similar to the following format:
mongodb+srv://<username>:<password>@<cluster-name>.<uid>.mongodb.net/
Click Connect and you should be off to the races.

MongoDB Compass connected to Atlas
Please note: if you’re running a VPN, you’ll likely need to disable this before connecting.
In both cases, Mongo will name your first database test. This is fine for the purposes of testing the connection, but we’ll see how to change this later on.
Initializing the Application
With everything set up correctly, the first thing we need to do is initialize our new project. To do this, create a folder named demo-node-app, enter that directory, and type the following in a terminal:
npm init -y
This will create and auto-populate a package.json file in the project root. We can use this file to specify our dependencies and to create various npm scripts, which will aid our development workflow.
Installing Express
Express is a lightweight web application framework for Node.js, which provides us with a robust set of features for writing web apps. These features include such things as route handling, template engine integration and a middleware framework, which allows us to perform additional tasks on request and response objects.
To install Express, run the following in your terminal:
npm install express
This will see Express added to the dependencies section of the package.json file. This signals to anyone else running our code that Express is a package our app needs to function properly.
Installing nodemon
nodemon is a convenience tool. It will watch the files in the directory it was started in, and if it detects any changes, it will automatically restart your Node application (meaning you don’t have to). In contrast to Express, nodemon is not something the app requires to function properly (it just aids us with development), so install it with this:
npm install --save-dev nodemon
This will add nodemon to the dev-dependencies section of the package.json file.
Creating some initial files
We’re almost through with the setup. All we need to do now is create a couple of initial files before kicking off the app.
In the demo-node-app folder, create an app.js file and a start.js file. Also create a routes folder, with an index.js file inside.
On Linux you can run this:
mkdir routes && touch app.js start.js routes/index.js
After you’re done, things should look like this:
.
├── app.js
├── node_modules
│   └── ...
├── package.json
├── package-lock.json
├── routes
│   └── index.js
└── start.js
Now, let’s add some code to those files.
In app.js:
const express = require('express');
const routes = require('./routes/index');

const app = express();
app.use('/', routes);

module.exports = app;
Here, we’re importing both the express module and our routes file into the application. The require function we’re using to do this is a built-in Node function which imports an object from another file or module. If you’d like a refresher on importing and exporting modules, read Understanding module.exports and exports in Node.js.
After that, we’re creating a new Express app using the express function and assigning it to an app variable. We then tell the app that, whenever it receives a request from forward slash anything, it should use the routes file.
Finally, we export our app variable so that it can be imported and used in other files.
In start.js:
const app = require('./app');

const server = app.listen(3000, () => {
  console.log(`Express is running on port ${server.address().port}`);
});
Here we’re importing the Express app we created in app.js (note that we can leave the .js off the file name in the require statement). We then tell our app to listen on port 3000 for incoming connections and output a message to the terminal to indicate that the server is running.
And in routes/index.js:
const express = require('express');

const router = express.Router();

router.get('/', (req, res) => {
  res.send('It works!');
});

module.exports = router;
Here, we’re importing Express into our routes file and then grabbing the router from it. We then use the router to respond to any requests to the root URL (in this case http://localhost:3000) with an “It works!” message.
Kicking off the app
Finally, let’s add an npm script to make nodemon start watching our app. Change the scripts section of the package.json file to look like this:
"scripts": {
  "watch": "nodemon ./start.js"
},
The scripts property of the package.json file is extremely useful, as it lets us specify arbitrary scripts to run in different scenarios. This means that we don’t have to repeatedly type out long-winded commands with a difficult-to-remember syntax. If you’d like to find out more about what npm scripts can do, read Give Grunt the Boot! A Guide to Using npm as a Build Tool.
Now, type npm run watch from the terminal and visit http://localhost:3000.
You should see “It works!”
Adding a Templating Engine
Returning an inline response from within the route handler is all well and good, but it’s not very extensible, and this is where templating engines come in. As the Express docs state:
A template engine enables you to use static template files in your application. At runtime, the template engine replaces variables in a template file with actual values, and transforms the template into an HTML file sent to the client.
In practice, this means we can define template files and tell our routes to use them instead of writing everything inline.
The docs continue:
Some popular template engines that work with Express are Pug, Mustache, and EJS.
So which one to use?
Basic templating with Pug
In this article, I’m going to use Pug as a templating engine. Pug (formerly known as Jade) comes with its own indentation-sensitive syntax for writing dynamic and reusable HTML.
I should point out that there has been some criticism that this project has stagnated. However, the author claims it is still maintained. Personally, I find Pug stable, full featured and easy to work with, but be aware that there are lots of other options out there, if you wish to choose a different library.
That said, let’s create a folder named views and in that folder a file named form.pug. Add the following code to this new file:
form(action="." method="POST")
  label(for="name") Name:
  input(
    type="text"
    id="name"
    name="name"
  )

  label(for="email") Email:
  input(
    type="email"
    id="email"
    name="email"
  )

  input(type="submit" value="Submit")
Hopefully the above example is easy to follow, but if you have any difficulties understanding what it does, just wait until we view this in a browser, then inspect the page source to see the markup it produces.
If you’d like a to learn a bit more about Pug before continuing, read our tutorial A Beginner’s Guide to Pug.
Installing Pug and integrating it into the Express app
Next, we’ll need to install pug, saving it as a dependency:
npm install pug
Then configure app.js to use Pug as a layout engine and to look for templates inside the views folder:
const express = require('express');
const path = require('path');
const routes = require('./routes/index');

const app = express();

app.set('views', path.join(__dirname, 'views'));
app.set('view engine', 'pug');

app.use('/', routes);

module.exports = app;
You’ll notice that we’re also requiring Node’s native Path module, which provides utilities for working with file and directory paths. This module allows us to build the path to our views folder using its join method and __dirname (which returns the directory in which the currently executing script resides).
Altering the route to use our template
Finally, we need to tell our route to use our new template. In routes/index.js:
router.get('/', (req, res) => {
  res.render('form');
});
This uses the render method on Express’s response object to send the rendered view to the client.
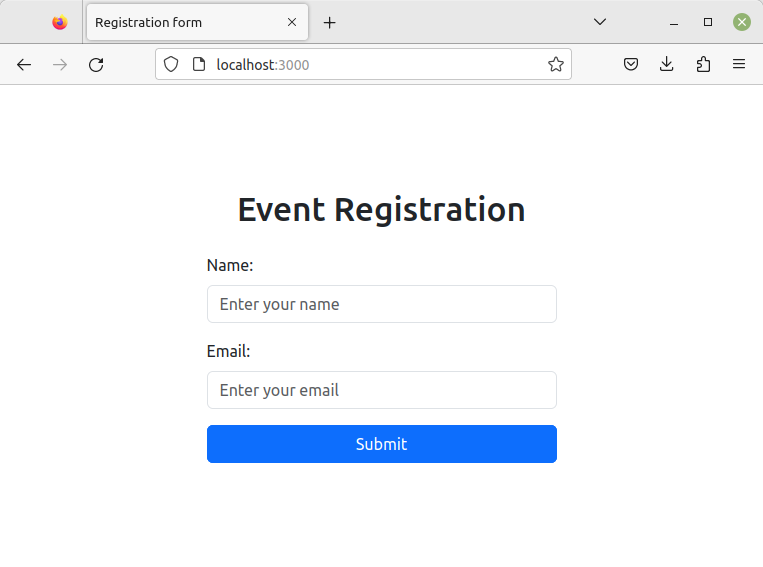
So let’s see if it worked. As we’re using nodemon to watch our app for changes, we should simply be able to refresh our browser and see our brutalist masterpiece.
Defining a layout file for Pug
If you open your browser and inspect the page source, you’ll see that Express only sent the HTML for the form. Our page is missing a doctype declaration, as well as a head and body section. Let’s fix that by creating a master layout for all our templates to use.
To do this, create a layout.pug file in the views folder and add the following code:
doctype html
html
  head
    title= `${title}`

  body
    h1 Event Registration

    block content
The first thing to notice here is the line starting title=. Appending an equals sign to an attribute is one of the methods that Pug uses for interpolation. You can read more about it here. We’ll use this to pass the title dynamically to each template.
The second thing to notice is the line that starts with the block keyword. In a template, a block is simply a “block” of Pug that a child template may replace. We’ll see how to use it shortly, but if you’re keen to find out more, read this page on the Pug website.
Using the layout file from the child template
All that remains to do is to inform our form.pug template that it should use the layout file. To do this, alter views/form.pug, like so:
extends layout

block content
  form(action="." method="POST")
    label(for="name") Name:
    input(
      type="text"
      id="name"
      name="name"
    )

    label(for="email") Email:
    input(
      type="email"
      id="email"
      name="email"
    )

    input(type="submit" value="Submit")
And in routes/index.js, we need to pass in an appropriate title for the template to display:
router.get('/', (req, res) => {
  res.render('form', { title: 'Registration form' });
});
Now if you refresh the page and inspect the source, things should look a lot better.
Dealing with Forms in Express
Currently, if we hit our form’s Submit button, we’ll be redirected to a page with a message: “Cannot POST /”. This is because, when submitted, our form POSTs its contents back to /, and we haven’t defined a route to handle that yet.
Let’s do that now. Add the following to routes/index.js:
router.post('/', (req, res) => {
  res.render('form', { title: 'Registration form' });
});
This is the same as our GET route, except for the fact that we’re using router.post to respond to a different HTTP action.
Now when we submit the form, the error message will be gone and the form should just re-render.
Handling form input
The next task is to retrieve whatever data the user has submitted via the form. To do this, we’ll need to install a package named body-parser, which will make the form data available on the request body:
npm install body-parser
We’ll also need to tell our app to use this package, so add the following to app.js:
const bodyParser = require('body-parser');
...
app.use(bodyParser.urlencoded({ extended: true }));
app.use('/', routes);

module.exports = app;
Note that there are various ways to format the data we POST to the server, and using body-parser’s urlencoded method allows us to handle data sent as application/x-www-form-urlencoded.
Then we can try logging the submitted data to the terminal. Alter the route handler in routes/index.js like so:
router.post('/', (req, res) => {
  console.log(req.body);
  res.render('form', { title: 'Registration form' });
});
Now when we submit the form, we should see something along the lines of this:
{name: 'Jim', email: 'jim@example.com'}
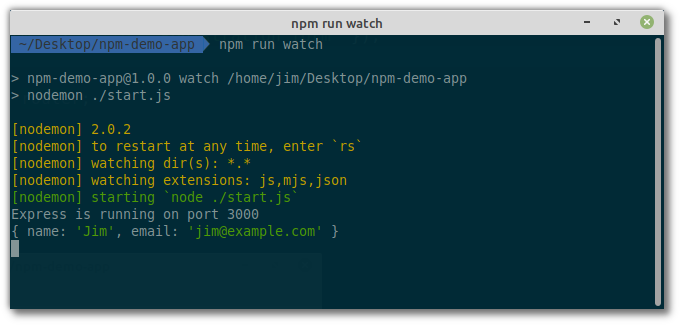
Form output logged to terminal
A note about request and response objects
By now, you’ve hopefully noticed the pattern we’re using to handle routes in Express:
router.METHOD(route, (req, res) => {
  // callback function
});
The callback function is executed whenever somebody visits a URL that matches the route it specifies. The callback receives req and res parameters, where req is an object full of information that’s coming in (such as form data or query parameters) and res is an object full of methods for sending data back to the user. There’s also an optional next parameter, which is useful if we don’t actually want to send any data back, or if we want to pass the request off for something else to handle.
Without getting too deep into the weeds, this is a concept known as middleware (specifically, router-level middleware) which is very important in Express. If you’re interested in finding out more about how Express uses middleware, I recommend you read the Express docs.
Validating form input
Now let’s check that the user has filled out both our fields. We can do this using express-validator module, a middleware that provides a number of useful methods for the sanitization and validation of user input.
We can install it like so:
npm install express-validator
Then we need to require the functions we’ll need in routes/index.js:
const { check, validationResult } = require('express-validator');
We can include it in our route handler like so:
router.post('/',
  [
    check('name')
      .isLength({ min: 1 })
      .withMessage('Please enter a name'),
    check('email')
      .isLength({ min: 1 })
      .withMessage('Please enter an email'),
  ],
  (req, res) => {
    ...
  });
We’re using the check method to validate two properties on req.body — namely, name and email. In our case, it’s sufficient to just check that these properties exist (that is, that they have a length greater than one), but if you’d like to do more you can check out the full range of validators here.
In a second step, we can call the validationResult method to see if validation passed or failed. If no errors are present, we can go ahead and render out a “Thanks for registering” message. Otherwise, we’ll need to pass these errors back to our template to inform the user that something’s wrong.
And if validation fails, we’ll also need to pass req.body back to the template, so that any valid form inputs aren’t reset:
router.post(
  '/',
  [
    ...
  ],
  (req, res) => {
    const errors = validationResult(req);

    if (errors.isEmpty()) {
      res.send('Thank you for your registration!');
    } else {
      res.render('form', {
        title: 'Registration form',
        errors: errors.array(),
        data: req.body,
      });
    }
  }
);
Now we have to make a couple of changes to our form.pug template. We firstly need to check for an errors property, and if it’s present, loop over any errors and display them in a list:
extends layout

block content
  if errors
    ul
      for error in errors
        li= error.msg
  ...
If the li= looks weird, remember that pug does interpolation by following the tag name with an equals sign.
Finally, we need to check if a data attribute exists, and if so, use it to set the values of the respective fields. If it doesn’t exist, we’ll initialize it to an empty object, so that the form will still render correctly when we load it for the first time. We can do this with some JavaScript, denoted in Pug by a minus sign:
-data = data || {}
We then reference that attribute to set the field’s value:
input(
  type="text"
  id="name"
  name="name"
  value=data.name
)
Note: in Pug, by default, all attributes are escaped. That is, special characters are replaced with escape sequences to prevent attacks (such as cross site scripting).
This gives us the following:
extends layout

block content
  -data = data || {}

  if errors
    ul
      for error in errors
        li= error.msg

  form(action="." method="POST")
    label(for="name") Name:
    input(
      type="text"
      id="name"
      name="name"
      value=data.name
    )

    label(for="email") Email:
    input(
      type="email"
      id="email"
      name="email"
      value=data.email
    )

    input(type="submit" value="Submit")
Now, when we submit a successful registration, we should see a thank you message, and when we submit the form without filling out both field, the template should be re-rendered with an error message.
Interacting with a Database
We now want to hook our form up to our database, so that we can save whatever data the user enters. If you’re working with Mongo locally, don’t forget to make sure the server is running (possibly with the command mongod).
Specifying connection details
We’ll need somewhere to specify our database connection details. For this, we’ll use a configuration file (which should not be checked into version control) and the dotenv package. Dotenv will load our connection details from the configuration file into Node’s process.env.
Install it like so:
npm install dotenv
And require it at the top of start.js:
require('dotenv').config();
Next, create a file named .env in the project root (note that starting a filename with a dot may cause it to be hidden on certain operating systems) and enter your Mongo connection details on the first line.
If you’re running Mongo locally:
DATABASE=mongodb://localhost:27017/<dbname>
Make sure to replace <db-name> with whatever you are calling your database.
If you’re using Mongo Atlas, use the connection string you noted down previously. It should be in this format:
mongodb+srv://<username>:<password>@<cluster-name>.<uid>.mongodb.net/<dbname>
We’re now specifying a database name, which Mongo will create if it doesn’t exist. You can name yours whatever you like and use Compass to delete the test database.
A word on security
There are two security matters to point out before we go any further. Neither should affect your ability to follow along with this tutorial, but they are definitely things you should be aware of.
- Local installations of MongoDB don’t have a default user or password. This is definitely something you’ll want to change in production, as it’s otherwise a security risk. You can check the Mongo docs for more info on how to do this.
- If you’re using Git to version your project, be sure to add the
.envfile to your.gitignore. The.envfile should remain on your PC and not be shared with anyone.
That said, let’s carry on building the app …
Connecting to the database
To establish the connection to the database and to perform operations on it, we’ll be using Mongoose. Mongoose is an ODM (object-document mapper) for MongoDB, and as we can read on the project’s home page:
Mongoose provides a straight-forward, schema-based solution to model your application data. It includes built-in type casting, validation, query building, business logic hooks and more, out of the box.
This means that it creates various abstractions over Mongo, which make interacting with our database easier and reduces the amount of boilerplate we have to write. If you’d like to find out more about how Mongo works under the hood, be sure to read our Introduction to MongoDB.
Install Mongoose like so:
npm install mongoose
Then, require it in start.js:
const mongoose = require('mongoose');
The connection is made like this:
mongoose.connect(process.env.DATABASE, {
  useNewUrlParser: true,
  useUnifiedTopology: true
});

mongoose.connection
  .on('open', () => {
    console.log('Mongoose connection open');
  })
  .on('error', (err) => {
    console.log(`Connection error: ${err.message}`);
  });
Notice how we use the DATABASE variable we declared in the .env file to specify the database URL.
This is what start.js should now look like:
require('dotenv').config();
const mongoose = require('mongoose');

mongoose.connect(process.env.DATABASE, {
  useNewUrlParser: true,
  useUnifiedTopology: true
});

mongoose.connection
  .on('open', () => {
    console.log('Mongoose connection open');
  })
  .on('error', (err) => {
    console.log(`Connection error: ${err.message}`);
  });

const app = require('./app');
const server = app.listen(3000, () => {
  console.log(`Express is running on port ${server.address().port}`);
});
When we save the file, nodemon will restart the app and, if all’s gone well, we should see the message “Mongoose connection open”.
Defining a Mongoose Schema
MongoDB can be used as a loose database, meaning it’s not necessary to describe what data will look like ahead of time. However, we’re using Mongoose to interact with it, and everything in Mongoose starts with a schema. In Mongoose, each schema maps to a MongoDB collection and defines the shape of the documents within that collection.
To this end, create a models folder in the project root, and within that folder, a new file named Registration.js.
Add the following code to Registration.js:
const mongoose = require('mongoose');

const registrationSchema = new mongoose.Schema({
  name: {
    type: String,
    trim: true,
  },
  email: {
    type: String,
    trim: true,
  },
});

module.exports = mongoose.model('Registration', registrationSchema);
Here, we’re just defining a type (as we already have validation in place) and are making use of the trim helper method to remove any superfluous white space from user input. We then compile a model from the Schema definition, and export it for use elsewhere in our app.
The final piece of boilerplate is to require the model in start.js:
...

require('./models/Registration');
const app = require('./app');

const server = app.listen(3000, () => {
  console.log(`Express is running on port ${server.address().port}`);
});
Saving data to the database
Now we’re ready to save user data to our database. Let’s begin by requiring Mongoose and importing our model into our routes/index.js file:
const express = require('express');
const mongoose = require('mongoose');
const { check, validationResult } = require('express-validator');

const router = express.Router();
const Registration = mongoose.model('Registration');
...
Now, when the user posts data to the server, if validation passes we can go ahead and create a new Registration object and attempt to save it. As the database operation is an asynchronous operation which returns a promise, we can chain a .then() onto the end of it to deal with a successful insert and a .catch() to deal with any errors:
if (errors.isEmpty()) {
-  res.send('Thank you for your registration!');
+  const registration = new Registration(req.body);
+  registration.save()
+    .then(() => { res.send('Thank you for your registration!'); })
+    .catch((err) => {
+      console.log(err);
+      res.send('Sorry! Something went wrong.');
+    });
} else {
  ...
}

...
Now, if we enter your details into the registration form, they should be persisted to the database. We can check this using Compass (hit Ctrl + R to refresh the data if our newly created records aren’t showing).
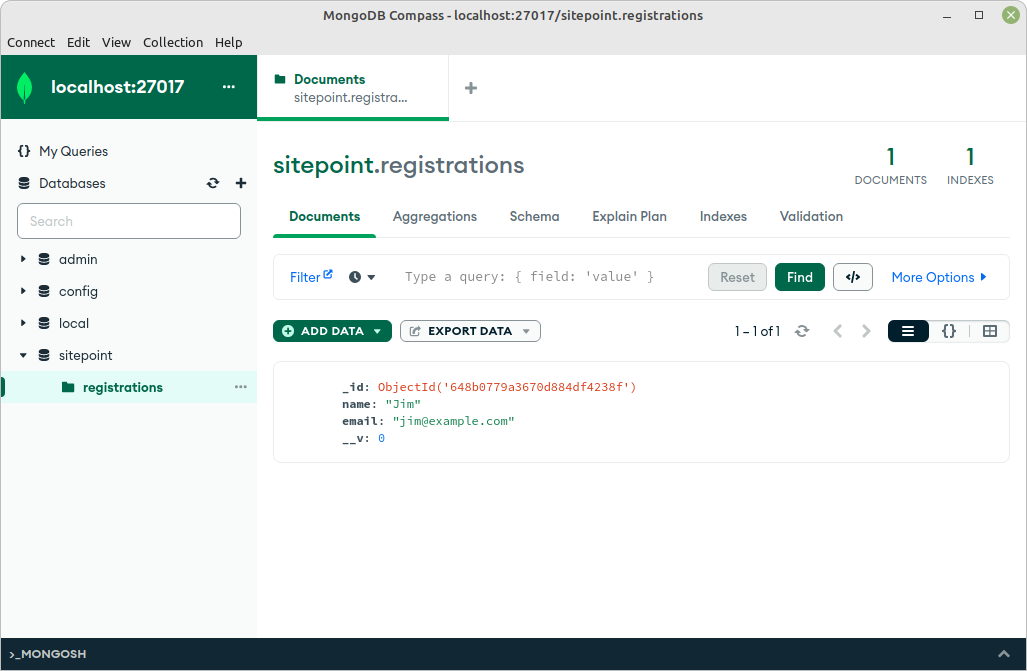
Using Compass to check that our data was saved to MongoDB
Retrieving data from the database
To round the app off, let’s create a final route, which lists out all of our registrations. Hopefully you should have a reasonable idea of the process by now.
Add a new route to routes/index.js, as follows:
router.get('/registrations', (req, res) => {
  res.render('index', { title: 'Listing registrations' });
});
This means that we’ll also need a corresponding view template (views/index.pug):
extends layout

block content
  p No registrations yet :(
Now when we visit http://localhost:3000/registrations, we should see a message telling us that there aren’t any registrations.
Let’s fix that by retrieving our registrations from the database and passing them to the view. We’ll still display the “No registrations yet” message, but only if there really aren’t any.
In routes/index.js:
router.get('/registrations', (req, res) => {
  Registration.find()
    .then((registrations) => {
      res.render('index', { title: 'Listing registrations', registrations });
    })
    .catch(() => { res.send('Sorry! Something went wrong.'); });
});
Here, we’re using Mongo’s Collection.find method, which, if invoked without parameters, will return all of the records in the collection. Because the database lookup is asynchronous, we’re waiting for it to complete before rendering the view. If any records were returned, these will be passed to the view template in the registrations property. If no records were returned, registrations will be an empty array.
In views/index.pug, we can then check the length of whatever we’re handed and either loop over it and output the records to the screen, or display a “No registrations” message:
extends layout

block content

block content
  if registrations.length
    table
      thead
        tr
         th Name
         th Email
      tbody
      each registration in registrations
        tr
          td= registration.name
          td= registration.email
  else
    p No registrations yet :(
Adding HTTP Authentication
The final feature we’ll add to our app is HTTP authentication, locking down the list of successful registrations from prying eyes.
To do this, we’ll use the http-auth module, which we can install like so:
npm install http-auth
Next we need to require it in routes/index.js, along with the Path module we met earlier:
const path = require('path');
const auth = require('http-auth');
Next, let it know where to find the file in which we’ll list the users and passwords (in this case users.htpasswd in the project root):
const basic = auth.basic({
  file: path.join(__dirname, '../users.htpasswd'),
});
Create this users.htpasswd file next and add a username and password separated by a colon. This can be in plain text, but the http-auth module also supports hashed passwords, so you could also run the password through a service such as Htpasswd Generator.
For me, the contents of users.htpasswd look like this:
jim:$apr1$FhFmamtz$PgXfrNI95HFCuXIm30Q4V0
This translates to user: jim, password: password.
Finally, add it to the route you wish to protect and you’re good to go:
router.get('/registrations', basic.check((req, res) => {
  ...
}));
Try accessing http://localhost:3000/registrations in your browser (refreshing the page, or restarting your browser if necessary). You should now be prompted for a password.
Note: you should also add users.htpasswd to your .gitignore file if you’re using Git.
Serving Static Assets in Express
Let’s give the app some polish and add some styling using Bootstrap. We can serve static files such as images, JavaScript files and CSS files in Express using the built-in express.static middleware function.
Setting it up is easy. Just add the following line to app.js:
app.use(express.static('public'));
Now we can load files that are in the public directory.
Styling the app with Bootstrap
Create a public directory in the project root, and in the public directory create a css directory. Download Bootstrap v5.3 as a zip file and extract it, then find bootstrap.min.css and place it in our public/css directory.
Next, we’ll need to add some markup to our Pug templates.
In layout.pug:
doctype html
html
  head
    title= `${title}`
    link(rel='stylesheet', href='/css/bootstrap.min.css')
    link(rel='stylesheet', href='/css/styles.css')

  body
    div.container
      h1.text-center.mb-4 Event Registration

      block content
Here, we’re including two files from our previously created css folder and adding a couple of Bootstrap classes.
In form.pug we need to add a couple of wrapper divs, as well as some further class names to the error messages and the form elements:
extends layout

block content
  -data = data || {}

  div.form-wrapper
    if errors
      ul.error-messages
        for error in errors
          li= error.msg

    form(action="." method="POST")
      div.mb-3
        label(for="name" class="form-label") Name:
        input(
          type="text"
          class="form-control"
          id="name"
          name="name"
          placeholder="Enter your name"
          value=data.name
        )
      div.mb-3
        label(for="email" class="form-label") Email:
        input(
          type="email"
          class="form-control"
          id="email"
          name="email"
          placeholder="Enter your email"
          value=data.email
        )

      input(
        type="submit"
        class="btn btn-primary"
        value="Submit"
      )
And in index.pug, more of the same:
extends layout

block content

  if registrations.length
    table.table.table-bordered.table-striped.mt-5
      thead.table-dark
        tr
         th Name
         th Email
      tbody
      each registration in registrations
        tr
          td= registration.name
          td= registration.email
  else
    p No registrations yet :(
Finally, create a file called styles.css in the css folder and add the following:
body {
  display: flex;
  justify-content: center;
  align-items: center;
  height: 100vh;
}

.form-wrapper {
  max-width: 350px;
  margin: auto;
}

.form-wrapper .form-control,
.form-wrapper .btn {
  width: 100%;
}

.error-messages {
  color: red;
  list-style: none;
  padding: 0;
  margin-bottom: 10px;
}

.error-messages li::before {
  content: "•";
  margin-right: 5px;
}
Now when you refresh the page, you should see all of the Bootstrap glory!
Conclusion
I hope you’ve enjoyed this tutorial. While we didn’t build the next Facebook, I hope that I was nonetheless able to help you make a start in the world of Node-based web apps and offer you some solid takeaways for your next project in the process. As noted above, the code for this tutorial is available on GitHub.
And while this tutorial has opened doors to fundamental concepts, mastering Node.js involves diving deeper and exploring its more intricate layers. A great way to further your knowledge and skills is through one of our books, Node.js: Novice to Ninja, over on SitePoint Premium.
If you have any questions or comments, please reach out on Twitter.
Happy coding!
FAQs About Using Node.js with Bootstrap and MongoDB
Node.js is a server-side runtime environment for JavaScript. It is commonly used in web development to create server-side applications, including those that interact with databases like MongoDB and serve front-end content built with frameworks like Bootstrap.
Yes, Node.js can be used with Bootstrap for server-side rendering, allowing you to generate HTML on the server and send it to the client. This can improve performance and SEO.
You can include Bootstrap in your Node.js project by either downloading it from the Bootstrap website and linking to the CSS and JavaScript files in your HTML, or you can use npm to install Bootstrap and include it in your project.
MongoDB is a popular choice for many Node.js applications, especially those that require flexible and scalable data storage. It’s well-suited for applications with rapidly changing data schemas and complex data structures.
You can use the official MongoDB Node.js driver or third-party libraries like Mongoose to connect your Node.js application to a MongoDB database. These libraries provide easy-to-use APIs for interacting with the database.

