
Every company and organization needs to communicate internally, and an intranet is a valuable tool in this continuous process.
This article shows how you can configure eZ publish to share information, and to restrict information over your intranet. It also shows how you can replace your existing network file system with an accessible virtual WebDav-enabled versioned file system.
Key Takeaways
- eZ publish, an open-source content management system, can be configured to share and restrict information over your intranet, serving as an accessible virtual WebDav-enabled versioned file system.
- Post-installation configuration of eZ publish allows customization of the intranet’s look and feel to fit the corporate profile, including changes to the CSS, design styles, and application of one of the 20 supplied themes.
- eZ publish offers a well-planned process for document management, enabling easy uploading and accessing of common content containers like Word, Excel, Power Point, PDF files, and more, making the transition to saving files on the intranet smooth for users.
- A role-based permission system controls the content in eZ publish, allowing for the creation of restricted areas, assignment of unique sections, and defining of user types with different attributes.
- eZ publish can be configured as an intranet site within 30 minutes on an Apache Web server, providing essential intranet functionality such as alternative central document storage and integrated search.
Get eZ publish Running
As eZ publish is Open Source, you can download it directly from the eZ publish site. In this article, I used the 3.5 version of the system, which was available in beta at the time of writing.
I will not cover the eZ publish installation process, since it’s well-covered in other sources, such as the official eZ publish install documentation. During the installation, you will be asked to select the site type; choose “intranet”. The next step in the installer is to select the functionality; there, select:
- files
- forum
- image gallery
- news
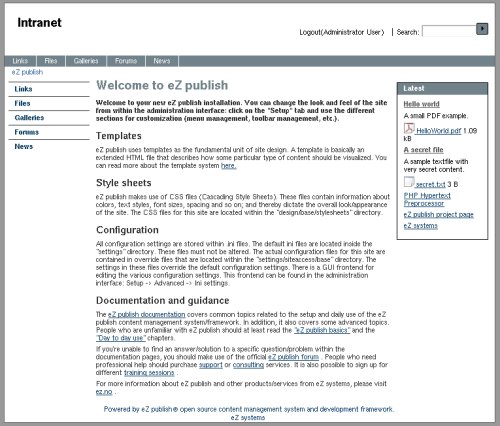
The intranet site type is pre-configured to require users to log in before they can use the site. This differs from the other site types, for which all content is public by default. The image below shows how our intranet site looks immediately after installation.
Post-Installation Configuration
Once eZ publish is installed you can instantly start to publish content such as articles, files and images. But, we want to change the look and feel of our intranet to fit the corporate profile. Let’s do this before we start to add content to the site.
eZ publish provides many possibilities for the application of design styles, with the easiest being simply to change the CSS. Since eZ publish is tagged with a so-called “table-less div layout”, you can change most of the design just by altering the CSS definitions. If you’re not as comfortable with CSS as you’d like to be, see SitePoint’s HTML Utopia: Designing Without Tables Using CSS.
For the purpose of this tutorial, we’re going to use one of the sample themes that come with the eZ publish installation. To change the style sheet with one of the 20 supplied themes, go to the Design tab in the Administration interface, and click on “Look and Feel”. There, you can change the site tile, edit some meta data, upload a new logo, and change the theme. I changed the title to “SitePoint Intranet” and picked theme 20.
By changing the template, you can make the site look different, but if you have very specific demands that cannot be met through alterations to the CSS file, you can always edit the templates yourself. All the visual parts of eZ publish are defined in templates and can be changed: the eZ publish site has detailed information about altering templates.
Menus and Toolbars
By default, eZ publish comes with a top and left menu. To use less horizontal space for our intranet, we can use Menu Management to switch to a double horizontal menu instead. Menu Management is found under the Design tab in the Administration interface. Be sure to have selected the correct site access before applying the menu changes. In our example, intranet is the correct site access name.
Toolbars are an eZ publish mechanism that enable you to configure the boxes with functionality on the top, right, or bottom of the default eZ publish installation. These are, of course, template-based, so you can alter or add additional toolbars, or change their positions. The Intranet site style comes with a tool that shows the most recently published files by default.
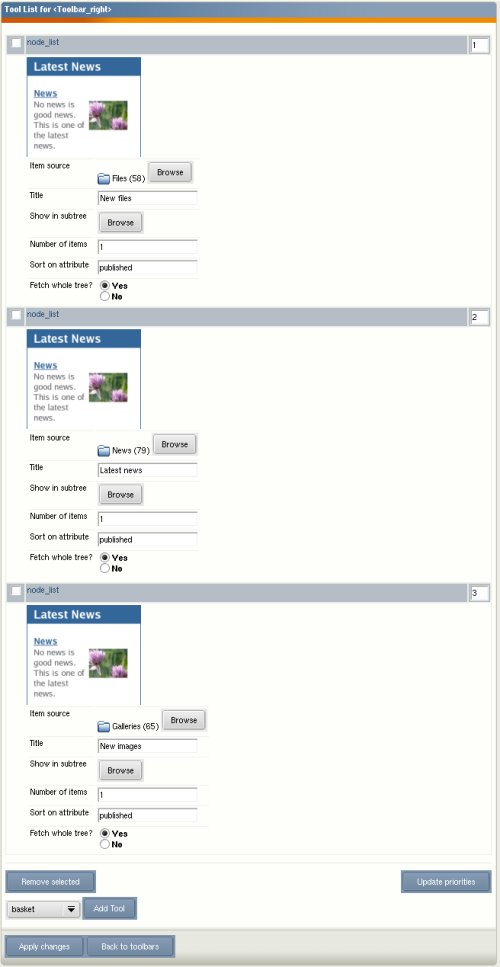
Let’s use Toolbar Management, found under the Design tab, to make eZ publish show the last file, the last news article, and the last images published. To do this, edit the right toolbar, adding three node list tools. Select the source from which the objects are fetched by clicking the item source browse button. Change the number of items to 1, and enter a new title for each box. The screenshot below shows the toolbar configuration page.
Document Management
Documents such as Word, Excel, Power Point, PDF, etc. are the most common content containers on every intranet. An intranet solution will not be used if uploading and accessing these files is too hard. It is therefore vital that every intranet has a well-planned process to manage this.
The users are used to saving the documents either on their local discs, or on a mounted network drive. We should try to make the transition to saving files on the intranet as smooth as possible. The users can use the intranet as a virtual file system if we use the WebDav functionality in eZ publish. Files that are uploaded via the WebDav Interface will then instantly be accessible on the intranet, and vise versa. The content of known files such as Word and PDF documents will also be indexed in the search engine, so retrieving the documents is simple. The eZ publush site offers information on how to configure the binary file indexer.
As a bonus, all documents in the system are versioned. This means that if you overwrite a file, eZ publish will create a new version of the document; you can roll back to the previous version later if the need arises.
Configuring The WebDav Interface
As mentioned earlier, eZ publish comes with a WebDav interface as standard. To get this interface up and running, we need to create a new virtualhost. To do so, we edit the Apache configuration file, httpd.conf. To add a new virtualhost directive in httpd.conf, you’ll need to add a configuration like the one shown below. Just replace the path, /var/www/intranet, with the root of your eZ publish installation, and the ServerName webdav.no with the DNS name for your WebDav virtualhost.
<VirtualHost *>

    Options FollowSymLinks Indexes

    ServerAdmin nospam@ez.no

    DocumentRoot /var/www/intranet

    RewriteEngine On

    RewriteRule !.(css|jar|js|html|php)$ /var/www/intranet/webdav.php

    ServerName webdav.no

    ErrorLog logs/error_log

    CustomLog logs/access_log common

</VirtualHost>
If you do not have access to a DNS server, you can add an entry in your ‘hosts’ configuration file; alternatively, you could have Apache listen to another port, for example, port 81. If you add the webdav host name to the ‘hosts’ configuration file, it will not be accessible from any other computer.
The webdav interface also needs to be enabled in eZ publish. This can be done by altering settings/webdav.ini. Below you find the setting that enables the WebDav interface.
[GeneralSettings]

EnableWebDAV=true
Using WebDav
To access eZ publish via the WebDav interface, you need a WebDav-enabled client. Some WebDav clients include Windows Explorer, OS-X Finder and Konqueror, but there are several other clients as well. In this article I’ll use the Konqueror client, as I use KDE under Linux on my workstation.
To access the WebDav interface, simply type “webdav://webdav.no” into the location toolbar. Remember to replace the domain with the domain you used in your configuration. The available “site accesses” should show up as folders. A site access is a virtual site defined in eZ publish; you can define several virtual sites within the same eZ publish installation.
When you enter the intranet site access, you will be prompted for your login and password. Use any valid eZ publish user for the login. From there, you can use eZ publish as a usual remote virtual file system. The tasks the user can perform are controlled by the permissions defined in the role system. So, “Area 51” will not be visible if you do not have permissions to view it.
Since eZ publish has a much more advanced structure than a normal file system, it will show as folders all the objects that are not images or files. This can, however, be configured in the webdav.ini configuration file.
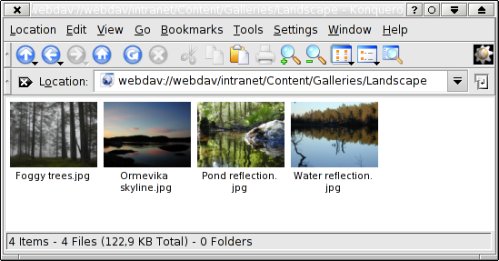
The screenshot below shows the appearance of the WebDav interface as images are browsed in the gallery. It’s just like navigating on your local file system: you can drag and drop images, files or folders, and they will automatically be imported into eZ publish and published.
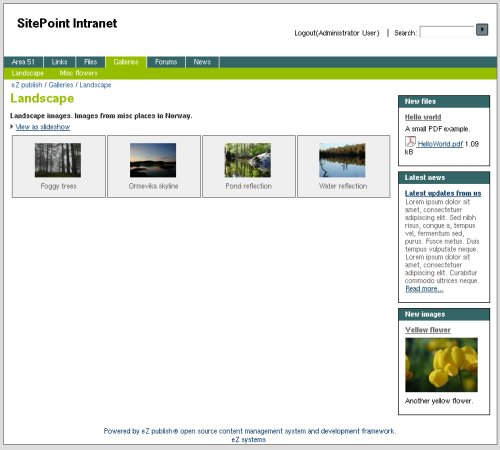
The screenshot below shows the image gallery displayed on the Web page. You can navigate files in the file folder in the same way. Also notice that the page has a new color theme, a new title and new toolbar boxes on the right hand side, resulting from the configuration options we set above.
Area 51
Any content in eZ publish is controlled by the role-based permission system. To create a restricted area, we establish a folder in the root of the intranet. Go to the administration interface in eZ publish and click on the Content Structure tab. This allows you to navigate the content root. Select “folder” from the drop-down and click the “Create here” button. You will then be redirected to the editing interface for the folder. Enter a name for the folder, for example, “Area 51”, and click on the “Send for publishing” button.
This folder will appear in the menu on the user site automatically, but it is not yet restricted in any way. We can assign a new “section” to this folder to make it unique. A section is an eZ publish mechanism that’s used, for example, to assign restricted permissions to objects.
First, we need to create this new section. If you go to the Setup tab and click on the Sections menu item, you’ll be given the option to create a new section; do so, and name the section “Restricted”. To assign the section to the folder, click on the paper clip icon in the section list. In the location browser choose the “Area 51” folder, and click ok.
To verify that the section is assigned correctly, go back to the navigation root by clicking the Content Structure tab. Click on Detailed View of the sub items. The screenshot below shows this detailed view. Notice that the section assigned to “Area 51” is restricted. Any content published under this folder will inherit the section information, and the content will therefore be restricted in the same way.
Creating a User
We need to create a new user since, by default, we have only the administrator user, who has permissions to view any object. To create a new user, go to the “User Accounts” tab and click on the “Guest Accounts” user group. Select user from the drop-down and click on the “Create Here” button. Then, enter the information about the user and click “Send for publishing”. You can now log in with this new user account; notice that you cannot access the “Area 51” folder any more. The reason for this is that guest users are assigned the anonymous role, which allows them to read only the content in the standard section.
Notice that this is the same kind of editing interface you used when we created the “Area 51” folder. This is because all the content in eZ publish is handled in the same way, and a user is just a particular type of content. If you like, you can define several different user types with different attributes. You can, for example, add phone number and address information to the user accounts.
A Word on Policies and Roles
The role-based permission system in eZ publish is based on roles. A role consists of a list of policies. A policy defines access to something, for example, to read articles, remove folders or log in to the administration interface. By default, users do not have access to anything unless that access is specifically defined in an assigned role. One role can be assigned to one or more users or groups.
You can create a hierarchy of user groups simply by adding a new user group under an existing group. Any role assigned to a user group is inherited by sub-users or -groups (this feature can be restricted to one level of inheritance in the configuration files if desired).
Final Words
We have looked at how the free, open source content management system eZ publish can be used to power a typical intranet site. The CMS has the essential functionality required by an intranet, including an alternative central document storage and integrated search. And all of it can be achieved with very little effort. If you have access to an Apache Web server, you can configure eZ publish as an intranet site within 30 minutes.
If you do not have access to an Apache Web server, but still want to try out eZ publish, you can use the eZ publish demo site. The administration interface is found at http://admindevel.ezpublish.no/. The username is “admin” and the password is “publish”. This site is publicly available with administration permissions. It is reset every two hours, so you can test any features you wish. But be aware that quite a few people might test the installation at the same time.
Frequently Asked Questions about Building an Intranet with eZ Publish
What is eZ Publish and how can it be used to build an intranet?
eZ Publish is an open-source content management system (CMS) that is widely used for building and managing websites, intranets, and online applications. It provides a robust and flexible platform that allows developers to create customized solutions to meet specific business needs. With its powerful content management capabilities, eZ Publish can be used to build an intranet that facilitates internal communication, collaboration, and information sharing within an organization.
How does eZ Publish compare to other CMS platforms for building an intranet?
Compared to other CMS platforms, eZ Publish offers several unique features that make it an excellent choice for building an intranet. These include its powerful content management capabilities, flexible architecture, and robust security features. Additionally, eZ Publish supports multilingual content, which can be particularly useful for organizations with international operations.
What are the key features of eZ Publish that make it suitable for building an intranet?
Some of the key features of eZ Publish that make it suitable for building an intranet include its powerful content management capabilities, flexible architecture, and robust security features. It also supports multilingual content and provides tools for managing user roles and permissions, which can be particularly useful in an intranet environment.
How can I customize my eZ Publish intranet to meet my organization’s specific needs?
eZ Publish provides a range of customization options that allow you to tailor your intranet to meet your organization’s specific needs. This includes the ability to create custom content types, design custom templates, and configure user roles and permissions. Additionally, eZ Publish’s flexible architecture allows you to integrate it with other systems and applications, further enhancing its functionality.
What are the security features of eZ Publish?
eZ Publish includes robust security features to protect your intranet from unauthorized access and data breaches. This includes support for secure protocols, encryption, and user authentication. Additionally, eZ Publish provides tools for managing user roles and permissions, allowing you to control who has access to what content and features on your intranet.
How does eZ Publish support multilingual content?
eZ Publish includes built-in support for multilingual content, allowing you to create and manage content in multiple languages. This can be particularly useful for organizations with international operations, as it allows you to provide content in the languages spoken by your employees.
Can I integrate eZ Publish with other systems and applications?
Yes, eZ Publish’s flexible architecture allows you to integrate it with other systems and applications. This can enhance the functionality of your intranet by allowing you to pull in data from other sources, integrate with third-party services, and more.
What kind of support is available for eZ Publish?
As an open-source platform, eZ Publish has a large and active community of users and developers who can provide support and assistance. Additionally, there are numerous resources available online, including documentation, tutorials, and forums, where you can find answers to your questions and learn more about using eZ Publish.
How can I get started with building an intranet using eZ Publish?
To get started with building an intranet using eZ Publish, you’ll first need to download and install the platform. From there, you can begin customizing your intranet to meet your organization’s specific needs. There are numerous resources available online to help you get started, including tutorials, documentation, and forums.
What are the system requirements for running eZ Publish?
eZ Publish requires a web server, a database server, and PHP to run. The specific requirements may vary depending on the version of eZ Publish you are using. It’s recommended to check the official eZ Publish documentation for the most accurate and up-to-date information.