

Key Takeaways
- IBM Worklight is a powerful platform for building mobile hybrid apps, enabling developers to use JavaScript, HTML5, and CSS3 to create applications for different mobile devices. It offers features such as version management, direct update, push notification, and connectivity to databases and web services.
- The installation process of IBM Worklight involves downloading and unzipping Eclipse Juno for J2EE, and then installing the IBM Worklight plugin. To develop for Android, the Android Developer Tools must also be installed.
- Creating a mobile hybrid application with IBM Worklight involves creating a Worklight Application, adding an Android environment, customizing and building the app. The platform supports HTML5 elements, JQuery Mobile and DoJo controls, allowing for easy customization of the app.
The development of mobile applications that run on many smartphones was considered a very difficult concern for mobile developers. Mobiles are different: multi-OS, multi-devices, multi-sizes, etc., so the marriage of web technologies – HTML5, CSS3 and JavaScript – with native execution is considered one of the best solutions to this concern.
Many companies have chosen hybrid mobile apps as a solution to this diversity in the mobile world. Hybrid mobile apps combine the benefits of native and web mobile apps, so we can develop one time using HTML5, JavaScript and CSS3, and deploy for all devices.
Indeed, hybrid apps can access the mobile native features: Camera, Compass, Files, etc., cutting the development life cycle complexity, time and cost, and gaining the advantages of native apps. Thse are the main reasons companies opt for hybrid mobile apps for their mobile business model.
In this article I’ll introduce you to one of the most powerful environments for building mobile hybrid apps. We’ll start by installing and preparing the development environment, the develop a test app, and test the app in a mobile simulator.
IBM Worklight
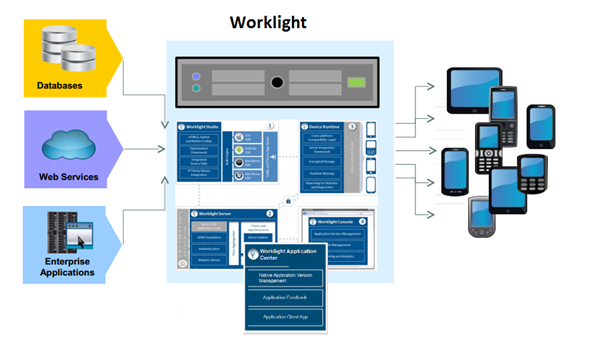
IBM Worklight is an open, complete and advanced mobile enterprise application platform for HTML5, hybrid and native mobile applications. It lets developers use JavaScript, HTML5 and CSS3 to develop applications for different mobile devices. By avoiding the vendor lock-in, it gives also to enterprises a set of features: version management, application center, direct update, push notification, connectivity to databases, web services and an enterprise information system.
IBM Worklight consists of the following components:
- IBM Worklight Studio is an Eclipse based IDE, allowing developers to perform all coding, testing and integration tasks for web, hybrid or native mobile applications.
- IBM Worklight Server is a scalable gateway between mobile application and enterprise or third party back-end and services. It acts as an auditable control point for mobile activities and contains strong security features such as multi-factor authentication and mobile applications authenticity checks. The Worklight Server enables data connectivity with multi-source data extraction and manipulation, mobile application management, analytics and unified push notifications.
- IBM Worklight Device Runtime Components consist of client-side runtime code compiled into final applications that embed functionality such as an off-line, encrypted and synchable datastore that interacts with the Worklight Server.
- IBM Worklight Application Center is a multi-platform private enterprise app store that helps organizations govern the distribution of any production-ready mobile apps across the enterprise with appropriate access control and role based security, and elicit and organize user feed-back. It can also be used by development teams to automate the distribution of pre-release software versions, and analyze feedback by version and device – accelerating cycle time.
- IBM Worklight Console is a web-based UI dedicated to the ongoing monitoring and administration of the Worklight Server and its deployed apps, adapters and push notifications, that helps summarize the various statistical measures of platform usage.
Installing IBM Worklight
IBM provides a trial version of Worklight Development Studio to developers who need to test the tool. As I’ve mentioned, Worklight is an Eclipse plugin, so first we should install Eclipse Juno for J2EE.
- Download and unzip Eclipse here.
- Open Eclipse and go to Help, choose Eclipse market place and search using the key word “worklight”.
- You could also find it by clicking Help, choose install new software, click on add, enter worklight as a name and the following URL for location: http://public.dhe.ibm.com/ibmdl/export/pub/software/mobile-solutions/worklight/wdeupdate/.
- Now click on the install button of the “IBM Worklight Developer Edition”.
- Click Next and accept the license terms to install the plugin.
- Restart Eclipse.
NOTE: You must use the JUNO SR2 version of Eclipse, if you use another version you will face some errors when installing Worklight.
Installing ADT
Now, after installing the IBM Worklight plugin we will need to install Android Developer Tools to be able to develop for Android.
- Download and unzip the Android SDK from here.
- Install the ADT Plugin by clicking Help > Install New Software.
- Click Add…, and enter the ADT Plugin as the name.
- For location enter: https://dl-ssl.google.com/android/eclipse/
- Select Developer Tools > Next > Next > Accept License Agreement > Finish.
- Restart Eclipse
Create a mobile hybrid application
Create a Worklight Application
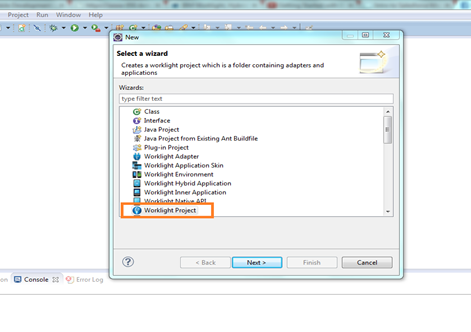
After installing all the necessary Eclipse plugins, we can now start developing our first Worklight mobile application. Open Eclipse and click on New, choose Other Project and select Worklight Project from the list.
Now click on Next, choose Hybrid Application and give it a name.
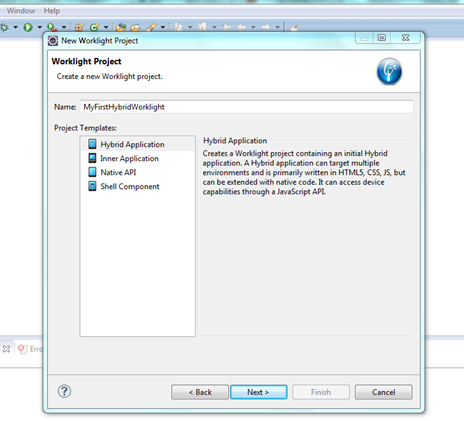
Click on Next.
You could add JQuery mobile to your application by downloading a zip file it from here.
Unzip it and give its location in the wizard like this:
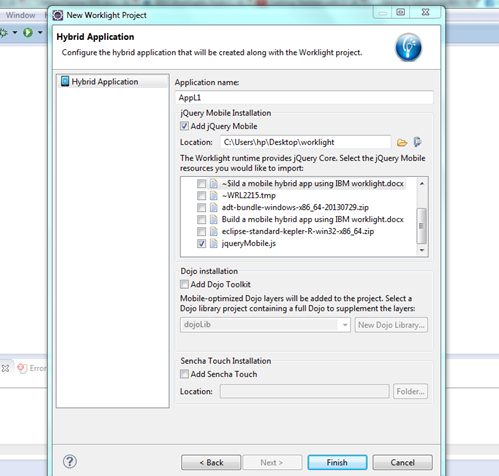
Click on Finish.
Add Android environment
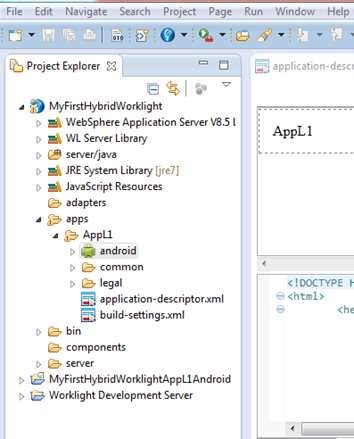
Development is undertaken in one or more environments. The mobile web application that will be packaged and built to environments is located in a folder called common. It contains HTML5, JS, CSS3 and images shared between all application environments. In our case we are using Eclipse and ADT, so we will add an Android environment.
Click on New, choose Worklight Environment, check the Android check box and click on Finish.
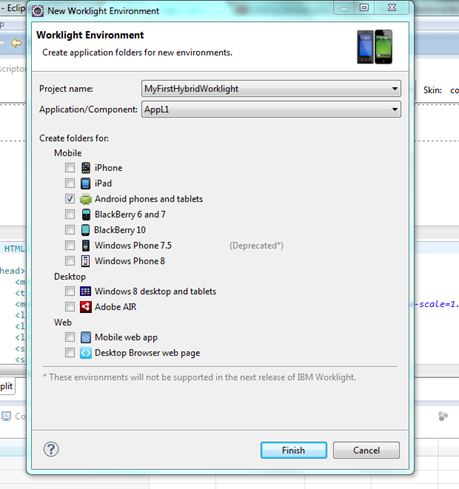
In the Project Explorer panel, you will notice that a new Android Environment has been added to your Worklight project.
Customize and build the app
Now, open the HTML page and use the WYSIWYG editor to modify the text. Add new HTML tags to the page using the Palette. You could also modify the code directly using the Source tab.
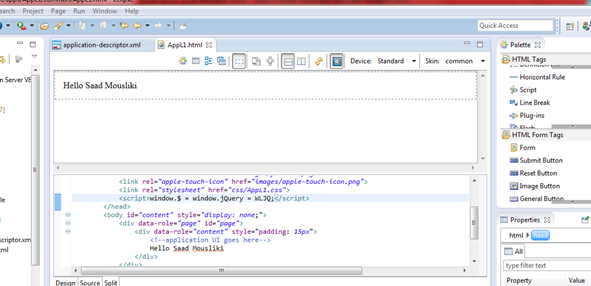
The Palette supports HTML5 elements, JQuery Mobile and DoJo controls, so you can drag and drop the controls easily from the Palette to the page and the HTML5 element will be automatically generated in the page source.
After customizing the page that will be rendered by the mobile, to build it right-click on the application folder and choose Run As. After that, click on Build All and Deploy.
In the next article, we will see how to develop a mobile app that follows the MVC architecture to access a back end system, and test it in Mobile Browser Simulator without requiring devices or heavyweight emulators and also in a mobile emulator. We will see also the Worklight web console capabilities.
Conclusion
Now that you’ve learned how to install the development environment of Worklight and use some of Worklight’s features, you’re ready to go ahead and start developing and testing a hybrid mobile app.
In the second part of the series, we’ll discover the Worklight web console and how to establish a back end connection using the Worklight adapter.
Frequently Asked Questions (FAQs) about Building a Mobile Hybrid App Using IBM Worklight
What is IBM Worklight and why is it important in mobile app development?
IBM Worklight is a platform that provides tools for developing, testing, and deploying mobile and hybrid applications. It is important in mobile app development because it supports a wide range of mobile operating systems, including iOS, Android, Windows Phone, and Blackberry. This means developers can write code once and deploy it across multiple platforms, saving time and resources. Additionally, IBM Worklight provides advanced security features, ensuring that your mobile applications are safe and secure.
How can I download and install IBM Worklight?
IBM Worklight can be downloaded from the IBM support page. After downloading, you can install it by following the instructions provided in the installation guide. It’s important to note that IBM Worklight requires certain system requirements, so make sure your system meets these before installing.
What is the IBM Mobile Application Platform Pattern v6.1?
The IBM Mobile Application Platform Pattern v6.1 is a software product that provides a platform for developing, deploying, and managing mobile applications. It includes IBM Worklight and is designed to simplify the process of mobile application development and deployment.
How can I use IBM Worklight to build a hybrid mobile app?
IBM Worklight provides a comprehensive set of tools for building hybrid mobile apps. You can use its visual editor to design your app’s user interface, and its code editor to write the app’s logic. IBM Worklight also provides a simulator for testing your app on different mobile devices and operating systems.
What are the key features of IBM Worklight?
IBM Worklight offers several key features that make it a powerful tool for mobile app development. These include cross-platform compatibility, advanced security features, a visual and code editor, a mobile device simulator, and integration with enterprise systems.
How does IBM Worklight ensure the security of mobile apps?
IBM Worklight provides several advanced security features to ensure the safety of your mobile apps. These include encryption of data at rest and in transit, user authentication and authorization, and protection against common web threats such as cross-site scripting and SQL injection.
Can I integrate IBM Worklight with other IBM products?
Yes, IBM Worklight can be integrated with other IBM products to provide additional functionality. For example, you can integrate it with IBM MobileFirst Platform Foundation to manage and secure your mobile apps.
What resources are available to help me learn IBM Worklight?
IBM provides several resources to help you learn IBM Worklight. These include the IBM Worklight documentation, tutorials, and sample code. You can also find many online tutorials and courses that cover IBM Worklight.
What are the system requirements for IBM Worklight?
IBM Worklight requires a system with a certain minimum hardware and software configuration. The exact requirements can vary depending on the version of IBM Worklight you are using, so it’s best to check the IBM Worklight documentation for the most accurate information.
Can I use IBM Worklight to develop apps for both mobile and desktop platforms?
Yes, IBM Worklight supports the development of apps for both mobile and desktop platforms. This means you can use the same codebase to create apps for iOS, Android, Windows Phone, Blackberry, and desktop operating systems.

