Javascript — a simple scripting language designed for the humble task of ‘making a web page more dynamic’ — has come a long way since 1995.
Invented by Mozilla Co-Founder Brendan Eich, it has been steadily replacing Adobe’s Flash as the web’s preferred vehicle for animation, games and apps for most of the past five years.
With the rise of JavaScript, a raft of new libraries and generators have emerged to allow developers to easy access more complex functionality. BounceJS is one of these new tools.
Created by Joel Besada, BounceJS lets you generate smooth, elegant CSS animations with the help of a simple interface, and then preview, share and export them. It’s remarkably straightforward! If you like nifty animations, give BounceJS a go.
In the following, we will have a look at its features and animation workflow, and design a custom animation from created scratch by us.
It should be fun, trust me!
Interface
The interface of the generator is clean and minimalistic, making the creation of an animation a straightforward task.
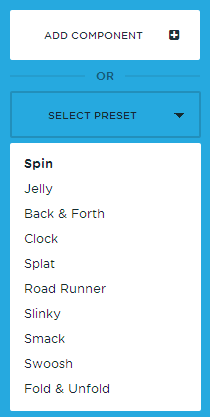
On the left is the component list, this is where we can add various effects to your animation chain and mix and tweak them later. It also offers a list of various animation presets which you can check out and remix.
The Road Runner animation preset is hilarious. You got to admire the love of detail the author committed to it.
A lot of these presets can be used as templates, so you can remix your custom animations and save some time when adding components.
In the middle of the screen, you can find the preview of the animation. A square is the placeholder, visualizing all the movements of your animations.
There are 3 buttons under the preview screen: Play animation, Loop Animation, and Slow motion.

The later is particularly useful for analyzing movements in detail.
Every animation you create has a unique URL. You can also get this short link by clicking on: GET SHORT URL
Disclaimer: As with most code generators, thoughtful, manually-composed code will almost always be far superior. However, it will also be considerably more demanding and time-consuming. I recommend not pushing Bounce too far if you’re not interested in manually tweaking your code afterward. Bounce.JS uses a lot of matrix transforms, which isn’t the optimal approach for all animation scenarios.
I learned this the hard way while working on this animation. However, it’s likely your animations will less complex than this one, which is a good thing. Remember: the longer the animation timeline, the more code is generated, so don’t go crazy.
So that’s the basics. There is nothing technically difficult about the process — the rest depends on your imagination.
Time to make something!
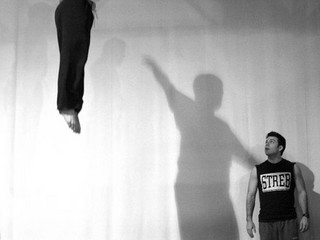
Let’s create a custom animation. In the following example, I’ll show how to create a parachute animation — the type of exaggerated animation you’d usually see in a cartoon — looking from the top down.
In Bounce.JS, animations are broken down into ‘components’. Think of components as the different parts of a dance routine. Bear in mind, we are only designing the behavior of this animation, not the object it is animating, nor the backdrop/stage. Of course, once our motion is finalized, it’s trivial to apply it to any object in any setting.
Animation Component 1
Q: What does a parachute jumper do after they jump?
A: Of course, they open their parachute. So let’s translate that into an animation.
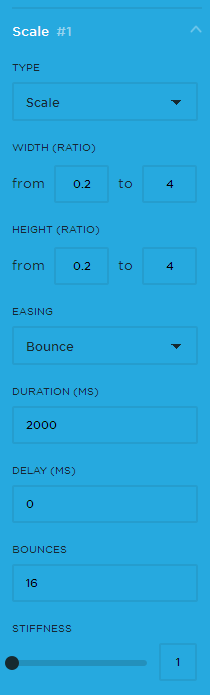
To simulate the opening of a parachute , the best way to go is a Scale component. Referring to the original size of the square in the preview, I used here an original size of 0.2, which ends with the size of 4. Basically, it becomes 20x larger at the end of the animation.
As the parachute would have the same width and length ( height if you look at it from the top), we keep the aspect ratio the same for both dimensions. We choose the Bounce attitude for the Easing, as it has the motion characteristics that best fit with our needs. In duration, we specify what time frame our animation should cover. As the opening of a parachute happens quite quickly, I put 2000ms here.
Regardless of the order of the animation components, all components are activated right at the start of the animation, so if you want a component to start later, you’ll need to specify a delay in the delay field.
Tip: If you create complex animations, it’s better to keep the order of the components the same as the order they’re activated, so you don’t get too easily confused.
The Bounces field specifies the number the element, well… bounces throughout the animation. In this case I put in 16, a relatively high number, but plausible for a parachute animation.
The same goes for the Stiffness amount. Let’s put in a minimum for that.
Animation Component 2
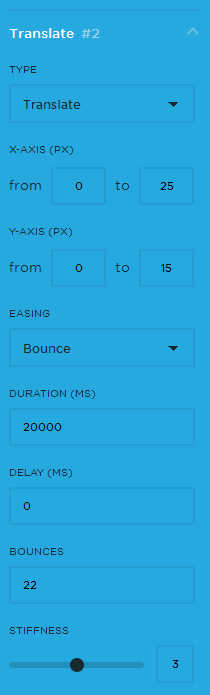
Next, we will simulate the movement of the parachute as if the wind is changing its path in a subtle random manner. For that, we are going to use the Translate component. I added a subtle movement here ( 25 units to the right, 15 units to the bottom), which should be really enough. I suggest to use Bouncing again as Easing, due to the animation’s fluid nature.
As this component will be played throughout the entire animation, I let it play for 20000ms, which should cover its whole length. The parachute will start moving from the beginning of the timeline, so we won’t need a delay here. As the movement of the parachute would be more affected by the wind, yet be way stiffer than the first component, I gave it here 22 Bounces and a Stiffness of 3.
Animation Component 3
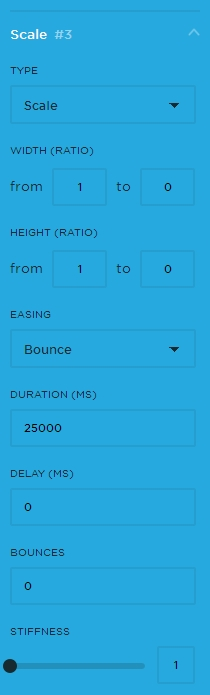
Finally we are going to add the last component of the animation.
If you look at at parachute jumper from above, he obviously would appear smaller and smaller due to the added distance after time.
So his initial size would be 1 and his size at the end of the animation would be practically 0. Let’s insert these values for both width and height.
The duration of the animation should be quite long here, obviously. An amount of 25000ms should do it.
As this animation component will be played simultaneously with the other components (i.e. there is no delay) we don’t need any bounce or stiffness effect added, as it’s inherited from the previous components. So leave them 0 as in the screenshot here.
Feel free to tweak and remix your results of course, this is only a rough guideline, but the outcome is obviously in your hands.
However, you should have a similar result to this afterwards.
Once you’re satisfied with the results, you can export the animation as CSS and use it in your projects.
You can find the repository of BounceJS also on GitHub
What do you think?
With so many innovative, new ways to design and animate websites, generators like BounceJS come in pretty handy, especially when it saves you precious time coding such animations manually.
Give it a try and post your experiments in the comments section. We’re curious to see your results!
Frequently Asked Questions about Bounce.js
How can I install Bounce.js in my project?
To install Bounce.js in your project, you can use npm or Bower. If you’re using npm, you can install it by running the command npm install bounce.js. For Bower, use the command bower install bounce.js. After installation, you can include it in your HTML file using the script tag.
Can I use Bounce.js with other JavaScript libraries?
Yes, Bounce.js is compatible with other JavaScript libraries. It doesn’t interfere with the functionality of other libraries. You can use it alongside libraries like jQuery, React, Angular, and Vue.js.
How can I create animations with Bounce.js?
Creating animations with Bounce.js involves creating a new Bounce object and adding components to it. You can add components like scale, rotate, translate, and skew. After adding the components, you can apply the animation to an element using the applyTo method.
Can I control the duration and delay of animations in Bounce.js?
Yes, Bounce.js allows you to control the duration and delay of animations. You can set the duration and delay using the duration and delay methods respectively. The values are in milliseconds.
How can I chain animations in Bounce.js?
You can chain animations in Bounce.js using the chain method. This method allows you to execute animations sequentially. You can pass an array of Bounce objects to the chain method to chain them.
Can I use Bounce.js for responsive design?
Yes, Bounce.js can be used for responsive design. The animations created with Bounce.js are scalable and adapt to different screen sizes. You can also use media queries to control the behavior of animations on different devices.
How can I stop an animation in Bounce.js?
You can stop an animation in Bounce.js using the stop method. This method stops the animation and resets the element to its initial state.
Can I use Bounce.js for complex animations?
Yes, Bounce.js is capable of creating complex animations. You can combine multiple components and chain animations to create complex effects. However, it requires a good understanding of the library and CSS animations.
Is Bounce.js compatible with all browsers?
Bounce.js is compatible with most modern browsers. However, some features may not work in older browsers. It’s always a good idea to test your animations in different browsers to ensure compatibility.
Can I use Bounce.js for commercial projects?
Yes, Bounce.js is open-source and free to use for both personal and commercial projects. You can use it to create animations for your websites, apps, games, and other projects.
 Elio Qoshi
Elio is a open source designer and founder of Ura Design. He coordinates community initiatives at SitePoint as well. Further, as a board member at Open Labs Hackerspace, he promotes free software and open source locally and regionally. Elio founded the Open Design team at Mozilla and is a Creative Lead at Glucosio and Visual Designer at The Tor Project. He co-organizes OSCAL and gives talks as a Mozilla Tech Speaker at various conferences. When he doesn’t write for SitePoint, he scribbles his musings on his personal blog.