Lesson 6: Install and Run Your First App
Lesson 3 introduced you to an app named W2A and showed you how to build this app. Now that you’ve learned to create and launch an AVD, Lesson 6 shows you how to install and run W2A on this device.
Install W2A
Lesson 3’s W2A-debug.apk file must be installed on the MyAVD emulated device before you can run this app. Assuming Windows, execute the following command line to install this APK on MyAVD, which must be running:
adb install C:prjdevW2AbinW2A-debug.apkIf adb outputs error: device offline or doesn’t finish, re-execute this command line until this error
disappears. Assuming success, you should see a message that’s similar to the following message:
31 KB/s (4508 bytes in 0.140s)

pkg: /data/local/tmp/W2A-debug.apk

Success
Note: You will have to include the path to adb in the command line if you haven’t added the android- sdkplatform-tools directory to your PATH environment variable.
Run W2A
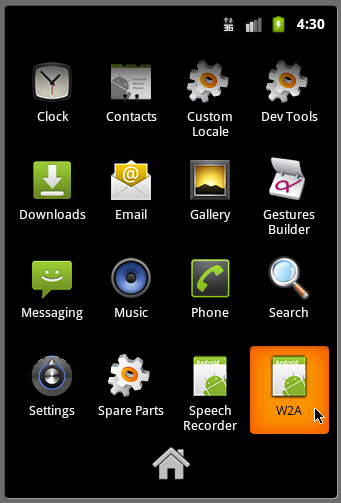
Click the home screen’s app launcher icon (the rectangular grid icon) and select the W2A icon, which is shown in Figure 18.

Click the W2A icon to launch this app. You should see the screen whose upper portion is shown in Figure 19.

When you finish looking at this app, press the Esc key or click the BACK button in the phone controls to return to the app launcher screen, from where you can explore and play with the device’s preinstalled apps.
Review
The following review questions help you test your mastery of Lesson 6’s material:
- What tool do you use to install W2A’s APK on the emulated device?
- How do you run W2A?
 Jeff Friesen
Jeff Friesen is a freelance tutor and software developer with an emphasis on Java and mobile technologies. In addition to writing Java and Android books for Apress, Jeff has written numerous articles on Java and other technologies for SitePoint, InformIT, JavaWorld, java.net, and DevSource.


