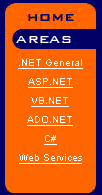
 I store the menu categories in a table called “
Sub_Category” in SQL Server, so that if I ever need to add one, I just add it to the table and it will appear on the menu. There are two fields in the table: Sub_Category_ID, and Sub_Category_Text.
Step 1 — Create the Page and Insert the Repeater Control
The Repeater control allows you to create templates to define the layout of its content. The templates are:
ItemTemplate— Use this template for elements that are rendered once per row of data.AlternatingItemTemplate— Use this template for elements that are rendered every other row of data. This allows you to alternate background colors, for example.HeaderTemplate— Use this template for elements that you want to render once before yourItemTemplatesection.FooterTemplate— Use this template for elements that you want to render once after yourItemTemplatesection.SeperatorTemplate— Use this template for elements to render between each row, such as line breaks.
Repeater:
....
<asp:Repeater ID="catlist" runat="server">
<HeaderTemplate>
<tr>
<td class="imgspace">
<img src="Images/areas.jpg" width="91" height="28" class="bigtext">
</td>
</tr>
</HeaderTemplate>
<ItemTemplate>
<tr>
<td>
<div align=center>
<asp:HyperLink class="text"
NavigateUrl="<%# "mainframeset.aspx?CatType=" +
DataBinder.Eval(Container.DataItem,"Sub_Category_ID")%>"
Text="<%#DataBinder.Eval(Container.DataItem, "Sub_Category_Text")%>"
runat="server" target="mainFrame" ID="Hyperlink1" NAME="Hyperlink1"/>
<br></div>
</td>
</tr>
</ItemTemplate>
<FooterTemplate>
<tr>
<td>
</td>
</tr>
</FooterTemplate>
</asp:Repeater>
....Repeater has a name of “catlist“. It uses the HeaderTemplate to print out the Areas image. It then uses the ItemTemplate to display a Hyperlink control that has our data in it. We’ll come back to this in Step Two.
The FooterTemplate is not necessary, but I put it in here for consistency.
Step 2 — Get the Data
Now let’s look at the data retrieval. Here is thePage_Load event in the Code Behind file.
private void Page_Load(object sender, System.EventArgs e)
{
SqlConnection conDotNet = new SqlConnection
"Server=xxxxxxx;UID=xxxx;PWD=xxxxx;Database=DotNetGenius");
string sSQL = "Select sub_category_id, sub_category_text
from Sub_Category";
SqlCommand cmd = new SqlCommand(sSQL, conDotNet);
conDotNet.Open();
SqlDataReader dtrCat = cmd.ExecuteReader();
catlist.DataSource = dtrCat;
catlist.DataBind();
}Sub_Category table. The last two lines bind our Repeater control to the DataReader. Now, let’s look again at the ItemTemplate section:
<ItemTemplate>
<tr> <td> <div align=center>
<asp:HyperLink class="text"
NavigateUrl="<%# "mainframeset.aspx?CatType=" +
DataBinder.Eval(Container.DataItem,"Sub_Category_ID")%>"
Text="<%#DataBinder.Eval(Container.DataItem, "Sub_Category_Text")%>"
runat="server" target="mainFrame" ID="Hyperlink1" NAME="Hyperlink1"/>
<br></div></td></tr>
</ItemTemplate>DataBind method of the Repeater control is called, ASP.NET will loop through the DataReader and populate the Repeater with the data we specify. The Databinder.Eval method uses reflection to parse and evaluate a data-binding expression against an object at run time, in this case the object is our Repeater. So this line of code:
NavigateUrl="<%# "mainframeset.aspx?CatType=" +
DataBinder.Eval(Container.DataItem,"Sub_Category_ID")%>""Sub_Category_ID" field for each row in the DataReader.
If you spend much time with ASP.NET, you will certainly be using this control often. I hope you find it handy!
If you enjoyed reading this post, you’ll love Learnable; the place to learn fresh skills and techniques from the masters. Members get instant access to all of SitePoint’s ebooks and interactive online courses, like Introductory Web Development Using ASP.NET.
Frequently Asked Questions (FAQs) about ASP.NET Repeater Control
How can I bind data to an ASP.NET Repeater Control?
Binding data to an ASP.NET Repeater Control is a straightforward process. First, you need to create a data source, which can be a database, an XML file, or any other data source. Then, you use the DataBind() method to bind the data source to the Repeater Control. Here’s a simple example:Repeater1.DataSource = dataSource;Repeater1.DataBind();
In this example, ‘dataSource’ is the data source you created. After calling the DataBind() method, the data from the dataSource will be bound to the Repeater1 control.
How can I customize the layout of an ASP.NET Repeater Control?
The ASP.NET Repeater Control allows you to fully customize the layout of your data. You can use the ItemTemplate, AlternatingItemTemplate, HeaderTemplate, and FooterTemplate properties to define the layout for different parts of the control. Each template can contain any combination of HTML markup and server controls. Here’s an example:<asp:Repeater ID="Repeater1" runat="server">
<HeaderTemplate>
<table>
</HeaderTemplate>
<ItemTemplate>
<tr>
<td><%# Eval("ColumnName") %></td>
</tr>
</ItemTemplate>
<FooterTemplate>
</table>
</FooterTemplate></asp:Repeater>
In this example, the Repeater Control will generate a table with each row containing data from the ‘ColumnName’ column of the data source.
How can I handle events in an ASP.NET Repeater Control?
The ASP.NET Repeater Control supports several events that you can handle to add custom logic to your application. The most commonly used event is the ItemDataBound event, which is raised after an item is data bound to the Repeater Control. You can handle this event to modify the data or controls in the item. Here’s an example:protected void Repeater1_ItemDataBound(object sender, RepeaterItemEventArgs e){
if (e.Item.ItemType == ListItemType.Item || e.Item.ItemType == ListItemType.AlternatingItem)
{
// Your custom logic here
}}
In this example, the ItemDataBound event handler checks if the current item is a regular item or an alternating item, and then executes your custom logic.
How can I use paging with an ASP.NET Repeater Control?
The ASP.NET Repeater Control does not support paging directly. However, you can use the PagedDataSource class to add paging functionality to the Repeater Control. The PagedDataSource class provides properties to specify the page size and the current page, and methods to navigate between pages. Here’s an example:PagedDataSource pagedDataSource = new PagedDataSource();pagedDataSource.DataSource = dataSource;pagedDataSource.PageSize = 10;pagedDataSource.CurrentPageIndex = 0;Repeater1.DataSource = pagedDataSource;Repeater1.DataBind();
In this example, the PagedDataSource class is used to display 10 items per page in the Repeater Control.
How can I use the ASP.NET Repeater Control with a database?
You can use the ASP.NET Repeater Control with a database by creating a data source that retrieves data from the database. The most common way to do this is by using the SqlDataSource control or the EntityDataSource control. Here’s an example:SqlDataSource dataSource = new SqlDataSource();dataSource.ConnectionString = ConfigurationManager.ConnectionStrings["YourConnectionString"].ConnectionString;dataSource.SelectCommand = "SELECT * FROM YourTable";Repeater1.DataSource = dataSource;Repeater1.DataBind();
In this example, the SqlDataSource control is used to retrieve data from a SQL Server database and bind it to the Repeater Control.
James is an independent consultant in the Philadelphia area. He is currently using Microsoft.NET technology to provide solutions for large manufacturing clients. Contact him at www.jwtechnology.com.


