A beta version has just been released for ASP.NET 4. Among the many new features included in this release is the Web API framework, but what is it? Basically, it allows you to create services that can be exposed over HTTP rather than through a formal service such as WCF or SOAP. If you’ve ever used the Facebook or Twiiter API, you’re already familiar with them. For me, this is one of the most exciting new features!
Web API was originally the WCF Web API project. Developing an API this way meant you followed the rules governed by WCF; starting with an interface, creating classes to derive from the interface, and then decorating the interface with the WCF attributes to form the endpoints. This was not a fluent process. WCF is tough and people like the ease that ASP.NET allows, Microsoft saw this and created Web API. They took the best pieces from WCF Web API and the ease of development that ASP.NET MVC allows.
Installation
Right now you can install MVC 4 beta for Visual Studio 2010 via the We Platform Installer. This requires ASP.NET 4 if you haven’t previously installed it, and can be downloaded from here.
Visual Studio 2011 Developer Preview has also just been released to the public. As an ASPInsider, we’ve had access to the release for quite some time, and I’m very happy with the new metro look and feel. If you’d like to install it, it can be downloaded here. All of the code and screen shots are from the new version.
Getting Started
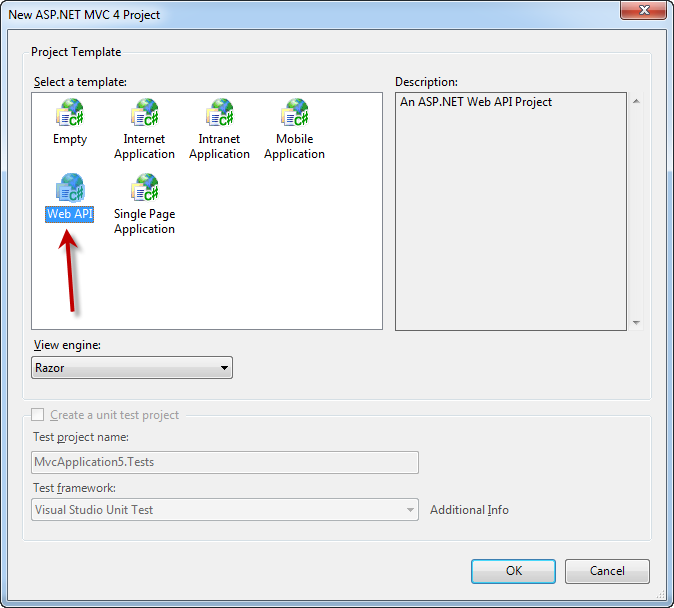
To get started writing your first Web API, open Studio 2011 and choose ASP.NET MVC 4 Web Application. The Project Template dialog will pop up next. There’s a couple of new choices, such as Mobile Application and Single Page Application (SPA), but for now choose Web API.
Before looking at any code, open the global.asax file and take a look at the default route.
public static void RegisterApis(HttpConfiguration config) {
 config.Routes.MapHttpRoute(
  "Default", // Route name
  "{controller}/{id}", // URL with parameters
  new { id = RouteParameter.Optional } // Parameter defaults
 );
}

protected void Application_Start() {
 RegisterApis(GlobalConfiguration.Configuration);
}
The main difference bewteen MVC routes and Web API routes is there’s no route defined for an action. That’s because Web API uses the HTTP method, not the URI path, to select the action.
I’ve created a simple Product class to represent the model and added that to the Models folder.
public class Product {
public int ID { get; set; }
public double Price { get; set; }
public string Name { get; set; }
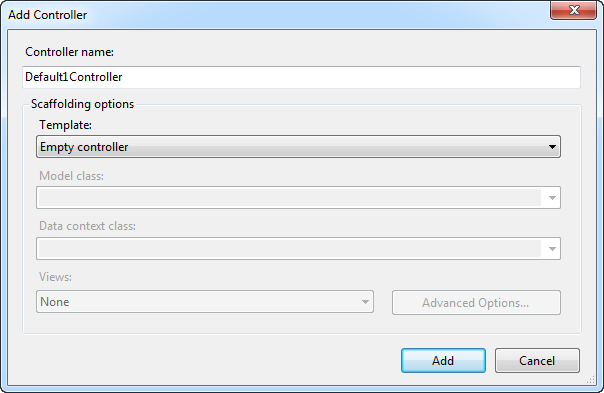
}Now I’m going to add a new controller called ProductController. There’s some new additions you can choose in this dialog for scaffolding options, but for now I’m going to generate an empty controller.
The controller looks the same, but Web API controllers derive from ApiController.
public class ProductController : ApiController {
 // GET: /Product/
 public ActionResult Index() {
  return View();
 }
}
Remember Web API uses HTTP methods, so we can map out the following HTTP methods:
| Action | HTTP method | Relative URI |
|---|---|---|
| Get a list of all products | GET | /products |
| Get a product by id | GET | /products/id |
| Create a new product | POST | /products |
| Update a product | PUT | /products/id |
| Delete a product | DELETE | /products/id |
The naming conventions in Web API follow the names of the HTTP methods, GET/POST/PUT/DELETE. You’ll see how these are mapped to the code in the following sections.
GET Actions
public List<Product> Get() {
 return _productsRepository.ToList();
}

public Product Get(int id) {
 return _productsRepository.First(p => p.ID == id);
}
Notice how I’ve defined two Get actions? This is because when the user invokes the API, they’ll pass in the HTTP method. If an incoming request is a GET request, and it doesn’t have an ID, it will call the Get action to return a list of products. If an ID is there, it invokes the Get action for a specific product. Nice and simple. And how can you test this code? I’m going to use Fiddler for this. If you’ve never used it, you should get it now.
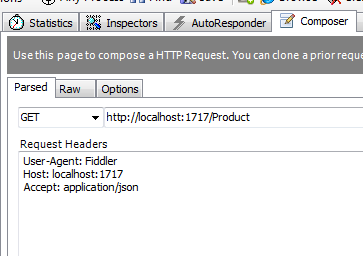
Using Fiddler I can create a GET request in the Composer builder. Calling http://localhost:1717/Product will return the list of products.
If I want only one product, I can pass in an ID; http://localhost:1717/Product/1. By default JSON is returned from all action methods. If you want a different format, like XML, just add in the Accept request head application/xml:
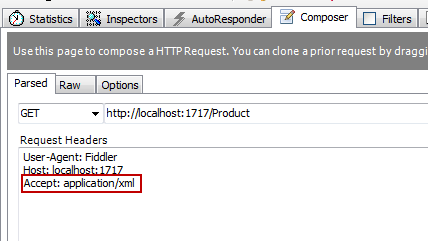
Without changing any code, it returns the result in XML.
POST Actions
public void Post(Product product) {
 _productsRepository.Add(product)
}
Following on from the GET requests are POST requests. This is where data will be created. Again I’ve named the action the same as the HTTP verb, so all I need to change is to add the Content-Type to application/json, and send up the JSON object. I can add the following request headers in Fiddler to post the new product.

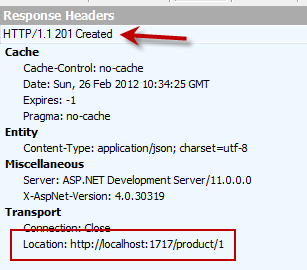
If you check the HTTP response code, you’ll see it returns 200, which is OK, but for a POST it should ideally return a 201 status code. This will indicate to the user that the product was successful. Also 201’s are supposed to have a Location value, so we’ll add that also.
public HttpResponseMessage<Product> Post(Product product) {
 _productsRepository.Add(product);
 var response = new HttpResponseMessage<Product>(product, HttpStatusCode.Created);
 string uri = Url.Route("http://localhost:1717/", new { id = contact.Id });
 response.Headers.Location = new Uri(Request.RequestUri, uri);
 return response;
}
Instead of returning void, we’re returning a new type HttpResponseMessage<T>. This gives you the flexibility of changing the returned status code as well as the response headers. Now if you run this through Fiddler, you’ll see a 201 returned plus the Location header.
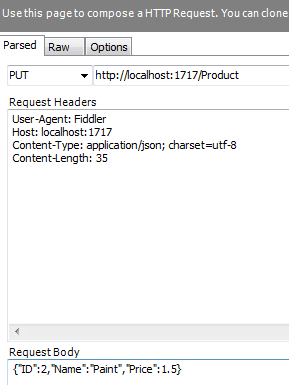
PUT Actions
public void Put(Product product) {
 _productsRepository.Update(product)
}
Put actions update resources, so returning a 200 or 204 is fine. By default, 200 is returned, so for this reason we don’t have to do anything to the action.
It’s worth noting that for the post and put actions I’m sending JSON. If I change the content-type to XML, I could easily send XML instead of JSON without having to change any code in the API. Web API automatically breaks the incoming request to strongly typed objects and maps the name properties.
DELETE Actions
public void Delete(Product product) {
 _productsRepository.Delete(product)
}
Delete actions delete resources, so depending if the resource is deleted immediately or at a later stage can determine the status code. If the resource is deleted immediately, the status code should be 200. If the deletion is for a later stage, then a 202 status code should be returned.
public HttpResponseMessage<Product> Delete(Product product) {
 _productsRepository.Delete(product);
 var response = new HttpResponseMessage<Product>(product, HttpStatusCode.Deleted);
 return response;
}
I’ve only scratched the surface of Web API, over the coming weeks I’ll explore different ways to use it.
 Malcolm Sheridan
Malcolm Sheridan is a Microsoft awarded MVP in ASP.NET, ASPInsider, Telerik Insider and a regular presenter at conferences and user groups throughout Australia and New Zealand. Follow him on twitter @malcolmsheridan.