When ASP.NET developers think of Web security and authentication, three options typically come to mind: Windows authentication, forms authentication, and passport authentication.
If you’re building an Intranet application within your organization, for instance, you might choose to use Windows authentication. Configuring Windows authentication within IIS is fairly straight forward and involves only two steps.
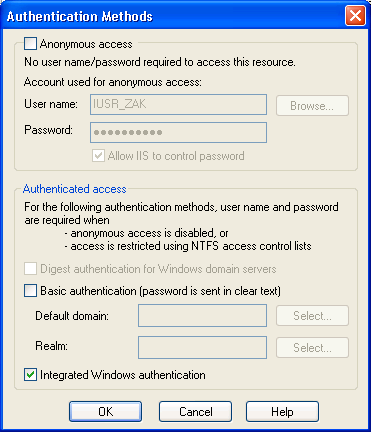
First, we make sure that Integrated Windows Authentication is checked and Anonymous Access is unchecked for a Web application by following the steps outlined below:
- Right-click on the Web app directory within IIS and select Properties.
- Select the Directory Security tab from the application’s Properties dialog.
- Select the Edit… button within the Anonymous Access and Authentication control panel.
- Uncheck Anonymous Access and make sure that Integrated Windows Authentication is checked similar to the figure below.
Second, we need only to modify the mode attribute within the authentication tag in the application’s Web.config file so that it’s set to Windows (which is set by default) as follows:
<authentication mode="Windows" />That’s all there is to it. Whenever users request a page, they’ll be asked to supply their Windows username and password. Once logged in, users can be tracked by accessing the user.identity property for the page.
In many scenarios, however, development is focused around forms authentication. Why? Because you wouldn’t want manually to create usernames and passwords for the thousands of potential users that would access your site. Assuming you’re building a large-scale forum application that is accessible by many users over the Internet, forms authentication would be your best bet because it allows you to store usernames and password within your data store (usually a database table) of choice, then validate your users based on a Web accessible login page similar to this:
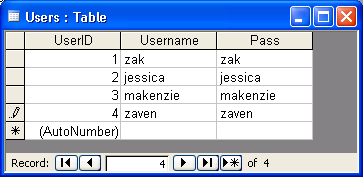
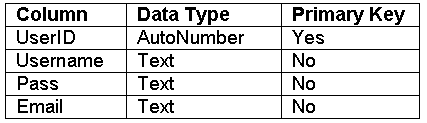
In this scenario, users enter their usernames and passwords and click a Login button. The Login button raises a Click event, some sort of validation method is called, and code is executed to compare the values users entered into the text boxes with values contained in a database. Typically, the database is structured with a Users table containing UserID, Username, and Password fields similar to the design shown here.
Now, I’ve read dozens of articles and a few dozen chapters in books that discuss working with forms authentication and most seem to structure their database table around the simple design shown above. So you’re probably asking yourself, "What’s the problem?" Well, password information is stored as clear text, so any developer with access to the database has access to the username and password information for all users that subscribe to the application. While it’s not a big deal for forum applications, it becomes an issue when you start dealing with online banking applications or even day-trading applications like E*Trade, TD Waterhouse, etc.
One solution to this problem could see us use simplistic hashing and store our passwords within a message digest.
Message Digest and Simplistic Hashing
A message digest is the representation of text in the form of a single string of digits created using a formula called a one-way hash function. A one-way hash function takes an input string (such as a password) and performs some math on it to produce a string of gobbledygook (a digest string). Let’s take the password "zak", for instance. I could "hash" that password and the resulting digest would be: D52987198EA2730FD22A38E7976344D843A7FFA0. Doesn’t look at all like "zak", does it?
A good hash function makes it extremely difficult to guess an input string that will produce a given digest string. What if you converted your users’ passwords into digest strings, and stored those digest strings in the database instead of the actual passwords? Whenever a user logs in, your authentication script could perform the same one-way hash function on the password he or she enters and compare it with the digest string stored in the database. A match means the user entered the right password, and should be granted access to the site.
The big advantage here is that someone who can read your user database (say, a database administrator), can see only the digest strings – not the original passwords! And, because it’s practically impossible to find the password to produce a particular message digest, they can’t use that information to gain access to your application!
To really appreciate how hashing works, let’s create a simple application that uses forms authentication.
Note that all the code included in this article is contained in this downloadable code archive.
Setting up a site to use forms authentication is just as easy as Windows authentication. First, we need only to modify the mode attribute within the authentication tag in the application’s Web.config file so that it’s set to Forms as follows:
<authentication mode="Forms" />Second, we can set the users attribute of the deny tag within the authorization section handler to "?" as follows:
<authorization>
<deny users="?" />
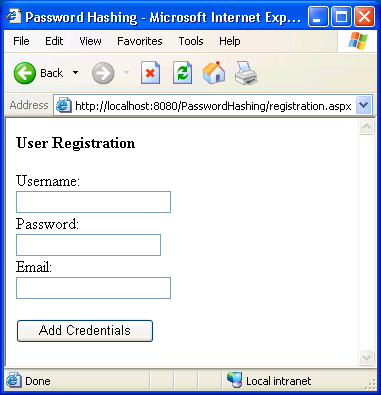
</authorization>Essentially, we’d be denying all anonymous users. Next, we create a registration page (registration.aspx) complete with three TextBox controls and a Button control to handle the user registration. The code should resemble the following:
<form runat="server">

<strong>User Registration</strong><br /><br />

Username:<br />

<asp:TextBox id="txtUsername" runat="server" /><br />

Password:<br />

<asp:TextBox id="txtPassword" runat="server" TextMode="Password" /><br />

Email:<br />

<asp:TextBox id="txtEmail" runat="server" /><br /><br />

<asp:Button id="btnAddCredentials" runat="server" Text="Add Credentials" />

</form>
When viewed in the browser, your page should resemble the image below.
Now that you’ve seen the UI output of our markup, let’s add the OnClick attribute that will call our AddCredentials_Click() method, which we’ll build in a minute:
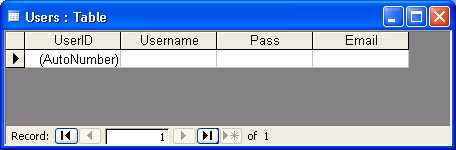
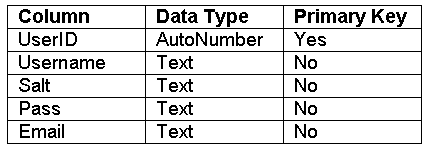
<asp:Button id="btnAddCredentials" runat="server" Text="Add Credentials" OnClick="AddCredentials_Click" />Now that we have our user interface ironed out, let’s create a new database and database table to store the username, password, and email (in case a user happens to forget the password and must reset it, we can send out the instructions to the user’s email). For this example, I create a simple Access database called Customers.mdb with a single table called Users. The design for the Users table is outlined below:
When complete, the Datasheet will resemble that shown below.
We can now write the code to store our user’s username, hashed password, and email within our database. We start by adding the necessary directives to the top of the page as follows:
<%@ Import Namespace="System.Data.OleDb" %>

<%@ Import Namespace="System.Web.Security" %>
Because we’ll be interacting with an Access database, we import the System.Data.OleDb namespace. Similarly, because we’ll need to work with the FormsAuthentication classes, we import the System.Web.Security namespace. Next, we can add a code declaration block within the <head> tag of our document, complete with variable declarations and our AddCredentials_Click() method, as follows:
<script runat="server">

Dim objConn As New OleDbConnection("Provider=Microsoft.Jet.OleDb.4.0;Data

  Source=C:InetpubwwwrootPasswordHashingDatabaseCustomers.mdb")

Dim objCmd As OleDbCommand

Dim sqlCmd As String


Sub AddCredentials_Click(s As Object, e As EventArgs)

  sqlCmd = "INSERT INTO Users (Username, Pass, Email)

        VALUES (@Username, @Pass, @Email)"

  objCmd = New OleDbCommand(sqlCmd, objConn)

  objCmd.Parameters.Add("@Username", txtUsername.Text)

  objCmd.Parameters.Add("@Pass",

               FormsAuthentication.HashPasswordForStoringInConfigFile(txtPassword.Text,

    "SHA1"))

  objCmd.Parameters.Add("@Email", txtEmail.Text)


  objConn.Open()

  objCmd.ExecuteNonQuery()

  objConn.Close()

End Sub

</script>
For the sake of brevity, I’ll assume that you have experience interacting with databases using ASP.NET. At first glance, everything seems fairly straight forward in the code above, except for the use of the HashPasswordForStoringInConfigFile() method of the FormsAuthentication class. This method exists as a way to hash and store a password within the Web.config file. We can use this method for our own purposes, that is, to store hashed passwords into a database.
As you can see, the method accepts two parameters. The first is obviously the text value to use. Since we’re retrieving this value from the password text box, we use txtPassword.Text. The second is the digest algorithm to use. In this example, I’ve use SHA1, which produces a 160 bit digest. You could also use MD5, in which case the result would be a 128 bit digest. Generally speaking, the more bits in a digest string, the harder it is to guess an input string that will produce it.
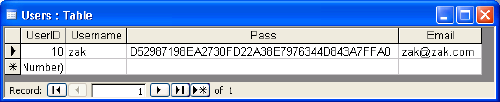
Now, when I add a new user, the password is hashed and the digest is stored within the Pass field in the Users table, as shown below.
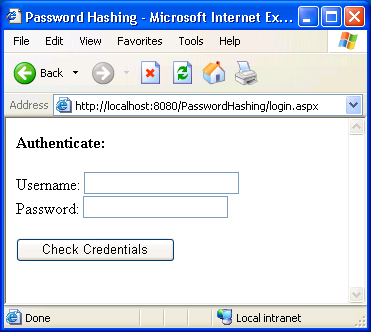
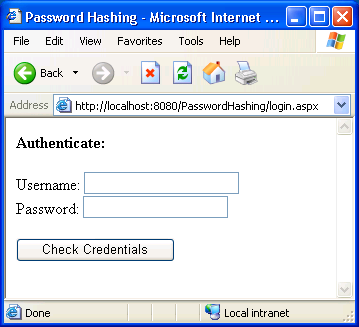
See how simple that is? To validate a user, we simply create a login form (login.aspx) complete with two TextBox controls and a Button control to handle the validation. The markup would resemble the following:
<form runat="server">

<strong>Authenticate:</strong><br /><br />

Username:<br />

<asp:TextBox id="txtUsername" runat="server" /><br />

Password:<br />

<asp:TextBox id="txtPassword" runat="server" TextMode="Password" /><br /><br />

<asp:Button id="btnCheck" runat="server" Text="Check Credentials" /><br /><br />

<asp:Label id="lblCheck" runat="server" />

</form>
As a result of this markup, our Login page should look like this:
Once you’ve got the interface looking the way you want it to, add the OnClick="CheckCredentials_Click" attribute to the Button control as follows:
<asp:Button id="btnCheck" runat="server" Text="Check Credentials" OnClick="CheckCredentials_Click" />Finally, we create a code declaration block within the <head> tag of our document and add the code to validate our users as follows:
<script runat="server">

Dim objConn As New OleDbConnection("Provider=Microsoft.Jet.OleDb.4.0;Data

  Source=C:InetpubwwwrootPasswordHashingDatabaseCustomers.mdb")

Dim objCmd As OleDbCommand

Dim objDR As OleDbDataReader


Function CheckCredentials(Username As String, Password As String) As Boolean

  objConn.Open()

  objCmd = New OleDbCommand("SELECT Username, Pass FROM Users WHERE

    Username=@givenUsername", objConn)

  objCmd.Parameters.Add("@givenUsername", Username)


  objDR = objCmd.ExecuteReader()

  If Not objDR.Read() Then

    Return False

  Else

    Dim storedHashedPassword As String = objDR("Pass")

    Dim givenHashedPassword As String =

      FormsAuthentication.HashPasswordForStoringInConfigFile(Password,

      "SHA1")

    Return storedHashedPassword = givenHashedPassword

  End If

End Function


Sub CheckCredentials_Click(s As Object, e As EventArgs)

  If (CheckCredentials(txtUsername.Text, txtPassword.Text) = True) Then

    lblCheck.Text = "You entered the right credentials!"

  Else

    lblCheck.Text = "You entered the wrong credentials!"

  End If

End Sub

</script>
Again, don’t forget to add the following directives to the top of the page:
<%@ Import Namespace="System.Data.OleDb" %>
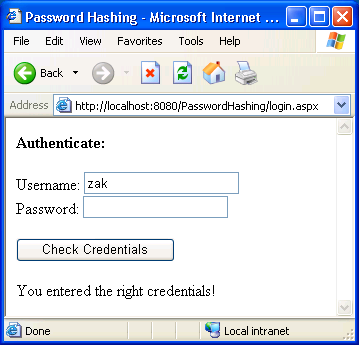
<%@ Import Namespace="System.Web.Security" %>Now, launch login.aspx within the browser and enter a username and password. As you can see from the figure below, when I log in with the right credentials, the Label control displays the message "You entered the right credentials".
Right away you can see the benefits to simplistic hashing. It’s far more secure than storing clear text because of the fact that it would be extremely difficult for someone to guess the original password that produced a hashed message digest. Notice I said "extremely difficult". Because we’ve only performed simplistic hashing, it wouldn’t be impossible for a hacker to perform what’s called a dictionary attack and exploit vulnerabilities. Again, there is a solution to this problem as well.
Salting a Hash
So far, we’ve managed to solve the problem of storing clear text passwords in our database in a relatively secure fashion. Unfortunately, this solution is secure enough only to prevent wandering database administrator eyes from seeing usernames and passwords in our database. A hacker can still perform what’s called a dictionary attack. Malicious parties may make a dictionary attack by taking, for instance, 100,000 passwords that they know people use frequently (e.g. city names, sports teams, etc.), hash them, and then compare each entry in the dictionary against each row in the database table. If the hackers find a match, bingo! They have your password. To solve this problem, however, we need only salt the hash.
To salt a hash, we simply come up with a random-looking string of text, concatenate it with the password supplied by the user, then hash both the randomly generated string and password together as one value. We then save both the hash and the salt as separate fields within the Users table.
In this scenario, not only would a hacker need to guess the password, they’d have to guess the salt as well. Adding salt to the clear text improves security: now, if a hacker tries a dictionary attack, he must hash his 100,000 entries with the salt of every user row. Although it’s still possible, the chances of hacking success diminish radically.
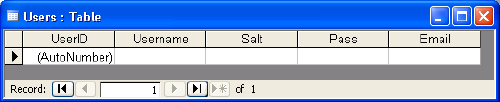
To implement this functionality, we start by adding a new field, called Salt, to our Users database table. The modified design will resemble the below.
When complete, the Datasheet will appear similar to the figure shown below.
Now, we can modify the code within registration.aspx slightly to accommodate the salt. I bolded the code additions to make them easier to distinguish:
<%@ Import Namespace="System.Data.OleDb" %>

<%@ Import Namespace="System.Web.Security" %>

<%@ Import Namespace="System.Security.Cryptography" %>


<html>

<head>

<title>Password Hashing</title>

<script runat="server">

Dim objConn As New OleDbConnection("Provider=Microsoft.Jet.OleDb.4.0;Data

  Source=C:InetpubwwwrootPasswordHashingDatabaseCustomers.mdb")

Dim objCmd As OleDbCommand

Dim sqlCmd As String

Dim objRng As New RNGCryptoServiceProvider

Dim intSaltSize As Integer = 16


Sub AddCredentials_Click(s As Object, e As EventArgs)

  sqlCmd = "INSERT INTO Users (Username, Salt, Pass, Email) VALUES

                           (@Username, @Salt, @Pass, @Email)"

  objCmd = New OleDbCommand(sqlCmd, objConn)

  objCmd.Parameters.Add("@Username", txtUsername.Text)

  Dim objByte() As Byte = New Byte(intSaltSize) {}

  objRng.GetBytes(objByte)

  Dim strSalt As String = Convert.ToBase64String(objByte)

  objCmd.Parameters.Add("@Salt", strSalt)

  objCmd.Parameters.Add("@Pass",

                          FormsAuthentication.HashPasswordForStoringInConfigFile(strSalt +

                          txtPassword.Text, "SHA1"))

  objCmd.Parameters.Add("@Email", txtEmail.Text)


  objConn.Open()

  objCmd.ExecuteNonQuery()

  objConn.Close()

End Sub

</script>

</head>

<body>


<form runat="server">

<strong>User Registration</strong><br /><br />

Username:<br />

<asp:TextBox id="txtUsername" runat="server" /><br />

Password:<br />

<asp:TextBox id="txtPassword" runat="server" TextMode="Password" /><br />

Email:<br />

<asp:TextBox id="txtEmail" runat="server" /><br /><br />

<asp:Button id="btnAddCredentials" runat="server" Text="Add Credentials"

onClick="AddCredentials_Click " />

</form>

</body>

</html>
Notice the use of the RNGCryptoServiceProvider class. This class is used to create the salt. The GetBytes() method of the RNGCryptoServiceProvider class creates an array of random bytes for cryptographic purposes. Although we could have used the Random class, the RNGCryptoServiceProvider class provides a result that is much more random than that of the Random class.
This time, when I add a new username (zak) and password (zak), the result is written similarly to our first example. The difference here is that, when I add a second user (fred) with the same password (zak), the digest for both the password and salt are completely different across the board. This point is illustrated below.

To validate a user now, we simply modify the CheckCredentials_Click() function within login.aspx as follows:
Function CheckCredentials(Username As String, Password As String) As Boolean
objConn.Open()
objCmd = New OleDbCommand("SELECT Salt, Pass FROM Users WHERE
Username=@givenUsername", objConn)
objCmd.Parameters.Add("@givenUsername", Username)
objDR = objCmd.ExecuteReader()
If Not objDR.Read() Then
Return False
Else
Dim strSalt As String = objDR("Salt")
Dim strStoredPassword As String = objDR("Pass")
Dim strGivenPassword As String =
FormsAuthentication.HashPasswordForStoringInConfigFile(strSalt
& Password, "SHA1")
Return strStoredPassword = strGivenPassword
End If
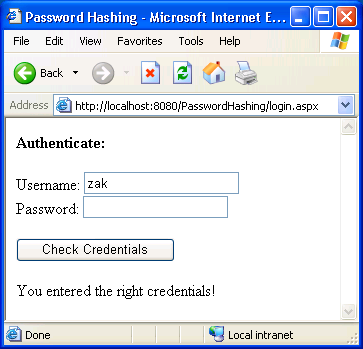
End FunctionThis time, when the user logs in, the hashed password is compared to the value of the salt and password combined. As you can see from the image below, I’ve entered the correct username and password.
Conclusion
Now that you know that the .NET Framework provides excellent support for storing passwords securely, you shouldn’t ever have to store clear text passwords within your database ever again!
 Zak Ruvalcaba
Involved in the Web since 1995, Zak is founder of and advisor to Module Media, a full service design and development firm in San Diego. He is author of �The Ten Minute Guide to Dreamweaver 4� and �Dreamweaver MX Unleashed�, and SitePoint's own Build Your Own ASP.NET Website Using C# and VB.NET.