Flash Catalyst, formerly codenamed Thermo, promises to make the process of converting an interface design to code a smooth and easy experience. In this tutorial, spread over two parts, Andrew Muller shows us how to build a nifty Flash application that retrieves music chart data from Yahoo!, using Illustrator, Flash Catalyst, and Flash Builder. Pay attention – there’s a quiz at the end!
Note: To play along at home, you’ll need to grab the following:
- Our sample design, in Illustrator format
- A copy of Illustrator CS4, if you’d like to edit the sample project
- A copy of the Flash Catalyst beta
- A copy of Flex Builder or Flash Builder – grab a demo of Flash Builder here.
The Designer’s Dilemma
Designers have a variety of tools they use on a regular basis to do their day job, often sticking to the one that they know best. Adobe’s Illustrator and Photoshop are two that dominate the software list of choice for interface designers of all stripes, whether they’re involved with site design, rich internet application (RIA) development, or any other kind of screen-based experience. Then, the design is handed over to a developer to convert into a working interface.
A shortcoming of this design process is that, while it allows the designer to create a look for a web application, it’s impossible to see the feel or interactivity of an application until a developer has implemented it. The translation of that design is often imperfect, with designer and developer sometimes at odds over an object being a pixel out or the wrong color shade. How can we build stronger bridges between the two? Enter Flash Catalyst.
Introducing Adobe Flash Catalyst
Adobe has recently released the first public beta of Flash Catalyst, a new tool to help designers become more involved in the process of building RIA interactions. Designers can use Catalyst to build interactive interfaces for the Flash Player from work they’ve created in either Illustrator or Photoshop, with support for Fireworks slated to follow in a later release. Catalyst is capable of maintaining virtually all the characteristics of the original artwork; users can create interfaces in the applications with which they’re most comfortable, import them to Catalyst for more changes, then complete the round-trip back to the original design tool for further design alterations. Of course, since Catalyst is still in beta, there are some missing options that should come in later beta releases, but it still will give the user a good feel for what’s to come.
As well as converting artwork into a Flash interface, Catalyst includes tools to add interactive elements to the design. This initial release has the ability to convert objects into a limited but useful number of UI components, including data lists, buttons, and scrollbars, with extra UI controls available for wireframing interfaces directly in the Catalyst design view. Catalyst also includes tools for managing state and animated effects. Developers are likely to enjoy Catalyst because the designer can now turn objects into buttons before handing over the design, thus reducing a developer’s workload. It will also mean that there should be less possibility of designs being improperly applied to Flash applications, since all the visuals have been prepared in advance.
Mocking Up the Interface in Illustrator
We’re going to create a simple Flash application that will display information retrieved online via Yahoo’s YQL (Yahoo Query Language) service. For dynamic content we’ll use four YQL queries to retrieve a variety of music chart information. To help make this tutorial easier, we’ve decided to use example queries from the YQL site. Yahoo also provides design stencils that you can use to prototype your next RIA masterpiece; the tab stencils from the Yahoo design kit were part of the inspiration for the design of this application.
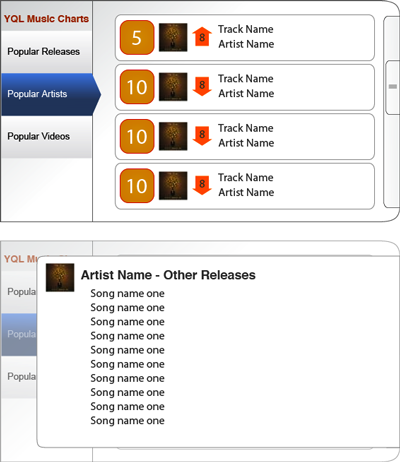
To begin, I’ve taken a vertical tab design out of the Yahoo stencil kit and imported that into Illustrator. The next task is to create the outline shape of the application – in this example I’ve used Illustrator’s drawing tools to design a box for that, with two rounded corners and a gradient fill to lift it up a bit. The app we’re building will be retrieving multiple rows of data from the YQL service as XML, so the next job is to define a way to display that repetitive data. Depending on the type of data, the typical interface pattern is to display information in either rows or tiles – here I’ve used rows.
We’ll then need to create artwork to represent a single row of music chart data. The data that we’ll receive could include chart position, a URL for album cover artwork, a chart position shift indicator, and the names of the artist and track. Lastly, there’s a scrollbar, designed to match the curvy corners of the application.
Next, we’ll need to create artwork to represent the detail view state for the application. In Catalyst, we’re able to specify different states using different files or different layers within the file. Catalyst also has a simple timeline, which may be used to control the timing of objects fading in and out as we switch between states.
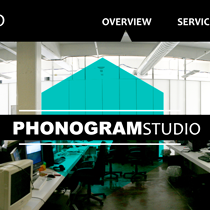
With that done we’re ready to show the mockups to a client for feedback, finalize the design, and bring it into Catalyst for some interactivity! Here’s the mockup displaying both states of our app.
Next, it’s time to start adding interactivity in Catalyst.
Making the Design Interactive in Flash Catalyst
Time to jump into Catalyst! Use the option to create a new project from an existing design file, and open the Illustrator file that we’ve created. It’ll take a moment or two to parse the file – naturally you should pay attention to the prompts for options like canvas size and editable regions, but in this example we’ll leave everything set at default.
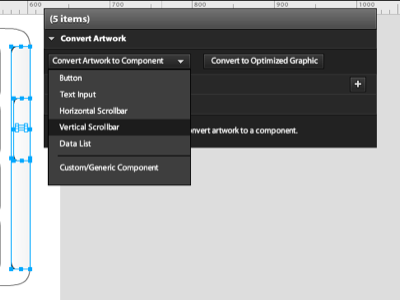
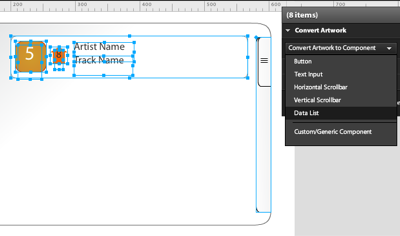
Let’s begin with the track/artist chart display part of the design. We’ll convert this into a predefined Catalyst component called a Data List. Select any object in the design, and you’ll see a floating gray panel called the Heads Up Display (HUD) appear. This is used to create and manage interactive components.
The column of options on the right of the screen contains a series of panels that may be familiar if you’ve used Flash previously. In here you’ll find layers, library panels, and property panels as you normally would in Flash to manage various aspects of your content. As in Flash, the higher an object is in the Layers panel, the closer it is to the top of the stack of objects – that’s an important point to remember. The Layers panel is also a good way of quickly selecting specific objects, especially if they’re small or otherwise difficult to click on.
Building the Data List
The list is made up of repeated items with a scrollbar to move through the content. We’ll start by converting the scrollbar art into a working scrollbar. Select the elements that make up the scrollbar design. In our slider, we have a track, a thumb, and three small lines representing the thumb’s grip; we’ll select all these, and choose Convert Artwork to Component > Vertical Scrollbar from the HUD. You might find that it’s easier to grab the items from the Layers panel, especially when they’re quite small, like the tiny texture on our scrollbar.
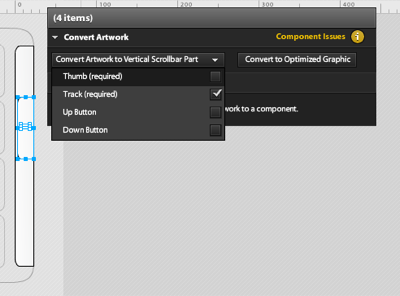
Once converted, you should see a small yellow message in the HUD indicating that there are some component issues: this is because we still need to identify the individual parts that make up our scrollbar. Choose Edit Parts from the HUD, and select the track, then define it as the scrollbar’s Track from the Convert Artwork drop-down. Select the thumb image and the gripper artwork, and set them as the Thumb part from the same set of options.
Now that we’re finished with the scrollbar, we’ll need to return to the main Design window to continue building the application. There’s a breadcrumb-like indicator at the top left of the design area listing which part of the application you’re in; click on the first item in the breadcrumb to return to the whole application.
The next component that we’ll use within the design is the repeated list item, representing how each row of information will look within our Data List. We’ll only need one of the rows that we created for the mockup, as this is all Catalyst requires to determine how the items should look, so we’ll delete the bottom three and just keep the first one. Then select all the graphics for that first row, plus the scrollbar component that we’ve just created, and use the HUD to convert the artwork to a Data List component.
Once again, a yellow message appears to indicate that there’s an issue with the component – we need to identify what element will form the repeated item. Select the artwork for the whole row, click Edit Parts, and define the row with the HUD to a Repeated Item. You should see that item will repeat down the window.
The size of the Data List affects what’s currently displayed, including the way that content will be cropped as you scroll up and down later on, so now’s the time to adjust the size of the data list to taste. Using the breadcrumbs above, double-check to see that you’re still within the Data List component, then use the drag handles to adjust the height of the list accordingly. We’ll extend the height of the Data List component to just inside the application itself; that way the list will appear to be masked by the application when it’s in use.
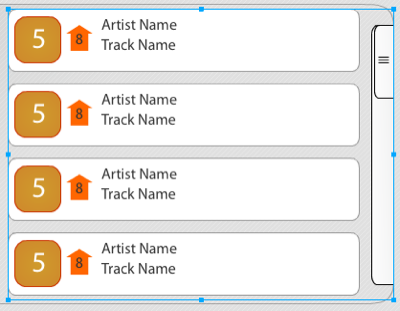
Let’s see how that looks. From the File menu, select Run Project. Flex will begin building your application, and a new browser window will appear. If all went well, you should find that you can scroll up and down the Data List using your scrollbar.
The next step in our application is to start adding the interactions to the design – but you’ll have to stay tuned for the next part of this tutorial for that! In Part II, we’ll add more interaction, show you how to take your Catalyst project into Flash Builder, and populate the application using queries generated via Yahoo’s YQL service.
For now, save your project, and relax – we’ll see you in Part II!
Think you have what it takes to be a Flash Catalyst guru? Prove it with our quick quiz!
 Andrew Muller
Trainer, mentor, developer, blogger, and presenter, Andrew Muller has been involved with Rich Internet Applications in Australia since 2002. He's also a certified Adobe instructor for Flex, AIR, ColdFusion, Flash, and Connect, and an Ambassador and Community Expert for Adobe.