
This article was originally published on OKTA Developer Blog. Thank you for supporting the partners who make SitePoint possible.
Angular (formerly called Angular 2.0) is quickly becoming one of the most powerful ways to build a modern single-page app. A core strength is Angular’s focus on building reusable components, which help you decouple the various concerns in your application. Take authentication, for example: it can be painful to build, but once you wrap it in a component, the authentication logic can be reused throughout your application.
The Angular CLI makes it easy to scaffold new components, and even entire projects. If you haven’t used the Angular CLI to quickly generate Angular code, you’re in for a treat!
In this example, you’ll build a simple web application with Angular CLI, a tool for Angular development. You’ll create an application with search and edit features, then add authentication.
Key Takeaways
- Quickly scaffold and run a new Angular application using Angular CLI, enhancing development efficiency.
- Integrate authentication seamlessly by setting up an OpenID Connect app with Okta, ensuring secure user management.
- Enhance user experience by adding search and edit features, utilizing Angular’s powerful component system.
- Utilize routing to manage navigation within the application, allowing for a smoother user flow and better state management.
- Implement form validation to ensure data integrity and provide feedback, improving overall usability.
- Secure application routes using Angular’s AuthGuard to protect sensitive information and enforce authentication.
Create an Angular Application
TIP: If you’d like to skip building the Angular application and get right to adding authentication, you can clone my ng-demo project, then skip to the Create an OpenID Connect App in Okta section.
git clone https://github.com/mraible/ng-demo.git
What You’ll Need
- About 20 minutes
- A favorite text editor or IDE. I recommend IntelliJ IDEA
- Node.js and npm installed. I recommend using nvm
- Angular CLI installed. If you don’t have Angular CLI installed, install it using
npm install -g @angular/cli
Create a new project using the ng new command:
ng new ng-demo
This will create a ng-demo project and run npm install in it. It should take about a minute to complete, but that could vary depending on your connection speed.
[mraible:~/dev] $ ng new ng-demo
installing ng
  create .editorconfig
  create README.md
  create src/app/app.component.css
  create src/app/app.component.html
  create src/app/app.component.spec.ts
  create src/app/app.component.ts
  create src/app/app.module.ts
  create src/assets/.gitkeep
  create src/environments/environment.prod.ts
  create src/environments/environment.ts
  create src/favicon.ico
  create src/index.html
  create src/main.ts
  create src/polyfills.ts
  create src/styles.css
  create src/test.ts
  create src/tsconfig.app.json
  create src/tsconfig.spec.json
  create src/typings.d.ts
  create .angular-cli.json
  create e2e/app.e2e-spec.ts
  create e2e/app.po.ts
  create e2e/tsconfig.e2e.json
  create .gitignore
  create karma.conf.js
  create package.json
  create protractor.conf.js
  create tsconfig.json
  create tslint.json
Successfully initialized git.
Installing packages for tooling via npm.
Installed packages for tooling via npm.
You can `ng set --global packageManager=yarn`.
Project 'ng-demo' successfully created.
[mraible:~] 46s $
You can see the what version of Angular CLI you’re using with ng --version.
$ ng --version
    _                      _                 ____ _     ___
   / \   _ __   __ _ _   _| | __ _ _ __     / ___| |   |_ _|
  / △ \ | '_ \ / _` | | | | |/ _` | '__|   | |   | |    | |
 / ___ \| | | | (_| | |_| | | (_| | |      | |___| |___ | |
/_/   \_\_| |_|\__, |\__,_|_|\__,_|_|       \____|_____|___|
               |___/
@angular/cli: 1.3.2
node: 8.4.0
os: darwin x64
Run Your Angular Application
The project is configured with webpack dev server. To start it, make sure you’re in the ng-demo directory, then run:
ng serve
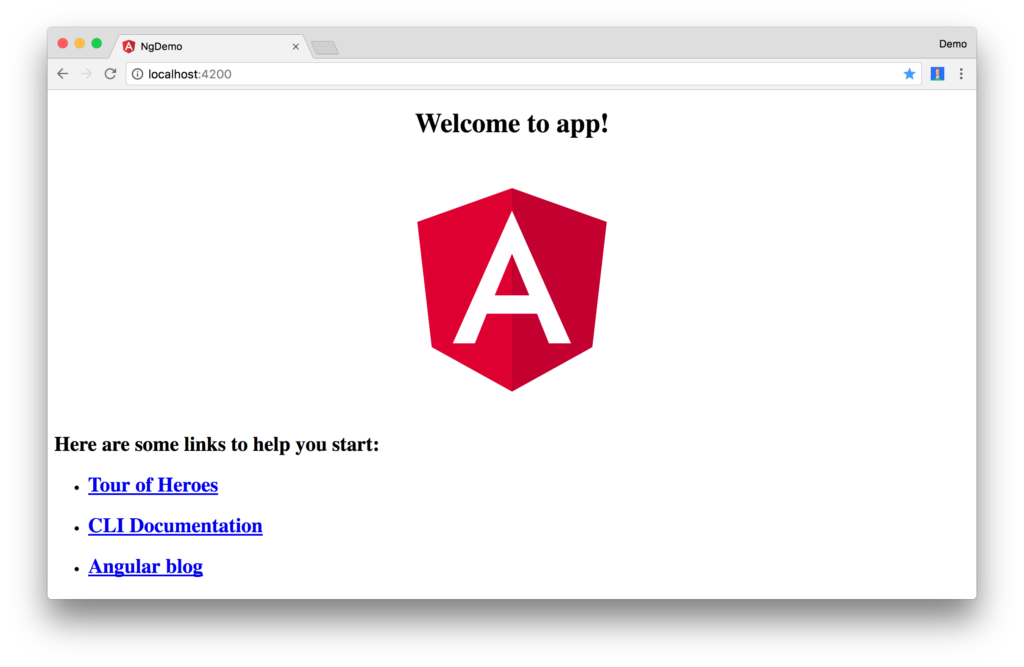
You should see a screen like the one below at http://localhost:4200.
You can make sure your new project’s tests pass, run ng test:
$ ng test
...
Chrome 60.0.3112 (Mac OS X 10.12.6): Executed 3 of 3 SUCCESS (0.239 secs / 0.213 secs)
Add a Search Feature
To add a search feature, open the project in an IDE or your favorite text editor. For IntelliJ IDEA, use File > New Project > Static Web and point to the ng-demo directory.
In a terminal window, cd into your project’s directory and run the following command. This will create a search component.
$ ng g component search
installing component
  create src/app/search/search.component.css
  create src/app/search/search.component.html
  create src/app/search/search.component.spec.ts
  create src/app/search/search.component.ts
  update src/app/app.module.ts
Open src/app/search/search.component.html and replace its default HTML with the following:
<h2>Search</h2>
<form>
  <input type="search" name="query" [(ngModel)]="query" (keyup.enter)="search()">
  <button type="button" (click)="search()">Search</button>
</form>
<pre>{{searchResults | json}}</pre>
The Router documentation for Angular provides the information you need to setup a route to the SearchComponent you just generated. Here’s a quick summary:
In src/app/app.module.ts, add an appRoutes constant and import it in @NgModule:
import { Routes, RouterModule } from '@angular/router';

const appRoutes: Routes = [
  {path: 'search', component: SearchComponent},
  {path: '', redirectTo: '/search', pathMatch: 'full'}
];

@NgModule({
  ...
  imports: [
    ...
    RouterModule.forRoot(appRoutes)
  ]
  ...
})
export class AppModule { }
In src/app/app.component.html, adjust the placeholder content and add a <router-outlet> tag to display routes.
<h1>Welcome to {{title}}!</h1>
<!-- Routed views go here -->
<router-outlet></router-outlet>
Now that you have routing setup, you can continue writing the search feature.
If you still have ng serve running, your browser should refresh automatically. If not, navigate to http://localhost:4200. You will likely see a blank screen. Open your JavaScript console and you’ll see the problem.
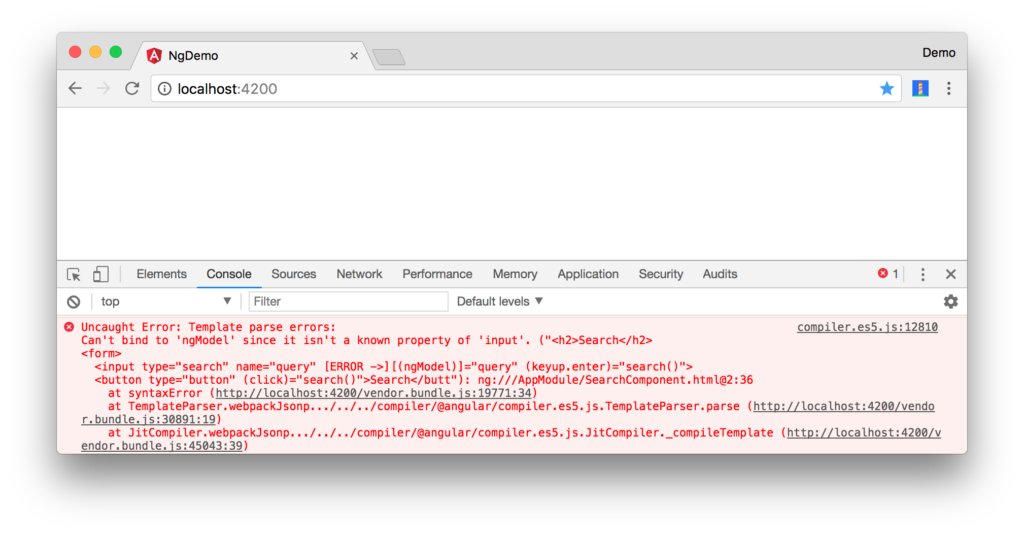
To solve this, open src/app/app.module.ts and add FormsModule as an import in @NgModule:
import { FormsModule } from '@angular/forms';

@NgModule({
  ...
  imports: [
    ...
    FormsModule
  ]
  ...
})
export class AppModule { }
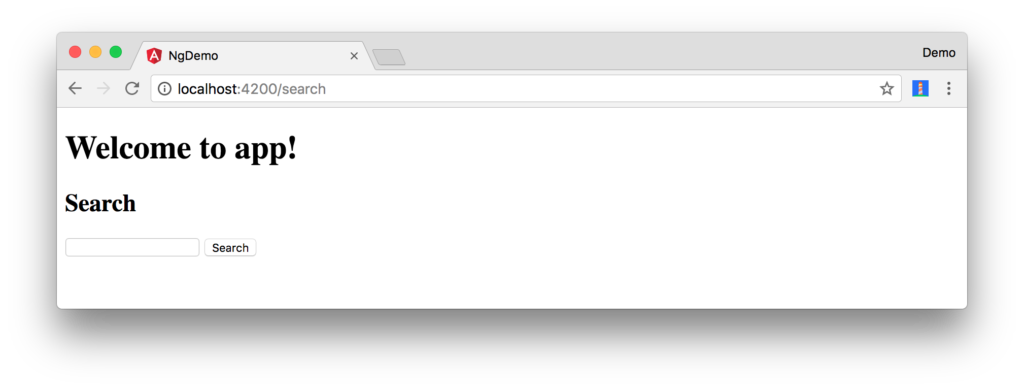
Now you should see the search form.
If you want to add CSS for this components, open src/app/search/search.component.css and add some CSS. For example:
:host {
  display: block;
  padding: 0 20px;
}
This section has shown you how to generate a new component to a basic Angular application with Angular CLI. The next section will show you how to create and use a JSON file and localStorage to create a fake API.
To get search results, create a SearchService that makes HTTP requests to a JSON file. Start by generating a new service.
$ ng g service search
installing service
  create src/app/search.service.spec.ts
  create src/app/search.service.ts
  WARNING Service is generated but not provided, it must be provided to be used
Move the generated search.service.ts and its test to app/shared/search. You’ll need to create this directory.
mkdir -p src/app/shared/search
mv src/app/search.service.* src/app/shared/search/.
Create src/assets/data/people.json to hold your data.
[
  {
    "id": 1,
    "name": "Peyton Manning",
    "phone": "(303) 567-8910",
    "address": {
      "street": "1234 Main Street",
      "city": "Greenwood Village",
      "state": "CO",
      "zip": "80111"
    }
  },
  {
    "id": 2,
    "name": "Demaryius Thomas",
    "phone": "(720) 213-9876",
    "address": {
      "street": "5555 Marion Street",
      "city": "Denver",
      "state": "CO",
      "zip": "80202"
    }
  },
  {
    "id": 3,
    "name": "Von Miller",
    "phone": "(917) 323-2333",
    "address": {
      "street": "14 Mountain Way",
      "city": "Vail",
      "state": "CO",
      "zip": "81657"
    }
  }
]
Modify src/app/shared/search/search.service.ts and provide Http as a dependency in its constructor. In this same file, create a getAll() method to gather all the people. Also, define the Address and Person classes that JSON will be marshalled to.
import { Injectable } from '@angular/core';
import { Http, Response } from '@angular/http';
import 'rxjs/add/operator/map';

@Injectable()
export class SearchService {
  constructor(private http: Http) {}

  getAll() {
    return this.http.get('assets/data/people.json')
        .map((res: Response) => res.json());
  }
}

export class Address {
  street: string;
  city: string;
  state: string;
  zip: string;

  constructor(obj?: any) {
    this.street = obj && obj.street || null;
    this.city = obj && obj.city || null;
    this.state = obj && obj.state || null;
    this.zip = obj && obj.zip || null;
  }
}

export class Person {
  id: number;
  name: string;
  phone: string;
  address: Address;

  constructor(obj?: any) {
    this.id = obj && Number(obj.id) || null;
    this.name = obj && obj.name || null;
    this.phone = obj && obj.phone || null;
    this.address = obj && obj.address || null;
  }
}
To make these classes available for consumption by your components, edit src/app/shared/index.ts and add the following:
export * from './search/search.service';
The reason for creating this file is so you can import multiple classes on a single line rather than having to import each individual class on separate lines.
In src/app/search/search.component.ts, add imports for these classes.
import { Person, SearchService } from '../shared';
You can now add query and searchResults variables. While you’re there, modify the constructor to inject the SearchService.
export class SearchComponent implements OnInit {
  query: string;
  searchResults: Array<Person>;

  constructor(private searchService: SearchService) {}
Then implement a search() method to call the service’s getAll() method.
search(): void {
  this.searchService.getAll().subscribe(
    data => { this.searchResults = data; },
    error => console.log(error)
  );
}
At this point, you’ll likely see the following message in your browser’s console.
ORIGINAL EXCEPTION: No provider for SearchService!
To fix the “No provider” error from above, update app.module.ts to import the SearchService and add the service to the list of providers. Because SearchService depends on Http, you’ll need to import HttpModule as well.
import { SearchService } from './shared';
import { HttpModule } from '@angular/http';

@NgModule({
  ...
  imports: [
    ...
    HttpModule
  ],
  providers: [SearchService],
  bootstrap: [AppComponent]
})
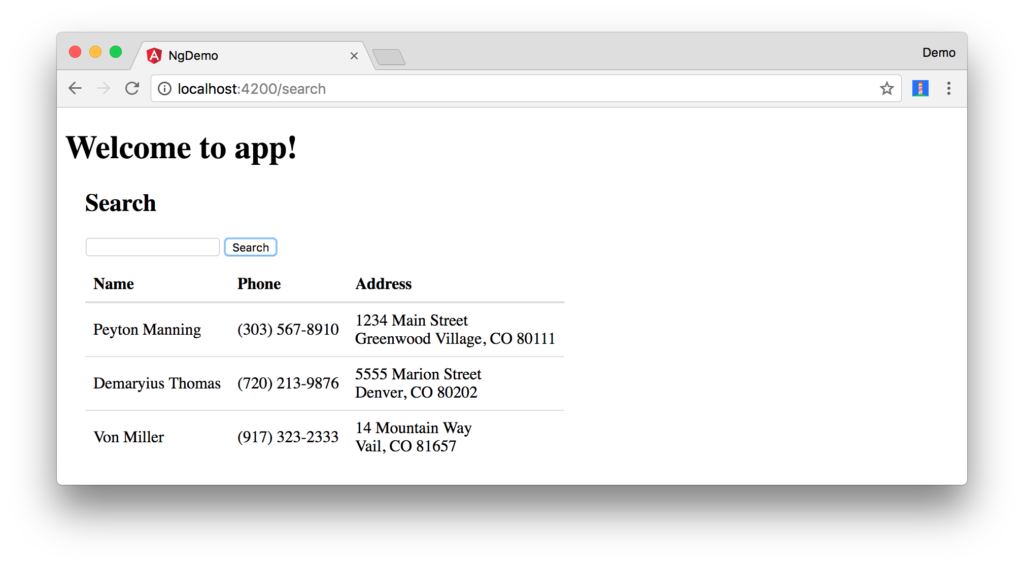
Now clicking the search button should work. To make the results look better, remove the <pre> tag and replace it with a <table> in src/app/search/search.component.html.
<table *ngIf="searchResults">
  <thead>
  <tr>
    <th>Name</th>
    <th>Phone</th>
    <th>Address</th>
  </tr>
  </thead>
  <tbody>
  <tr *ngFor="let person of searchResults; let i=index">
    <td>{{person.name}}</td>
    <td>{{person.phone}}</td>
    <td>{{person.address.street}}<br/>
      {{person.address.city}}, {{person.address.state}} {{person.address.zip}}
    </td>
  </tr>
  </tbody>
</table>
Then add some additional CSS in src/app/search/search.component.css to improve its table layout.
table {
  margin-top: 10px;
  border-collapse: collapse;
}

th {
  text-align: left;
  border-bottom: 2px solid #ddd;
  padding: 8px;
}

td {
  border-top: 1px solid #ddd;
  padding: 8px;
}
Now the search results look better.
But wait, you still don’t have search functionality! To add a search feature, add a search() method to SearchService.
import { Observable } from 'rxjs';

search(q: string): Observable<any> {
  if (!q || q === '*') {
    q = '';
  } else {
    q = q.toLowerCase();
  }
  return this.getAll().map(data => data.filter(item => JSON.stringify(item).toLowerCase().includes(q)));
}
Then refactor SearchComponent to call this method with its query variable.
search(): void {
  this.searchService.search(this.query).subscribe(
    data => { this.searchResults = data; },
    error => console.log(error)
  );
}
Now search results will be filtered by the query value you type in.
This section showed you how to fetch and display search results. The next section builds on this and shows how to edit and save a record.
Add an Edit Feature
Modify src/app/search/search.component.html to add a link for editing a person.
<td><a [routerLink]="['/edit', person.id]">{{person.name}}</a></td>
Run the following command to generate an EditComponent.
$ ng g component edit
installing component
  create src/app/edit/edit.component.css
  create src/app/edit/edit.component.html
  create src/app/edit/edit.component.spec.ts
  create src/app/edit/edit.component.ts
  update src/app/app.module.ts
Add a route for this component in src/app/app.module.ts:
const appRoutes: Routes = [
  {path: 'search', component: SearchComponent},
  {path: 'edit/:id', component: EditComponent},
  {path: '', redirectTo: '/search', pathMatch: 'full'}
];
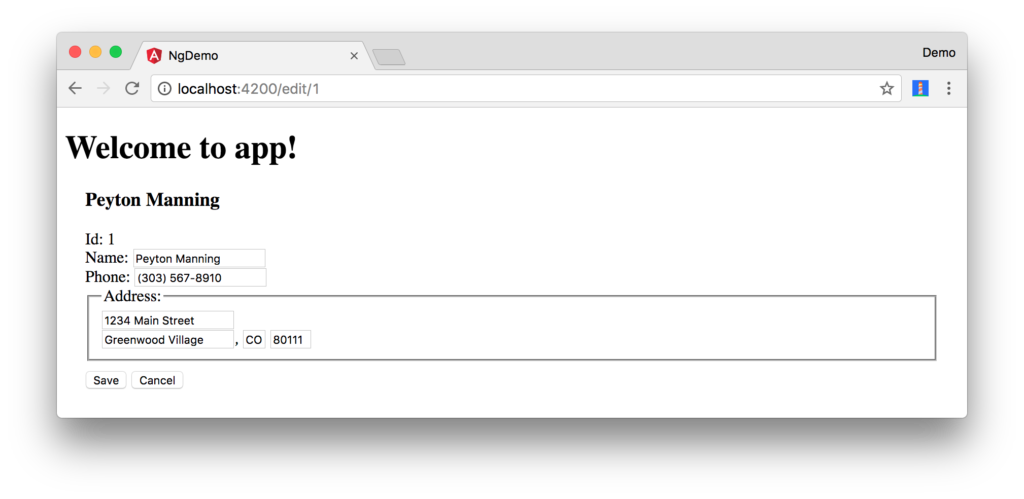
Update src/app/edit/edit.component.html to display an editable form. You might notice I’ve added id attributes to most elements. This is to make things easier when writing integration tests with Protractor.
<div *ngIf="person">
  <h3>{{editName}}</h3>
  <div>
    <label>Id:</label>
    {{person.id}}
  </div>
  <div>
    <label>Name:</label>
    <input [(ngModel)]="editName" name="name" id="name" placeholder="name"/>
  </div>
  <div>
    <label>Phone:</label>
    <input [(ngModel)]="editPhone" name="phone" id="phone" placeholder="Phone"/>
  </div>
  <fieldset>
    <legend>Address:</legend>
    <address>
      <input [(ngModel)]="editAddress.street" id="street"><br/>
      <input [(ngModel)]="editAddress.city" id="city">,
      <input [(ngModel)]="editAddress.state" id="state" size="2">
      <input [(ngModel)]="editAddress.zip" id="zip" size="5">
    </address>
  </fieldset>
  <button (click)="save()" id="save">Save</button>
  <button (click)="cancel()" id="cancel">Cancel</button>
</div>
Modify EditComponent to import model and service classes and to use the SearchService to get data.
import { Component, OnInit, OnDestroy } from '@angular/core';
import { Address, Person, SearchService } from '../shared';
import { Subscription } from 'rxjs';
import { ActivatedRoute, Router } from '@angular/router';

@Component({
  selector: 'app-edit',
  templateUrl: './edit.component.html',
  styleUrls: ['./edit.component.css']
})
export class EditComponent implements OnInit, OnDestroy {
  person: Person;
  editName: string;
  editPhone: string;
  editAddress: Address;

  sub: Subscription;

  constructor(private route: ActivatedRoute,
              private router: Router,
              private service: SearchService) {
  }

  ngOnInit() {
    this.sub = this.route.params.subscribe(params => {
      const id = + params['id']; // (+) converts string 'id' to a number
      this.service.get(id).subscribe(person => {
        if (person) {
          this.editName = person.name;
          this.editPhone = person.phone;
          this.editAddress = person.address;
          this.person = person;
        } else {
          this.gotoList();
        }
      });
    });
  }

  ngOnDestroy() {
    this.sub.unsubscribe();
  }

  cancel() {
    this.router.navigate(['/search']);
  }

  save() {
    this.person.name = this.editName;
    this.person.phone = this.editPhone;
    this.person.address = this.editAddress;
    this.service.save(this.person);
    this.gotoList();
  }

  gotoList() {
    if (this.person) {
      this.router.navigate(['/search', {term: this.person.name} ]);
    } else {
      this.router.navigate(['/search']);
    }
  }
}
Modify SearchService to contain functions for finding a person by their id, and saving them. While you’re in there, modify the search() method to be aware of updated objects in localStorage.
search(q: string): Observable<any> {
  if (!q || q === '*') {
    q = '';
  } else {
    q = q.toLowerCase();
  }
  return this.getAll().map(data => {
    const results: any = [];
    data.map(item => {
      // check for item in localStorage
      if (localStorage['person' + item.id]) {
        item = JSON.parse(localStorage['person' + item.id]);
      }
      if (JSON.stringify(item).toLowerCase().includes(q)) {
        results.push(item);
      }
    });
    return results;
  });
}

get(id: number) {
  return this.getAll().map(all => {
    if (localStorage['person' + id]) {
      return JSON.parse(localStorage['person' + id]);
    }
    return all.find(e => e.id === id);
  });
}

save(person: Person) {
  localStorage['person' + person.id] = JSON.stringify(person);
}
You can add CSS to src/app/edit/edit.component.css if you want to make the form look a bit better.
:host {
  display: block;
  padding: 0 20px;
}

button {
  margin-top: 10px;
}
At this point, you should be able to search for a person and update their information.
The <form> in src/app/edit/edit.component.html calls a save() function to update a person’s data. You already implemented this above.
The function calls a gotoList() function that appends the person’s name to the URL when sending the user back to the search screen.
gotoList() {
  if (this.person) {
    this.router.navigate(['/search', {term: this.person.name} ]);
  } else {
    this.router.navigate(['/search']);
  }
}
Since the SearchComponent doesn’t execute a search automatically when you execute this URL, add the following logic to do so in its constructor.
import { ActivatedRoute } from '@angular/router';
import { Subscription } from 'rxjs';
...

sub: Subscription;

constructor(private searchService: SearchService, private route: ActivatedRoute) {
  this.sub = this.route.params.subscribe(params => {
    if (params['term']) {
      this.query = decodeURIComponent(params['term']);
      this.search();
    }
  });
}
You’ll want to implement OnDestroy and define the ngOnDestroy method to clean up this subscription.
import { Component, OnInit, OnDestroy } from '@angular/core';

export class SearchComponent implements OnInit, OnDestroy {
...
  ngOnDestroy() {
    this.sub.unsubscribe();
  }
}
After making all these changes, you should be able to search/edit/update a person’s information. If it works – nice job!
Form Validation
One thing you might notice is you can clear any input element in the form and save it. At the very least, the name field should be required. Otherwise, there’s nothing to click on in the search results.
To make name required, modify edit.component.html to add a required attribute to the name <input>.
<input [(ngModel)]="editName" name="name" id="name" placeholder="name" required/>
You’ll also need to wrap everything in a <form> element. Add <form> after the <h3> tag and close it before the last </div>. You’ll also need to add an (ngSubmit) handler to the form and change the save button to be a regular submit button.
<h3>{{editName}}</h3>
<form (ngSubmit)="save()" ngNativeValidate>
  ...
  <button type="submit" id="save">Save</button>
  <button (click)="cancel()" id="cancel">Cancel</button>
</form>
After making these changes, any field with a required attribute will be required.
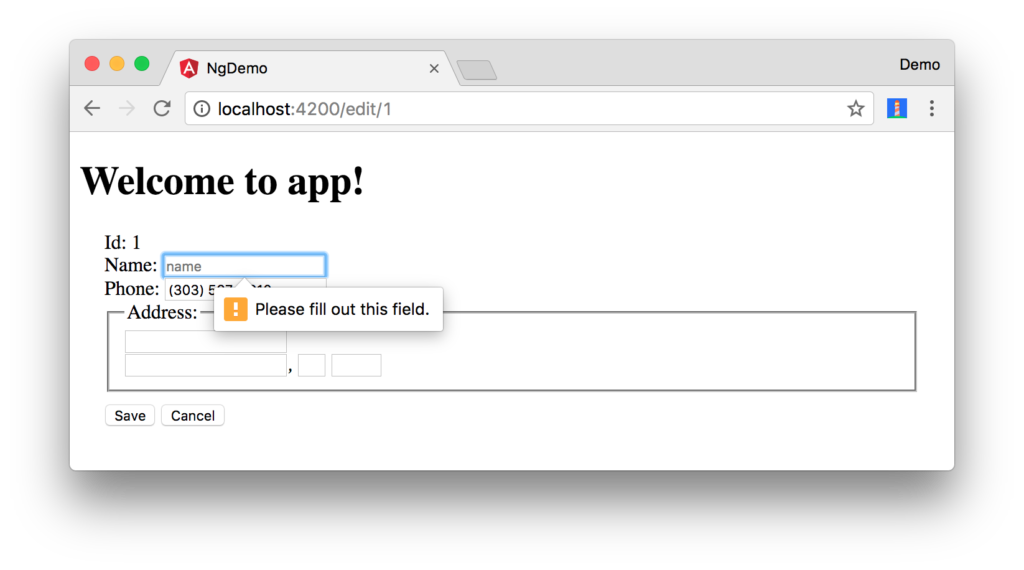
In this screenshot, you might notice the address fields are blank. This is explained by the error in your console.
If ngModel is used within a form tag, either the name attribute must be set or the form
control must be defined as 'standalone' in ngModelOptions.

Example 1: <input [(ngModel)]="person.firstName" name="first">
Example 2: <input [(ngModel)]="person.firstName" [ngModelOptions]="{standalone: true}">
To fix, add a name attribute to all the address fields. For example:
<address>
  <input [(ngModel)]="editAddress.street" name="street" id="street"><br/>
  <input [(ngModel)]="editAddress.city" name="city" id="city">,
  <input [(ngModel)]="editAddress.state" name="state" id="state" size="2">
  <input [(ngModel)]="editAddress.zip" name="zip" id="zip" size="5">
</address>
Now values should display in all fields and name should be required.

If you want to provide your own validation messages instead of relying on the browser’s, complete the following steps:
- Remove
ngNativeValidateand add#editForm="ngForm"to the<form>element. - Add
#name="ngModel"to the<input id="name">element. - Add
[disabled]="!editForm.form.valid"to the Save button. - Add the following under the
namefield to display a validation error.
<div [hidden]="name.valid || name.pristine" style="color: red">
  Name is required
</div>
To learn more about forms and validation, see Angular forms documentation.
Create an OpenID Connect App in Okta
OpenID Connect (OIDC) is built on top of the OAuth 2.0 protocol. It allows clients to verify the identity of the user and, as well as to obtain their basic profile information. To learn more, see https://openid.net/connect.
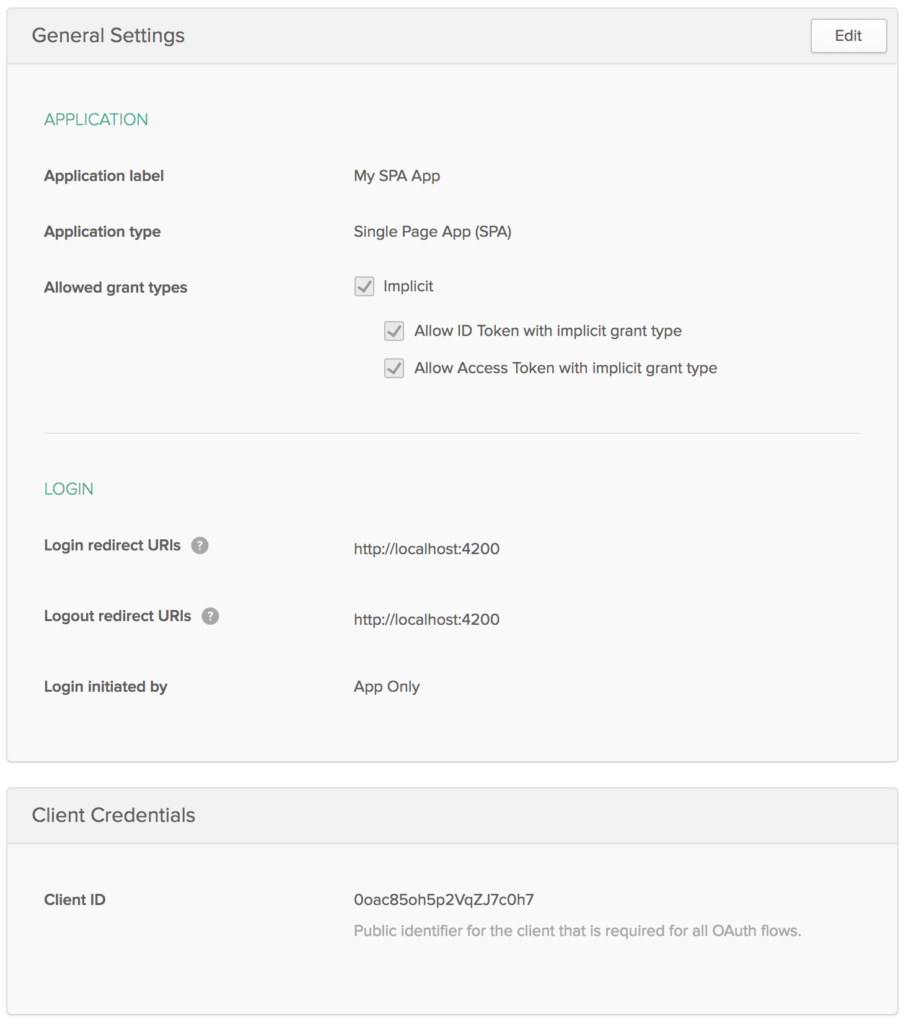
To integrate Okta for user authentication, you’ll first need to register and create an OIDC application.
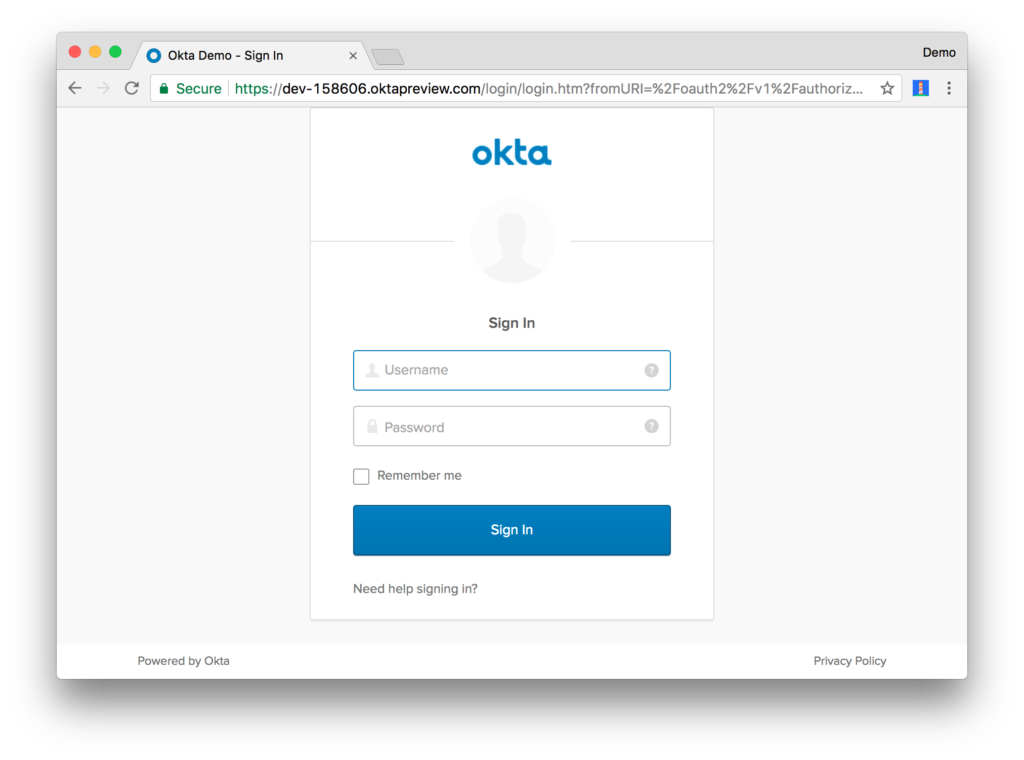
Login to your Okta account, or create one if you don’t have one. Navigate to Applications and click on the Add Application button. Select SPA and click Next. On the next page, specify http://localhost:4200 as a Base URI, Login redirect URI, and Logout redirect URI. Click Done and you should see settings like the following.
Install Manfred Steyer’s project to add OAuth 2 and OpenID Connect support using npm.
npm install --save angular-oauth2-oidc
Modify src/app/app.component.ts to import OAuthService and configure your app to use your Okta application’s settings.
import { OAuthService, JwksValidationHandler } from 'angular-oauth2-oidc';

...

  constructor(private oauthService: OAuthService) {
    this.oauthService.redirectUri = window.location.origin;
    this.oauthService.clientId = '{client-id}';
    this.oauthService.scope = 'openid profile email';
    this.oauthService.issuer = 'https://dev-{dev-id}.oktapreview.com';
    this.oauthService.tokenValidationHandler = new JwksValidationHandler();

    // Load Discovery Document and then try to login the user
    this.oauthService.loadDiscoveryDocument().then(() => {
      this.oauthService.tryLogin();
    });
  }
...
Create src/app/home/home.component.ts and configure it to have Login and Logout buttons.
import { Component } from '@angular/core';
import { OAuthService } from 'angular-oauth2-oidc';

@Component({
  template: `
    <div *ngIf="givenName">
      <h2>Welcome, {{givenName}}!</h2>
      <button (click)="logout()">Logout</button>
      <p><a routerLink="/search" routerLinkActive="active">Search</a></p>
    </div>

    <div *ngIf="!givenName">
      <button (click)="login()">Login</button>
    </div>`
})
export class HomeComponent {

  constructor(private oauthService: OAuthService) {
  }

  login() {
    this.oauthService.initImplicitFlow();
  }

  logout() {
    this.oauthService.logOut();
  }

  get givenName() {
    const claims = this.oauthService.getIdentityClaims();
    if (!claims) {
      return null;
    }
    return claims['name'];
  }
}
Create src/app/shared/auth/auth.guard.service.ts to navigate to the HomeComponent if the user is not authenticated.
import { Injectable } from '@angular/core';
import { ActivatedRouteSnapshot, CanActivate, Router, RouterStateSnapshot } from '@angular/router';
import { OAuthService } from 'angular-oauth2-oidc';

@Injectable()
export class AuthGuard implements CanActivate {

  constructor(private oauthService: OAuthService, private router: Router) {}

  canActivate(route: ActivatedRouteSnapshot, state: RouterStateSnapshot): boolean {
    if (this.oauthService.hasValidIdToken()) {
      return true;
    }

    this.router.navigate(['/home']);
    return false;
  }
}
Export AuthGuard in src/shared/index.ts:
export * from './auth/auth.guard.service';
Import the OAuthModule in src/app/app.module.ts, configure the new HomeComponent, and lock the /search and /edit routes down with the AuthGuard.
import { OAuthModule } from 'angular-oauth2-oidc';
import { HomeComponent } from './home/home.component';
import { SearchService, AuthGuard } from './shared';

const appRoutes: Routes = [
  {path: 'search', component: SearchComponent, canActivate: [AuthGuard]},
  {path: 'edit/:id', component: EditComponent, canActivate: [AuthGuard]},
  {path: 'home', component: HomeComponent},
  {path: '', redirectTo: 'home', pathMatch: 'full'},
  {path: '**', redirectTo: 'home'}
];

@NgModule({
  declarations: [
    ...
    HomeComponent
  ],
  imports: [
    ...
    OAuthModule.forRoot()
  ],
  providers: [
    AuthGuard,
    SearchService
  ],
  bootstrap: [AppComponent]
})
export class AppModule { }
After making these changes, you should be able to run ng serve and see a login button.
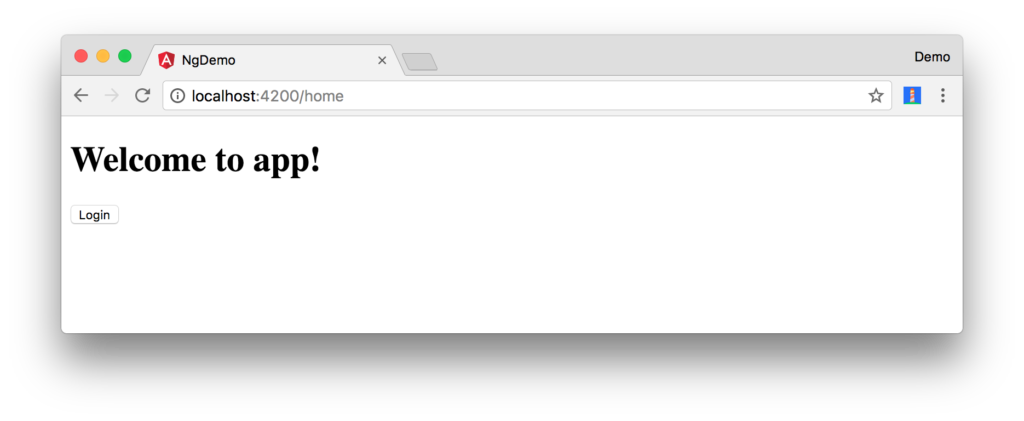
Click the Login button and sign-in with one of the people that’s configured in your Okta application.
After logging in, you’ll be able to click Search and view people’s information.
If it works – great! If you want to build your own login form in your app, continue reading to learn how to use the Okta Auth SDK with OAuthService.
Authentication with the Okta Auth SDK
The Okta Auth SDK builds on top of Otka’s Authentication API and OAuth 2.0 API to enable you to create a fully branded sign-in experience using JavaScript.
Install it using npm:
npm install @okta/okta-auth-js --save
Add a reference to this library’s main JavaScript file in .angular-cli.json:
"scripts": [
  "../node_modules/@okta/okta-auth-js/dist/okta-auth-js.min.js"
],
The components in this section use Bootstrap CSS classes. Install Bootstrap 4.
npm install bootstrap@4.0.0-beta --save
Modify src/styles.css to add a reference to Bootstrap’s CSS file.
@import "~bootstrap/dist/css/bootstrap.css";
Update src/app/app.component.html to use Bootstrap classes for its navbar and grid system.
<nav class="navbar navbar-light bg-secondary">
  <a class="navbar-brand text-light" href="#">Welcome to {{title}}!</a>
</nav>
<div class="container-fluid">
  <router-outlet></router-outlet>
</div>
Create src/app/shared/auth/okta.auth.wrapper.ts to wrap the Okta Auth SDK and integrate it with OAuthService. Its login() method uses OktaAuth to get a session token and exchange it for ID and access tokens.
import { OAuthService } from 'angular-oauth2-oidc';
import { Injectable } from '@angular/core';

declare const OktaAuth: any;

@Injectable()
export class OktaAuthWrapper {

  private authClient: any;

  constructor(private oauthService: OAuthService) {
    this.authClient = new OktaAuth({
      url: this.oauthService.issuer
    });
  }

  login(username: string, password: string): Promise<any> {
    return this.oauthService.createAndSaveNonce().then(nonce => {
      return this.authClient.signIn({
        username: username,
        password: password
      }).then((response) => {
        if (response.status === 'SUCCESS') {
          return this.authClient.token.getWithoutPrompt({
            clientId: this.oauthService.clientId,
            responseType: ['id_token', 'token'],
            scopes: ['openid', 'profile', 'email'],
            sessionToken: response.sessionToken,
            nonce: nonce,
            redirectUri: window.location.origin
          })
            .then((tokens) => {
              const idToken = tokens[0].idToken;
              const accessToken = tokens[1].accessToken;
              const keyValuePair = `#id_token=${encodeURIComponent(idToken)}&access_token=${encodeURIComponent(accessToken)}`;
              return this.oauthService.tryLogin({ <1>
                customHashFragment: keyValuePair,
                disableOAuth2StateCheck: true
              });
            });
        } else {
          return Promise.reject('We cannot handle the ' + response.status + ' status');
        }
      });
    });
  }
}
In the above code, oauthService.tryLogin() parses and stores the idToken and accessToken so they can be retrieved using OAuthService.getIdToken() and OAuthService.getAccessToken().
Export OktaAuthWrapper in src/shared/index.ts:
export * from './auth/okta.auth.wrapper';
Add OktaAuthWrapper as a provider in app.module.ts.
import { SearchService, AuthGuard, OktaAuthWrapper } from './shared';

@NgModule({
  ...
  providers: [
    ...
    OktaAuthWrapper
  ],
  bootstrap: [AppComponent]
})
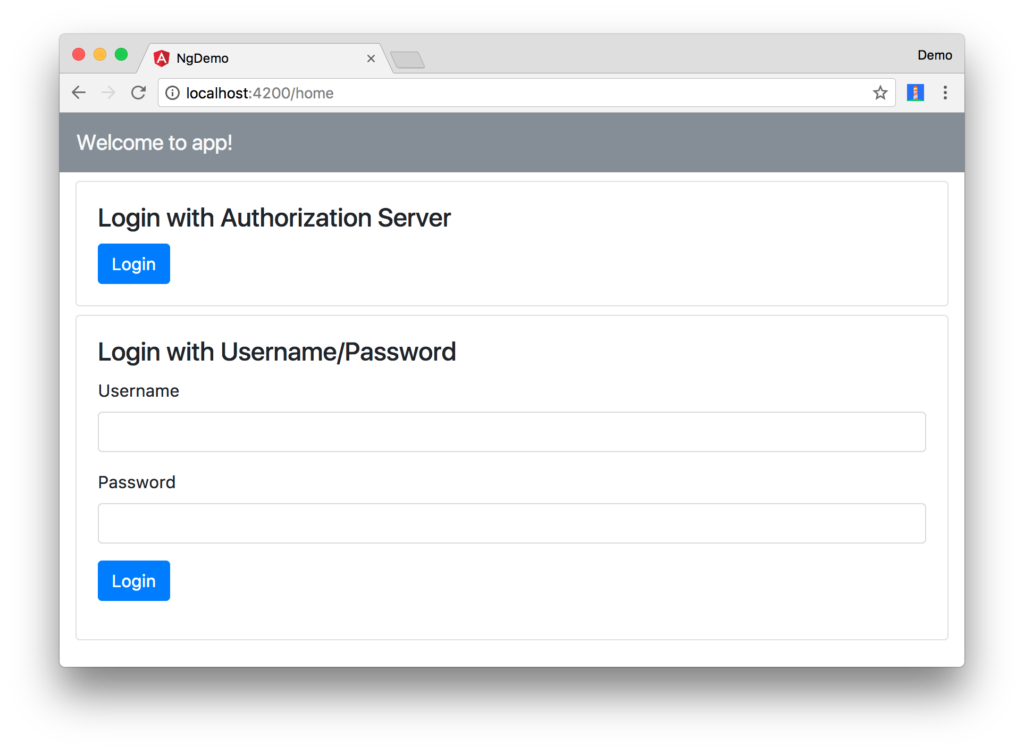
Change HomeComponent to declare OktaAuth and modify its template so it has a button to login, as well as a sign-in form.
@Component({
  template: `
    <div *ngIf="givenName" class="col-12 mt-2">
      <button (click)="logout()" class="btn btn-sm btn-outline-primary float-right">Logout</button>
      <h2>Welcome, {{givenName}}!</h2>
      <p><a routerLink="/search" routerLinkActive="active">Search</a></p>
    </div>

    <div class="card mt-2" *ngIf="!givenName">
      <div class="card-body">
        <h4 class="card-title">Login with Authorization Server</h4>
        <button class="btn btn-primary" (click)="login()">Login</button>
      </div>
    </div>

    <div class="card mt-2" *ngIf="!givenName">
      <div class="card-body">
        <h4 class="card-title">Login with Username/Password</h4>

        <p class="alert alert-error" *ngIf="loginFailed">
          Login wasn't successful.
        </p>

        <div class="form-group">
          <label>Username</label>
          <input class="form-control" [(ngModel)]="username">
        </div>
        <div class="form-group">
          <label>Password</label>
          <input class="form-control" type="password" [(ngModel)]="password">
        </div>
        <div class="form-group">
          <button class="btn btn-primary" (click)="loginWithPassword()">Login</button>
        </div>
      </div>
    </div>`
})
After making these changes, the HomeComponent should render as follows.
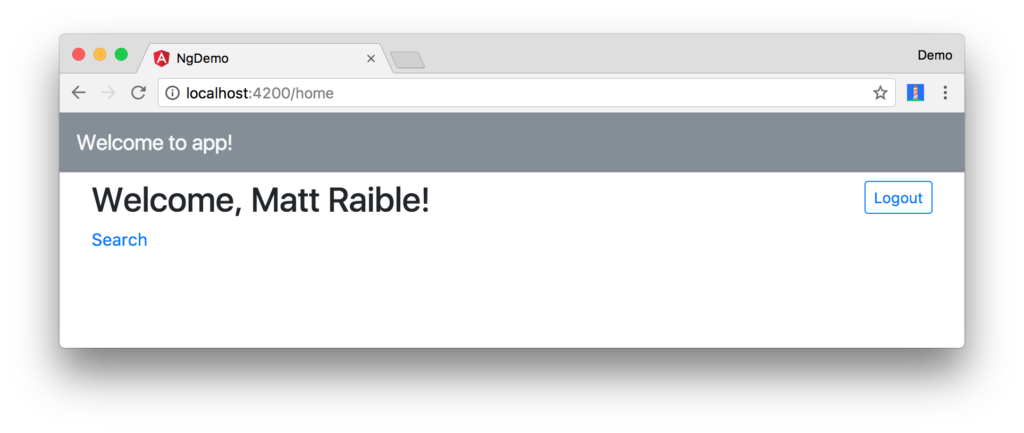
Add local variables for the username and password fields, import OktaAuthWrapper, and implement a loginWithPassword() method in HomeComponent.
import { OktaAuthWrapper } from '../shared';
...

username;
password;

constructor(private oauthService: OAuthService,
            private oktaAuthWrapper: OktaAuthWrapper) {
}

loginWithPassword() {
  this.oktaAuthWrapper.login(this.username, this.password)
    .then(_ => console.debug('logged in'))
    .catch(err => console.error('error logging in', err));
}
You should be able to sign in using the form, using one of your app’s registered users. After logging in, you’ll be able to click the Search link and view people’s information.
Angular + Okta
If everything works – congrats! If you encountered issues, please post a question to Stack Overflow with an okta tag, or hit me up on Twitter @mraible.
You can find a completed version of the application created in this blog post on GitHub. To learn more about security in Angular, see Angular’s Security documentation. If you’d like to learn more about OpenID Connect, I’d recommend watching the soothing video below.
Frequently Asked Questions (FAQs) on Angular Authentication with OIDC
What is the Role of OIDC in Angular Authentication?
OpenID Connect (OIDC) is a simple identity layer built on top of the OAuth 2.0 protocol. It allows clients to verify the identity of the end-user based on the authentication performed by an authorization server. In Angular, OIDC is used to handle user authentication. It provides a secure and scalable framework that can handle multiple user identities, making it easier to manage user sessions and access control.
How Can I Implement OIDC in Angular?
Implementing OIDC in Angular involves several steps. First, you need to install the necessary packages, such as angular-auth-oidc-client. Then, you configure the OIDC module in your app module, specifying the necessary parameters such as the authority, client ID, and response type. After that, you can use the OIDC service to handle user login, logout, and token validation.
How Does Angular Handle JWT Tokens?
JSON Web Tokens (JWT) are used in Angular to securely transmit information between parties as a JSON object. When a user logs in, the server generates a JWT that contains the user’s identity and sends it to the client. The client stores this token and includes it in every request to the server. The server then verifies the token to ensure the user is authenticated.
What is the Difference Between OAuth2 and OIDC?
OAuth2 is a protocol that allows applications to obtain limited access to user accounts on an HTTP service. It’s used for authorization. On the other hand, OIDC is an identity layer built on top of OAuth2. It extends OAuth2 to provide authentication, allowing applications to verify the identity of users.
How Can I Secure My Angular Application?
Securing your Angular application involves several steps. First, you should use HTTPS to encrypt data in transit. Second, use JWT for user authentication and session management. Third, implement access control to restrict what resources a user can access. Finally, sanitize user input to prevent cross-site scripting (XSS) attacks.
How Can I Handle User Sessions in Angular?
User sessions in Angular can be handled using JWT. When a user logs in, the server generates a JWT that contains the user’s identity and sends it to the client. The client stores this token and includes it in every request to the server. The server then verifies the token to ensure the user is authenticated.
What is the Role of the Angular-auth-oidc-client Package?
The angular-auth-oidc-client package is a library for Angular that allows you to connect your application with Identity Providers using OpenID Connect and OAuth2. It handles user authentication, session management, and token validation.
How Can I Implement Access Control in Angular?
Access control in Angular can be implemented using route guards. Route guards are interfaces that can tell the router whether or not it should allow navigation to a requested route. They can be used to restrict access to certain routes based on the user’s role or authentication status.
How Can I Handle Errors in Angular Authentication?
Errors in Angular authentication can be handled using error handlers. An error handler is a function that takes an error as a parameter and handles it. You can use it to display an error message to the user, log the error, or even redirect the user to a different page.
How Can I Test Angular Authentication?
Testing Angular authentication involves creating unit tests for your authentication service and end-to-end tests for your application. You can use tools like Jasmine and Karma for unit testing, and Protractor for end-to-end testing. These tests should verify that the authentication process works as expected and handles errors correctly.