


Sails.js is a Node.js MVC (model–view–controller) framework that follows the “convention over configuration” principle. It’s inspired by the popular Ruby on Rails web framework, and allows you to quickly build REST APIs, single-page apps and real-time (WebSockets-based) apps. It makes extensive use of code generators that allow you to build your application with less writing of code — particularly of common code that can be otherwise scaffolded.
The framework is built on top of Express.js, one of the most popular Node.js libraries, and Socket.io, a JavaScript library/engine for adding real-time, bidirectional, event-based communication to applications. At the time of writing, the official stable version of Sails.js is 0.12.14, which is available from npm. Sails.js version 1.0 has not officially been released, but according to Sails.js creators, version 1.0 is already used in some production applications, and they even recommend using it when starting new projects.
Key Takeaways
- Sails.js is a Node.js MVC framework that enables rapid development of applications by employing a “convention over configuration” approach and extensive code generation.
- Built on top of Express.js and Socket.io, Sails.js supports real-time applications with WebSockets and is database agnostic due to its integrated Waterline ORM/ODM.
- Despite its powerful features, Sails.js currently lacks support for SQL JOIN queries and transactions, which are planned for future releases.
- The framework simplifies database interactions through Waterline, which abstracts complexities and supports multiple databases without initial configuration, using a built-in file system-based database for early development stages.
- Sails.js provides a CLI tool for scaffolding new projects quickly, and supports automatic generation of RESTful APIs without writing backend code from scratch.
- It integrates seamlessly with front-end build tools like Grunt, and supports other tools through custom generators, enhancing workflow and productivity in development.
Main Features
Sails.js has many great features:
- it’s built on Express.js
- it has real-time support with WebSockets
- it takes a “convention over configuration” approach
- it has powerful code generation, thanks to Blueprints
- it’s database agnostic thanks to its powerful Waterline ORM/ODM
- it supports multiple data stores in the same project
- it has good documentation.
There are currently a few important cons, such as:
- no support for JOIN query in Waterline
- no support for SQL transactions until Sails v1.0 (in beta at the time of writing)
- until version 1.0, it still uses Express.js v3, which is EOL (end of life)
- development is very slow.
Sails.js vs Express.js
Software development is all about building abstractions. Sails.js is a high-level abstraction layer on top of Express.js (which itself is an abstraction over Node’s HTTP modules) that provides routing, middleware, file serving and so on. It also adds a powerful ORM/ODM, the MVC architectural pattern, and a powerful generator CLI (among other features).
You can build web applications using Node’s low-level HTTP service and other utility modules (such as the filesystem module) but it’s not recommended except for the sake of learning the Node.js platform. You can also take a step up and use Express.js, which is a popular, lightweight framework for building web apps.
You’ll have routing and other useful constructs for web apps, but you’ll need to take care of pretty much everything from configuration, file structure and code organization to working with databases.
Express doesn’t offer any built-in tool to help you with database access, so you’ll need to bring together the required technologies to build a complete web application. This is what’s called a stack. Web developers, using JavaScript, mostly use the popular MEAN stack, which stands for MongoDB, ExpressJS, AngularJS and Node.js.
MongoDB is the preferred database system among Node/Express developers, but you can use any database you want. The most important point here is that Express doesn’t provide any built-in APIs when it comes to databases.
The Waterline ORM/ODM
One key feature of Sails.js is Waterline, a powerful ORM (object relational mapper) for SQL-based databases and ODM (object document mapper) for NoSQL document-based databases. Waterline abstracts away all the complexities when working with databases and, most importantly, with Waterline you don’t have to make the decision of choosing a database system when you’re just starting development. It also doesn’t intimidate you when your client hasn’t yet decided on the database technology to use.
You can start building you application without a single line of configuration. In fact, you don’t have to install a database system at all initially. Thanks to the built-in sails-disk NeDB-based file database, you can transparently use the file system to store and retrieve data for testing your application functionality.
Once you’re ready and you have decided on the convenient database system you want to use for your project, you can then simply switch the database by installing the relevant adapter for your database system. Waterline has official adapters for popular relational database systems such as MySQL and PostgreSQL and the NoSQL databases, such as MongoDB and Redis, and the community has also built numerous adapters for the other popular database systems such as Oracle, MSSQL, DB2, SQLite, CouchDB and neo4j. In case when you can’t find an adapter for the database system you want to use, you can develop your own custom adapter.
Waterline abstracts away the differences between different database systems and allows you to have a normalized interface for your application to communicate with any supported database system. You don’t have to work with SQL or any low-level API (for NoSQL databases) but that doesn’t mean you can’t (at least for SQL-based databases and MongoDB).
There are situations when you need to write custom SQL, for example, for performance reasons, for working with complex database requirements, or for accessing database-specific features. In this case, you can use the .query() method available only on the Waterline models that are configured to use SQL systems (you can find more information about query() from the docs).
Since different database systems have common and database-specific features, the Waterline ORM/ODM can only be good for you as long as you only constrain yourself to use the common features. Also, if you use raw SQL or native MongoDB APIs, you’ll lose many of the features of Waterline, including the ability to switch between different databases.
Getting Started with Sails.js
Now that we’ve covered the basic concepts and features of Sails.js, let’s see how you can quickly get started using Sails.js to create new projects and lift them.
Prerequisites
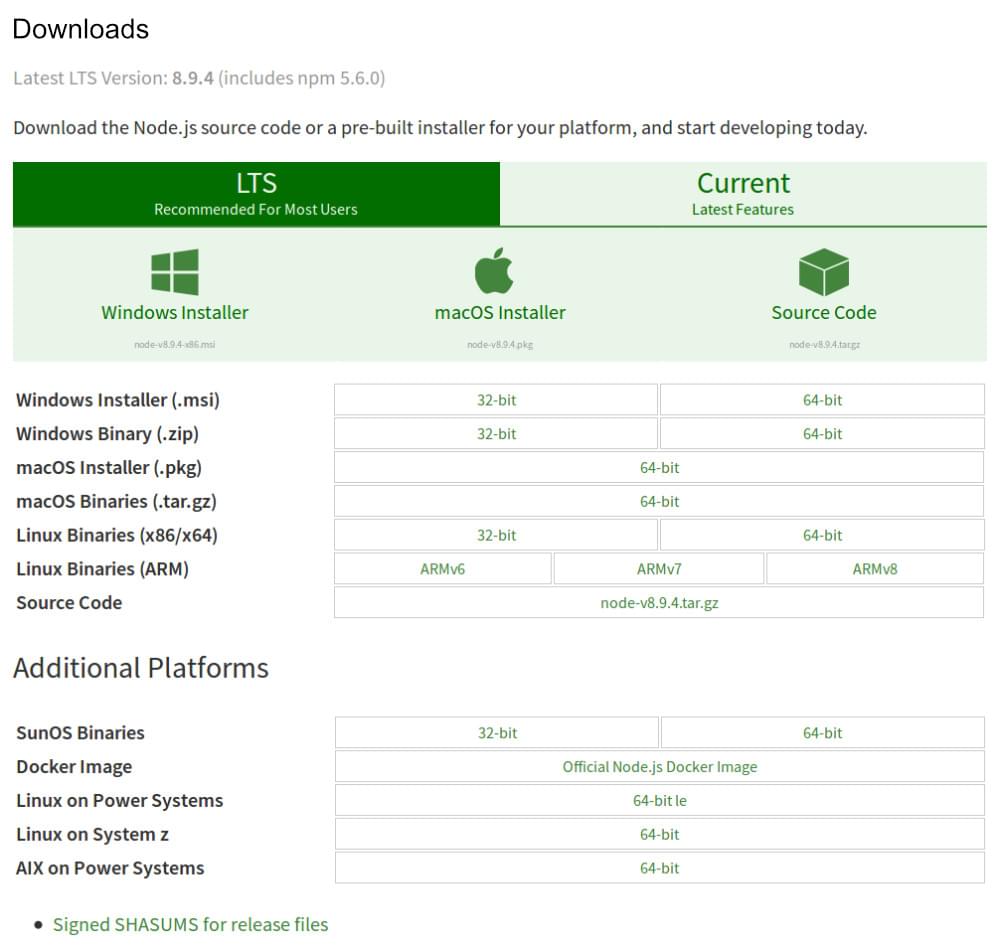
Before you can use Sails.js, you need to have a development environment with Node.js (and npm) installed. You can install both of them by heading to the official Node.js website and downloading the right installer for your operating system.
Make sure, also, to install whatever database management system you want to use with Sails.js (either a relational or a NoSQL database). If you’re not interested by using a full-fledged database system, at this point, you can still work with Sails.js thanks to sails-disk, which allows you to have a file-based database out of the box.
Installing the Sails.js CLI
After satisfying the working development requirements, you can head over to your terminal (Linux and macOS) or command prompt (Windows) and install the Sails.js Command Line Utility, globally, from npm:
sudo npm install sails -g
If you want to install the latest 1.0 version to try the new features, you need to use the beta version:
npm install sails@beta -g
You may or may not need sudo to install packages globally depending on your npm configuration.
Scaffolding a Sails.js Project
After installing the Sails.js CLI, you can go ahead and scaffold a new project with one command:
sails new sailsdemo
This will create a new folder for your project named sailsdemo on your current directory. You can also scaffold your project files inside an existing folder with this:
sails new .
You can scaffold a new Sails.js project without a front end with this:
sails new sailsdemo --no-frontend
Find more information about the features of the CLI from the docs.
The Anatomy of a Sails.js Project
Here’s a screenshot of a project generated using the Sails.js CLI:
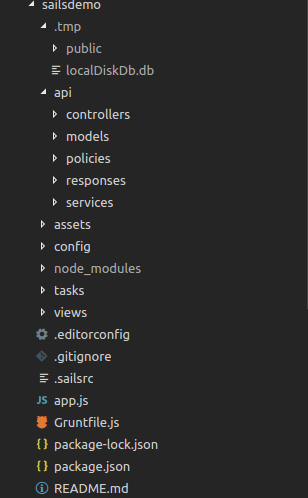
A Sails.js project is a Node.js module with a package.json and a node_modules folder. You may also notice the presence of Gruntfile.js. Sails.js uses Grunt as a build tool for building front-end assets.
If you’re building an app for the browser, you’re in luck. Sails ships with Grunt — which means your entire front-end asset workflow is completely customizable, and comes with support for all of the great Grunt modules which are already out there. That includes support for Less, Sass, Stylus, CoffeeScript, JST, Jade, Handlebars, Dust, and many more. When you’re ready to go into production, your assets are minified and gzipped automatically. You can even compile your static assets and push them out to a CDN like CloudFront to make your app load even faster. (You can read more about these points on the Sails.js website.)
You can also use Gulp or Webpack as your build system instead of Grunt, with custom generators. See the sails-generate-new-gulp and sails-webpack projects on GitHub.
For more community generators, see this documentation page on the Sails.js site.
The project contains many configuration files and folders. Most of them are self explanatory, but let’s go over the ones you’ll be working with most of the time:
api/controllers: this is the folder where controllers live. Controllers correspond to the C part in MVC. It’s where the business logic for your application exists.api/models: the folder where models exist. Models correspond to the M part of MVC architecture. This is where you need to put classes or objects that map to your SQL/NoSQL data.api/policies: this is the folder where you need to put policies for your applicationapi/responses: this folder contains server response logic such as functions to handle the 404 and 500 responses, etc.api/services: this where your app-wide services live. A service is a global class encapsulating common logic that can be used throughout many controllers../views: this folder contains templates used for displaying views. By default, this folder contains the ejs engine templates, but you can configure any Express-supported engine such as EJS, Jade, Handlebars, Mustache and Underscore etc../config: this folder contains many configuration files that enable you to configure every detail of your application, such as CORS, CSRF protection, i18n, http, settings for models, views, logging and policies etc. One important file that you’ll frequently use isconfig/routes.js, where you can create your application routes and map them to actual actions in the controllers or to views directly../assets: this is the folder where you can place any static files (CSS, JavaScript and images etc.) for your application.
Running your Sails.js Project
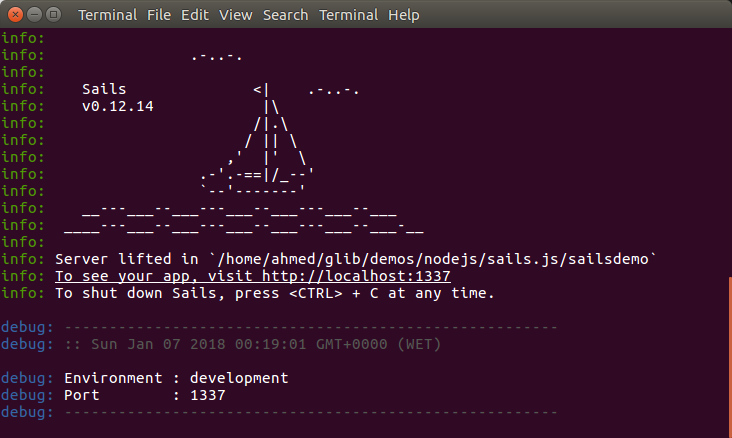
You can start the development server by running the following command from your project’s root:
sails lift
This will prompt you to choose a migration strategy, and then will launch the dev server.
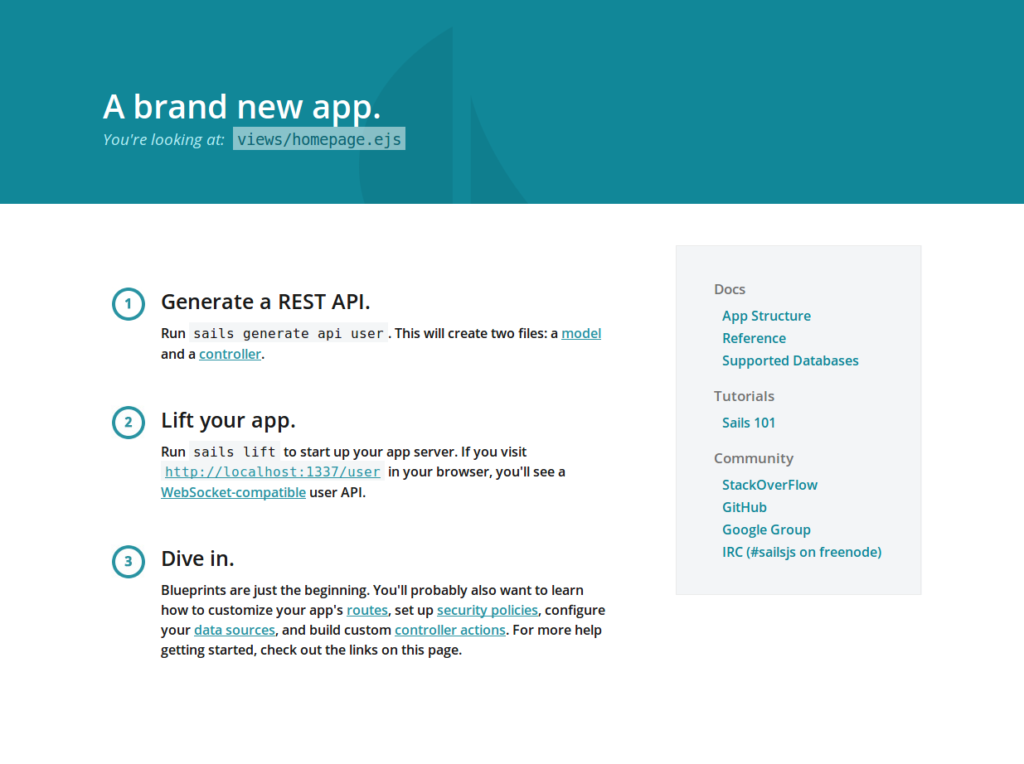
You can then use your web browser to navigate to [http://localhost:1337/](http://localhost:1337/). If you’ve generated a Sails.js project with a front end (i.e without using the –no-frontend option) you’ll see this home page:
Creating Waterline Models
A model is an abstraction, usually represented by an object or a class in a general-purpose programming language, and it refers/maps either to an SQL table in a relational database or a document (or key-value pairs) in a NoSQL database.
You can create models using the Sails.js CLI:
sails generate model product
This will create a Product.js model in api/models with the following content:
/**
 * Product.js
 *
 * @description :: TODO: You might write a short summary of how this model works and what it represents here.
 * @docs        :: http://sailsjs.org/documentation/concepts/models-and-orm/models
 */

module.exports = {

  attributes: {

  }
};
You can then augment your model with attributes. For example:
module.exports = {

  attributes: {
    name: {
      type: 'string',
      defaultsTo: '',
      required: 'true'
    },
    description: {
      type: 'string',
      defaultsTo: ''
    },
    quantity: {
      type: 'integer'
    },
    user: { model: 'User' }
  }
};
Notice how we can define the association (one-to-many or belongsTo relationship) with the model User. You can see all supported associations and how to create them via this Sails.js associations page.
For more information about the available model attributes, see the Sails.js attributes page.
You can also add configurations per model or model settings by adding top-level properties in the model definition, which will override the global models settings in config/models.js. You can override settings related to the model’s attributes, database connections etc.
For example, let’s specify a different datastore for the product model other than the global one used throughout the project:
module.exports = {
  connection: 'mysqlcon'
  attributes: { /*...*/}
}
This will instruct Sails.js to use a connection named mysqlcon to store this model data. Make sure you add the mysqlcon connection to the connections object in config/connections.js:
module.exports.connections = {
  // sails-disk is installed by default.
  localDiskDb: {
    adapter: 'sails-disk'
  },
  mysqlcon: {
    adapter: 'sails-mysql',
    host: 'YOUR_MYSQL_HOST',
    user: 'YOUR_MYSQL_USER',
    password: 'YOUR_MYSQL_PASSWORD',
    database: 'YOUR_MYSQL_DB'
  }
};
You also need to install the sails-mysql adapter from npm:
npm install sails-mysql@for-sails-0.12
You can find the available model settings that you can specify from the Sails.js model settings page.
Sails.js Controllers
Controllers hold your app’s business logic. They live in api/controllers and provide a layer which glues your app’s models and views. Controllers contain actions that are bound to routes and respond to HTTP requests from web/mobile clients.
A controller is a JavaScript object that contains methods called the controller actions, which take two parameters: a request and a response.
You can find more information about controllers on the Sails.js controllers page.
You can generate a controller using the Sails.js CLI:
sails generate controller product
This command will generate a controller named api/controllers/ProductController.js, with the following content:
/**
 * ProductController
 *
 * @description :: Server-side logic for managing products
 * @help        :: See http://sailsjs.org/#!/documentation/concepts/Controllers
 */

module.exports = {

};
The code exports an empty JavaScript object where you can add new actions or override the default (automatically added) controller actions.
At this point, you can actually execute CRUD operations against your server without further adding any code. Since Sails.js follows convention over configuration, it wires your controllers to their corresponding routes and provides default actions for handling the common HTTP POST, GET, PUT and DELETE requests etc.
Testing with Postman
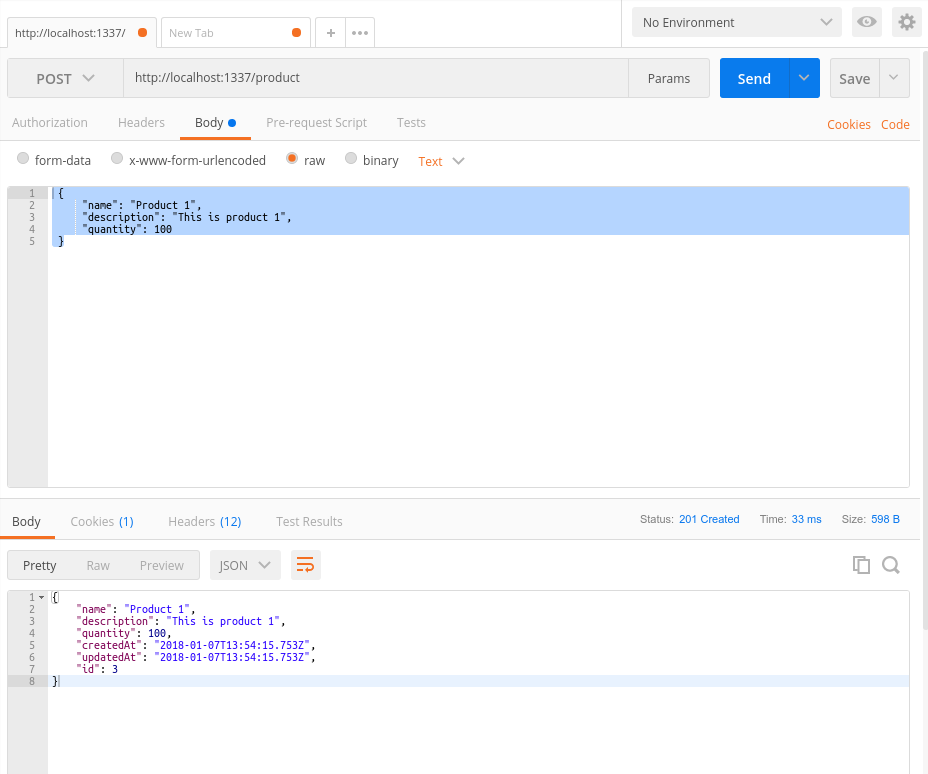
Using Postman, you can send POST, GET and other requests to test your API, so go ahead and grab the Postman version for your operating system. Next, enter the product endpoint URL http://localhost:1337/product. Then choose the HTTP method to send — POST in this case, because we want to create a Product. Next, you need to provide data, so click on the Body tab, select the Raw option, then enter the following:
 {
     "name": "Product 1",
     "description": "This is product 1",
     "quantity": 100
 }
Then hit the Send button:

You should pay attention to the returned status code: 200 OK means the product was successfully created.

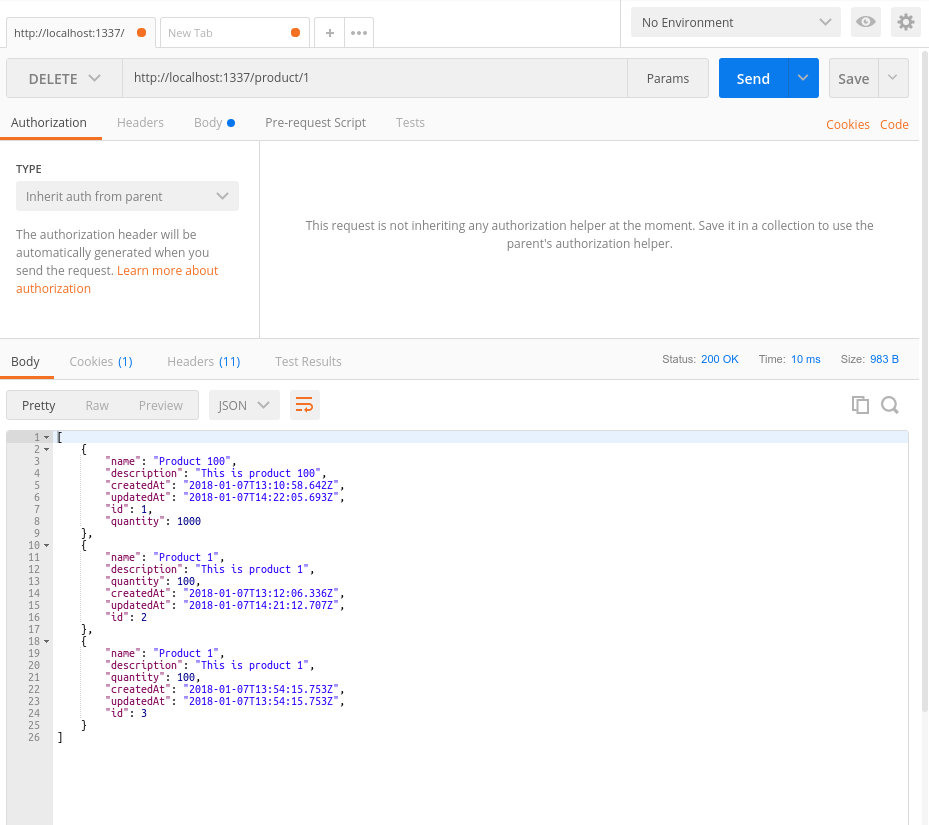
You can then verify if products are created by sending a GET request:
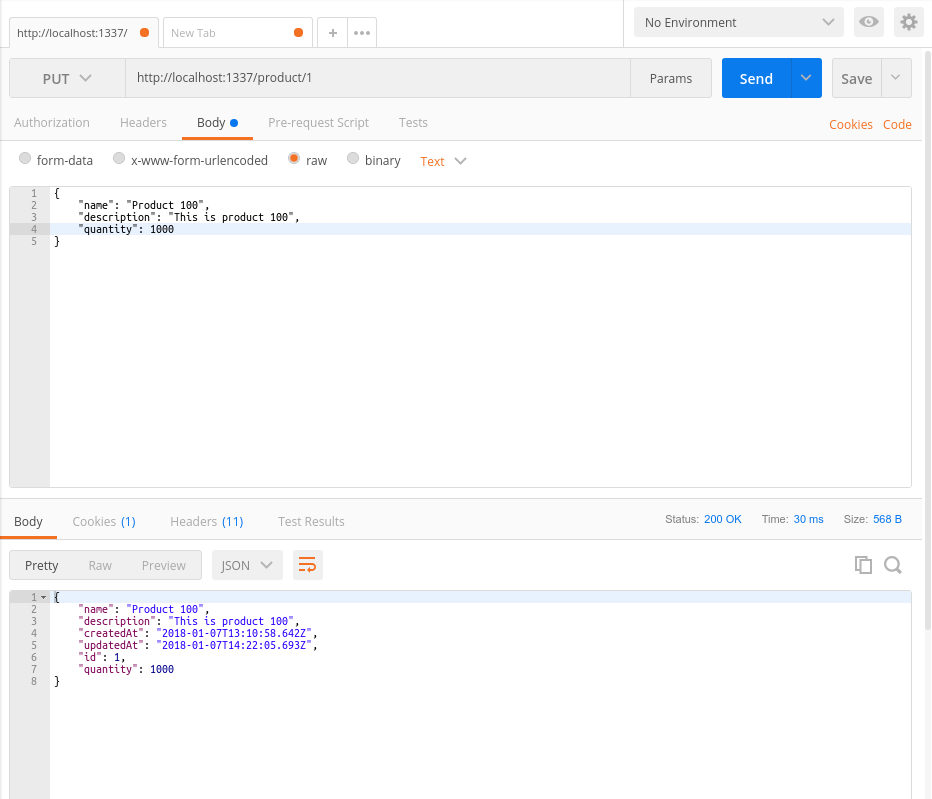
You can also update a product by its id by sending a PUT request:
Finally, you can delete a product by its id by sending a DELETE request:
For custom logic, you can also override these actions and implement your own.
When you create an API (i.e. a controller and a model) Sails.js automatically adds eight default actions, which are:
add tocreatedestroyfind onefind wherepopulate whereremove fromupdate
Find where and find one, create, update and destroy are normal CRUD actions that needs to be present in most APIs. The others are related to foreign records:
add to: used to add a foreign record to another record collection (e.g a product to a user’s products).populate where: used to populate and return foreign record(s) for the given association of another record. Read more information here.remove from: used to remove a foreign record (e.g. a product) from one of a related record collection association (e.g. user’s products). See more information and examples here.
For customizing the behavior of the default actions, you can do either of these:
- Override the action in a specified controller. That is, create an action with the same name as one of these actions:
find,findOne,create,update,destroy,populate,addorremove. - Override the default action for all controllers. You can do this by creating an
api/blueprintsfolder, where you need to add files with lowercase names for a default action (e.g.find.js,findone.js,create.js, etc.). You can find more information about blueprints by checking the Sails.js Blueprint API docs.
Routing in Sails.js
Routes allow you to map URLs to controllers or views. Just like the default actions, Sails.js automatically adds default routes for the default actions, allowing you to have an automatic API by just creating models and controllers.
You can also add custom routes for your custom actions or views. To add a route, open the config/routes.js file and add this:
module.exports.routes = {
  '/products': {
    view: 'products'
  }
};
This maps /products to the template named products in views folder.
You can optionally add an HTTP verb to the URL. For example:
module.exports.routes = {
  'get /': {
    view: 'homepage'
  }
};
You can also specify a controller action for a route. For example:
module.exports.routes = {
    'post /product': 'ProductController.create',
};
This tells Sails.js to call the create action of the ProductController controller when a client sends a POST request to the /product endpoint.
Conclusion
In this article, you were introduced to Sails.js. We looked at the basic concepts of Sails.js, and how to generate a new Sails.js project, and then created an API by just generating models, adding some attributes then generate controllers. Sails.js has other advanced concepts such as services, policies, blueprints and hooks. These you can further discover on your own, once you grasp and get familiar with the basic concepts in this introduction.
Frequently Asked Questions (FAQs) about Sails.js
What are the key features of Sails.js that make it stand out from other Node.js frameworks?
Sails.js is a popular MVC framework for Node.js that is designed to emulate the familiar MVC pattern of frameworks like Ruby on Rails, but with support for the requirements of modern apps. It offers several key features that set it apart from other Node.js frameworks. Firstly, it supports auto-generated REST APIs, which means you can build a Node.js app without having to write any backend code. Secondly, it has a powerful ORM (Object-Relational Mapping) that supports all major databases and can handle complex queries. Thirdly, it has built-in support for WebSockets, which makes it easy to build real-time features like chat. Lastly, it is highly configurable and extensible, allowing developers to customize and extend the framework to suit their specific needs.
How does Sails.js handle data validation and error handling?
Sails.js provides a robust system for data validation and error handling. It uses Waterline, a powerful ORM, for data validation. Waterline supports a variety of validation rules, including required, unique, string, number, boolean, date, and more. You can also define custom validation rules. For error handling, Sails.js provides a standard way to handle errors in your app. It uses Express-style middleware, which allows you to define custom error handling logic. You can also use the built-in responses to handle common HTTP errors.
Can I use Sails.js for building real-time applications and how?
Yes, Sails.js is an excellent choice for building real-time applications. It has built-in support for WebSockets, a technology that allows for real-time, bi-directional communication between the server and the client. This makes it easy to build real-time features like chat, notifications, and live updates. To use WebSockets in Sails.js, you can use the sails.sockets methods to send and receive messages. You can also use the sails.io.js library on the client side to interact with the server via WebSockets.
How does Sails.js support database integration?
Sails.js supports all major databases through its ORM, Waterline. Waterline provides a simple and consistent API to interact with different databases. It supports SQL databases like MySQL, PostgreSQL, and SQLite, as well as NoSQL databases like MongoDB and Redis. You can also use multiple databases in the same app. To use a database in Sails.js, you need to install the corresponding adapter, configure the connection settings, and then you can use the Waterline methods to interact with the database.
How can I extend the functionality of Sails.js?
Sails.js is highly configurable and extensible. You can extend its functionality in several ways. Firstly, you can use hooks, which are modules that run code at specific points in the app lifecycle. You can use built-in hooks or create your own. Secondly, you can use policies, which are functions that run before your controllers. They are useful for permissions and access control. Thirdly, you can use services, which are reusable pieces of code that you can use across your app. Lastly, you can use custom responses to customize how your app responds to different HTTP requests.
What is the role of Grunt in Sails.js?
Grunt is a JavaScript task runner that is used in Sails.js for asset management. It is responsible for tasks like compiling LESS or SASS files into CSS, minifying JavaScript files, and reloading the browser when files change. Sails.js comes with a default Gruntfile that is configured for common tasks, but you can customize it to suit your needs. You can also add new Grunt tasks and plugins to automate other tasks in your development workflow.
How does Sails.js handle file uploads?
Sails.js provides a built-in way to handle file uploads. It uses the Skipper library, which is a body parser that supports file uploads. Skipper can handle multi-part form data, which means you can upload multiple files at once. It also supports streaming, so you can upload large files without running out of memory. To handle file uploads in Sails.js, you can use the req.file method, which returns a Skipper Upstream. You can then use the Upstream methods to process the uploaded file.
How can I secure my Sails.js application?
Sails.js provides several features to help you secure your application. Firstly, it has built-in CSRF protection, which protects against cross-site request forgery attacks. Secondly, it supports CORS, which allows you to control which domains can access your API. Thirdly, it has a policy system, which allows you to control access to your controllers. Lastly, it supports session management and authentication, which allows you to manage user sessions and protect sensitive routes.
Can I use Sails.js with front-end frameworks like Angular or React?
Yes, Sails.js can be used with any front-end framework, including Angular, React, Vue, and others. Sails.js serves as the backend of your application, providing the API that your front-end consumes. You can use the auto-generated REST APIs or the WebSocket support to interact with your front-end. Sails.js also supports server-side rendering, so you can render your views on the server and send them to the client.
How can I test my Sails.js application?
Sails.js supports testing through the Mocha test framework. You can write tests for your models, controllers, services, and other parts of your application. Sails.js also supports test-driven development (TDD), so you can write tests before you write your code. To run your tests, you can use the sails test command. You can also use other testing tools and libraries, like Chai for assertions and Sinon for mocks and spies.