

Key Takeaways
- Sharpening images in Photoshop can add depth by enhancing details, making an image crisper, sharper, and more refined. However, traditional sharpening techniques like Unsharp Mask and Smart Sharpening can sometimes distort colors or fail to target precise parts of the image.
- Converting an image to LAB Mode allows for clear colors and precise targeting during sharpening. LAB Mode separates lightness and color information, allowing for sharpening in the lightness channel, focusing on details and excluding color information that can cause distortions.
- Smart filters allow for adjustable sharpening effects and the ability to mask out areas that you don’t want to sharpen. This gives ultimate control over what is sharpened and what is left alone.
- Other sharpening techniques include the High Pass Sharpening Method and Smart Sharpening. High Pass Sharpening can be performed in RGB mode and can yield good results, while Smart Sharpening allows for pinpoint precision in what you want to sharpen, with the ability to remove blurriness due to specific problems.
Sharpening your images is an important skill for any designer who wants crisp, clean imagery for their designs. You may have an image that seems a little bland or lacks the desired level of detail. Sharpening can add depth by enhancing details and making your image crisper, sharper, and more refined.
Traditional sharpening techniques can have varied results. Filters such as Unsharp Mask and Smart Sharpening affect all pixels, which means that some colors change or turn when you sharpen your image. Some sharpening appears too sharp, and sometimes you simply can’t get good results, due to color limitations, halos resulting from sharpening in RGB mode, and the fact that you can’t target precise parts of your image to sharpen.
Converting your image to LAB Mode is a great way to circumvent these problems and sharpen your imagers with clear colors and precise targeting. The reason that the LAB color mode makes such a difference is due to the fact that LAB is made up of lightness, and the “A” and “B” channels contain the color information. This separation of lightness and color information makes for excellent sharpening; you can sharpen your image in the lightness channel, focusing on your details and excluding the color information of the image, which can cause distortions and haloing.
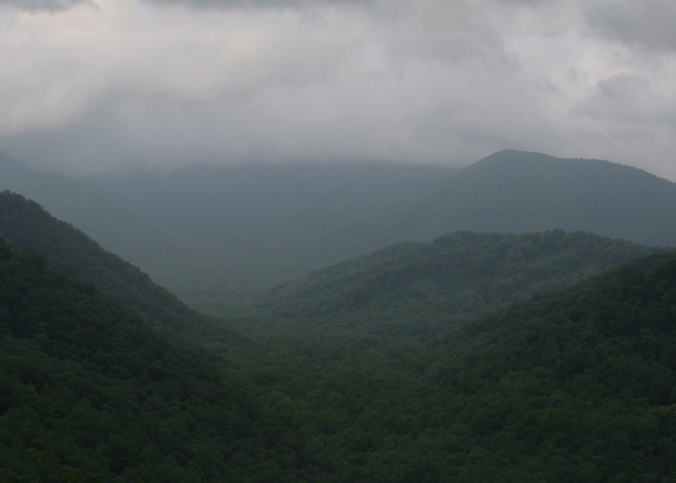
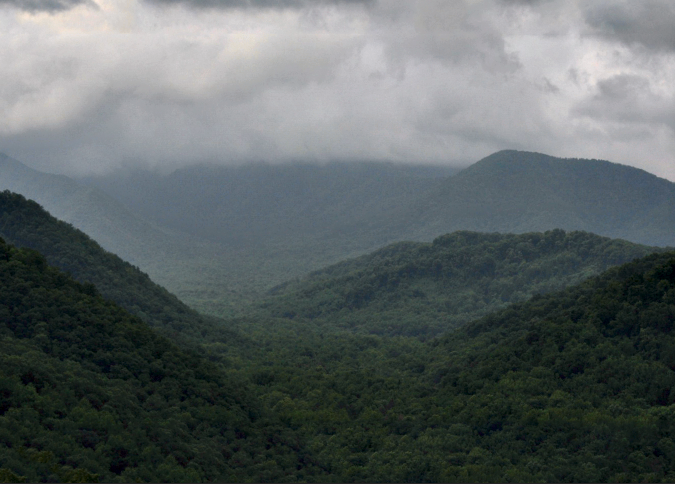
The image below is a really nice show of mountains and trees. It looks nice, but it lacks detail. The trees seem fuzzy; they would definitely benefit from being sharpened. The whole image seems to be lacking contrast and depth. The mountains and trees in the distance are hazy, and you can’t really see any detail at all.
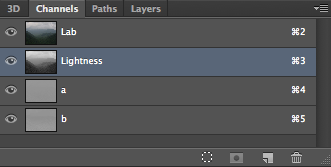
First, we need to change the color mode from RGB to LAB. To do this, go to “Image” > “Mode” > “LAB.” It is here that I would suggest duplicating your image so that if you make a mistake, you always have the original image to work from. Even better, Smart Filters work in LAB mode as well. Right-click on your image layer and select “Convert to Smart Object” from the popup menu. This is a really important step for this technique to work properly. With your smart object layer selected, go to the Channels panel and select only the Lightness Channel.

Photoshop tends to turn off the other layers, so if this happens, go back and reactivate their visibility by clicking the eye icon.

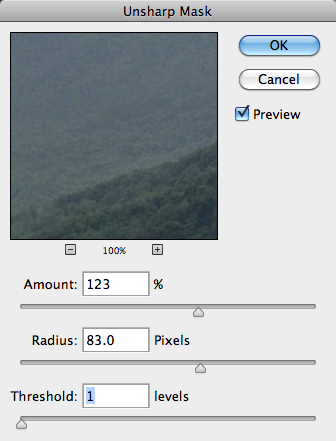
Next, go to “Filter” > “Sharpen” > “Unsharp Mask.” Since the layer is a smart object, any filter that you apply to it will be a smart filter, making the effect infinitely adjustable. We will want to increase the Amount and Radius values substantially. Increasing these values sharpens an image. Threshold actually decreases sharpness as you increase its value, so it is a good idea to keep Threshold set to a low value for our purposes.
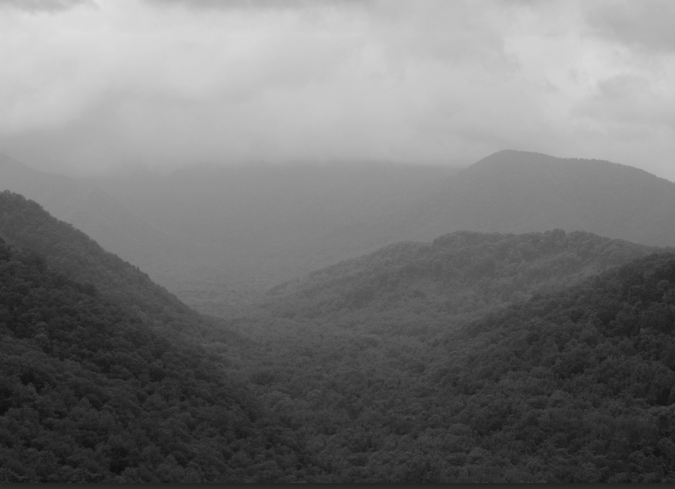
Immediately, you will notice a difference, and the details seem to come alive. There is more detail in the foreground, and the level of detail in the horizon and off in the distance is tremendous. There are no halos, and the fog and haziness is decreased enough to the point that you can see almost every tree in great detail.
One of the best things about smart filters, especially in this case, is that you have the ability to mask out areas that you don’t want to sharpen. Smart filters come with a Layer Mask by default. Simply select a soft edge brush, click on the mask icon, and paint with black to hide the sharpening for that part of the image. You can also to the opposite by painting with white to bring back sharpening for a distinct area. This gives you ultimate control over what is sharpened and what is left alone. In the example below, I wanted add back in some of the haziness in the valley in the top left. A good tip is to lower your brush’s opacity to 30-50%, so that you can slowly build the mask up without creating harsh changes within your image.


Alternate Technique: The High Pass Sharpening Method
The High Pass Filter Sharpening method is a decent alternative method to sharpening with LAB mode. You can perform the High Pass method in RGB mode. To use this method, hit Command/Ctrl + “J” to duplicate the layer. On the duplicated layer, change the blend mode to “Overlay.” You can convert the duplicated layer to a smart object.
Next, go to “Filter” > “Other” > “High Pass.” Set the radius so that your image sharpens and becomes more defined without over-sharpening. For our sample image, 200 yielded the best results, but this strictly depends on the image itself, as well as its resolution. You can see from the image below that the results are good, but LAB sharpening give more natural results and exposes much more detail.


Method #3: Smart Sharpening
Smart Sharpening is a good way of taking care of specific problems. Smart sharpen breaks down the sharpening process to the point where you can pinpoint what you want to sharpen, what you are trying to correct, and whether you are sharpening the highlights or the shadows of an image. First, you must convert your image to a smart object. This way, you can go back and edit your sharpening filter indefinitely. You will always have the opportunity to go back and make adjustments to your image, rather than starting all over again.
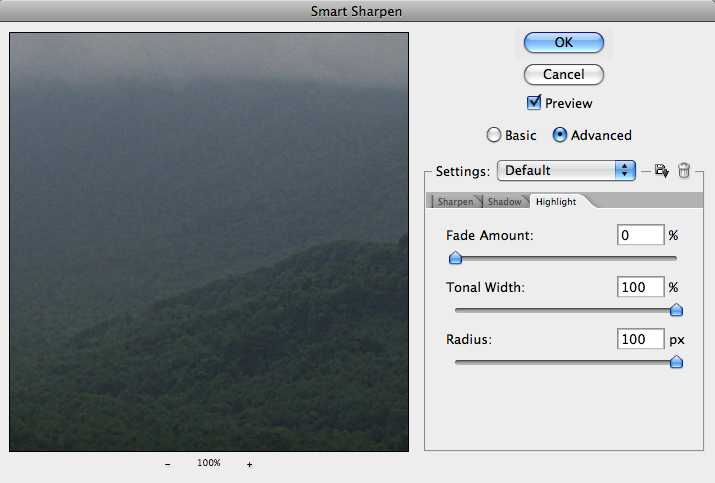
Once you have converted your image into a smart object, simply go to “Filter” > “Sharpen” > “Smart Sharpen.” a dialog box will come up with several options, and this is where you can target and correct specific problems. For the best results, check the “Advanced” button to unlock the extra options that this menu has to offer.

The settings for Smart Sharpen are fairly similar to how you would regularly use sharpening, but there are a few slight differences. The first and most useful difference is the ability to remove blurriness due to specific problems. Notice in the example above where it says “Remove.” You have the option of removing a Gaussian blur, a lens blur, or a motion blur. For motion blur, the option to choose what angle of the blur to correct becomes available.
Under the Shadows and Highlights tabs, you have the ability to lower sharpening for these parts of the images by increasing the fade amount. With this method, you could sharpen just the highlights of the image while leaving the shadows intact. You could also sharpen just the shadowy areas of the image while leaving the highlights intact. This allows you to sharpen only the areas that you need to.

The only problem with the last two image sharpening methods is that when you include color information within the sharpening process, the results tend to be grainy. This doesn’t happen when using the LAB method, because you are adjusting only the lightness of the image without affecting the color information. You also tend to get a much sharper image, that doesn’t look fake or forcefully sharpened. On the other hand, you can use Smart Sharpen to remove motion blur and lens blur, which can sometimes yield better results than LAB mode.
Conclusion
When done the right way, sharpening can greatly enhance an image and make it look much more detailed. Some methods create unwanted noise within your image, so it is good to use them sparingly, but some methods sharpen your image without any unwanted side effects, making your images much sharper without compromising quality. Converting your image to a smart object allows you to use smart filters, making your adjustments infinitely editable and saving you time and effort. You can sharpen your images as much as you need, and if you need to tweak your adjustments, you can do so by utilizing smart filters.
Do you have any solid sharpening techniques? Which of the above methods is your favorite?
Frequently Asked Questions on Advanced Image Sharpening in Photoshop
What are the best techniques for sharpening images in Photoshop?
There are several techniques for sharpening images in Photoshop, each with its own advantages. The most common methods include the Unsharp Mask, Smart Sharpen, and High Pass filter. The Unsharp Mask allows you to adjust the amount, radius, and threshold of the sharpening effect. Smart Sharpen provides more advanced controls, including the ability to remove Gaussian blur and lens blur. The High Pass filter is often used in combination with other techniques for a more subtle effect. It’s important to experiment with these different methods to find the one that best suits your image.
How can I avoid over-sharpening my images in Photoshop?
Over-sharpening can lead to a loss of detail and an unnatural appearance. To avoid this, always start with a lower sharpening amount and gradually increase it until you achieve the desired effect. Also, use the preview function to check the effect before applying it. If you notice any haloing or noise, reduce the amount or radius of the sharpening.
Can I sharpen only specific areas of an image in Photoshop?
Yes, you can selectively sharpen specific areas of an image using layer masks. After applying a sharpening effect, add a layer mask and use the brush tool to paint over the areas you want to sharpen. This allows you to control the intensity and location of the sharpening effect.
How does the High Pass filter work for image sharpening in Photoshop?
The High Pass filter works by isolating and enhancing the edges within an image. When applied with a blending mode such as Overlay or Soft Light, it can create a sharpening effect. The radius setting controls the width of the edges that are enhanced, allowing you to adjust the intensity of the sharpening.
What is the difference between the Unsharp Mask and Smart Sharpen in Photoshop?
The Unsharp Mask and Smart Sharpen are both tools for sharpening images, but they offer different levels of control. The Unsharp Mask has three settings: Amount, Radius, and Threshold. Smart Sharpen, on the other hand, provides more advanced options, including the ability to remove different types of blur and to apply selective sharpening.
How can I reduce noise when sharpening images in Photoshop?
Reducing noise when sharpening images can be achieved by using the Reduce Noise filter before applying any sharpening effects. Additionally, the Smart Sharpen tool has a ‘Reduce Noise’ slider that can be used to minimize noise during the sharpening process.
Can I use the Camera Raw filter for image sharpening in Photoshop?
Yes, the Camera Raw filter in Photoshop includes a Detail panel that provides controls for sharpening and noise reduction. This can be a powerful tool for refining your images, especially if you’re working with RAW files.
How can I sharpen an image without affecting the color in Photoshop?
To sharpen an image without affecting the color, you can convert the image to Lab Color mode and apply the sharpening to the Lightness channel only. This allows you to enhance the detail without altering the color information.
What is the best way to sharpen an image for print in Photoshop?
When sharpening an image for print, it’s important to consider the type of paper and the printing process. Generally, images for print should be slightly more sharpened than those for web display. The Unsharp Mask or Smart Sharpen tools can be used, with a higher radius setting for larger prints.
Can I preview the sharpening effect in Photoshop?
Yes, all of the sharpening tools in Photoshop provide a preview option. This allows you to see the effect of the sharpening settings before you apply them, helping you to avoid over-sharpening and to achieve the best possible result.

