Key Takeaways
- Vanishing Point is a feature in Photoshop CS2 that allows users to impose a 3D framework on a 2D image, making interactions behave as if they were in a 3D environment.
- Activating Vanishing Point launches a workspace with its own set of tools and controls, where users can mark out a ‘reference rectangle’ on their base image, and scale it to fit their image.
- Once the framework is set, users can manipulate items in a faux 3D environment, with any pasted items immediately distorting to match the perspective of the plane the cursor is in contact with.
- The Vanishing Point filter can be used for various functions such as adjusting grid size, applying it to a layer mask, creating a perspective grid, cloning in perspective, correcting perspective distortion, adding text in perspective, and creating a reflection.
Continuing the ‘Adobe Creative Suite 2’ theme from my last post, I thought I’d walk you through one of Photoshop’s newest and grooviest features.
Vanishing Point is a new ‘mini-app’ within Photoshop that allows you impose a 3D framework on top of any 2D image. With this grid in place, all your interactions (cut, paste, draw, paint, clone, select, etc) behave as if they were in a 3D environment. Here’s a quick demo.
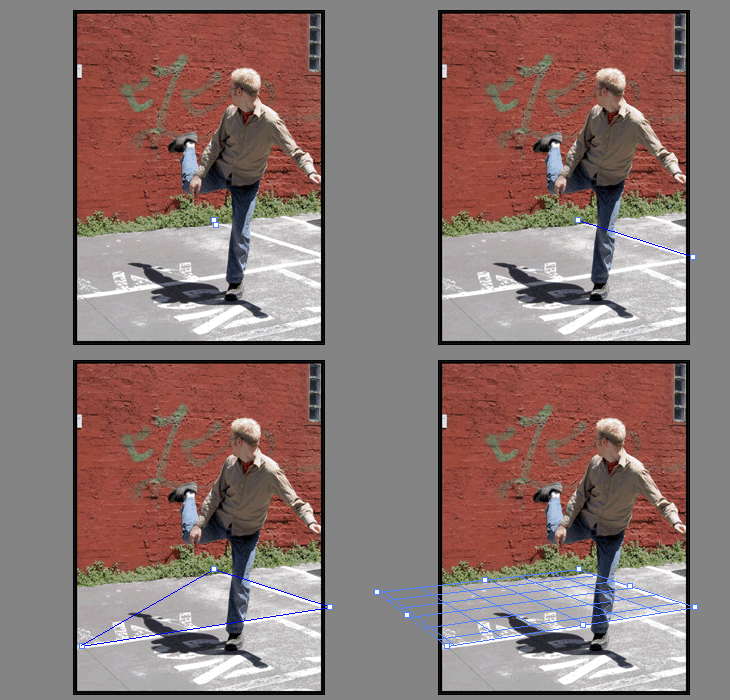
1) Activating Vanishing Point from the ‘Filter’ menu (or Alt+Ctrl+V) will launch your image into a Vanishing Point workspace with it’s own set of controls and tools.
By default, the ‘Make Plane Tool’ is selected and waiting to go. Your task, should you choose to accept it, is to find and mark out a ‘reference rectangle’ on your base image, that you could resonably expect to have right-angled corners. This might be a window, a building, a wall or a door, but obviously the larger the more margin for error (my example isn’t quite square).

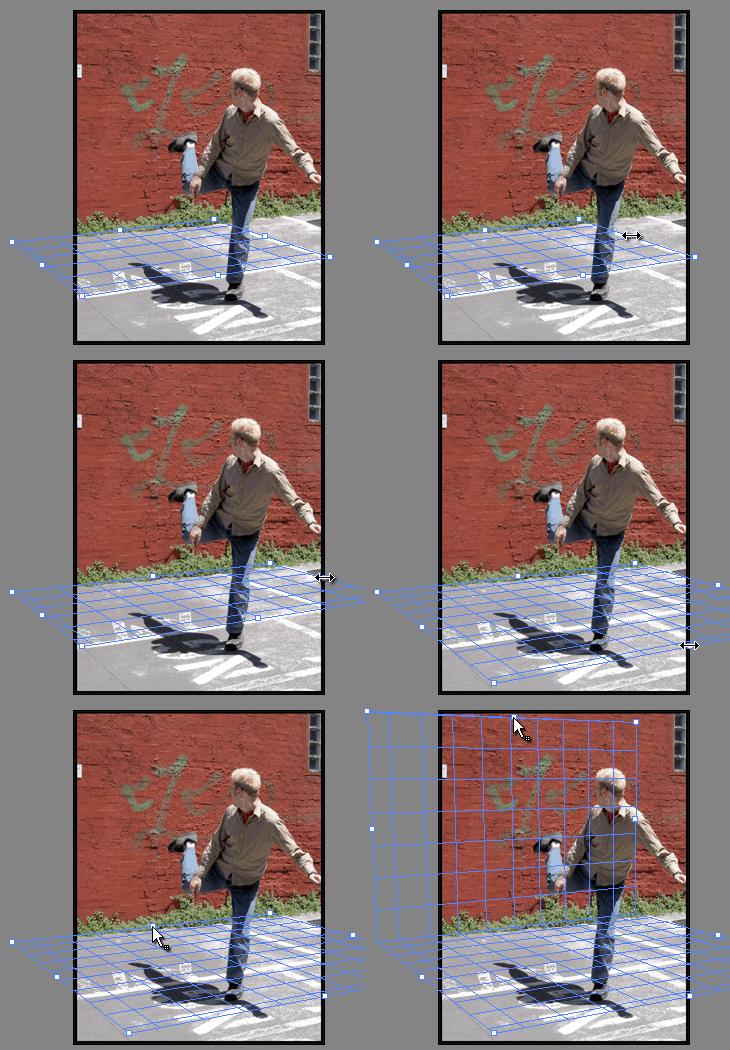
2) Once your rectangle is in place, you’re free to scale it to your image by dragging it’s edges. However, holding down [CRTL] while dragging the same edge will create a new plane running perpendicular to the current one. It’s relatively easy to get the hang of, and after a few minutes you should be effortlessly stepping around corners and up and over buildings.

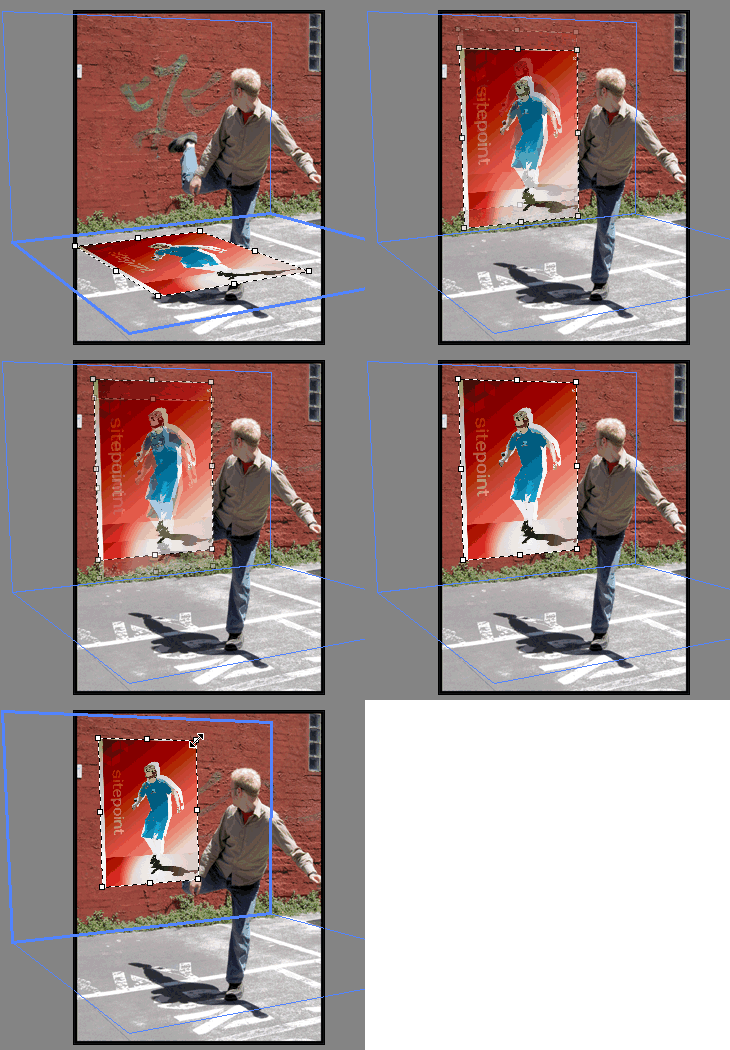
3) With the framework finished, you’re reading to start working in faux 3D. For instance, pasting any item from the clipboard will immediately distort it to the perspective of the plane you cursor is in contact with. Likewise, your painted lines distort and taper as they slant away from you — even the squared selection tool conforms to the plane it’s on. Nice.

The only feature I missed was the ability paint from plane to plane without having to stop and restart your stroke. Perhaps something for the next version.
In the end, although it’s hard to say how truly useful a feature is until you find yourself using it, I’m expecting to get some value out of this feature in the future.
Frequently Asked Questions about Vanishing Point in Photoshop CS2
How can I adjust the grid size in the Vanishing Point filter in Photoshop CS2?
Adjusting the grid size in the Vanishing Point filter is quite simple. After you’ve selected the Vanishing Point filter from the Filter menu, you’ll see a dialog box appear. In this box, you’ll find the Grid Size option. You can adjust the size by clicking on the arrows next to the number or by typing in the desired size. Remember, the grid size will affect how your image is manipulated, so it’s important to choose a size that suits your needs.
Can I use the Vanishing Point filter on a layer mask in Photoshop CS2?
Yes, you can use the Vanishing Point filter on a layer mask in Photoshop CS2. To do this, first, create a layer mask on the layer you want to work with. Then, select the layer mask and go to the Filter menu to select the Vanishing Point filter. This will allow you to apply the filter directly to the layer mask.
How can I save my Vanishing Point settings in Photoshop CS2?
Unfortunately, Photoshop CS2 does not have a built-in feature to save Vanishing Point settings. However, you can manually note down your settings or take a screenshot of your settings for future reference.
Can I use the Vanishing Point filter to create a perspective grid in Photoshop CS2?
Yes, you can use the Vanishing Point filter to create a perspective grid in Photoshop CS2. After selecting the Vanishing Point filter from the Filter menu, you can use the Create Plane tool to draw a grid on your image. You can then adjust the grid to match the perspective of your image.
How can I clone in perspective using the Vanishing Point filter in Photoshop CS2?
Cloning in perspective using the Vanishing Point filter is a two-step process. First, you need to create a perspective grid using the Create Plane tool. Once you’ve created and adjusted your grid, you can use the Clone Stamp tool within the Vanishing Point filter to clone in perspective.
Can I use the Vanishing Point filter to correct perspective distortion in Photoshop CS2?
Yes, you can use the Vanishing Point filter to correct perspective distortion in Photoshop CS2. By creating a perspective grid and adjusting it to match the perspective of your image, you can then use the Transform tool within the Vanishing Point filter to correct any distortion.
How can I export a Vanishing Point grid to a 3D program in Photoshop CS2?
Unfortunately, Photoshop CS2 does not support the exporting of Vanishing Point grids to 3D programs. This feature was introduced in later versions of Photoshop.
Can I use the Vanishing Point filter to create a depth map in Photoshop CS2?
While the Vanishing Point filter can help you understand the perspective and depth of your image, it does not directly create a depth map. However, you can use the information from your perspective grid to manually create a depth map.
How can I use the Vanishing Point filter to add text in perspective in Photoshop CS2?
To add text in perspective, first, create a perspective grid using the Vanishing Point filter. Then, use the Text tool within the filter to add your text. The text will automatically conform to the perspective of your grid.
Can I use the Vanishing Point filter to create a reflection in Photoshop CS2?
Yes, you can use the Vanishing Point filter to create a reflection. After creating your perspective grid, you can use the Clone Stamp tool within the filter to clone your image. You can then flip and adjust this clone to create a reflection.
Alex has been doing cruel and unusual things to CSS since 2001. He is the lead front-end design and dev for SitePoint and one-time SitePoint's Design and UX editor with over 150+ newsletter written. Co-author of The Principles of Beautiful Web Design. Now Alex is involved in the planning, development, production, and marketing of a huge range of printed and online products and references. He has designed over 60+ of SitePoint's book covers.


